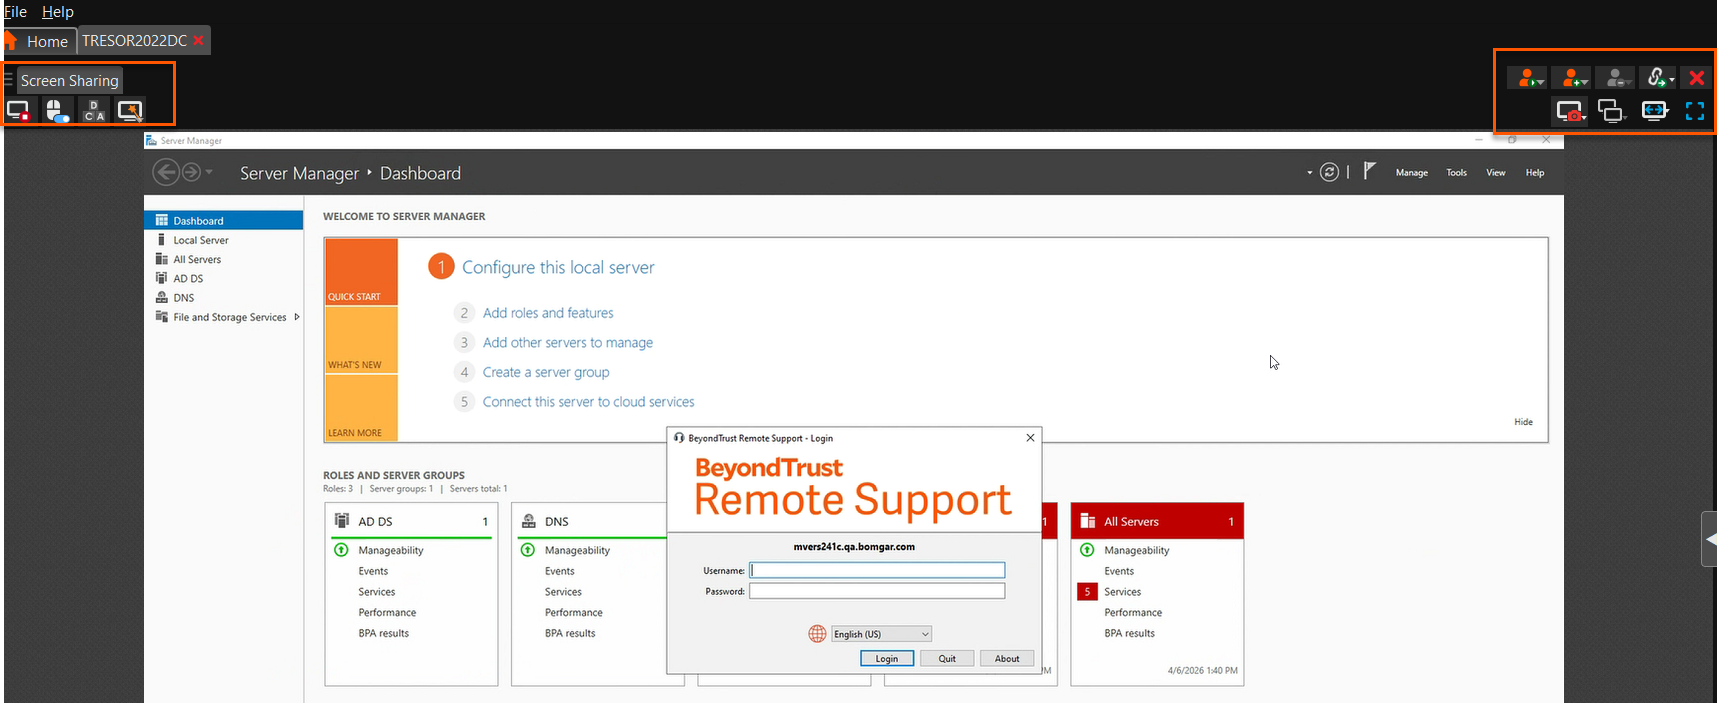
Access session | PRA for Desktop
Session tools
 : Click the menu icon at the top left of the session window to open session controls for your session. You can also right-click the session tab to see session controls. From the menu, select Detach Session Tab to separate the session from the console, or click the session tab and drag it away from the main window. The menu icon remains with your session even if you detach the session tab, allowing you to position the session tab anywhere, such as on a separate monitor, and retain session tool access. Reattach the session using the Attach Session Tab selection in the menu or by clicking the X to close the detached window. Additionally, from the menu, select Locate Sidebar to find the sidebar for the session, which can be helpful if you have several detached session sidebars (see below) scattered on your screen. You can also rename the session or revert the name to the default from the menu.
 : Collapse the sidebar to maximize your session workspace. To pin the sidebar again, hover over the collapsed sidebar arrow and click the
  Pin Sidebar icon.
 : Click this icon to detach the sidebar. Once detached, the sidebar can be positioned anywhere on your desktop or placed on a separate monitor. The sidebar also can be resized according to your needs, or resize the panes in the sidebar for more viewing space. Click the
  Attach Sidebar icon to reattach the sidebar. When the sidebar is detached, the Home icon is enabled (see below).
 : This Home icon is enabled whenever the sidebar is detached. In the case where you might have several sessions going on at the same time and several detached sidebars on your screen, clicking on a sidebar's This Home icon is enabled whenever the sidebar is detached. In the case where you might have several sessions going on at the same time and several detached sidebars on your screen, clicking on a sidebar's Home icon brings up the associated session, saving time and avoiding confusion when trying to identify which sidebar goes with which session. icon brings up the associated session, saving time and avoiding confusion when trying to identify which sidebar goes with which session.
 : It is possible to reposition the different widget sections displayed on the sidebar, like the chat window, the session info pane, etc. When hovering over the title bar of a section, the cursor turns into a closed hand, allowing you to drag and reposition that section on the sidebar.
 : Invite another user to participate in a shared session. You maintain ownership of the session but can receive input from one or more teammates or an external user.
 The session owner can remove another user from a shared session.
 : Open a web browser on your computer to any sites defined by your administrator. This button can be configured to include detailed information about the session, the endpoint, and/or the BeyondTrust user who is opening the custom link. If, for instance, the external key matches the unique identifier of a case in your customer relationship management system, clicking this button could pull up the associated case in the external system.
 : Close your session tab entirely. You can close the session from the sidebar, the session menu, or the session tab.
At the bottom right of the session window is information about the remote system. Also, if your administrator has enabled the XML API, you may designate an external key for use in session reports. Any custom session attributes enabled by your administrator appears in a Custom Info tab. Click Copy to copy all information to your clipboard.
Another option that your administrator may choose to enable is the ability to log out the Windows user automatically or lock the remote computer when the session closes. When you have been working on an unattended system, for example, locking the computer is recommended to prevent unauthorized users from viewing private information. Set the action to take from the dropdown at the bottom of the pane.
Credential injection
Sign in to remote systems using credential injection from the access console
When accessing a Windows-based Asset via the access console, you can use credentials from a credential store to log into the endpoint or to run applications as an admin.
Before using credential injection, make sure that you have a credential store or password vault available to connect to BeyondTrust Privileged Remote Access.
- Credential injection is not available for Mac or Linux Jump Clients.
- This feature is not supported for ARM-based Windows systems.
Install and configure the endpoint credential manager
Before you can begin accessing Assets using credential injection, you must download, install, and configure the BeyondTrust Endpoint Credential Manager (ECM). The BeyondTrust ECM allows you to quickly configure your connection to a credential store, such as a password vault.
The ECM must be installed on your system to enable the BeyondTrust ECM Service and to use credential injection in BeyondTrust Privileged Remote Access.
System requirements
- Windows Vista or newer, 64-bit only
- .NET 4.5 or newer
-
To begin, download the BeyondTrust Endpoint Credential Manager (ECM) from BeyondTrust Support.
-
Start the BeyondTrust Endpoint Credential Manager Setup Wizard.
Agree to the EULA terms and conditions. Mark the checkbox if you agree, and then click Install.
-
If you need to modify the ECM installation path, click the Options button to customize the installation location.
You are not allowed to proceed with the installation unless you agree to the EULA.
- Click Next on the Welcome screen.
- Choose a location for the credential manager, and then click Next.
- On the next screen, you can begin the installation or review any previous step.
- Click Install when you are ready to begin.
- The installation takes a few moments. On the screen, click Finish.
- To ensure optimal up-time, administrators can install up to three ECMs on different Windows machines to communicate with the same credential store. A list of the ECMs connected to the appliance site can be found at /login > Status > Information > ECM Clients.
- When ECMs are connected in a high availability configuration, the BeyondTrust Appliance B Seriesroutes requests to the ECM in the ECM Group that has been connected to the appliance the longest.
- If you get a Windows plugin error during installation, locate and unblock BeyondTrustVaultRestPlugin.dll.
Configure a connection to your credential store
Using the ECM Configurator, set up a connection to your credential store.
- Locate the BeyondTrust ECM Configurator you just installed using the Windows Search entry field or by viewing your Start menu programs list.
- Run the program to begin establishing a connection.
- When the ECM Configurator opens, complete the fields. All fields are required.
| Field Label | Value |
|---|---|
| Client ID | The ID for your credential store. |
| Client Secret | The secret key for your credential store. |
| Site | The URL for your credential store instance. |
| Port | The server port through which the ECM connects to your site. |
| Plugin | Click the Choose Plugin... button to locate the plugin. |
- When you click the Choose Plugin... button, the ECM location folder opens.
- Paste your plugin files into the folder.
- Open the plugin file to begin loading.
If you are connecting to a password vault, more configuration at the plugin level may be needed. Plugin requirements vary based on the credential store that is being connected.
Important informationTo apply new settings in the configuration, restart the ECM service.
Use credential injection to access remote systems
After the credential store has been configured and a connection established, the access console can begin using credentials in the credential store to log into remote systems.
- Log into the access console.
- Connect to a remote system with an Asset installed as an elevated service on a Windows machine.
- Click the Play button to begin screen sharing with the remote system. If the remote system is at the Windows login screen, the Inject Credentials button is highlighted.
- Click the Inject Credentials button. A pop-up credential selection dialog appears, listing the credentials available from the ECM.
- Select the appropriate credentials to use from the ECM. The system retrieves the credentials from the ECM and injects them into the Windows login screen.
- The representative is logged into the remote system.
Choose from favorite credentials for injection
After you have used a set of credentials to log into an endpoint, the system stores your preferred credentials for the endpoint and the context in which they were used (to log in, to perform a special action, to elevate, or to push) in the B Series Appliance database. The next time you use a credential to access the same endpoint, the credential injection menu makes a recommendation for which credentials to use. The credentials are displayed at the top of the credentials list, under Recommended Accounts, followed by any remaining credentials. If no credential history exists for an endpoint, the B Series Appliance displays all possible credentials, grouped by accounts that are associated with the Asset and not associated with the Asset. Asset associations for accounts and account groups are configured in /login.
The credential list recommends no more than five credentials.
Check out and check in Vault credentials
Select the Vault Accounts tab to see a list of available credentials and associated information.
Control the remote endpoint with screen sharing
From the session window, click the Screen Sharing button to request control of the remote computer if screen sharing does not automatically start. Options may be available below the button depending on your account settings. Click the gear button to view options.
Once you have started a session, the access console immediately starts screen sharing with the endpoint. Depending on the system, you may have full control or view only privileges while screen sharing with the system.
Screen sharing options
- Leaving all options unchecked requests full screen sharing, which grants view and control of the remote system's entire desktop and all applications.
- If you check View Only, you may see but not control the remote screen.
- Privacy Screen starts the session with remote view and control of the endpoint disabled. Privacy screen is not available when supporting Windows 8.
Screen sharing tools
 : Stop screen sharing.
 : While viewing the remote computer, start or stop control of the remote keyboard and mouse. Representatives using a macOS system can send CTRL+Left-Click through the connected screen sharing session to the remote system by using CTRL+CMD+Left-Click.
 : If your permissions allow, you can disable the remote user's screen view and mouse and keyboard input. The end user's view of the privacy screen clearly explains that the BeyondTrust user has disabled the end user's view. The end user can regain control at any time by pressing Ctrl+Alt+Del. Alternatively, disable the end user's mouse and keyboard input while still allowing them to view the screen. When input is restricted, an orange border appears around the end user's monitors, and a message indicates that the BeyondTrust user has mouse and keyboard control. The end user can regain control at any time by pressing Ctrl+Alt+Del. Restricted endpoint interaction is available only when accessing macOS or Windows computers. Restricted customer interaction is available only when supporting Windows computers. In Windows Vista and above, the endpoint client must be elevated. On Windows 8, this feature is limited to disabling the mouse and keyboard.
 : Annotation tools allow easier collaboration during shared sessions. A number of tools are available, including shapes and free drawing.
 : Reboot the remote system in either normal or safe mode with networking, or shut down the remote system.
 : Send a Ctrl-Alt-Del command to the remote computer.
 : Perform a special action on the remote system. Based on remote operating system and configuration, available tasks vary. Canned scripts available to the user appear in a fly-out menu. With the Run As special action on a Windows® system, you may select credentials from an Endpoint Credential Manager. Use of the Endpoint Credential Manager requires a separate services agreement with BeyondTrust. Once a services agreement is in place, you may download the required middleware from the BeyondTrust Support Portal. In a Remote Desktop Services or virtual desktop environment with an elevated session, you can switch between active sessions on the same machine using the Terminal Sessions option in the Special Actions dropdown during a screen sharing session. This option is available in any environment that uses Remote Desktop Services to manage virtual sessions, provided there are other active sessions and the representative has the permission to use elevated special actions.
 : If System Sound Sharing is enabled, click this button to unmute and hear sounds from the endpoint.
 : Access a dropdown of available smart card readers on your local system. Use the virtual smart card to perform administrative actions, running programs in another user context or even logging in as another user. The appropriate virtual smart card drivers must be installed on both your local system and the remote system, with their services running.
 : To restart iOS device screen sharing. For details, see Supporting Apple iOS Devices. When supporting an Apple OS X 10.10+ system attached to an Apple iOS 8.0.1+ mobile device, click this button to begin or end view-only screen sharing on the attached iOS device. Note that this button is not visible unless you are in a standard screen sharing access session with an Apple OS X Yosemite system, and that the button is not enabled unless an Apple iOS 8.0.1+ device is connected to the OS X Yosemite system being supported.
 : Log into the endpoint using credentials provided by an external credential store. Use of the Endpoint Credential Manager requires a separate services agreement with BeyondTrust. Once a services agreement is in place, you may download the required middleware from the BeyondTrust Support Portal. Prior to 15.2, this feature is available only in sessions started from an elevated Jump Client on Windows®. Starting with 15.2, you also may use an Endpoint Credential Manager in Remote sessions, Microsoft® Remote Desktop Protocol sessions, VNC sessions, and Shell sessions.
 : While screen sharing, capture a screenshot of the remote screen or screens at their full resolution, saved in png format. Save the image file to your local system or to your clipboard. The capture action is recorded in the chat log with a link to a locally saved image. The link remains active even after the customer has left the session, but it does not persist in the BeyondTrust session report. You can adjust the directory where screenshots are saved by going to the File > Settings > Tools menu in the access console. This feature works on Mac, Windows, and Linux.
 : Manually send the contents of your clipboard to the remote computer. This tool icon is not visible if you are permitted to automatically send the contents of your clipboard or if you are disallowed to send clipboard information to the remote system.
 : Manually receive the contents of the clipboard from the remote computer. This tool icon is not visible if you are permitted to automatically receive the contents of your clipboard or if you are disallowed to receive clipboard information from the remote system.
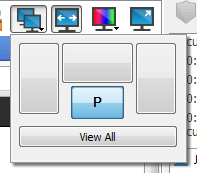
 : Select an alternate remote monitor to display, view all monitors, or pop out all monitors. The primary monitor is designated by a P.
 : View the remote screen at actual or scaled size.
 : Select the color optimization mode to view the remote screen. If you are going to be primarily sharing video, select Video Optimized; otherwise select between Black and White (uses less bandwidth), Few Colors, More Colors, or Full Color (uses more bandwidth). Both Video Optimized and Full Color modes allow you to view the actual desktop wallpaper.
 : View the remote desktop in full screen mode or return to the interface view.
- When in full screen mode, special keys are passed through to the remote system. This includes but is not limited to modifier keys, function keys, and the Windows Start key.
- When not in full screen mode, you can pass special keys to the remote system by placing the mouse pointer over the screen sharing window.
- This does not apply to the Ctrl-Alt-Del command, which is sent with the toolbar button noted above.
Annotations
Use annotation tools to collaborate with other users during shared sessions. Annotations provide an interactive way of communicating visually, reducing potentially frustrating situations and speeding processes.
While in annotation mode you can still use your mouse to move or control items on the remote desktop. Holding down the Shift key temporarily suspends annotation mode.
Enabling annotations
To start using Annotations, click the icon.
Clicking any of the dropdown menu items turns the Annotations mode on. The following tools and functions are available:
- Virtual Pointer
- Pen
- Rectangle drawing tool
- Ellipse drawing tool
- Eraser
- Undo
- Clear
- Red, Black, or White colors
- Thin, Medium, or Thick line
You can select your tool from the Annotations dropdown menu or by right-clicking inside the remote screen area. If you click on the areas outside of the remote screen, the dropdown menu does not display.
Annotations appear on the remote screen to draw attention to specific points of interest or highlight areas as needed.
To turn off Annotations, select No Tool from the dropdown menu, or click Esc.
All annotations are deleted from the customer's screen when the session terminates.
Multiple monitors
BeyondTrust supports remote desktops configured to use multiple monitors. When you first connect to a remote desktop, you see the primary monitor in the Screen Sharing tab. If additional monitors are configured, a Display icon appears active in the Screen Sharing toolbar, and a Displays tab appears in the bottom right corner of the console.
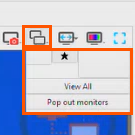
Using the display icon
Select the Display ( ) icon to see all the displays attached to the remote computer. In this view, the remote monitors are represented by rectangles rather than thumbnail images. The position of each rectangle corresponds to the position configured for each monitor on the remote desktop.
The primary monitor appears in the Screen Sharing window by default. To change your view, click on the rectangle that represents the monitor you wish to see. You can select View All to show all the displays attached to the remote computer in the Screen Sharing window.
You can also select Pop out monitors to view each monitor in a separate window. You can resize and reposition each window. To close a popped out monitor, click the X in the top right corner.
If the remote computer has no additional monitors attached, the Display icon is inactive.
RDP session multi-monitor support
An option allows you to open a PRA connection expanded across all the monitors on the client computer regardless of the client monitor configuration. With this feature, you can fully utilize all the monitors connected to the client computer, therefore being able to adjust screen sizing and scaling during an RDP session across multiple monitors.
If you are using full screen view while using this feature, the remote system is displayed across all of your monitors.
Using the displays tab
Select the Displays tab to see thumbnail images of all the displays attached to the remote computer. The position of each thumbnail image corresponds to the position configured for each display on the remote desktop. The monitor currently displayed in the Screen Sharing tab is highlighted.
The primary monitor appears in the Screen Sharing window by default. To change your view, click on the thumbnail of the monitor you wish to see. You can also select View All to show all the displays attached to the remote computer in the Screen Sharing window.
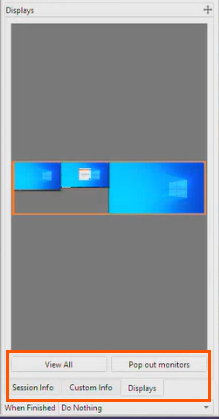
If the session is in grayscale mode, the remote monitors are represented by rectangles rather than thumbnail images. The position of each rectangle corresponds to the position configured for each monitor on the remote desktop.
The refresh cycle of the thumbnail image is about three seconds in ideal conditions but can lag depending on connection speed and data transfer.
File transfer
During a session, privileged users can transfer, delete or rename files and even entire directories both to and from the remote computer, or from the remote device and to or from the device SD card. You do not have to have full control of the remote computer in order to transfer files.
The File Transfer tab is available for many Asset session types, including Shell. It is not available for RDP sessions, where file transfer is done using copy and paste.
Depending upon the permissions your administrator has set for your account, you may be allowed only to upload files to the remote system or to download files to your local computer. File system access may also be restricted to certain paths on the remote or local system, thereby enforcing that uploads or downloads occur only in certain directories.
Transfer files by using the upload and download buttons or by dragging and dropping files. Right clicking on a file brings up a context sensitive menu from where you can, among other things, create a new directory; rename, open, or delete the file; or download it directly to your machine.
If an ICAP server is enabled, the file shows as "Scanning" until the transfer ends. During or after a file transfer, the results of the scan appear in the File Transfer Log. If malware is detected in the file, it is not transferred. To enable an ICAP server, see Security.
File transfer tools
 : Stop access to the remote device's file system when it is no longer needed.
 : Go up a directory in the selected file system.
 : Refresh your view of the selected file system.
 : Create a new directory.
 : Rename a directory or file.
 : Delete a directory or file. Note that deleting a file or folder permanently deletes it. It is not sent to the recycle bin.
 : Show hidden files.

 : Select one or more files or directories and then click the appropriate button to upload the files to the remote system or download to your local system. You can also drag and drop files to transfer.
 : If a file of the same name already exists in the location to which you are attempting to transfer a file, choose whether to respond by automatically overwriting the existing file, canceling the transfer, or prompting for each file of identical name. Note that if the content of the files is identical, the upload is skipped and results in a warning message.
 : Preserving file information keeps the file's original timestamp. If this option is disabled, the file's timestamp reflects the date and time when it was transferred.
 : If automatic file transfer is enabled, transfers begin as soon as the upload or download button is clicked or a file is dragged from one file system to the other.
 : If automatic file transfer is not enabled, select from the transfer manager the files you wish to transfer and then click the Start button to begin the transfer.
 : From the transfer manager, select a file and then click the Details button to view information such as the date and time of the transfer, the origin and destination of the files, and the number of bytes transferred.
 : Select one or more files from the transfer manager and then click Cancel to stop the transfer from completing.
 : Clear all information from the transfer manager.
Command shell
Remote command shell enables privileged users to open a virtual command line interface on remote computers. Users can then type locally but have the commands executed on the remote system. You can work from multiple shells. Note that scripts available to the user may also be executed on the remote computer from the screen sharing interface.
Your administrator can also enable remote shell recording so that a video of each shell instance can be viewed from the session report. If shell recording is enabled, a transcript of the command shell is also available.
Command shell tools
 : Stop command prompt access when it is no longer needed.

 : Open a new shell to run multiple instances of command prompt, or close individual shells without relinquishing command prompt access. Shells are tabulated at the bottom of the screen.
 : If permitted, access a dropdown of previously written scripts. When you select a script to run, a prompt displays with a brief description of the script. When you click Yes, the script runs in the active command shell.
 : Access tools to use within the command prompt. Paste the contents of your clipboard either by selecting it from the menu or by right-clicking in the terminal window. Copy a log of the current shell to your clipboard or save it to your computer. To copy a portion of the text, select it. Clear any lines not currently in sight, or clear all content from the terminal. Tools can also be accessed by pressing Ctrl+right-click within the terminal window.
 : Select the size at which to view the display. Choose from 80x50, 80x25, or any size.
System information
Privileged users may view a complete snapshot of the remote device's or computer's system information to reduce the time needed to diagnose and resolve the issue. The system information available varies depending on the remote operating system and configuration. Users with appropriate permissions may also kill processes; may start, stop, pause, resume, and restart services; and may uninstall programs.
Because the large amount of data that can be pulled may result in slow transmission times, you can choose to start your view with only the Overview tab or to pull data for all tabs. If you choose to start with Overview Only, you can gather data from the other tabs by going to the section you need to view and clicking the Refresh button at the top of that section.
System information tools
 : Stop pulling information about the remote system. Stopping leaves the last updated information available to view but does not pull current data.
 : Refresh your view of system information or pull information for tabs to which you did not initially request access. Refresh can take place for individual sections or for all sections of the selected tab.
 : Auto-refresh a category of system information.
 : Copy the information to your clipboard. Copy individual sections or all sections of the selected tab.
 : Save a text file of the system information to your local computer. You can save individual sections or all sections of the selected tab.
 : End a running process on the remote system.
 : Uninstall an app on the remote system.
 : Start a stopped service on the remote system.
 : Resume a paused service on the remote system.
 : Pause a running service on the remote system.
 : Stop a running service on the remote system.
 : Restart a running service on the remote system.
Registry editor
Access a remote Windows registry without requiring screen sharing. While in the virtual registry editor, you can add new keys, delete keys, edit keys, search, and import or export keys.
Registry editor tools
 : Refresh the registry.
 : Import registry entries from a file.
 : Export registry entries to a file.
 : Create a new registry key.
 : Create a new registry value.
 : Modify the selected registry value.
 : Rename the selected registry entry.
 : Delete the selected registry entry.
 : Search the registry.
 : Find next.
Updated 14 days ago
