AWS Identity Center - Personal Role
Note - internal
This guide is currently unavailable.
If that does become available, please make sure you add the following info to the root page, under the different types of integration setups:
Using a persistent Personal Role for each user assuming. This is the best practice for a streamlined user experience.
How Does It Work
- Entitle connects to the root account of your organization.
- From the root account, Entitle retrieves and manages SSO users, groups, and permission sets.
- From the root account, Entitle assumes the roles configured for each sub-account.
- For each sub-account, Entitle collects and manages the resources via the role.
- A personal role will be created for each employee requesting access through Entitle, to which they will assume through a dedicated permission set.
- Access will be granted and removed to that personal role.
End User Experience
- The employee will log into the desired AWS account using a dedicated Entitle permission set, called
entitle-ps.
- Upon receiving JIT access using Entitle, the employee will receive a dedicated message either through Teams/Slack, which contains 2 login options:
- An AWS Management Console URL.
- A CLI command to assume his/her personal role.

Slack Message Example
- Using the AWS Management Console URL above will refer the employee to the assume-role AWS page with the details already filled, just click Switch Role and you’re all set.
Setup
AWS Setup
- Step 1: Get the SSO instance ARN and region, as well as the management account ID.
- Step 2: Create a dedicated permission set.
- Step 3: Create a set of policies for Entitle to manage access to your AWS accounts.
- Step 4: Create an IAM user with programmatic credentials and permissions which will be used by Entitle.
- Step 5: For each selected sub-account - create a role with the required permissions.
Step 1: Get Your SSO Instance ARN, Region, And Management Account ID
- Log in to your AWS account and navigate to your management account.
- Click IAM Identity Center on the top left.
- Click the Settings option on the left-side menu
- Under the Details section, you will find the SSO instance ARN, and the region in which the SSO resides in.
- Copy both values, as you will use them later on in the configuration.
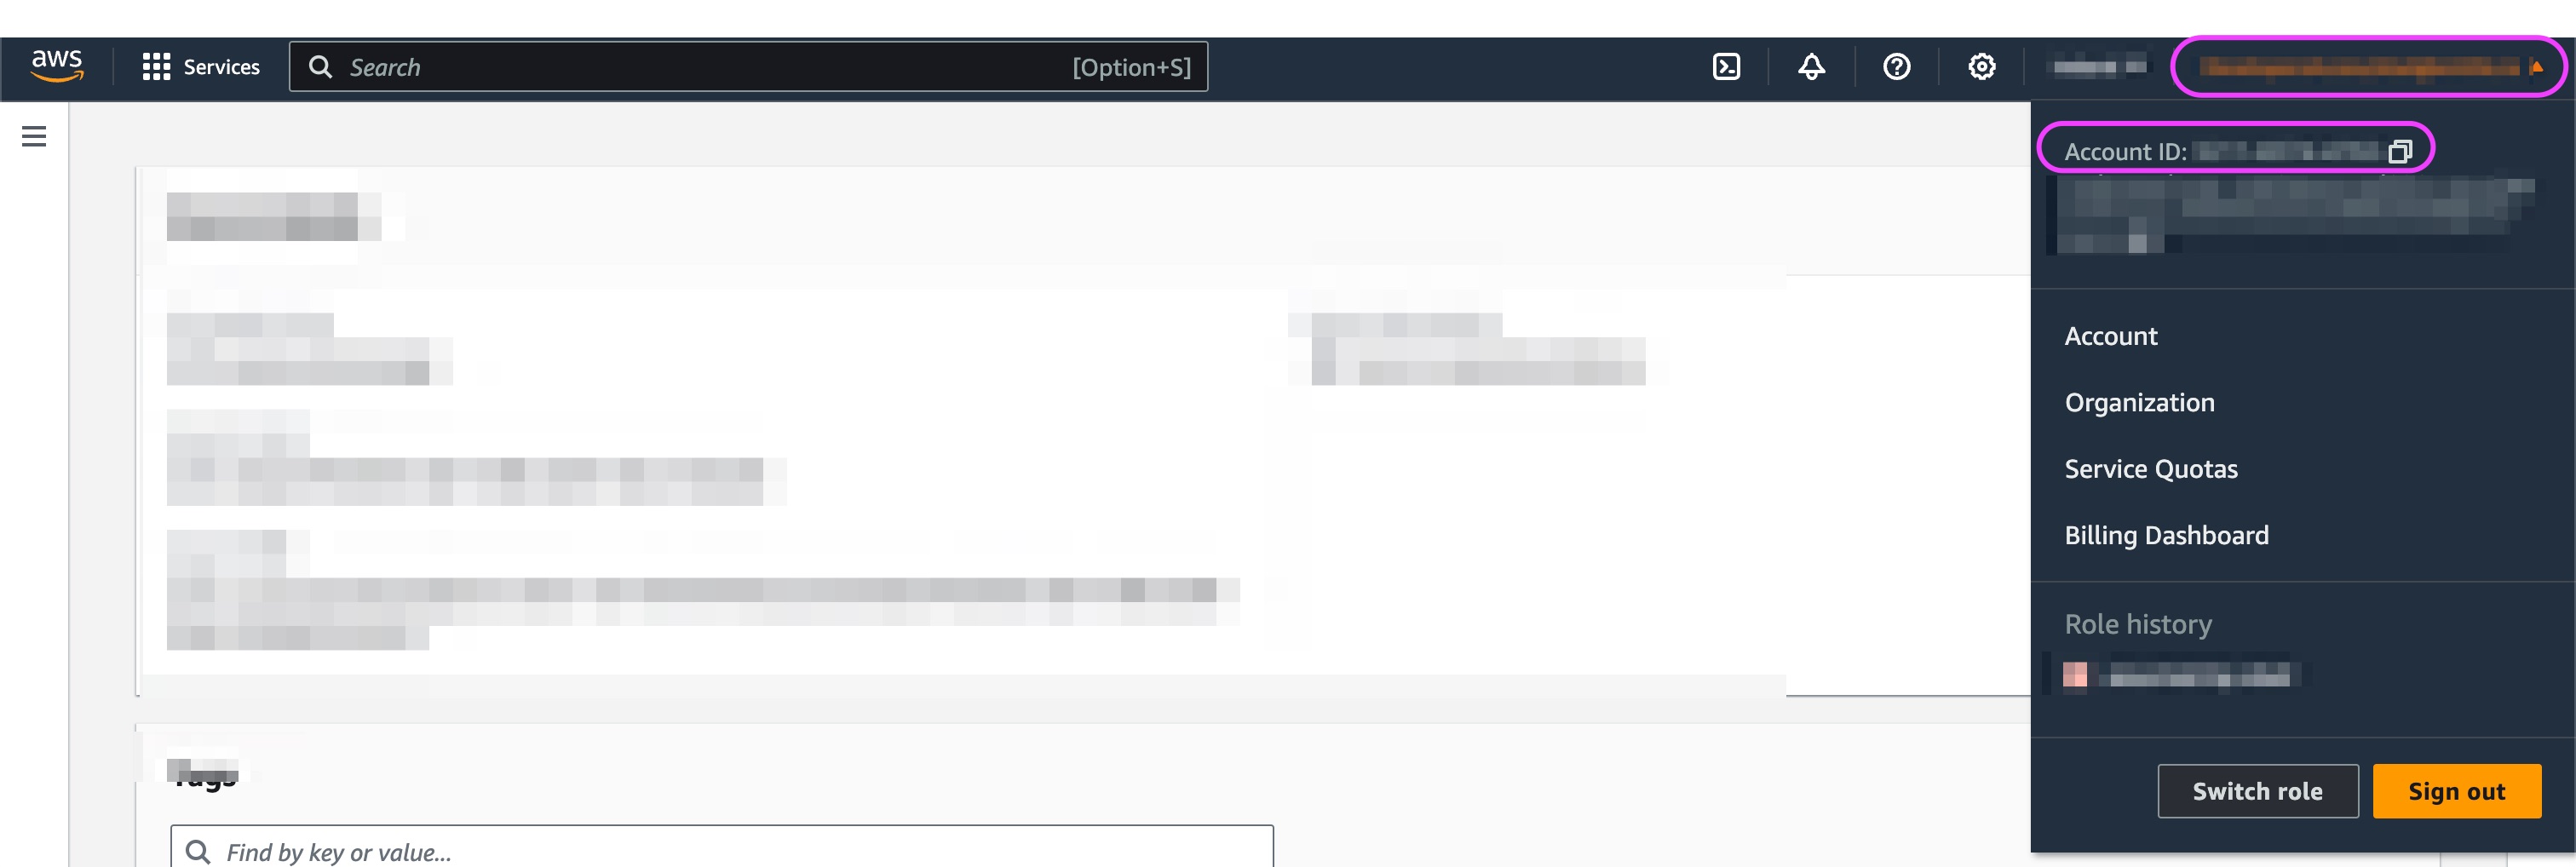
- Copy your management account ID by copying the Account ID by clicking on your role at the top right. It will be used later on.
Step 2: Create A Dedicated Permission Set
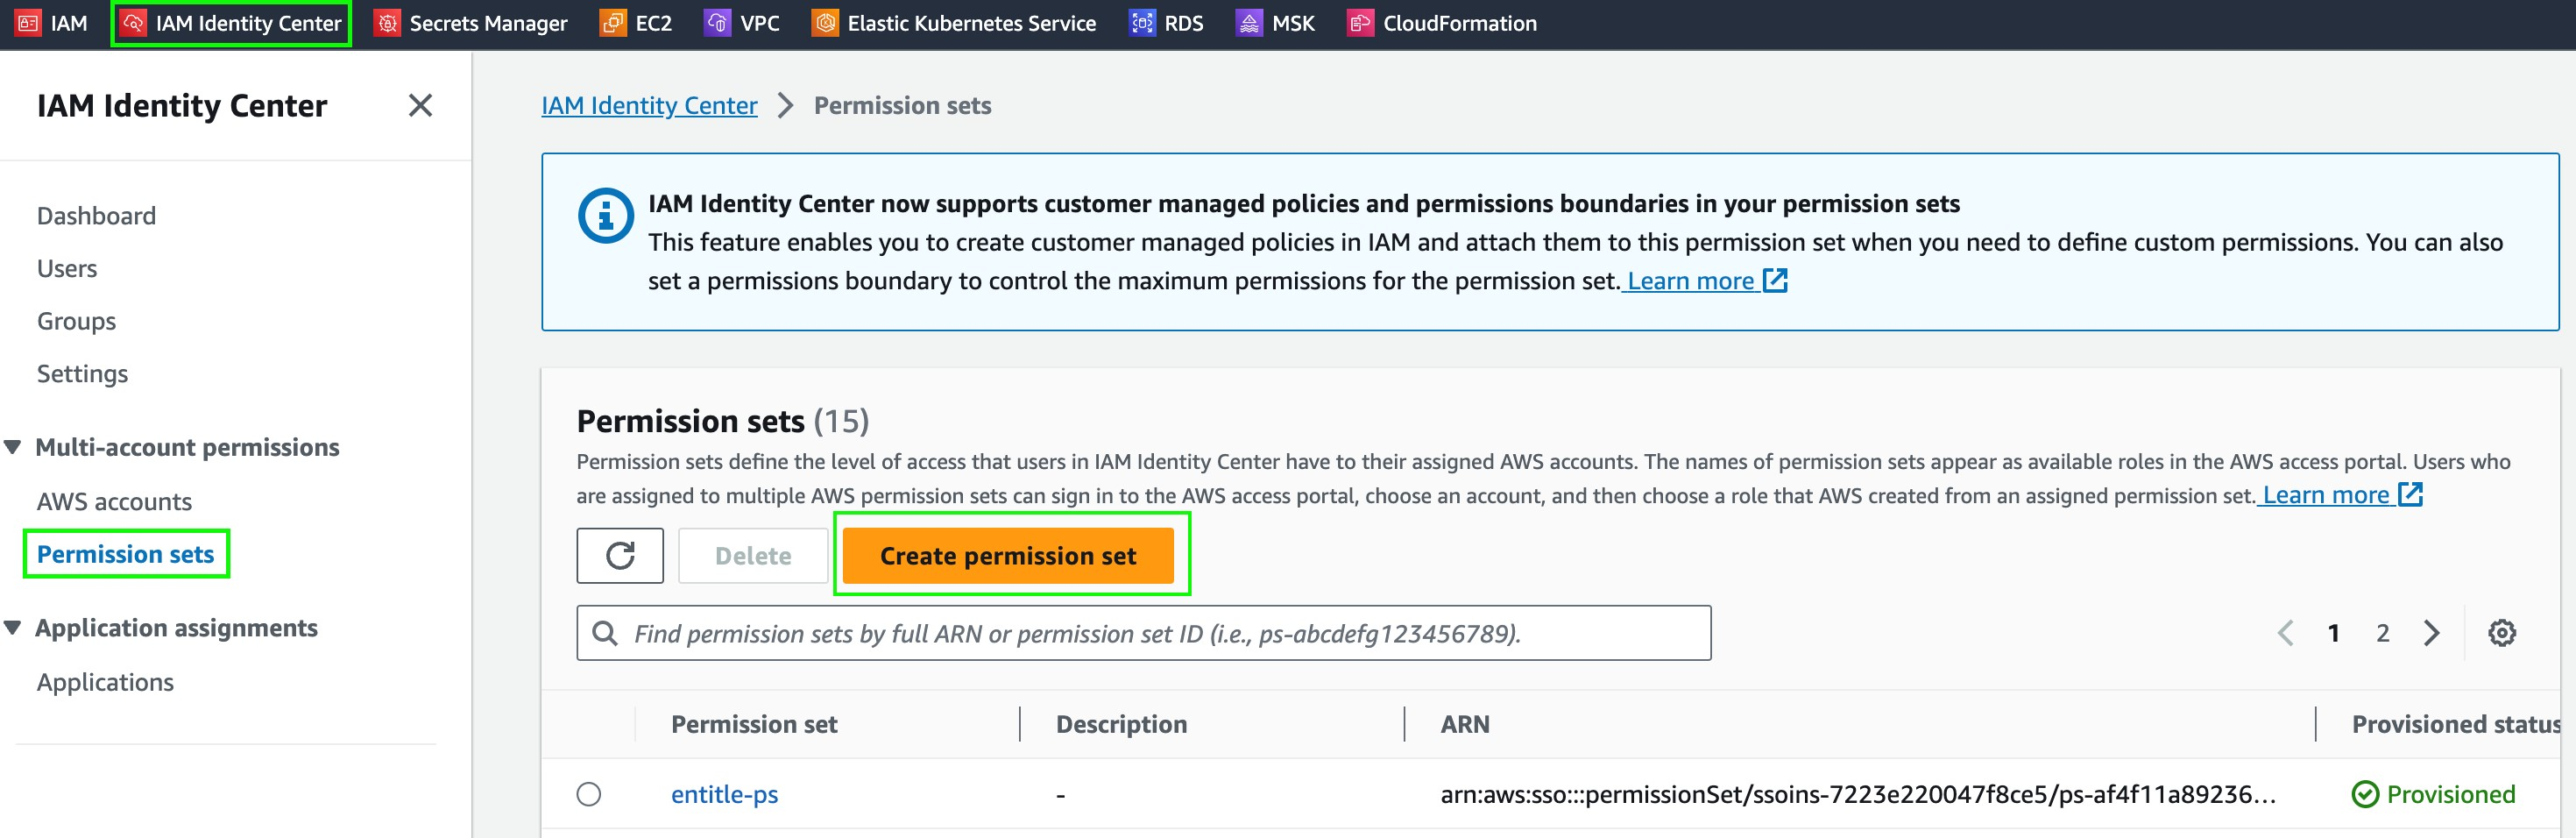
- Log in to your AWS account and navigate to your management account.
- Click IAM Identity Center on the top left.
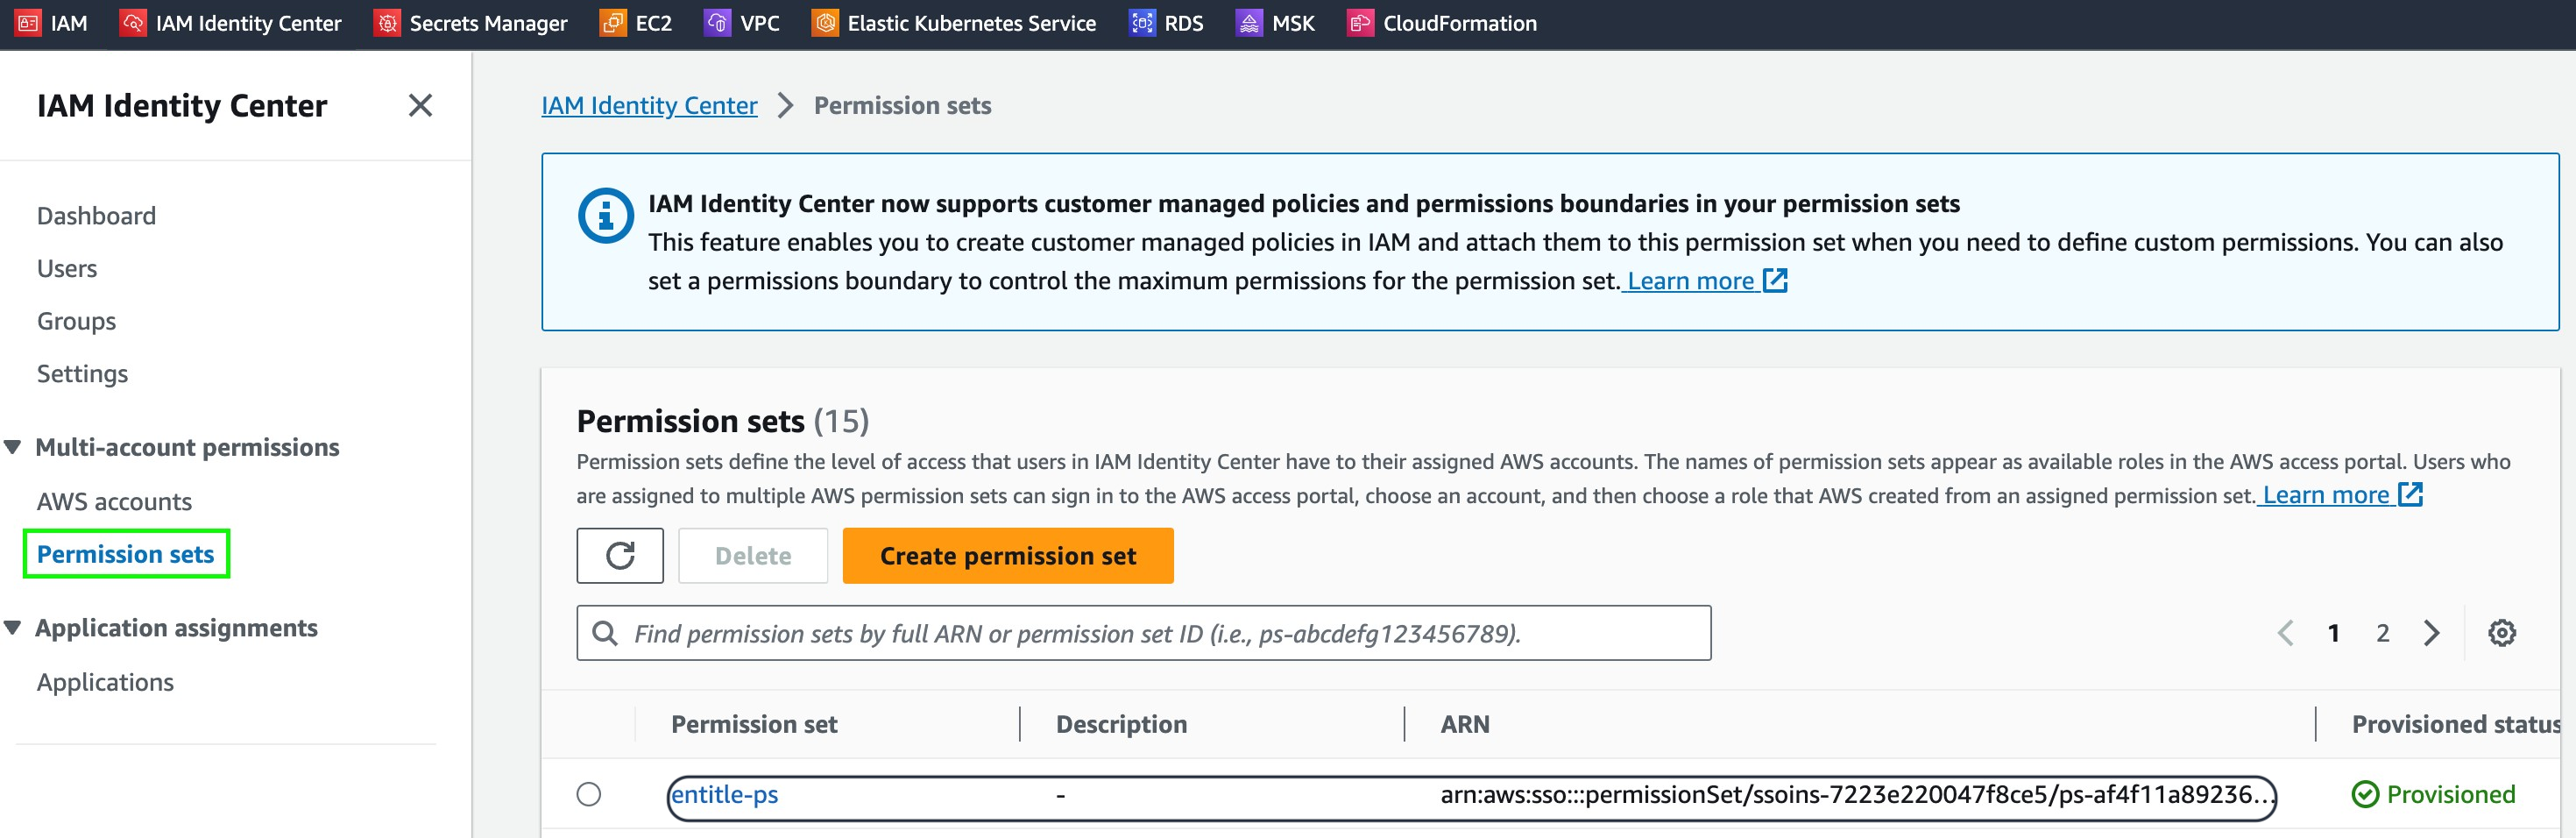
- Click the Permission sets option on the left-side menu.
- Click the orange Create Permission Set button.
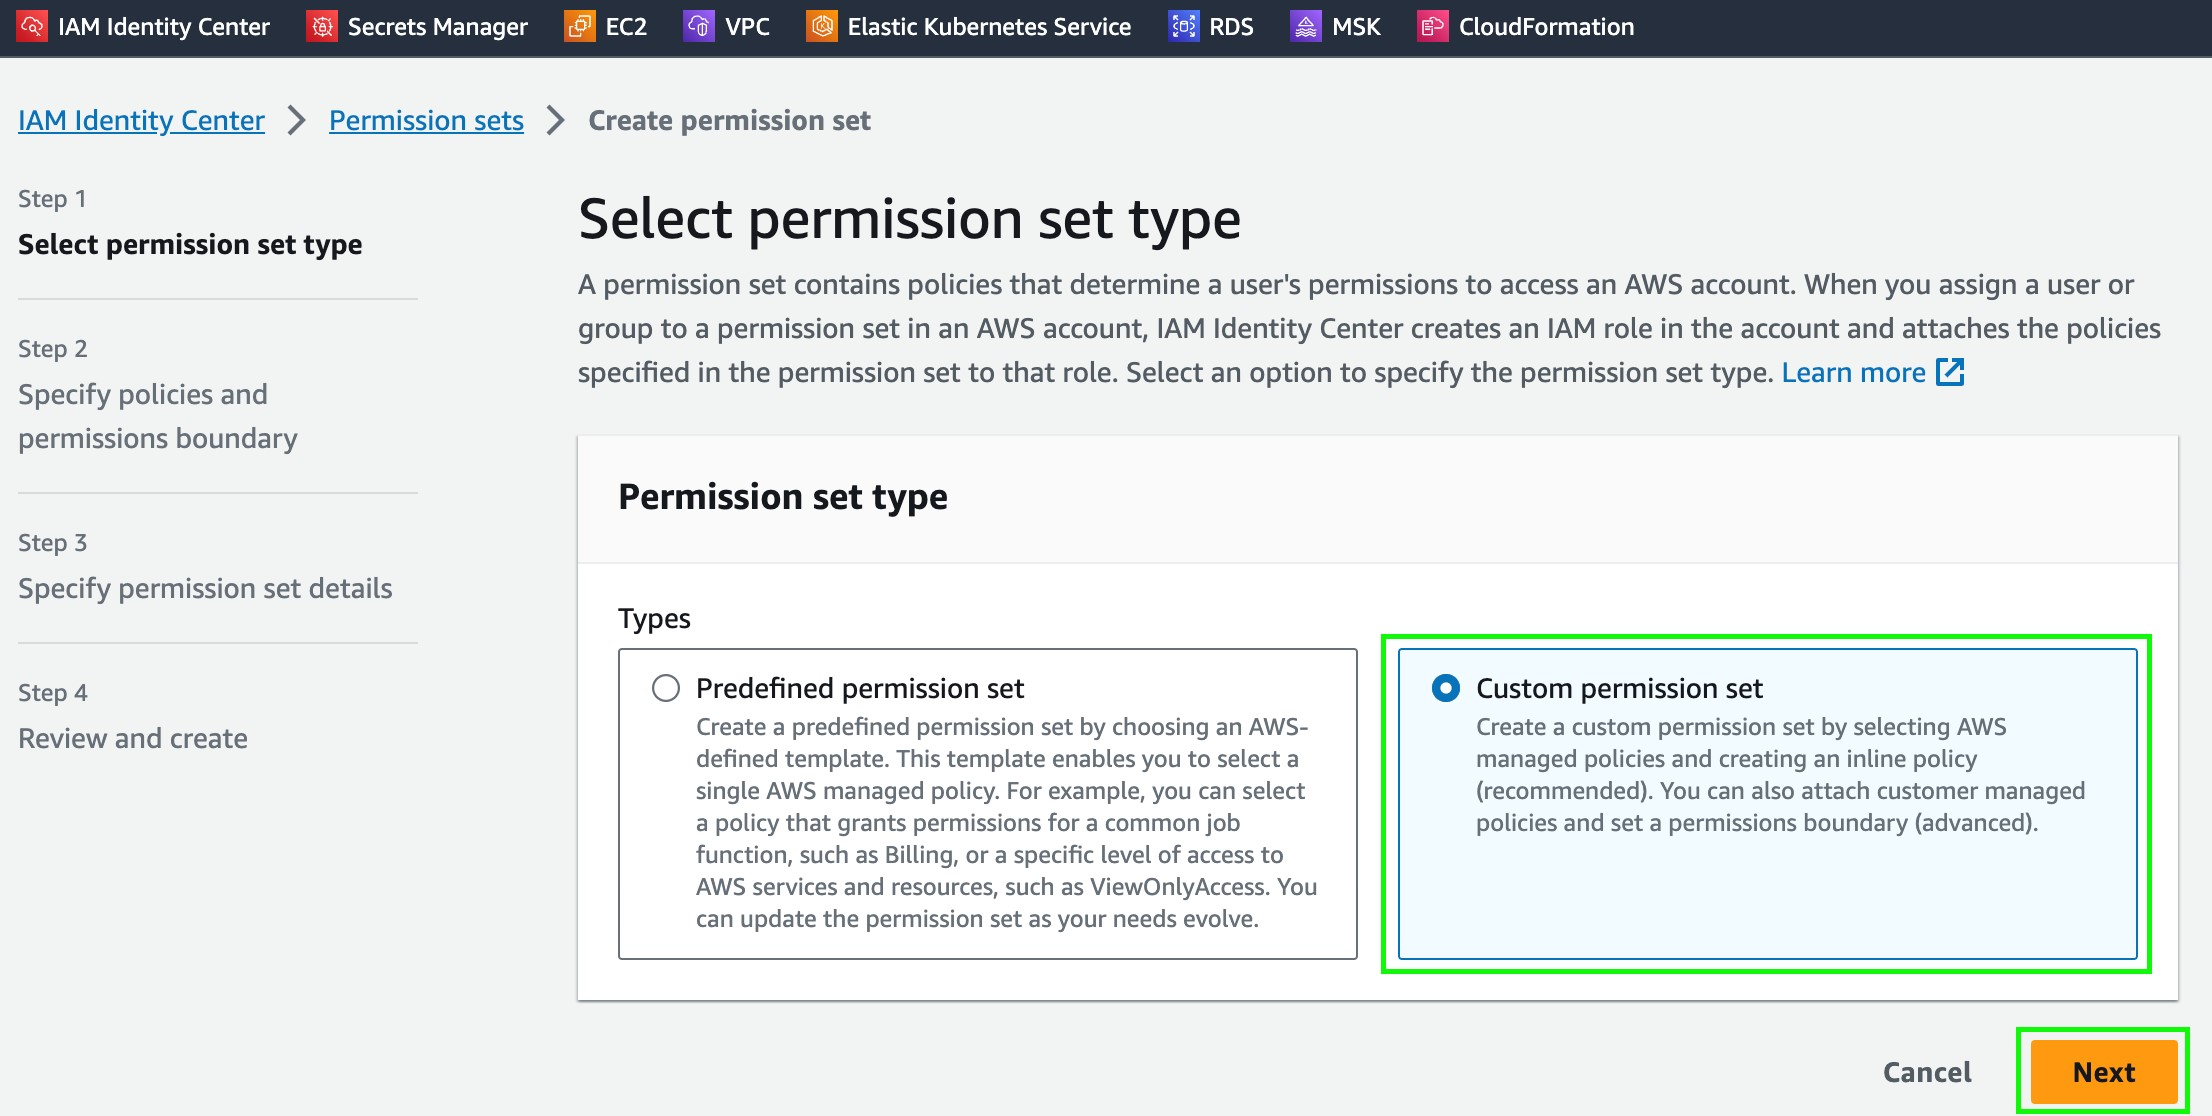
- Click Custom Permission Set, and then click Next.
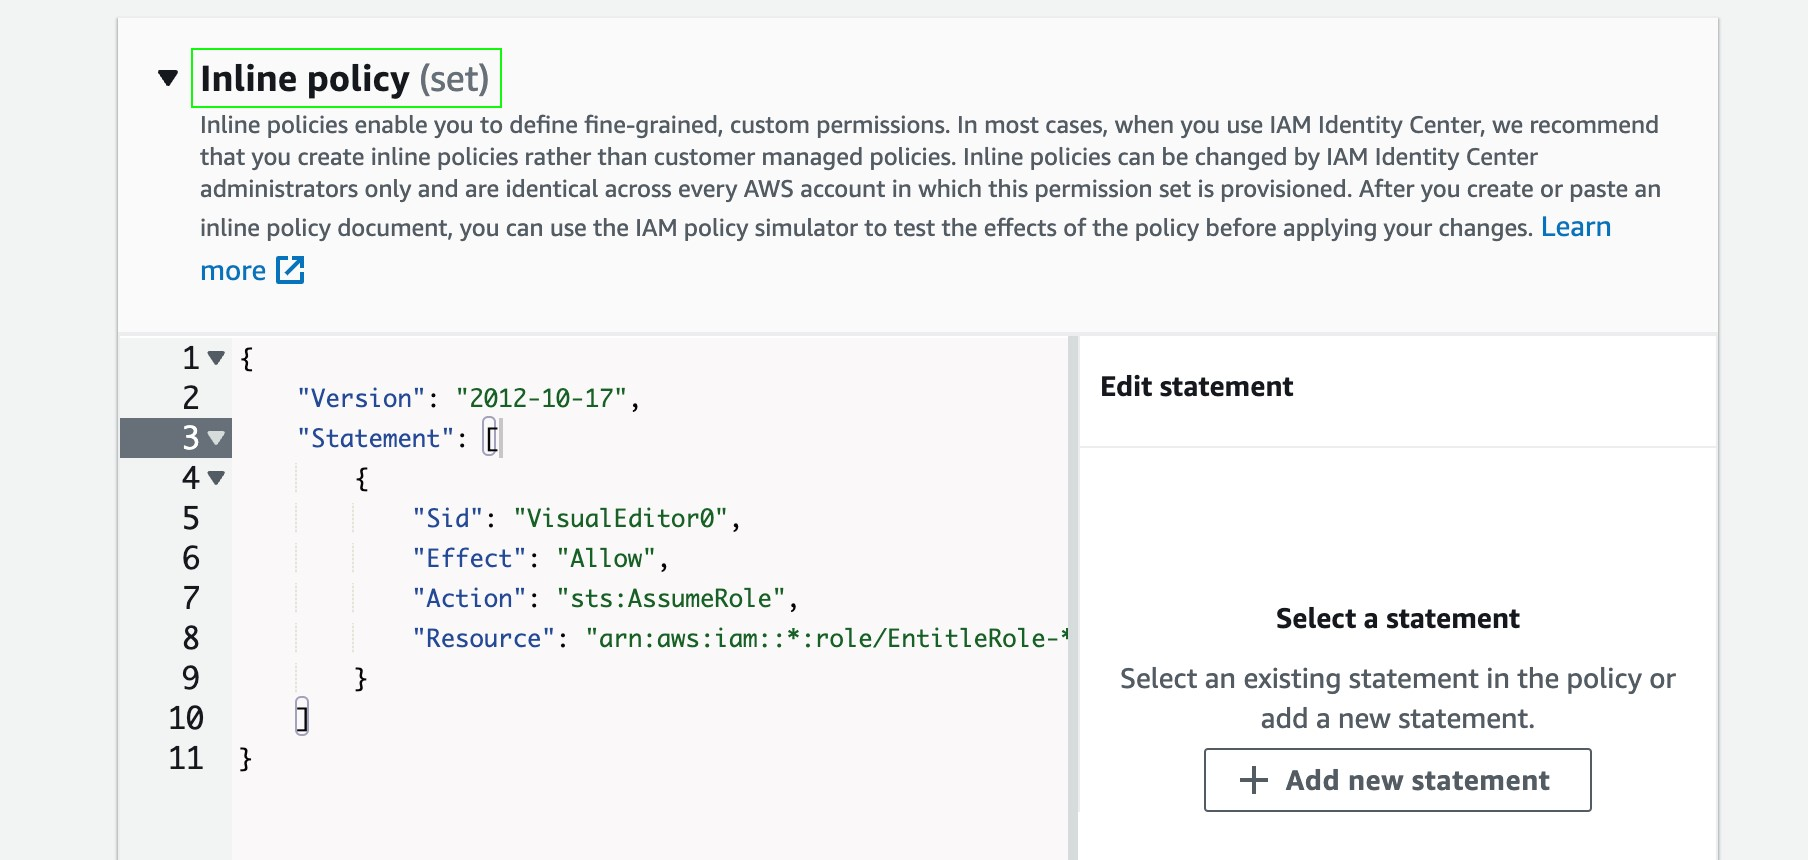
- Choose Inline Policy and paste the following JSON:
{
	"Version": "2012-10-17",
	"Statement": [
		{
			"Sid": "VisualEditor0",
			"Effect": "Allow",
			"Action": "sts:AssumeRole",
			"Resource": "arn:aws:iam::*:role/EntitleRole-*"
		}
	]
}
- The Inline policy for the permission set ensures the user logged in via the dedicated permission set can assume his Personal Role.
- Name it entitle-ps,.
- Click Save.
- In the Permission Sets page, locate the newly-created Entitle permission set,
entitle-ps, and copy the ARN, as you will use it later on in the configuration.
Step 3: Create Policies - Root Account
In that stage, we will configure a few policies that are required in order for Entitle to manage access to your AWS accounts. Later on in Stage 3, you will create an IAM user and attach these policies to it.
- Click IAM on the top left.
- Click Policies.
- Click Create Policy.
- In this window, click on the blue JSON button on the right.
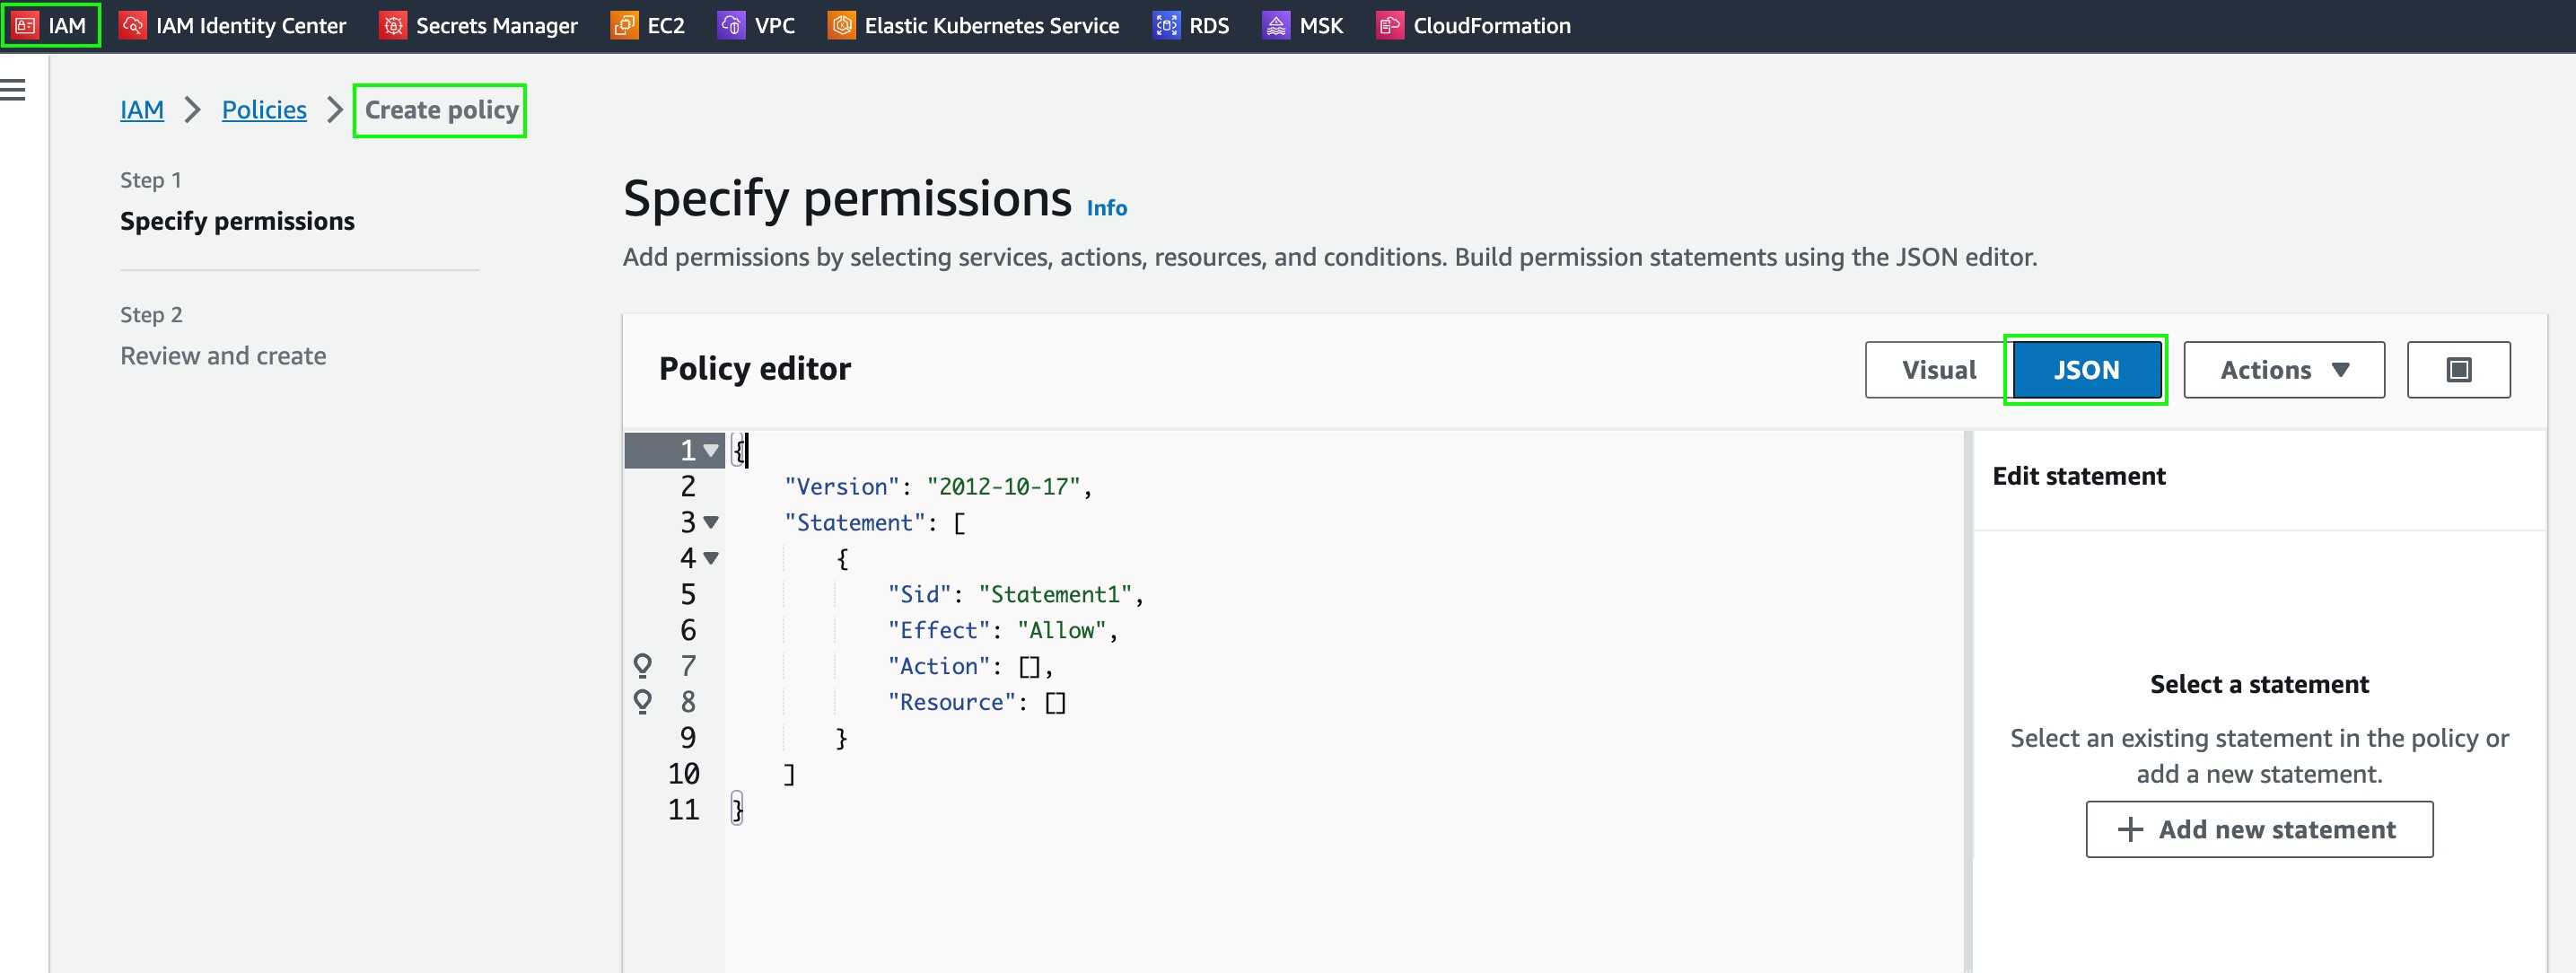
- Paste the JSON below to the Policy editor.
- Name that policy with the title of the JSON below.
- Click Save.
{
    "Version": "2012-10-17",
    "Statement": [
        {
            "Sid": "VisualEditor0",
            "Effect": "Allow",
            "Action": [
                "iam:AttachRolePolicy",
                "iam:AttachUserPolicy",
                "iam:CreateRole",
                "iam:CreatePolicy",
                "iam:CreatePolicyVersion",
                "iam:DetachUserPolicy",
                "iam:DetachRolePolicy",
                "iam:DeleteRole",
                "iam:DeletePolicy",
                "iam:DeletePolicyVersion",
                "iam:GetPolicy",
                "iam:GetPolicyVersion",
                "iam:GetRole",
                "iam:GetSAMLProvider",
                "iam:ListAttachedRolePolicies",
                "iam:ListEntitiesForPolicy",
                "iam:ListPolicies",
                "iam:ListPolicyTags",
                "iam:ListPolicyVersions",
                "iam:ListRolePolicies",
                "iam:ListUserPolicies",
                "iam:ListUsers",
                "identitystore:CreateGroupMembership",
                "identitystore:DeleteGroupMembership",
                "identitystore:DescribeGroup",
                "identitystore:DescribeGroupMembership",
                "identitystore:DescribeUser",
                "identitystore:GetGroupId",
                "identitystore:GetGroupMembershipId",
                "identitystore:GetUserId",
                "identitystore:IsMemberInGroups",
                "identitystore:ListGroupMemberships",
                "identitystore:ListGroupMembershipsForMember",
                "identitystore:ListGroups",
                "identitystore:ListUsers",
                "organizations:ListAccounts",
                "sso-directory:DescribeUsers",
                "sso:AttachCustomerManagedPolicyReferenceToPermissionSet",
                "sso:AttachManagedPolicyToPermissionSet",
                "sso:CreateAccountAssignment",
                "sso:CreatePermissionSet",
                "sso:DeleteAccountAssignment",
                "sso:DeletePermissionSet",
                "sso:DescribeAccountAssignmentCreationStatus",
                "sso:DescribeAccountAssignmentDeletionStatus",
                "sso:DescribePermissionSet",
                "sso:DetachCustomerManagedPolicyReferenceFromPermissionSet",
                "sso:ListAccountAssignments",
                "sso:ListCustomerManagedPolicyReferencesInPermissionSet",
                "sso:ListInstances",
                "sso:ListPermissionSets",
                "sso:ListTagsForResource",
                "sso:TagResource",
                "sso:UntagResource"
            ],
            "Resource": "*"
        }
    ]
}
- Repeat steps 1-7 to create the following policies:
- entitle-integration-base-permissions-management
- entitle-integration-cross-account-assume-role
{
    "Version": "2012-10-17",
    "Statement": [
        {
            "Sid": "VisualEditor0",
            "Effect": "Allow",
            "Action": [
                "iam:AttachRolePolicy",
								"iam:PutRolePolicy",
                "iam:AttachUserPolicy",
                "iam:CreateRole",
                "iam:CreatePolicy",
                "iam:CreatePolicyVersion",
                "iam:DetachUserPolicy",
                "iam:DetachRolePolicy",
                "iam:DeleteRole",
                "iam:DeletePolicy",
                "iam:DeletePolicyVersion",
                "iam:GetPolicy",
                "iam:GetPolicyVersion",
                "iam:GetRole",
								"iam:ListRoles",
                "iam:ListAttachedRolePolicies",
                "iam:ListEntitiesForPolicy",
                "iam:ListPolicies",
                "iam:ListPolicyTags",
                "iam:ListPolicyVersions",
                "iam:ListRolePolicies",
                "iam:ListRoleTags",
                "iam:ListUserPolicies",
                "iam:ListUsers",
                "iam:TagPolicy",
                "organizations:ListAccounts",
                "organizations:DescribeAccount",
								"iam:TagRole",
								"iam:UnTagRole",
								"iam:TagPolicy",
			    "iam:UntagPolicy"
            ],
            "Resource": "*"
        }
    ]
}
{
    "Version": "2012-10-17",
    "Statement": [
        {
            "Sid": "VisualEditor0",
            "Effect": "Allow",
            "Action": "sts:AssumeRole",
            "Resource": "arn:aws:iam::*:role/entitle-integration-sub-account-role"
        }
    ]
}
Note
Make sure you created 3 policies in total:
- entitle-integration-sso-management
- entitle-integration-base-permissions-management
- entitle-integration-cross-account-assume-role
- If the role name was edited, please note that you will be requested to edit the configuration at Stage 5, step 19.
Step 4: Create An IAM User For Entitle - Root Account
- Click IAM on the top left.
- Click Users.
- Click Create User.

- Name the user
entitle-integration-user, and click Next. - Choose the Attach policies directly option.
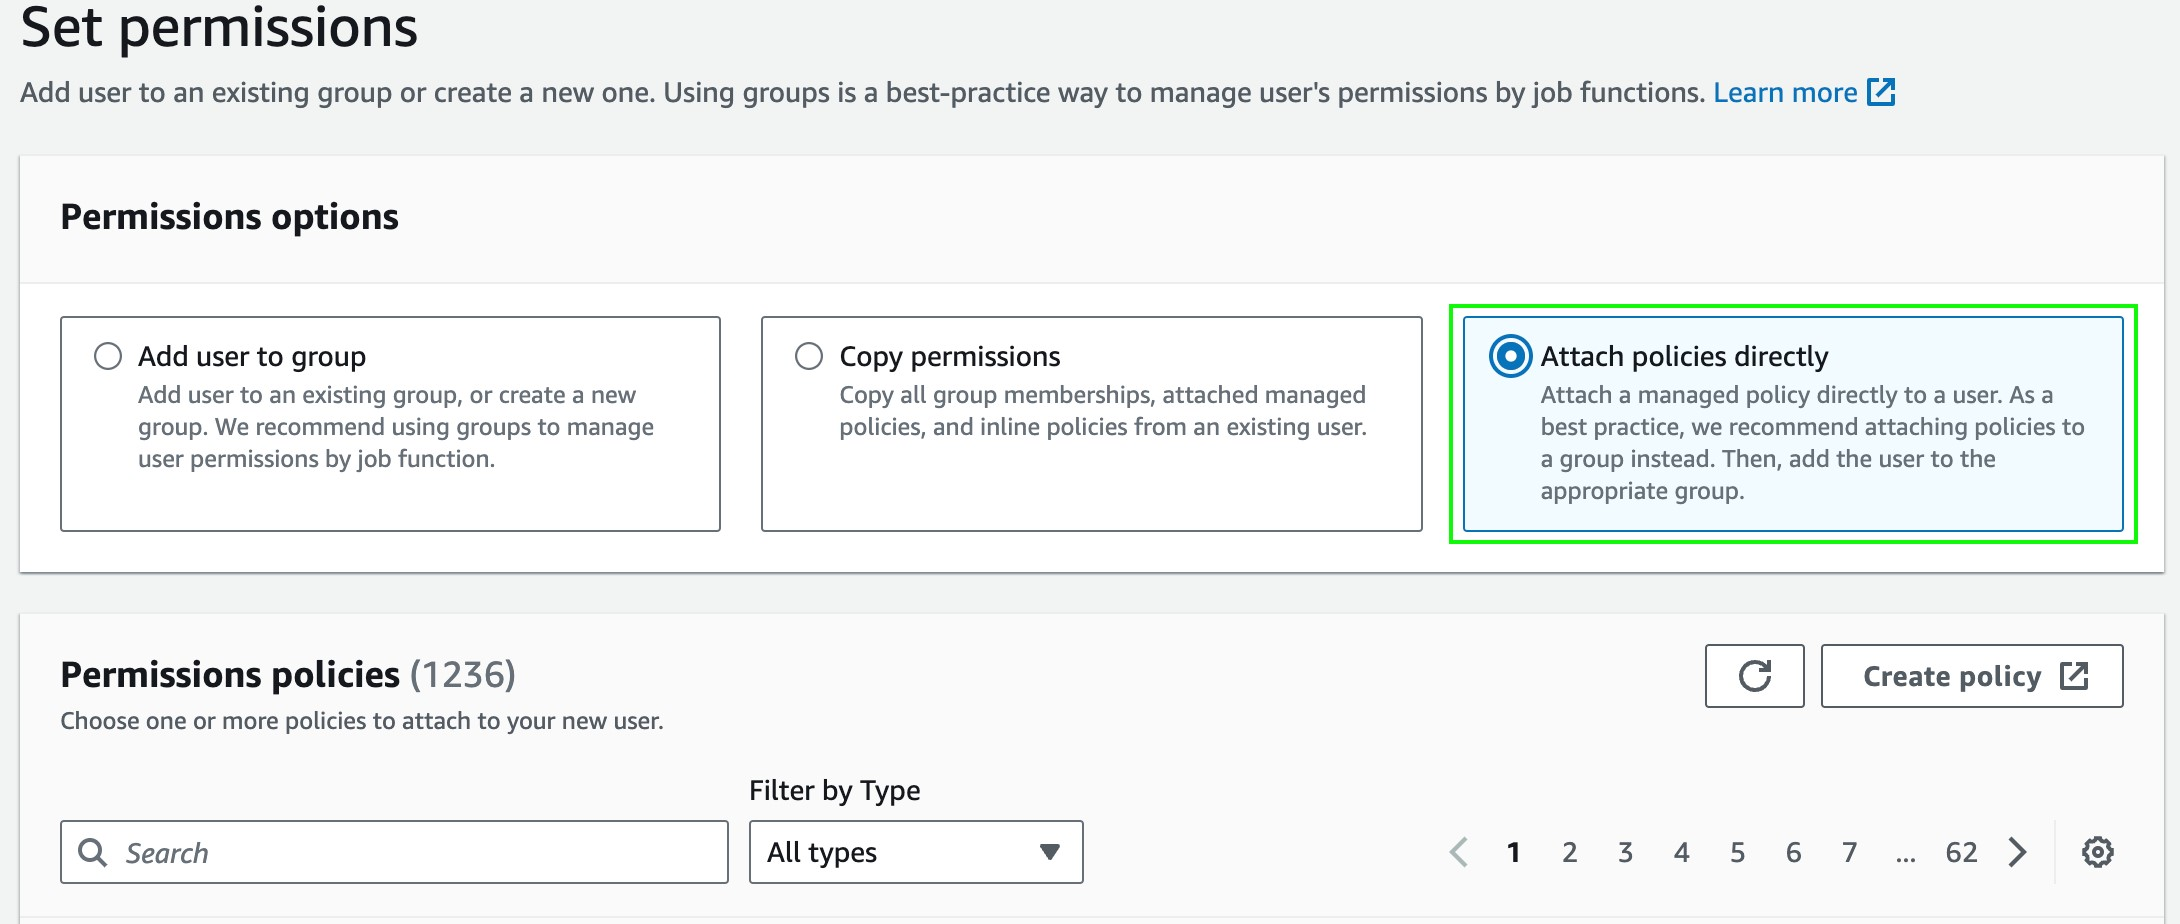
- Add the policies created on the previous stage by searching and checking them.
- Click Next.
- Click Create User.
- Search for the newly created user, and click on it.
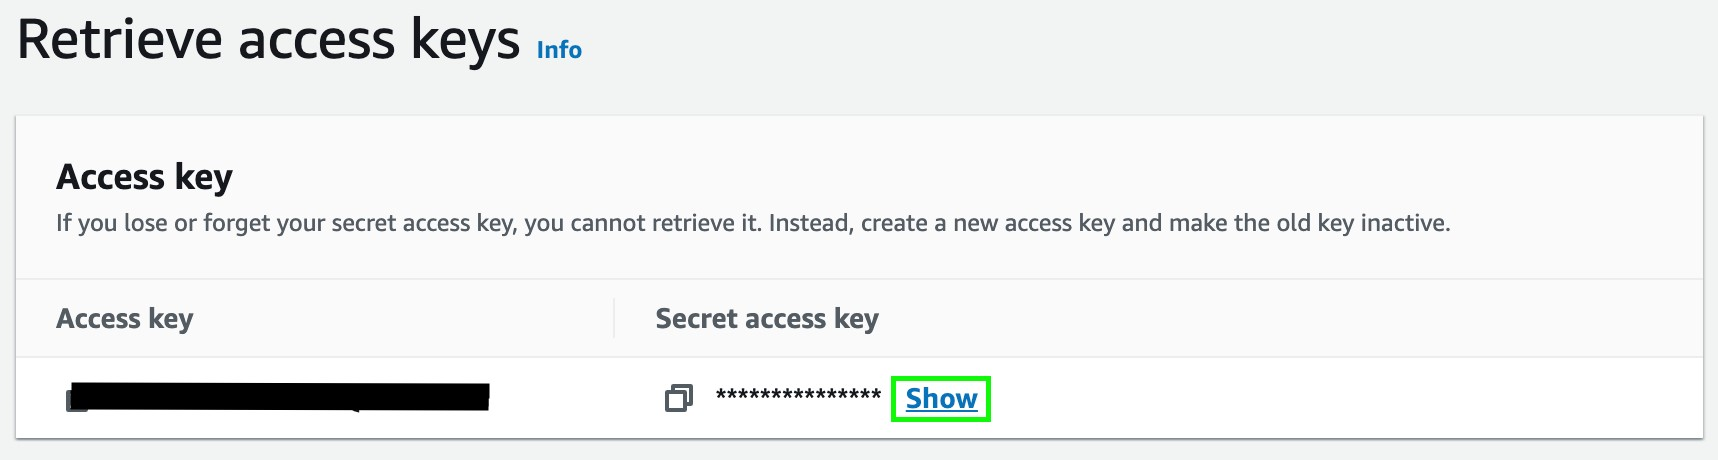
- Click Security Credentials.
- Scroll down, and click Create access key.
- Click Command Line Interface.
- Click Next, and then click Create.

- Copy the Access key and Secret access key, you will use them later on in the configuration.
Step 5: Add Sub-Account permissions
In this stage, you will create a role in each sub-account you wish to manage access using Entitle.
Repeat the steps in the stage for each sub-account.
Note
Entitle supports auto-discovery of the sub-accounts, after the step was completed for all of them.
In case you want to select a specific set of sub-accounts - please copy the new role ARN and the sub-account ID for each of the sub-accounts you completed the steps below for.
Create Policies to Manage Access To Your Sub-Account
- Navigate to the selected sub-account.
- Click IAM on the top left.
- Click Policies.
- Click Create Policy.
- In this window, click on the blue JSON button on the right.
- Paste the JSON below to the Policy editor. That Base Permissions Management Policy is required to allow Entitle manage permissions to the account.
- Name that policy with the title of the JSON below.
- Click Save.
{
    "Version": "2012-10-17",
    "Statement": [
        {
            "Sid": "VisualEditor0",
            "Effect": "Allow",
            "Action": [
                "iam:AttachRolePolicy",
								"iam:PutRolePolicy",
                "iam:AttachUserPolicy",
                "iam:CreateRole",
                "iam:CreatePolicy",
                "iam:CreatePolicyVersion",
                "iam:DetachUserPolicy",
                "iam:DetachRolePolicy",
                "iam:DeleteRole",
                "iam:DeletePolicy",
                "iam:DeletePolicyVersion",
                "iam:GetPolicy",
                "iam:GetPolicyVersion",
                "iam:GetRole",
								"iam:ListRoles",
                "iam:ListAttachedRolePolicies",
                "iam:ListEntitiesForPolicy",
                "iam:ListPolicies",
                "iam:ListPolicyTags",
                "iam:ListPolicyVersions",
                "iam:ListRolePolicies",
                "iam:ListRoleTags",
                "iam:ListUserPolicies",
                "iam:ListUsers",
                "iam:TagPolicy",
                "organizations:ListAccounts",
                "organizations:DescribeAccount",
								"iam:TagRole",
								"iam:UnTagRole",
								"iam:TagPolicy",
			    "iam:UntagPolicy"
            ],
            "Resource": "*"
        }
    ]
}
- Below listed the policies which are required in order to manage access to specific resource types in AWS. Repeat steps 2-8 for each of those resource types you wish to manage access.
{
    "Version": "2012-10-17",
    "Statement": [
        {
            "Sid": "VisualEditor0",
            "Effect": "Allow",
            "Action": [
                "iam:ListPolicies",
                "iam:GetRole",
                "iam:GetPolicyVersion",
                "s3:GetBucketTagging",
                "ec2:DescribeInstances",
                "iam:GetPolicy",
                "ec2:DescribeTags",
                "ec2:DescribeRegions",
                "iam:ListEntitiesForPolicy",
                "iam:AttachUserPolicy",
                "s3:ListBucket",
                "iam:ListUserPolicies",
                "iam:CreatePolicy",
                "s3:ListAllMyBuckets",
                "iam:ListUsers",
                "iam:ListPolicyTags",
                "iam:DetachUserPolicy"
            ],
            "Resource": "*"
        }
    ]
}
{
    "Version": "2012-10-17",
    "Statement": [
        {
            "Sid": "VisualEditor0",
            "Effect": "Allow",
            "Action": [
                "iam:ListPolicies",
                "iam:GetPolicyVersion",
                "iam:GetPolicy",
                "iam:TagRole",
                "iam:ListEntitiesForPolicy",
                "iam:AttachUserPolicy",
                "iam:ListUsers",
                "iam:ListUserPolicies",
                "iam:ListPolicyTags",
                "iam:TagPolicy",
                "iam:TagUser"
            ],
            "Resource": "*"
        }
    ]
}
{
    "Version": "2012-10-17",
    "Statement": [
        {
            "Sid": "VisualEditor0",
            "Effect": "Allow",
            "Action": [
                "iam:ListPolicies",
                "iam:GetRole",
                "iam:GetPolicyVersion",
                "iam:ListRoleTags",
                "iam:GetPolicy",
                "iam:AttachUserPolicy",
                "iam:ListEntitiesForPolicy",
                "iam:ListRoles",
                "iam:ListUserPolicies",
                "iam:CreatePolicy",
                "iam:ListUsers",
                "iam:ListPolicyTags",
                "iam:DetachUserPolicy"
            ],
            "Resource": "*"
        }
    ]
}
{
    "Version": "2012-10-17",
    "Statement": [
        {
            "Sid": "VisualEditor0",
            "Effect": "Allow",
            "Action": [
                "iam:ListPolicies",
                "iam:GetPolicyVersion",
                "iam:GetPolicy",
                "iam:ListEntitiesForPolicy",
                "iam:AttachUserPolicy",
                "iam:ListUserPolicies",
                "iam:CreatePolicy",
                "iam:ListUsers",
                "iam:ListPolicyTags",
                "iam:DetachUserPolicy",
                "secretsmanager:ListSecrets",
                "secretsmanager:DescribeSecret"
            ],
            "Resource": "*"
        }
    ]
}
Create A Role to Manage Access To Your Sub-Account
- Click IAM on the top left.
- Click Roles.
- Click Create Role.
- Under Trusted entity type, select AWS account.
- Under An AWS Account, choose Another AWS account between the two options.
- Insert the Account ID of your management account you copied on Stage 1, step 6.
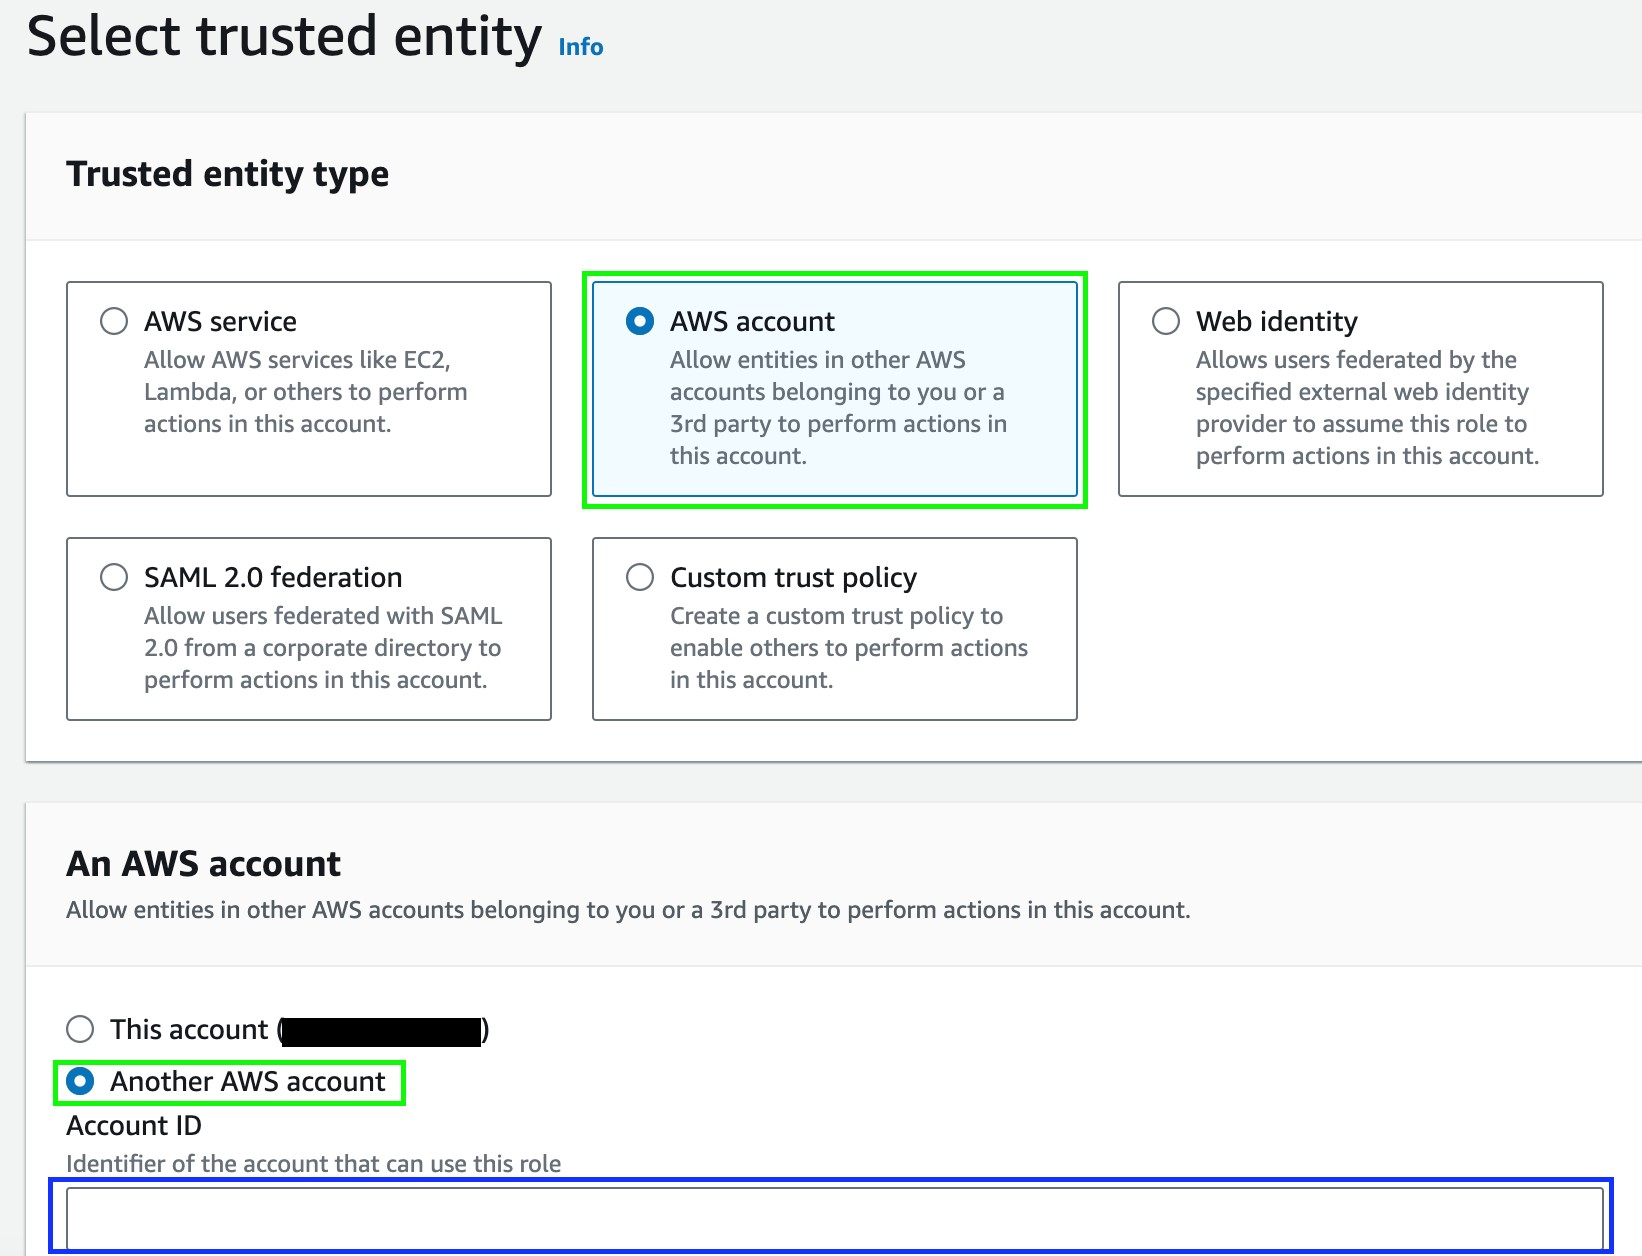
- Click Next.
- Assign the policies created in the sub-account to this role.
- Click Next.
- Name the role
entitle-integration-sub-account-role. - Click Save.
Note!
The IAM role name should be identical to the role name you set in the
entitle-integration-cross-account-assume-rolepolicy in Stage 3.
Entitle Integration Setup
All that is left to do is create an integration on the Entitle application (for more information on how to create a new Entitle integration, see Here).
-
Log into Entitle and navigate to the Integrations page.
-
After clicking the Add Integration button, type AWS in the Application field. You can find more information about integration creation in Entitle here.
-
Don’t forget to set the Save on field with your configuration, i.e. your own hosted agent or Entitle’s cloud.
-
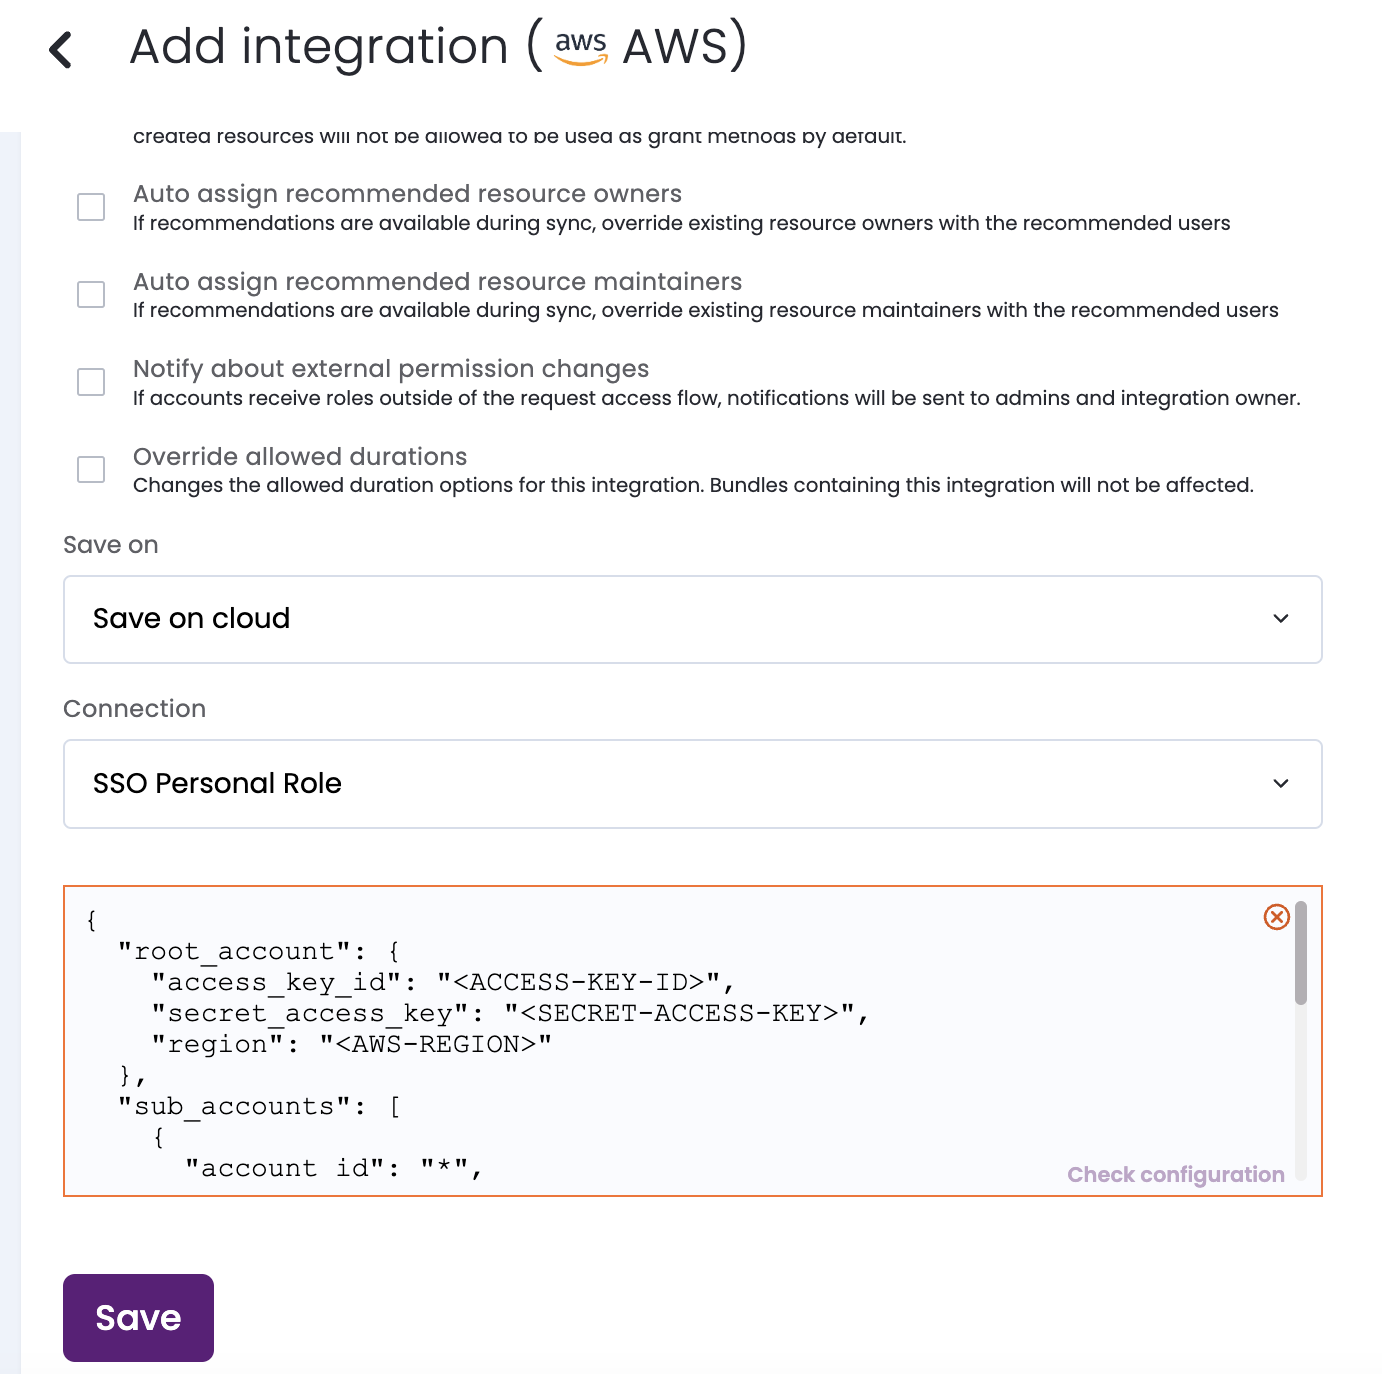
Under Connection choose
SSO Personal Role.
-
Under the
root_accountconfiguration:- Paste the access key and the secret access key created in Stage 4, step 14, to the
access_key_idandsecret_access_keyrespectively. - Paste the region copied on Stage 1, step 5, to the
regionvalue.
- Paste the access key and the secret access key created in Stage 4, step 14, to the
-
Under the
sub_accountsconfiguration:- If auto-discovery of the sub-account was selected - please complete the
Entitle Configuration - Sub-Account Auto Discoveryconfiguration below. - If a set of sub-accounts was selected - please complete the
Entitle Configuration - Sub-Account Selectionconfiguration below, and provide for each sub-account instance its ID and role ARN at the corresponding place.
- If auto-discovery of the sub-account was selected - please complete the
-
Under the
optionsconfiguration:- Paste the SSO instance ARN copied on Stage 1, step 5, to the
sso_instance_arnvalue. - Paste the Entitle permission set ARN copied on Stage 3, step 6, to the corresponding
entitle_permission_set_arnvalue. - If you wish to attach the policies employees are already permitted to (via other permission sets) to their Personal Role - set the
"copy_permission_sets_permissions"to true. Otherwise - keep that as false.- Note - A role is limited to 10 attached policies.
- Optional -
tags- this will enable the retrieval of only resources with the listed tags.
- Paste the SSO instance ARN copied on Stage 1, step 5, to the
Example Connection JSON:
{
    "root_account": {
        "access_key_id": "<ACCESS-KEY-ID>",
        "secret_access_key": "<SECRET-ACCESS-KEY>",
        "region": "<AWS-REGION>"
    },
    "sub_accounts": [
        {
            "account_id": "*",
            "access_role_arn": "arn:aws:iam::*:role/entitle-integration-sub-account-role"
        }
    ],
    "options": {
        "sso_instance_arn": "<SSO-INSTANCE_ARN>",
        "entitle_permission_set_arn": "<DEDICATED-PS-ARN>",
        "copy_permission_sets_permissions": false,
        "tags": [
            {
                "key": "env",
                "value": "production"
            }

        ]
    }
}
{
    "root_account": {
        "access_key_id": "<ACCESS-KEY-ID>",
        "secret_access_key": "<SECRET-ACCESS-KEY>",
        "region": "<AWS-REGION>"
    },
    "sub_accounts": [
        {
            "account_id": "<SUB_ACCOUNT_ID>",
            "access_role_arn": "arn:aws:iam::<SUB_ACCOUNT_ACCESS_ROLE_ARN>:role/entitle-integration-sub-account-role"
        }
    ],
    "options": {
        "sso_instance_arn": "<SSO-INSTANCE_ARN>",
        "entitle_permission_set_arn": "<DEDICATED-PS-ARN>",
        "copy_permission_sets_permissions": false,
        "tags": [
            {
                "key": "env",
                "value": "production"
            }

        ]
    }
}
- Click Save, you are done!🎉
Updated 3 months ago