
Identity providers | PS Pathfinder
BeyondTrust Pathfinder supports connecting to your third-party single sign-on applications. Configuring an identity provider allows members of your organization secure and authorized access to BeyondTrust applications, allowing you to centrally manage accounts, passwords, and identity verification in a manner familiar to both your users and security team.
You can use any IdP that supports SAML and single sign-on. We have provided documentation as examples to use as guidance when configuring your IdP.
You must:
- be a Pathfinder administrator to access identity provider features, and
- have Pathfinder and your identity provider dashboard open to complete setup.
Pathfinder-wide authentication methods
Pathfinder supports three authentication methods: Local, SSO (SAML), Active Directory or LDAP via proxy.
This page covers SAML-specific behavior; see Configure LDAP on Pathfinder for directory authentication.
Authentication methods
There are only two authentication methods available for SAML (Does not apply to local users or LDAP users)
Method #1: Local (Invite) or SCIM
Users created through Invite or SCIM provisioning before SAML is configured. Authentication through the Pathfinder URL is immediately available once SAML setup completes.
The admin can set user permissions at time of invite.
Method #2: Authentication through SSO provider
Users not pre-provisioned in Pathfinder, initial authentication must be performed through their SSO provider using (IdP Initiated Auth). This process triggers account provisioning in Pathfinder. After the account is created, subsequent logins can be completed directly via the Pathfinder URL, which will forward to their IdP.
For example, for Entra/Azure users, they should navigate to My Apps and open the SAML app for Pathfinder that they've configured to complete the IdP initiated authentication. After this, they should be able to login directly to Pathfinder since the account will have then been created/provisioned.
The second method is particularly suited for large-scale deployments or user onboarding, wherein administrators pre-create all accounts in their IdP. In this scenario, each user will authenticate through the IdP first to provision their account in Pathfinder before logging in through the Pathfinder URL for future access.
If the admin configures default access rules that will reduce admin involvement with SAML user auth.
How SAML authentication works in Pathfinder
When a SAML IdP is configured in Pathfinder, it is associated with a specific domain.
- If a user attempts to log in using an email address that matches this domain, Pathfinder automatically initiates SAML authentication in the background.
- If the domain does not match any configured SAML IdP, Pathfinder defaults to local or SCIM authentication—provided the user account exists in the system.
Default access rules
Use default access rules to define baseline product or application access for end users upon their initial login via SAML Single Sign-On (SSO). These rules are applied universally across all IdPs configured in your organization and are triggered only during a user's first SAML-based login.
Users can initiate this login either through the Pathfinder login URL or directly from their IdP application portal. In both cases, the default access rules are enforced only during the initial SAML authentication.
To configure default access rules:
- Sign in to login.beyondtrust.io.
The BeyondTrust Home page displays. - At the top right of the page, click your site name to display a drop-down menu.
- Select Administration.
The BeyondTrust Pathfinder Administration page opens and displays each available site as a tile. - Go to Administration > Identity & Authentication Providers.
- Expand the default access rules.
- Select a role from list: Standard User or Administrator. Standard users cannot access administration features.
- Select one or more sites and the applications in a site your users must access.
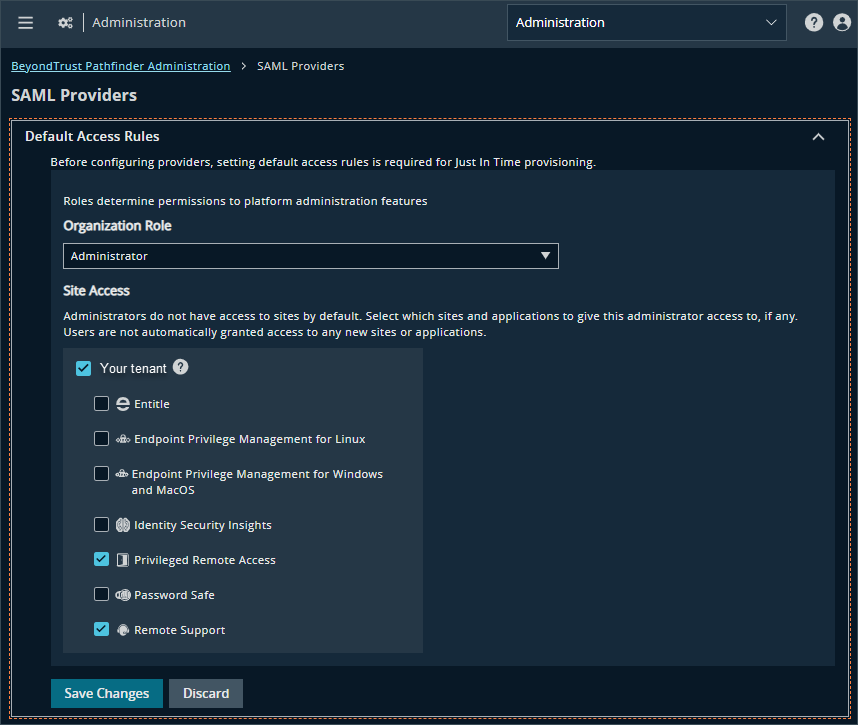
- Click Save Changes.
Configure group claims to use with Pathfinder applications
If your organization is configured to authenticate with a SAML Identity Provider, user groups can be passed. Pathfinder applications can retrieve user groups information from the Identity Provider to use in the applications.
For information on setting up the identity provider, see their respective documentation:
- Microsoft: Add group claims to tokens for SAML applications using SSO configuration
- Okta: Define group attribute statements
How to configure
The identity provider must be configured to provide a SAML assertion called Groups.
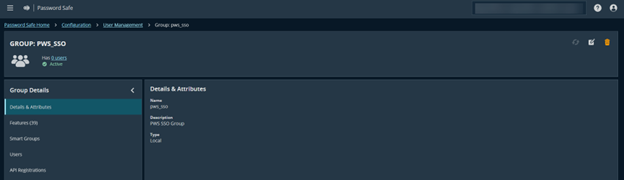
The examples below use the group name pws_sso and we are sending that in the claim/assertion so the Pathfinder applications can retrieve user groups information from the Identity Provider.
More information on the Password Safe application
If SAML group claims are configured correctly for the IDP, Password Safe respects those and provisions users into groups (provided they exist). If you are logged into Pathfinder, go to https://app.beyondtrust.io/api/auth/userinfo to inspect the group names coming in on the SAML assertion claim. That user should be placed in that list of groups when they access Password Safe assuming a matching group name is already created in Password Safe Configuration.
In the example below, the group created in Password Safe is the same group name coming through the SAML claim. Any user logging into Pathfinder via SAML, will be added to the group in Password Safe.
How to allow multiple groups through a SAML claim
AD groups synced to Azure AD (option #1)
In your identity provider:
To pass all your groups through the claim, in the Group Claims section:
- Select Security groups as the group type to include in the claim.
- Select sAMAccountName from the Source attribute list. If sAMAccountName doesn't work try using Cloud-only group display names.
- Select the Customize the name of the group claim check box and enter groups as the name.
AD groups synced to Azure AD (option #2)
If you use option #2, ensure your groups are added to the SAML application under the Users and groups section in the Azure SAML application.
In your identity provider:
To pass all your groups through the claim, in the Group Claims section:
- Select Groups assigned to the application as the group type to include in the claim.
- Select sAMAccountName from the Source attribute list. If sAMAccountName doesn't work try using Cloud-only group display names.
- Select the Customize the name of the group claim check box and enter groups as the name.
Cloud only groups
Ensure your groups are added to the SAML application under the Users and groups section in the Azure SAML application.
In your identity provider:
To pass all your groups through the claim, in the Group Claims section:
- Select Groups assigned to the application as the group type to include in the claim.
- Select Cloud-only group display names from the Source attribute list.
- Select the Customize the name of the group claim check box and enter groups as the name.
Edit an Identity Provider
To edit an Identity Provider:
- Sign into login.beyondtrust.io.
The BeyondTrust Home page displays. - At the top right of the page, click your site name to display a drop-down menu.
- Select Administration.
The BeyondTrust Platform Administration page displays. - From the top left of the page, click
 > Administration > Identity & Authentication Providers.
The SAML Providers page displays. - For the Identity Provider you want to edit, click
 > Edit Provider.
 - Make your changes, and then click Save Changes.
Delete an Identity Provider
-
Sign into login.beyondtrust.io.
The BeyondTrust Home page displays. -
At the top right of the page, click your site name to display a drop-down menu.
-
Select Administration.
The BeyondTrust Platform Administration page displays. -
From the top left of the page, click
> Administration > Identity & Authentication Providers.
The SAML Providers page displays. -
For the Identity Provider you want to remove, click
> Delete Provider. -
The following confirmation dialog displays:
![A confirmation box reads, "Confirm Provider Deletion. Are you sure you want to delete [server name]? This action cannot be undone." A text box has the word "delete" typed in. Two buttons are available: Delete and Discard.](https://files.readme.io/d755d4278a11f4ac4d21786374283b1e5bd1bf3bc5f43188d39b0113127cc523-ConfirmationDelete_ServiceProvider.png)
- In the textbox, type "delete".
- Click Delete.
SCIM provisioning for BeyondInsight in Pathfinder
Pathfinder provisions BeyondInsight users and groups from your identity provider (IdP) using SCIM. You configure SCIM once in Pathfinder, and Pathfinder keeps BeyondInsight in sync as identities change in your IdP.
This service is new and works differently from the SCIM service in BeyondInsight. The most important difference is this:
WarningThis service differs from the SCIM service in BeyondInsight, which requires the PAM LinkedObject extension to create a directory-typed user. Pathfinder uses externalId instead. Review the externalId mapping in your identity provider before you enable provisioning, because that value determines the type of BeyondInsight user you get.
Pathfinder does not expose a BeyondInsight SCIM endpoint. You point your IdP at Pathfinder, not at BeyondInsight.
How provisioning flows
- You configure SCIM in Pathfinder and connect your IdP.
- Your IdP sends user and group changes to Pathfinder.
- Pathfinder emits lifecycle events for those users and groups.
- BeyondInsight consumes the events and creates or updates the matching users and groups in BeyondInsight.
For information on how to configure SCIM provisioning in Pathfinder, see SCIM provisioning.
Because BeyondInsight receives events rather than SCIM calls, you manage all SCIM configuration in Pathfinder. You do not configure a SCIM endpoint, token, or schema extension in BeyondInsight.
How externalId determines the user type
Pathfinder reads the externalId value your IdP sends and infers the BeyondInsight user type from it. No extra configuration or schema extension applies.
| externalId value | BeyondInsight user type |
|---|---|
| An Entra Object ID GUID | Entra ID user, matched by object ID |
| A distinguished name (DN) | Active Directory or LDAP user, resolved live against your configured directories |
| Anything else, or no directory match | Local user |
When Pathfinder receives a distinguished name, it resolves the DN against the directories you configure in BeyondInsight and types the user as Active Directory or LDAP based on the match. If no directory matches the DN, Pathfinder provisions a local user instead.
ImportantWhatever you map into
externalIddecides the kind of BeyondInsight user you get. Map the Entra object ID to get Entra ID users.Map the distinguished name to get Active Directory or LDAP users.
Leave
externalIdunset to get local users.Review your IdP attribute mapping before you enable provisioning.
Differences from BeyondInsight SCIM
The SCIM service in BeyondInsight (on-premises and cloud) requires the PAM extension urn:ietf:params:scim:schemas:pam:1.0:LinkedObject to create a directory-typed user. That extension carries a Source value of Active Directory or LDAP and a NativeIdentifier value holding the distinguished name.
Pathfinder ignores the LinkedObject extension and uses plain externalId instead. If you move from the BeyondInsight SCIM service to Pathfinder, remap the identifier your IdP sends into externalId and remove the LinkedObject mapping.
| Feature / Setting | BeyondInsight SCIM | Pathfinder SCIM |
|---|---|---|
| Endpoint you point the IdP at | BeyondInsight | Pathfinder |
| Attribute that sets the user type | LinkedObject PAM extension | externalId |
| Schema extension required | Yes | No |
| Directory typing | Declared by Source | Inferred from the externalId format |
User lifecycle
Pathfinder handles the full user lifecycle:
- Create: provisions a new BeyondInsight user with the type that
externalIdimplies. - Update: applies attribute changes, including renames, to the existing account.
- Disable and delete: deprovisions the user in BeyondInsight.
BeyondInsight anchors each user to its platform identity rather than to a username. A user who is renamed in your IdP, or who signs in again after a change, resolves to the same BeyondInsight account and keeps existing group memberships and permissions.
Group lifecycle
Pathfinder handles the full group lifecycle:
- Create: provisions a new BeyondInsight user group.
- Rename: updates the group name in BeyondInsight.
- Delete: removes the group from BeyondInsight.
- Membership changes: adds and removes members as your IdP reports them.
BeyondInsight anchors each provisioned group to its platform identity, so renaming a group in your IdP updates the existing BeyondInsight group instead of creating a duplicate.
Assign Smart Rules, roles, and permissions to provisioned groups in BeyondInsight. Pathfinder manages group existence and membership; it does not manage what a group can do.
For more information on Smart Rules and groups, see Create a group and assign roles.
Updated 1 day ago
