Kubernetes External Secrets Operator | PS
Overview
The BeyondTrust (BT) provider retrieves ASCII secrets from Password Safe Secrets Safe and makes them available as Kubernetes secrets.
The ESO creates the Kubernetes secrets returned from the BT provider, based on the configuration you provide in your secrets-store.yml or cluster-secret-store.yml files. The secrets are requested from the BT provider using either a Secrets Safe path or a path to a managed account.
The external secrets controller continuously syncs secrets at the rate specified in the configuration from Password Safe Secrets Safe to Kubernetes secrets. This allows immediate retrieval and usage of secrets from your Kubernetes pods.
Important informationThe ESO is designed to write secrets to Kubernetes secrets which are by default written to etcd base 64 encoded. This is not secure. You must configure Kubernetes encryption or use third-party encryption for production environments.
If the BT provider secret is deleted it will still exist in the Kubernetes secrets.
Prerequisites
- The BT provider supports retrieval of a secret from Password Safe versions 23.1 or later releases.
- For this provider to retrieve a secret, the Password Safe Secrets Safe instance must be preconfigured with the secret in question and authorized to read it.
You can use existing group, user, access policy, managed system, and managed account, and then modify as required for the configuration in BeyondInsight, if desired.
Set up OAuth application user in BeyondInsight
To use the External Secrets Operator (ESO) with Password Safe you must configure OAuth for the application user by assigning it an API registration in BeyondInsight.
To set up OAUTH for a user, you must create an API access policy. For more information, see Add OAuth authentication for API access for application users
Create a new API registration
-
From the left sidebar in BeyondInsight, click Configuration.
-
Under General, click API Registrations.
-
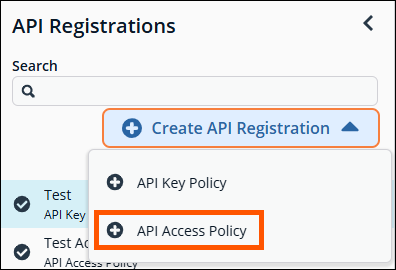
Click + Create API Registration.
-
Select + API Access Policy.
-
Enter a Name for the registration.
-
Define the duration for the Access Token.
-
Determine if a client certificate is required.
By requiring a client certificate, each web request using this API Registration must include a valid certificate issued by a well known certificate authority.
- Select the Authentication Rule Options you wish to enable.
- Click Add Authentication Rule +.
The Create New Authentication Rule panel displays. - In the Create New Authentication Rule panel:
- Enter the IP address of your Kubernetes cluster in the IP Address field.
- Click Create Rule. The Create New Authentication Rule panel closes.
- Click Create Registration to save your new API registration.
For more detailed information on API registrations, see Configure API Registration.
Assign API registration to group
The API registration you created above must be assigned to a group that contains a Password Safe user that is used for the API requests. Creating a new API group is optional; if one already exists it can be used.
Create a new group
- From the left sidebar in BeyondInsight, click Configuration.
- Under Role Based Access, click User Management.
- On the Groups tab, click + Create New Group.
- Select Create a New Group. The Create New Group panel displays.
- Enter a name and description for the group, and then click Create Group.
The new group is created and its details page displays.
Assign permissions to the group
The below permissions must be assigned to the group from the group's Group Details panel.
Features permissions
- Click Features.
- From the Show dropdown above the Features grid, select All Features.
- In the list of features, scroll to Secrets Safe and click the vertical ellipsis at the end of the row.
- Select + Assign Permissions Full Control.
Smart Groups permissions
- Click Smart Groups.
- From the Show dropdown above the Smart Groups Permissions grid, select All Smart Groups.
- In the list of Smart Groups, scroll to All Managed Accounts and click the vertical ellipsis at the end of the row.
- Select + Assign Permissions Read Only.
- Click the vertical ellipsis again for the All Managed Accounts Smart Group.
- Select Edit Password Safe Roles.
The Password Safe Roles panel displays. - Check Requestor.
- Select an access policy that has view password auto-approve set, from the dropdown.
- Check Approver.
- Click Save Roles.
The Password Safe Roles panel closes. The Smart Group is enabled with the Requestor and Approver roles for the group.
Enable the API registration for the group
- From the Group Details panel, click API Registrations.
- Check the box for the API Registration you created for the ESO application user.
Assign an API user to the group
To complete OAuth authentication, an Application User must be created and assigned to the group.
Create a new user
- From the left sidebar in BeyondInsight, click Configuration.
- Under Role Based Access, click User Management.
- Select the Groups tab, and click + Create New User.
- Select Add an Application User. The Create New Application User panel displays.
- Enter the details for the user.
- Select the API Access Policy from the drop down list (created from above steps), and then click Create User. The new user is created and its details page displays with the Groups grid selected.
- From the Show dropdown above the Groups grid, select All Groups.
External Secrets Operator usage
Inputs
-
clientid required: API OAuth Client ID
-
clientsecretrequired: API OAuth Client Secret
-
apiurlrequired: BeyondTrust Password Safe API URL https://example.com:443/beyondtrust/api/public/V3
-
secretpathrequired: Path of the secret to retrieve
-
managed_account_pathrequired: Path of the Managed account to retrieve
-
clientcertificateContent of the certificate (cert.pem) for use when authenticating with an OAuth client ID using a Client Certificate
-
clientcertificatekeyCertificate private key (key.pem). For use when authenticating with an OAuth client ID
-
verifycarequired: Indicates whether to verify the certificate authority on the Secrets Safe instanceWarning: false is insecure, instructs the BT provider not to verify the certificate authority.
-
retrievaltype
- Defaults to MANAGED_ACCOUNT type when not specified
- SECRET– Secrets Safe (credential, text, file).
- Secret Path - Path to the Secrets Safe secret. For example folder1/folder2.
- Secret Title – Title of the Secrets Safe secret found at the path specified above.
- MANAGED_ACCOUNT – Password Safe account associated with a system.
- Managed system - system managed by Password Safe.
- Managed account - account associated with the managed system.
-
clienttimeoutsecondsTimeout specifies a time limit for requests made by this Client. The timeout includes connection time, any redirects, and reading the response body. Defaults to 45 seconds.
-
decrypt
- parameter is optional , When set to true, the decrypted password field is returned. When set to false, the password field is omitted. This option applies only to secret retrieval type. Defaults to true if not specified.
-
apiVersion
- The recommended version is 3.1. If no version is specified, the default API version 3.0 is used.
Example usage
You can follow the below example to create an
ExternalSecretresource. Secrets can be referenced by path.
You can also use a
ClusterExternalSecretallowing you to reference secrets from all namespaces. See ClusterExternalSecret.
Example external secret
apiVersion: external-secrets.io/v1beta1
kind: ExternalSecret
metadata:
 name: beyondtrust-external-secret
spec:
 refreshInterval: 300s
 secretStoreRef:
   kind: SecretStore
   name: secretstore-beyondtrust
target:
  name: my-beyondtrust-secret # name of secret to create in k8s secrets (etcd)
  creationPolicy: Owner
data:
  - secretKey: secretKey
    remoteRef:
      key: system01/managed_account01
Example secret store
You can follow the below example to create a resource.
SecretStoreYou can also use a ClusterSecretStore to allow you to reference secrets from all namespaces. See ClusterSecretStore.
ClusterSecretStoreapiVersion: external-secrets.io/v1
kind: SecretStore
metadata:
name: secretstore-beyondtrust
spec:
provider:
beyondtrust:
auth:
certificate:
secretRef:
name: bt-certificate
key: ClientCertificate
certificateKey:
secretRef:
name: bt-certificatekey
key: ClientCertificateKey
clientSecret:
secretRef:
name: bt-secret
key: ClientSecret
clientId:
secretRef:
name: bt-id
key: ClientId
apiKey:
secretRef:
name: bt-apikey
key: ApiKey
server:
retrievalType: MANAGED_ACCOUNT
verifyCA: true
clientTimeOutSeconds: 45
apiUrl: https://example.ps-dev.beyondtrustcloud.com:443/BeyondTrust/api/public/v3/
apiVersion: "3.1"
decrypt: trueCreating a PushSecret
The PushSecret resource sends a Kubernetes Secret value into Password Safe as a credential, file, or text secret. The Kubernetes Secret value selected by data.match.secretKey becomes the secret payload; the destination location and metadata in Password Safe are described entirely through the metadata block.
remoteRef.remoteKey and remoteRef.property are not used by the BeyondTrust provider. Password Safe identifies the destination by folder_name + title from metadata. Leave them empty.
The provider builds a v3.0 / v3.1 / v3.2 request body based on the apiVersion configured on the SecretStore. Populating the metadata below is sufficient regardless of apiVersion field selection per API version is handled internally.
Push metadata fields
| Field | Type | Required for | Description |
|---|---|---|---|
secret_type | string | all | One of CREDENTIAL, FILE, TEXT. Defaults to CREDENTIAL. |
title | string | all | Display title in Password Safe. |
folder_name | string | all | Target folder (must already exist). |
description | string | optional | Free-form description. |
notes | string | optional | Free-form notes. |
username | string | CREDENTIAL | Username paired with the pushed password. |
file_name | string | FILE | File name stored in Password Safe. |
owner_type | string | API v3.0 | User or Group. |
owner_id | int | API v3.0 (when owner_type=Group) | Owner identifier required by API v3.0. |
urls | list | optional | List of { url, id, credential_id } entries to associate with the secret. |
The API user is added as the owner by default.
Credential Secret
Pushes the value of a Kubernetes Secret key as the credential's password.
Create the source Secret:
kubectl apply -f beyondtrust-credential-source.ymlapiVersion: v1
kind: Secret
metadata:
name: app-credentials
type: Opaque
stringData:
password: S3cr3tP@ssCreate the PushSecret:
kubectl apply -f beyondtrust-push-secret-credential.ymlapiVersion: external-secrets.io/v1alpha1
kind: PushSecret
metadata:
name: pushsecret-beyondtrust-credential
spec:
refreshInterval: 1h0m0s
secretStoreRefs:
- name: beyondtrust-store
kind: ClusterSecretStore
selector:
secret:
name: app-credentials
data:
- match:
secretKey: "password"
remoteRef:
remoteKey: "" # not used by BeyondTrust PushSecret
property: "" # not used by BeyondTrust PushSecret
metadata:
secret_type: CREDENTIAL
title: My Credential Secret
folder_name: folder1
username: fhernandez
description: API credentials for production
notes: "Rotate quarterly"
owner_id: 1
owner_type: User
urls: # optional
- url: https://myapp.example.com/loginText secret
Pushes the value of a Kubernetes Secret key as the secret's text content.
Create the source Secret:
kubectl apply -f beyondtrust-text-source.ymlapiVersion: v1
kind: Secret
metadata:
name: app-text
type: Opaque
stringData:
value: "my plain-text configuration value"Create the PushSecret:
kubectl apply -f beyondtrust-push-secret-text.ymlapiVersion: external-secrets.io/v1alpha1
kind: PushSecret
metadata:
name: pushsecret-beyondtrust-text
spec:
refreshInterval: 1h0m0s
secretStoreRefs:
- name: beyondtrust-store
kind: ClusterSecretStore
selector:
secret:
name: app-text
data:
- match:
secretKey: "value"
remoteRef:
remoteKey: "" # not used by BeyondTrust PushSecret
property: "" # not used by BeyondTrust PushSecret
metadata:
secret_type: TEXT
title: My Text Secret
folder_name: folder1
description: Plain-text configuration value
notes: "Configuration snippet"
owner_id: 1
owner_type: UserFile secret
Pushes the value of a Kubernetes Secret key as file content. Use file_name to set the file name stored in Password Safe.
Create the source Secret from a local file:
kubectl create secret generic app-file --from-file=content=password.txtor directly in the manifest:
apiVersion: v1
kind: Secret
metadata:
  name: app-file
type: Opaque
stringData:
  password: File content
Create the PushSecret:
kubectl apply -f beyondtrust-push-secret-file.ymlapiVersion: external-secrets.io/v1alpha1
kind: PushSecret
metadata:
name: pushsecret-beyondtrust-file
spec:
refreshInterval: 1h0m0s
secretStoreRefs:
- name: beyondtrust-store
kind: ClusterSecretStore
selector:
secret:
name: app-file
data:
- match:
secretKey: "content"
remoteRef:
remoteKey: "" # not used by BeyondTrust PushSecret
property: "" # not used by BeyondTrust PushSecret
metadata:
secret_type: FILE
title: My File Secret
folder_name: folder1
file_name: credentials.json
description: Service account file
notes: "Service account JSON"
owner_id: 1
owner_type: UserThe API user is added as the owner by default.
Required Password Safe permissions
The Application User configured on the SecretStore must belong to a Secrets Safe group with Read and Write on the destination folder.
Example Configuration Stored in K8s
$ kubectl create secret generic bt-secret --from-literal ClientSecret="<your secret>"
$ kubectl create secret generic bt-id --from-literal ClientId="<your ID>"
$ kubectl create secret generic bt-certificate --from-file=ClientCertificate=./ps_cert.pem
$ kubectl create secret generic bt-certificatekey --from-file=ClientCertificateKey=./ps_key.pem
Extracting Client Certificate Secret
Download the pfx certificate from Secrets Safe, extract the certificate, and create two Kubernetes secrets.
openssl pkcs12 -in client_certificate.pfx -nocerts -out ps_key.pem -nodes
openssl pkcs12 -in client_certificate.pfx -clcerts -nokeys -out ps_cert.pem
Copy the text from the ps_key.pem to a file.
-----BEGIN PRIVATE KEY-----
...
-----END PRIVATE KEY-----
Copy the text from the ps_cert.pem to a file.
-----BEGIN CERTIFICATE-----
...
-----END CERTIFICATE-----
Best practices
- External Secrets Operator security: Security Best Practices - External Secrets Operator (external-secrets.io)
- ESO Access Control Overview: External Secrets Operator of ESO.
Updated 2 months ago
