Google Cloud Platform | PS
Overview
Use the following configuration to set up Password Safe and Google Cloud Platform to auto-manage Google Cloud Platform user accounts.
Set up Google Cloud Platform
Create a service account key in Google Cloud Platform
To set up a project:
- Create a project or select an existing project.
- The project requires access to the Admin SDK API. Go to APIs & Services > Library > search for "Admin SDK API" > select Admin SDK API, select Enable.
- Create an IAM service account in the project. No roles are required.
- Create and download a key file for your service account. The key file must be in JSON format.
- If an error displays while trying to create keys, you may need to enable key creation in your project or org.
Create a user in Cloud Identity
Create a user to be the functional account user. The user must be assigned a role with the required privileges.
- Go to Directory > Users and select Add new user.
- Enter the required information. Phone number or secondary email are not required.
Create a role
- In your new user page, find Admin roles and privileges and select the dropdown menu.
- Select the pencil/edit icon, and then select Create Custom Role.
- Select Create new role.
- Assign the following required role permissions.
Admin console privileges:
-
Organizational Units
- Read
-
Users
- Update (all)
-
Groups
-
Security
- User security management
Admin API Privileges: (set automatically based on Admin Console Privileges above)
-
User security management
-
Groups (all)
-
Organizational Units
- Read
-
Users
- Update (all)
- Save role.
- Select Assign members.
- Find your user using the search bar and select Assign Role.
- Assign Domain-wide Delegation to your Google Cloud Platform service account.
- The client ID is the client ID of your service account.
- Add the following scopes:
Use the email from your new user account as the Impersonated User Email for your functional account.
Create a managed system
For complete step-by-step instructions on creating a managed system, see Add assets to Password Safe.
-
Select Managed Systems from the main menu.
-
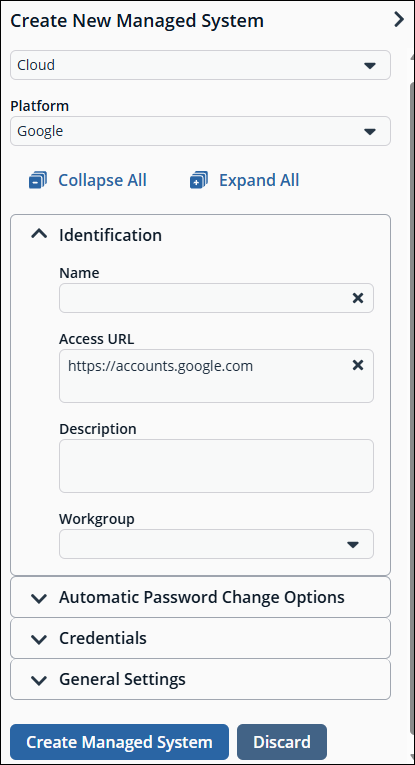
Select Create New Managed System.
-
Select Cloud as the entity type.
-
Select Google as the platform.
-
Enter other properties for the managed system (name, description, workgroup, etc.)
-
Create a functional account. The Impersonated User Email is the Primary Email address of the functional account user created in Cloud Identity.
-
Upload the JSON file that you downloaded from Google Cloud.
-
Back on the Create New Managed System panel, select the functional account.
-
Select Create Managed System.
Test the functional account
- Select the menu for the new managed system, and then select Advanced Details.
- Select Functional Account.
- Select Test Functional Account.
Create a managed account
- Select the menu for the new managed system, and then select Create New Managed Account.
- Add a name. The name must be the Primary Email Address of the Google Cloud account to be managed.
- There are no other required fields for the managed account.
- Go to the Managed Accounts page, and select the newly created account.
- Select Change Password from the menu.
Now, the password is auto-managed.
Create a Smart Rule
-
In BeyondInsight Password Safe, navigate to Smart Rules.
-
From the Smart Rule filter, select Managed Accounts.
-
Click Create Smart Rule.
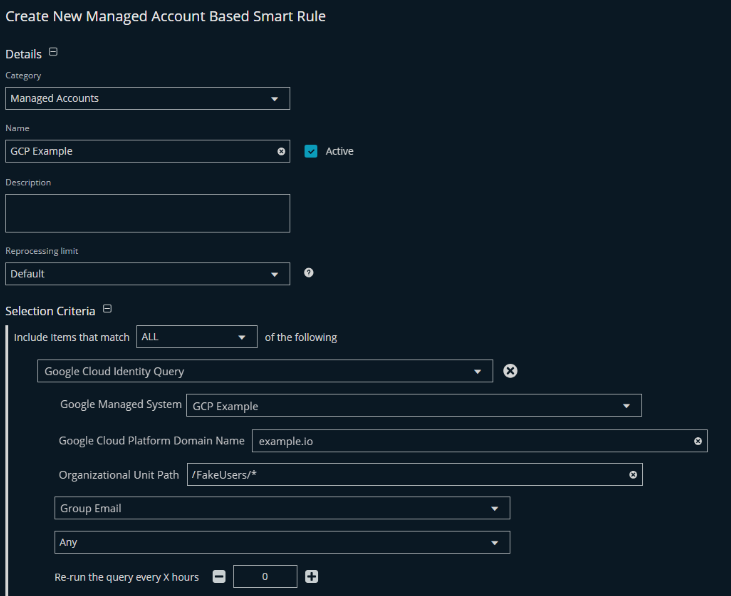
The Create New Managed Account Based Smart Rule page displays. -
For Category, select Managed Accounts.
-
Name the Smart Rule appropriately.
-
Use the Selection Criteria dropdown and choose Google Cloud Identity Query.
-
Fill in the fields using the appropriate details:
• Google Managed System: GCP. Example (Use the Managed System name from the above section)
• Google Cloud Platform Domain Name: example.io (GCP Domain Name)
• Organizational Unit Path: /FakeUsers/_ (Path to the Organizational Unit (OU))A wildcard (_) can be used after a parent OU to indicate all child OU's should be included.
-
Group Email or User Primary Email can be selected.
• Use the drop-down to select Any, equals (=), starts with, or contains to narrow the scope -
Set the Actions to:
• Manage Account Settings
• Show managed account as Smart Group -
Click Create Smart Rule.
-
Click View Results.
-
A list of users from GCP appears.
• If the expected users are not listed, or if some users should be filtered out, return to the Smart Rule by clicking Edit Smart Group and modify the selection criteria.
• After each edit, click Save Changes then View Results to check the correct users are pulled in from GCP.
Example Smart Rule uses
- Selecting users from a specific group email
• If a group of users needs to be brought in, use the selection criteria Group Email and change the filter to equals (=). Enter the exact name of the group, the one displayed within GCP, into the field and save the changes.
• For example, [email protected] - Using a specific Organizational Unit (OU)
• If there are multiple subfolders within an OU, it might be necessary to narrow down which one to use. Within the Organization Unit Path field, enter the exact path to the subfolder. This ensures only those users will be pulled in from GCP.
• For example, only users within the child OU of Accounting should be pulled in. The field should have /FakeUsers/Accounting as the criteria. - Using key words in email addresses
• Emails with similar names, such as support or admin, can be brought in by using the User Primary Email option. Select starts with or contains then enter the word or characters that should be found.
• For example, if there are multiple support emails like desktop-support, product-support and hr-support, the term support can be used to bring in all emails with that term.
Updated 10 days ago
