Smart Rules | PS Pathfinder
What are Smart Rules?
A Smart Rule is a query that you can use to organize assets into Smart Groups and manage Password Safe managed accounts.
When you create a smart rule, you are essentially creating "if-then" logic.
The IF portion is the criteria you use to select assets in the Selection Criteria section. This criterion can be based on any collected data from scans or event processing.
The Then is the action you wish to take. This is in the Actions part of the smart rule form and can have multiple actions.
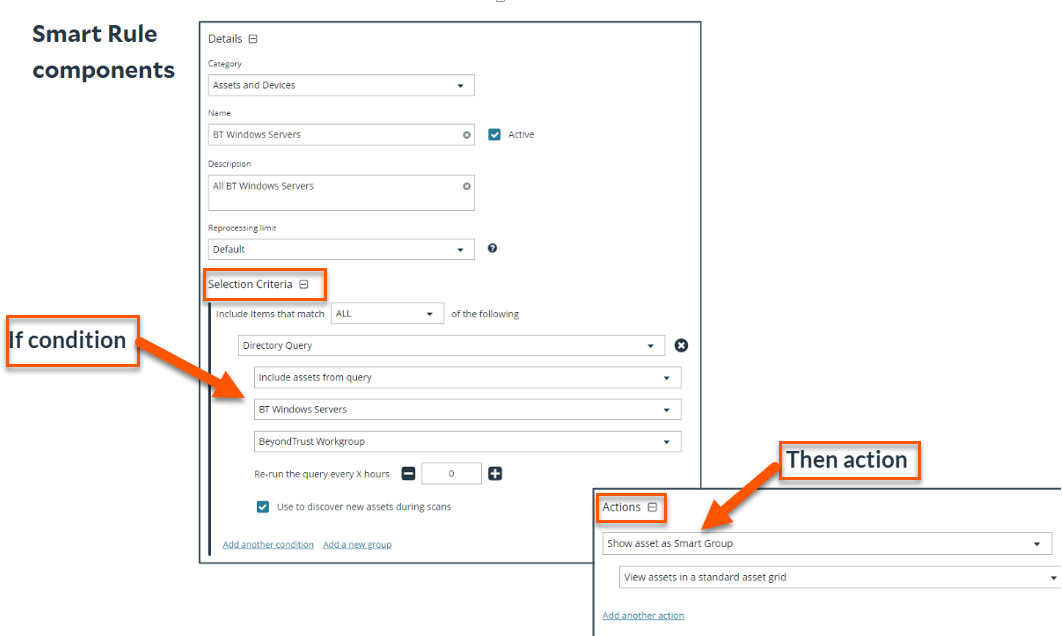
The View Results button allows you to preview the results of your smart rule, however you must create your smart rule before the results display by clicking Create Smart Rule.
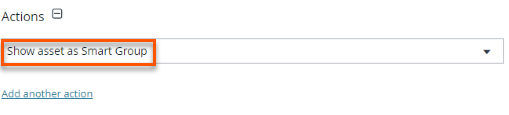
You must include the Show as a Smart Group action for the preview of results to take effect.
For this reason, we recommend creating a smart rule without adding any additional actions beyond Show as a Smart Group.
Why use Smart Rules for asset discovery and onboarding
Smart Rules play a vital role in automating and optimizing asset management workflows. Use them to:
- Group assets and accounts into Smart Groups- Allows you to simplify classification and policy enforcement.
- Streamline onboarding workflows- Allows you to automate asset handling based on predefined logic.
- Apply rules across asset, account, and managed system types- Allows you to achieve broad coverage and consistency.
- Define selection criteria and actions using IF/THEN logic- Allows you to create dynamic, responsive rules and is the core of how Smart Rules operate; that is, evaluating conditions in real time and executing actions based on defined criteria.
- Target specific assets with scheduled discovery scans- Ensures you get timely updates and visibility.
- Reference Smart Groups within other Smart Rules- Allows you to build layered, modular logic.
- Enable role-based assignment - Allows you to enforce granular access control and improve security posture.
Smart Rules types
You can use a Smart Rule to organize assets based on the filters selected. There are three types of smart rules:
| Smart Rules Type | Description |
|---|---|
| Asset-based | This rule target assets that are stored within Password Safe database or through a Directory Query to onboard them for Password Safe management. |
| Managed Account | This rule manages accounts in Password Safe by giving the ability to change passwords on accounts and corresponding settings, functional accounts, and password policies. |
| Managed System | This rule targets current managed systems in Password Safe to edit settings or to group them using the Smart Rule action Show managed system as Smart Group. |
Some common uses for Smart Rules are:
- Search for assets to onboard to Password Safe
- Discover Active Directory accounts and manage them in Password Safe
- Link discovered Active Directory accounts to manage them
Tip
Think of a Smart Rule as the logic engine which asks the question "How to select items"?
What are Smart Groups?
Smart Groups are a collection of managed assets, managed systems, or assets defined by a Smart Rule. These Smart Groups are automatically associated with:
- Read permissions for all groups that the group creator is a member of
- Full Control permissions for all groups that the user is a member of, and where the user has Asset Management and Smart Rule Management permissions
Tip
Think of a Smart Group as the resulting buckets that hold the filtered items created by a Smart Rule.
How are Smart Rules useful?
When you use a Smart Rule to register assets as Smart Groups, you can run Discovery Scans, and monitor and view assets. Smart rules can:
- Save time: Automating actions based on vulnerability findings or asset changes saves time for IT and security teams.
- Ensure consistency: Actions are taken consistently, reducing the risk of human error or missed steps in critical processes.
- Reduce risk: By automating responses to vulnerabilities and security issues, Smart Rules help reduce the time window in which systems remain vulnerable.
- Enhance compliance: Smart Rules help ensure that remediation efforts align with compliance requirements, automating compliance workflows and reporting.
- Improve your security posture: Automating security processes leads to quicker identification and remediation of risks, improving overall security.
- Administration menu: Access Pathfinder administration pages if you are assigned as an administrator. You can also access all permissioned areas within Password Safe from the menu.
- Filters: Select a filter to refine your results.
Filter types
Smart Rule type filter: Filter by Asset, Managed Account, or Managed System.
Filter by: Filter by Locked, Status, Category, Name, Description, Reprocessing Limit, Last Updated By, Last Updated, or Action.
- Create Smart Rule: Click to create a Smart Rule.
- Smart Rules grid: Displays information based on filter selections.
- Grid display preferences: Set display preferences on the Smart Rules grid using the following options represented by icons above the grid:
- Click
to refresh the list,
to download the list to a .csv file,
to select which columns to display on the page,
to configure your page display, and
to expand the grid.
- Click
- Smart Rules list columns: Not all columns display in the image above.
Column Names
-
Category
-
Name
-
Description
-
Reprocessing Limit
-
Last Updated By
-
Last Updated
-
Processed Date
-
Processing Status
-
Last Attempt
-
Average Time (min)
-
Successful Attempts
-
Failed Attempts
-
- List navigation options: Navigate in the Smart Rules list.
Critical Importance of Smart Rules
- The BeyondInsight user must be a member of the Administrators group or be assigned the Full Control permission on the Asset Management and the applicable Smart Rule Management feature(s) to be able to create and edit Smart Rules.
- Users assigned Read Only permissions on these features may only view the details of Smart Rules.
- Smart Rules update results automatically, ensuring assets match the criteria and are current.
- You can create address groups or Active Directory queries from the Configuration page to use as Smart Rule filters.
- You can use more than one filter to refine or extend the scope of assets in a Smart Rule. Filters can be joined with and (match ALL criteria) or or (match ANY criteria) conditions. If you select to match ALL, every indented filter must be set to True for an asset to be included. If you select to match ANY, only one of the indented filter items must be set to True for an asset to be included. The screen capture shows a filter example that includes all assets in the EMEA domain that are either servers or workstations.
Important
Virtual machine asset onboarding with predefined Smart Rules has been deprecated as of Password Safe 24.1. However, you can still create custom Smart Rules to onboard virtual machine assets.
For upgrades to Password Safe 24.1 and later releases:
- the Virtualized Devices category for Smart Rules still displays but any Smart Rules based on this category are marked as inactive.
- Child Smart Rule filters that use any of the following built-in rules are removed:
- Microsoft Hyper-V
- Parallels
- Recent Virtual Servers not in Password Safe
- Virtual Servers
- Virtual Workstations
- VMware vSphere
- Xen
Smart Rule processing
A Smart Rule processes and updates information in Smart Groups when certain actions occur, such as the following:
- The Smart Rule is created, or edited and saved.
- A timer expires.
- You manually process the rule.
The Process action on the Smart Rules page does not apply to managed account and managed system Quick Group Smart Rules, because these only run once (upon creation) and cannot be triggered to run again.
- A Smart Rule with Smart Rule children triggers the children to run before the parent completes.
- Managed account Smart Rules with selection criteria Dedicated Account process when a change to a mapped group is detected. This can occur in the following scenarios:
- A new user logs on.
- The group refreshes in Active Directory by an administrator viewing or editing the group in the Configuration > Role Based Access > User Management page.
The Directory Attribute Match Smart Rule filter is not available in Pathfinder. If a Smart Rule exists with this filter before upgrading to Pathfinder, empty drop downs display for that filter post-upgrade.
To check if a Smart Rule contains this filter:
- At the top left of the page, click
> Password Safe > Smart Rules.
The Smart Rulespage displays. You can also access the Smart Rules grid by navigating to Configuration > General > Smart Rules.- Locate the Smart Rule in the grid.
- Click
> View Details.
The Smart Rule's details panel displays with the rule's selection criteria and actions.- Look under Selection Criteria for the Directory Attribute Match filter.
We recommend removing this filter from any existing Smart Rules prior to upgrading to Pathfinder.
Available Smart Rule filters for assets
| Filter | Description |
|---|---|
| Address Group | Create a group of IP addresses. |
| Asset Fields | Group the Smart Rule by asset fields, such as, Asset Name, Domain or DNS, Risk, and Kind. You can include more than one asset field filter in the Smart Rule to refine the results. |
| Assigned Attributes | Create a filter based on an attribute. If the attribute is unassigned on a particular asset, you can choose to include or exclude the asset from the rule. |
| Child Smart Rule | You can reuse a Smart Rule to save time when creating new Smart Rules. This is especially useful if the Smart Rule is a complicated set of filters. Reusing a Smart Rule further refines the assets that will be a part of the Smart Rule. |
| Cloud Assets | Filter assets on the cloud connector. |
| Directory Query | Create an Active Directory or an LDAP query to include or exclude assets in the selected domain. |
| Installed Software | Filter on any combination of installed software. |
| Operating System | Filter on any combination of OS. Operating systems included in the list are those detected in your network. Assets with no OS detected, can be included or excluded from the rule. |
| Processes | Filter on any combination of processes. |
| Services | Filter by any combination of services. |
| Software Version | Filter by software version. The software that you can filter on is determined by the software that is discovered during the scan. |
| User Account Attribute | Filters user accounts by SID or privilege. You can filter on both. If either value is not selected then it will be ignored. Using this filter you can determine if any users have administrator privileges that might no longer be required. You can create a Smart Rule using this filter and set the email alert action to notify you when a user account with admin privileges is detected. |
| Windows Events | Filter by Windows events that are available in the Windows Event Viewer. For example, Application, Security, or System. |
| Workgroup | Filter by workgroup. |
Predefined Smart Group categories
| Category | Description |
|---|---|
| Agents and Scanners | Detects assets where scanners are deployed. |
| Assets and Devices | Includes default Smart Groups for all assets and all assets labeled as workstations. |
| Intelligent Alerts | Includes Smart Groups that detect assets added since the previous day, and mobile assets with critical vulnerabilities. Intelligent Alerts are inactive by default. |
| Servers | Includes Smart Groups that detect mail server, web server, database server, domain controller, and SCADA assets. Only the Web Servers Smart Group is marked as active. |
| Virtualized Devices | Includes Smart Groups for virtual environments, including Microsoft Hyper-V and Parallels. Assets detected as virtual environments belong to these Smart Groups. This default category also includes two Smart Groups: Virtual Servers and Virtual Workstations. Assets that are servers or workstations might not be detected, and as a result, not be included in the Smart Group. For example, the asset might be a router or unknown, resulting in exclusion from the Smart Group. |
Create an asset-based Smart Rule
- At the top left of the page, click
> Password Safe > Smart Rules.
The Smart Rulespage displays. You can also access the Smart Rules grid by navigating to Configuration > General > Smart Rules. - Select Asset in the Smart Rule type filter dropdown.
- Click Create Smart Rule.
The Create New Asset Based Smart Rule page displays. - Select a Category from the dropdown.
- Enter a name and description.
- Uncheck the Active setting, if required.
By default, the Smart Rule is set to Active, so it is always available for processing. Disable the active setting if you do not want to process the rule.
- In the Selection Criteria section, select the inclusion filter (ANY or ALL).
- From the dropdown, select one of the available conditions and complete the associated fields.
- Click Add a new group to further refine the condition.
- Click Add another condition to add more conditions to your Smart Rule.
- In the Actions section, select the action you want to happen when the Smart Rule processes:
| Action | Description |
|---|---|
| Mark each asset for deletion | Select to create a Smart Group that contains assets to be marked for deletion. |
| Mark each asset inactive | Assets detected as inactive are no longer be displayed on the Assets page or in reports. |
| Send an email Alert | Select and enter the email addresses for notification when the rule criteria is matched. Emails are only sent if the list of assets that match the rule is changed from the last time the rule was processed. |
| Set attributes on each asset | Select the attribute type from the list, and then select the attribute. |
| Set Scanner Properties | Select one or more scanners to lock to the Smart Group. |
| Set attributes on each asset | Select attributes for each asset. |
| Show asset as Smart Group | When selected, the rule is displayed in the Smart Groups pane as a Smart Group. You can select the Smart Group to filter the list of assets in the Smart Groups pane. You can also select the default view to display on the Assets page when the Smart Group is selected. Smart Groups are also used for running scans and registering for patch updates. |
- Click Add another action to add more actions to your Smart Rule.
- Click Create Smart Rule.
The Smart Rule saves. - Click View Results to view the Smart Rule contents.
Important
Because the Smart Rule must process to display the results we recommend viewing the results using only the Show asset as Smart Group action before adding additional actions that may make changes to accounts and assets in your network.
Once you confirm the rule contains the correct items, you can add additional actions to the Smart Rule.
The Assets page displays with the Smart Rule's asset, domain, operating system, description, asset type, solution, and last-updated date.
A banner displays if the rule is actively processing.
Warning
It is not recommended to mark assets as inactive if a Managed System is tied to them, as that may cause unexpected behavior.
When an asset is marked as inactive, it is removed from viewing in the asset grids, but it still exists in the database. If an associated Managed System is tied to this Asset, the Managed System information is still visible.
View a Smart Rule's details
- At the top left of the page, click
> Password Safe > Smart Rules.
The Smart Rulespage displays. You can also access the Smart Rules grid by navigating to Configuration > General > Smart Rules. - Locate the rule you want to view from the Smart Rules list.
- Click
> View Details.
The Smart Rule's details panel displays with the rule's selection criteria and actions.
Edit a Smart Rule
- At the top left of the page, click
> Password Safe > Smart Rules.
The Smart Rulespage displays. You can also access the Smart Rules grid by navigating to Configuration > General > Smart Rules. - Locate the rule you want to edit from the Smart Rules list.
- Click
> Edit Smart Rule.
The Create New Asset Based Smart Rule page displays with the existing selection criteria. - Modify, add, or remove conditions and/or actions. See Create an asset-based Smart Rule, above, for more information.
- Click Save Changes.
The Smart Rule saves.
Deactivate a Smart Rule
- At the top left of the page, click
> Password Safe > Smart Rules.
The Smart Rulespage displays. You can also access the Smart Rules grid by navigating to Configuration > General > Smart Rules. - Locate the rule you want to deactivate from the Smart Rules list.
- Click
> Deactivate Smart Rule.
- If the Smart Rule is not included in another (active) Smart Rule's filter or action, the rule deactivates.
- If the Smart Rule is included in another (active) Smart Rule's filter or action does not deactivate, an error message displays.
Clone a Smart Rule
- At the top left of the page, click
> Password Safe > Smart Rules.
The Smart Rulespage displays. You can also access the Smart Rules grid by navigating to Configuration > General > Smart Rules. - Locate the rule you want to clone from the Smart Rules list.
- Click
> Clone Smart Rule.
The Create New Asset Based Smart Rule page displays with the existing selection criteria. - Change the name, if required. By default, cloned Smart Rules append the existing rule name with _1 (for example, SmartRule_1).
- Modify, add, and/or remove conditions and actions. See Create an asset-based Smart Rule, above, for more information.
- Click Save Changes.
The Smart Rule saves.
Process a Smart Rule
- At the top left of the page, click
> Password Safe > Smart Rules.
The Smart Rulespage displays. You can also access the Smart Rules grid by navigating to Configuration > General > Smart Rules. - Locate the rule you want to process from the Smart Rules list.
- Click
> Process.
A success message displays, and the rule processes. - Modify, add, or remove conditions and/or actions. See Create an asset-based Smart Rule, above, for more information.
- Click Save Changes.
The Smart Rule saves.
View a Smart Rule's results
Important
Because the Smart Rule must process to display the contents in the grid, we recommend viewing the results using only the Show as Smart Group action and before adding additional actions that may make changes to accounts and assets in your network.
Once you confirm the rule contains the correct items, you can add additional actions to the Smart Rule.
- At the top left of the page, click
> Password Safe > Smart Rules.
The Smart Rulespage displays. You can also access the Smart Rules grid by navigating to Configuration > General > Smart Rules. - Locate the rule you want to view from the Smart Rules list.
- Click
> View Results.
The Assets page displays with the Smart Rule's asset, domain, operating system, description, asset type, solution, and last-updated date.
A banner displays if the rule is actively processing.
Audit Smart Rules
- At the top left of the page, click
> Password Safe > Configuration.
The Configuration page displays. - Under General select User Audits.
The User Audits page displays. - Select a date range from the Create Date filter.
By default, the date range is set to Last 30 days. - In the Filter by dropdown, select Section.
A new Section filter displays. - In the Section filter, select Smart Rule.
The list automatically filters to only Smart Rules with an action within the date range set. - Locate a rule you want to audit.
- Click
to the right of the Smart Rule to view details about the associated action.
- If a Smart Rule is added, the Add Details pane displays with all added information.
- If a Smart Rule is edited, the Edit Details pane displays with all edited information.
Delete a Smart Rule
Warning
Deleting a Smart Rule is an unrecoverable operation.
- At the top left of the page, click
> Password Safe > Smart Rules.
The Smart Rulespage displays. You can also access the Smart Rules grid by navigating to Configuration > General > Smart Rules. - Locate the rule you want to delete.
- Click
> Delete.
A confirmation message displays. - Click Delete.
The rule is immediately deleted.
Configure Smart Rule options
- At the top left of the page, click
> Password Safe > Configuration.
The Configuration page displays. - Under General select Smart Rule Options.
The Smart Rule Options page displays.
From here, you can configure multi-worker node usage, the number of Smart Rule threads per type, and the failure thresholds using the Smart Rule Omni Worker Options.
Multi-Node Processing is turned off by default. Enable this to allow assignment of Smart Rules to process specific worker nodes. Choosing a worker node for a Smart Rule to process is accomplished by setting the Target Processing to Workgroup action on the Smart Rule in question. When enabled, this allows multiple Omni Workers to process Smart Rules.
Important
For the following options to be available, you must enable Multi-Node Processing. An all Omni Worker restart is required to enable this processing.
- Asset Threads: (Default 5) Choose a number of threads to use for processing asset based Smart Rules.
- Managed Account Threads: (Default 5) Choose a number of threads to use for processing managed account based Smart Rules.
- Managed System Threads: (Default 5) Choose a number of threads to use for processing managed system based Smart Rules.
- Policy User Threads: (Default 5) Choose a number of threads to use for processing policy based Smart Rules.
- Force Re-queued if stale: (Default 12) Choose a number of hours after which an unprocessed Smart Rule is considered stale and re-queued for processing.
- Failure cool off threshold: (Default 5) Choose a number of times to let a Smart Rule process fail after which a cool-off period is observed.
- Failure cool off skip time: (Default 60) Choose a number of minutes to wait before trying to process the Smart Rule again after reaching the failure cool off threshold.
Click Update Smart Rule Omni Worker Options when you have finished setting the options.
Additional multi-node processing information
The Multi-Node Processing feature was added to allow more granular control over the performance of smart rule processing.
Impact of multi-node processing
Multi-node processing is a combination of features:
- Controls the number of nodes and threads per node that are used for processing different types of Smart Rules.
- Restricts the processing of certain Smart Rules to specific nodes if required. This might come into play if the Smart Rule is built on a directory query that only one worker node has access to. Trying to process a Smart Rule like this across all Omni Workers would result in occasional failures if the node doing the processing lacks the necessary access to run the directory query.
- Controls certain behaviors in failure scenarios. The defaults should be sufficient, but are adjustable to give more control to support assisting customers in this area.
- When multi-node processing is turned off, then Smart Rule processing occurs on a single node using N threads, where N is configurable per Smart Rule TYPE in the configuration user interface (Asset Threads, Managed Account Threads, Managed System Threads, and Policy User Threads). While better than the historical single-threaded model, this can still be a lot of work for the Omni Worker and might cause poor performance in other areas (password rotations, event forwarding, etc.).
- When multi-node processing is turned on, then Smart Rule processing is shared across ALL worker nodes, using N threads per worker node, where N is configurable per Smart Rule TYPE in the configuration user interface (Asset Threads, Managed Account Threads, Managed System Threads, and Policy User Threads).
- The default setting for each Smart Rule type is 5 threads. The valid range is between 1 and 20 threads.
- Changes to the multi-node processing settings, as well as changes to thread counts and changes to failure scenario handling, can be made anytime but do not take effect until all Omni Worker services are restarted. This restart is a manual step. There is no risk to enabling or disabling these settings during production times, but you will not see any change in processing until Omni Worker services are restarted.
Overall best practices
The Multi-Node Processing setting is turned off by default. Turning it on is beneficial if multiple worker nodes or Omni Workers are available, and if the existing Omni Workers are running at full capacity. If turning this feature on doesn’t help Omni Worker performance, support should be contacted.
The lower the thread count, the less benefit you may get from turning this setting on. However, setting the thread count too high can also result in problems if your Omni Worker or worker nodes are not powerful enough to handle the load. Start with the default and adjust up or down as necessary.
Reason for multi-node processing
Before this feature was added, Smart Rule processing was only supported in a single-threaded model running in RemManagerService. Moving it to Omni Worker allows it to be multi-threaded on a single node. Adding the multi-node option allows Smart Rule processing to be scaled out even further.
Multi-node processing environment
This feature is used in an environment with multiple worker nodes or Omni Workers, where an Omni Worker is taxed by Smart Rule processing.
Assign a rule to a node
If multi-node processing is turned on and a Smart Rule contains a specific criteria or action that only works if executed on a particular worker node, then that Smart Rule is expected to get an action of Targeted to Workgroup set. The Omni Worker or worker node that executes this Smart Rule should be manually set to the same work group under Worker Nodes. Some examples of criteria or actions that only work on a particular node are directory queries that run on a specific network, or database account onboarding that runs on a specific network. Any network-specific Smart Rules are likely candidates to target a specific worker node.
Troubleshooting methods
-
Smart Rule Grid
Three optional columns have been added to the Smart Rule grid to give some extra visibility into Smart Rule processing: Processed Date (checks to see if any rules were not processed recently), Successful Attempts, and Failed Attempts. Other columns that are helpful are Reprocessing Limit, Average Time, Last Attempt, and Processing Status.
-
Dynamic Dashboard
Troubleshooting also includes checking the Omni Worker Dynamic dashboard in the user interface (administrators only). There you can see the Omni Worker agents, queued messages, messages sent to dead-letter (undeliverable letters, reached the limit of processing attempts), and messages actively being processed.
-
Health Dashboard
This dashboard shows stats regarding issues on worker nodes, slowest Smart Rules, failed Smart Rules, and errors in the system.
-
Logfiles
There is one log file per Omni Worker. Because this can be hard to read across environments, we have added the System Event Viewer and System Event Settings features. Enabling System Event Database Recording logs error or warning messages from across the system into the database so they can be viewed and searched using the System Event Viewer. Purging these events from the database is configurable. The default is 5 days.
Issues with feature
The feature has been developed to avoid deadlocks, race conditions, memory leaks, etc., as part of our development and QA process. However, it is possible that some issues still exist. Contact BeyondTrust Support with any issues that arise for resolution.
Changed behaviors in the database
On its own, multi-node processing does not make changes in the database. Any database changes to schemas, tables, views, procedures, etc., that are required for this and other features are made during an upgrade, whether this feature is enabled or not. If the Enable System Event Database Recording setting is turned on, then database entries are made for warnings or errors in the system. Purging is enabled for this data, and the time frame is configurable.
Logged nodes
Each Omni Worker has its own logs. Logging takes place across multiple nodes when this setting is turned on. The System Event Viewer shows any issues that are occurring.
Failover processing
Existing support for worker node or Omni Worker service failover also encompasses the Smart Rule processing function. In the event of a failover situation, the secondary node picks up where the primary node leaves off.
View and select Smart Rules processing statistics
The Smart Rules grid displays some processing statistics by default. Additional Smart Rules processing statistics, such as Processed Date, Successful Attempts, and Failed Attempts are available and can be displayed in the Smart Rules grid.
To add this information to the grid:
-
At the top left of the page, click
> Password Safe > Smart Rules.
The Smart Rulespage displays. You can also access the Smart Rules grid by navigating to Configuration > General > Smart Rules. -
Click
above the grid. -
Click the desired column to add that information to the grid.
- Check marks indicate columns currently displayed.
- You can remove a displayed column by clicking the column name in the Column chooser list.
- If there are more columns displayed than can fit in the width of the screen, a scroll bar appears at the bottom of the grid. It may be necessary to scroll sideways to view any additional columns.
Updated 26 days ago
