Integrations | U-Series
The Integrations page centralizes the settings that allow the U‑Series Appliance to communicate securely with other systems, services, and peer appliances. These integration features support health event forwarding, email delivery, appliance API keys, log export workflows, and date and time configuration. Each integration capability ensures that the appliance can participate effectively in a larger BeyondInsight deployment or within third‑party monitoring and automation environments.
From this page, you can manage the following:
- Appliance API Keys, which authenticate communication between U‑Series Appliances in high‑availability configurations.
- Remote appliance registration, which establishes trust and enables appliances to exchange status and configuration data.
- Health event forwarding, which transmits appliance-generated alerts to BeyondInsight for centralized monitoring and correlation.
- Email (SMTP) settings, which ensure the appliance and BeyondInsight can send notifications reliably, even during maintenance or database outages.
- Log file export, which delivers appliance log data to external locations or third‑party tools on a defined schedule.
- Date and Time configuration, allows you to display the current time and date of the appliance and configure settings.
These integration capabilities help administrators maintain secure communication channels, consolidate system health data, automate notifications, and ensure operational visibility across the environment.
This topic contains the following five sectioins:
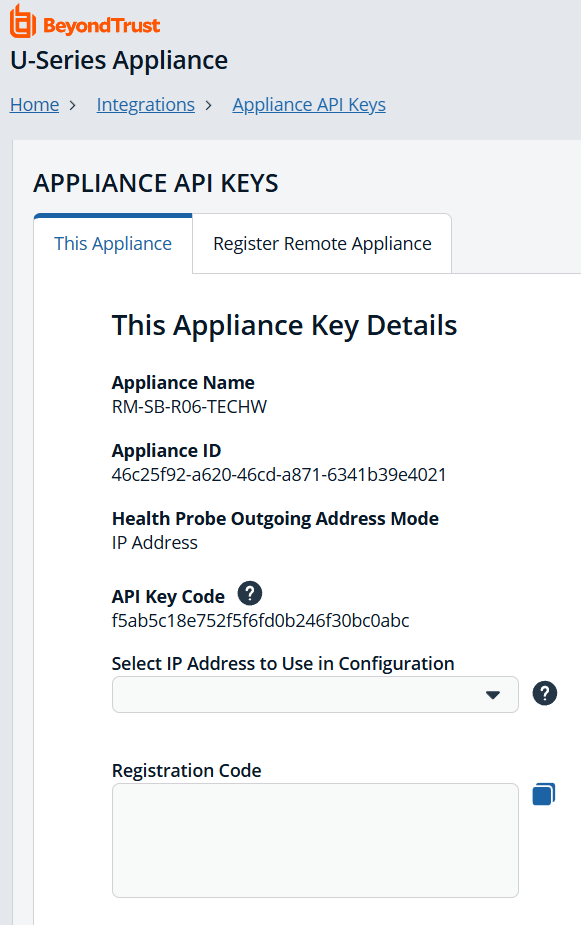
Manage the U-Series Appliance API key
The U-Series Appliance API manages the communication between U-Series Appliances when high availability is used in your environment. The API key enables U-Series Appliances to communicate with each other.
The API key is automatically generated and is available to copy from the Appliance API Keys page.
Important informationFor security reasons, we recommend that you regenerate the key regularly. Remote appliances using the previous registration code to communicate with this appliance are denied access until the new registration code is copied to that appliance and registered again.
To view this appliance's key details:
-
Using a web browser, enter <IP>/appliance in the address field.
-
Enter the credentials and click Log In.
-
From the left menu, click
 .
.
The Integrations page displays. -
Click the Appliance API Keys card.
-
From This Appliance tab, you can view the API key details for this appliance in the This Appliance Key Details section.
-
To view the registration code:
- Select the IP address the remote appliance uses to communicate with this appliance from the Select IP Address to Use in Configuration list.
- The registration code displays in the Registration Code box. Click the Copy button next to the box to copy the code.
-
To create a new API key:
-
Under Regeneration And Settings, click Regenerate Registration Code.
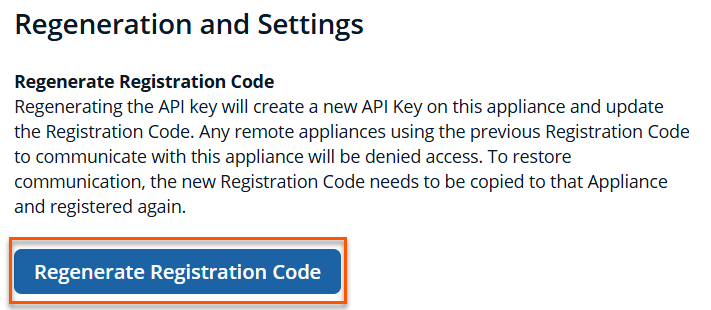
-
Follow step 3 to view and copy the new registration code.
-
Register a remote appliance
Communication between appliances requires both appliances to be registered with each other.
To register a remote appliance:
- Open the U-Series Appliance console on the remote appliance first.
- From the left menu, click .
The Integrations page displays. - Click the Appliance API Keys card.
- Click the Register Remote Appliance tab.
- Add the registration code from the appliance that you want to link to this appliance into the Registration Code from Remote Appliance box.
- Optionally, enter a short Description for the appliance being registered.
- Click Register Remote Appliance.
- Click the This Appliance tab.
- Select an IP from the Select IP Address to Use in Configuration dropdown.
- Click the Copy button to the right of the Registration Code box.
- Go back to the first appliance's console, and go to the Appliance API Keys page again.
- Click the Register Remote Appliance tab.
- Paste the registration code from the remote appliance.
- Optionally, enter a short Description for the appliance being registered.
- Click Register Remote Appliance.
The registered remote appliance now appears in the Registered Remote Appliance grid at the bottom of the page. To refresh that list at any time, click the Refresh button at the top right of the table.
To view more of the table, to the right of the Appliance API Keys section, click the down arrow to collapse that section.
Set the background network check interval
In the Registered Remote Appliance grid, you might see the word Communicating under the Outgoing Status and Incoming Status headings. You can adjust how often the connected appliances check with each other to make sure they are still connected, as follows:
- From the left menu, click .
The Integrations page displays. - Click the Appliance API Keys card.
- On the This Appliance tab, under the Regeneration And Settings section, enter the number of minutes for the Background Network Check Interval.
- Click Save Settings.
Export log files
Log file exporting facilitates making appliance log files available to third-party tools for analysis. The U-Series Appliance can be configured to generate a set of log files and save them to an external location, on a specified schedule.
By default, the Export Log File to Remote Location option is on. When it is turned off, none of the setup options are visible.
The file cannot be saved on the U-Series Appliance.
To set up log file export and authentication:
- From the left menu, click .
The Integrations page displays. - Click the Log File Export card.
- Slide the Export Log File to Remote Location toggle to the right to enable it.
- Enter a Log File Export Location.
- If the log file export location requires authentication, check the box.
- Enter the Log File Export Location Username.
- (Optional). Enter a Log File Export Location Password.
- (Optional). Enter the Domain.
- To verify the authentication, click Test Credentials.
- Expand the Log Export Options section.
- Click All Available Logs to export everything.
- Click Select Logs to Export to export individually checked logs.
- Expand the Log File Export Schedule section.
- If using the default Recurring option:
- Enter the Start Date and Start Time, and then select the Frequency from the dropdown list.
- If required, toggle the Specify end date option to set an end date and time.
- Select additional options based on the frequency of the export.
- Select Immediate for an immediate export. Click the Export Log Files Now button.
- Select One Time for a single export. Set the Start Date and Start Time.
- Click Save Log File Export Settings.
- If using the default Recurring option:
At any time after the settings are initially configured, you can click Export Log Files Now to save the log file to the share.
Set up health event forwarding
You can send alerts from the U-Series Appliance to your BeyondInsight management console for further analysis.
Health events are about the hardware or software services that are generated by your appliance. If you require these events to be integrated with third-party monitoring products, you can forward these events to BeyondInsight.
BeyondInsight has a wide variety of third-party connectors that allow you to integrate your monitoring needs (for example, SNMP, SIEM tools, Microsoft Operations Manager, etc.).
In addition to choosing an option on this page, there must be a Syslog Event Forwarder connector configured from the BeyondInsight Management console so that BeyondInsight can import health events.
To set up health event forwarding:
- From the left menu, click .
The Integrations page displays. - Click the Health Event Forwarding card.
- Select an option:
- None: No events are forwarded.
- Local: Forward events to the local BeyondInsight installation.
- Remote: Forward events to a remote BeyondInsight server, specified by IP Address or DNS Name.
- If using the Remote option, two additional fields appear. You must export a certificate from the remote server and import the certificate to the local U-Series Appliance.
- If the remote server is another U-Series Appliance, log in to that U-Series Appliance's website.
- From the left sidebar, under Security and Compliance, click Certificate Management.
- Under Export Certificate, enter a password and confirm it, and then click Export and Download Certificate.
- Import the certificate on the local U-Series Appliance, as follows:
- From the left sidebar, under Security and Compliance, click Certificate Management.
- Upload the certificate by dragging the file into the drag and drop box, and entering the password created in the previous step.
- Return to the Health Event Forwarding page. Under the Remote option, enter a Server Address, and select a Certificate from the list.
- If the remote server is a software install of BeyondInsight, use the BeyondInsight Configuration Tool to create and export the certificate.
- Click Save Health Event Forwarding Settings.
You must also create a connector from the BeyondInsight management console, as follows:
- Sign in to BeyondInsight.
- Open a browser and enter the URL for your Password Safe instance: https://<hostname>/WebConsole/index.html.
- Enter your username and password.
- From the left menu, click
 .
.
The Configuration page displays. - Under General, select Connectors.
- Click Create New Connector +.
- Enter a Connector Name.
- Select Syslog Event Forwarder from the Connector Type dropdown.
- Click Create Connector.
- Enter the details for the U-Series Appliance, including IP address, protocol, and facility.
- Expand the Event Filters section.
- Slide the BeyondInsight Application Audit and Password Safe toggles to the right the to enable it.
- By default, all severity levels are included. You may select an alternate level if needed.
- Click Create Connector.
For more information on importing a certificate to the U-Series Appliance, see Upload SSL Certificate.
Set Email SMTP server settings
You can configure SMTP settings for the appliance and BeyondInsight. The BeyondInsight SMTP settings are stored in the database, which might not always be available (for example, when offline for maintenance). To ensure consistent SMTP access, appliance SMTP settings can also be configured.
Set the U-Series Appliance and BeyondInsight SMTP addresses and ports to enable the appliance software email notifications.
Appliance SMTP settings
To configure the U-Series Appliance SMTP settings:
- From the left menu, click
 .
.
The Integrations page displays. - Click the Email card.
- Type a valid address in the SMTP Address field.
- Set the Port Number.
- Select the Enable SSL checkbox to enable it. The email server must have a valid SSL/TLS certificate installed.
- In the SMTP Authentication section, select the SMTP Requires Authentication checkbox and enter credentials.
- In the Customize Email "From" Address section:
- Set the System Email "From" Address to be used on all U-Series Appliance notification emails.
- Type in a Recipient Address test email you can use to verify that the notifications are working.
- Click Test Email. Verify the recipient email address you used for reception of the notification.
- After a successful test, at the bottom of the Appliance SMTP Settings, click Save Email Settings.
BeyondInsight SMTP settings
To configure the BeyondInsight SMTP settings:
- From the left menu, click .
The Integrations page displays. - Click the Email card.
- Type in the SMTP Address.
- Set the Port Number.
- Check the box to Enable SSL.
- In the SMTP Authentication section, check the box to ensure SMTP requires authentication, and enter credentials.
- Type in a Recipient Address test email you can use to verify that the notifications are working.
- Click Test Email. Verify the recipient email address you used for reception of the notification.
- After a successful test, at the bottom of the BeyondInsight SMTP Settings, click Save Email Settings.
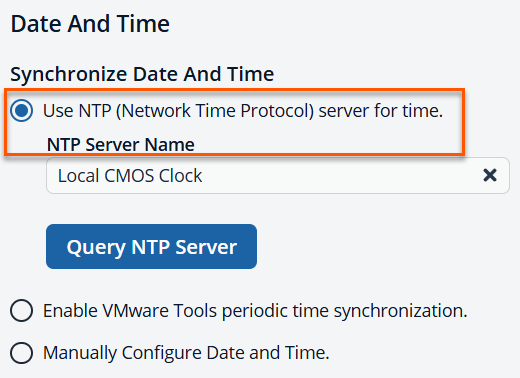
Date and Time configuration
You can view the appliance’s current date and time, adjust the time zone, and update the date and time by modifying the Network Time Protocol (NTP) server name.
Current date and time
- From the left menu, click .
The Integrations page displays. - Click the Date and Time Configuration card.
The current date and time for the appliance displays.
Change time zone
-
From the left menu, click
.
The Integrations page displays. -
Click the Date And Time Configuration card.
-
From the Date And Time section, use the appropriate methods to synchronize the date and time. The default method is using the Network Time Protocol (NTP).
-
Click Save Date And Time Synchronization.
Updated about 1 month ago
