Managed systems | BI Cloud
What are managed systems?
A managed system is any system being managed by Password Safe. A managed system can be an asset, database, directory, or cloud platform. By default, all managed systems are listed on the Managed Systems page, as the Smart Group filter is set to the built-in Smart Group All Managed Systems. You can filter the systems listed in the grid by selecting a different Smart Group from the Smart Group filter list.
Managed systems can be manually created from the Managed Systems page, as well as from the Assets page. Managed systems can also be added using Smart Rules.
How are managed systems useful?
Managed systems provide centralized control, security, and organization for various assets, databases, directories, etc.
How do I access managed systems?
- Use a browser to sign in to your BeyondInsight/Password Safe URL.
This URL is provided in the BeyondTrust welcome email and includes your site URL followed by /login. - From the left menu, click
 .
.
The Managed Systems page displays.
The Managed Systems page
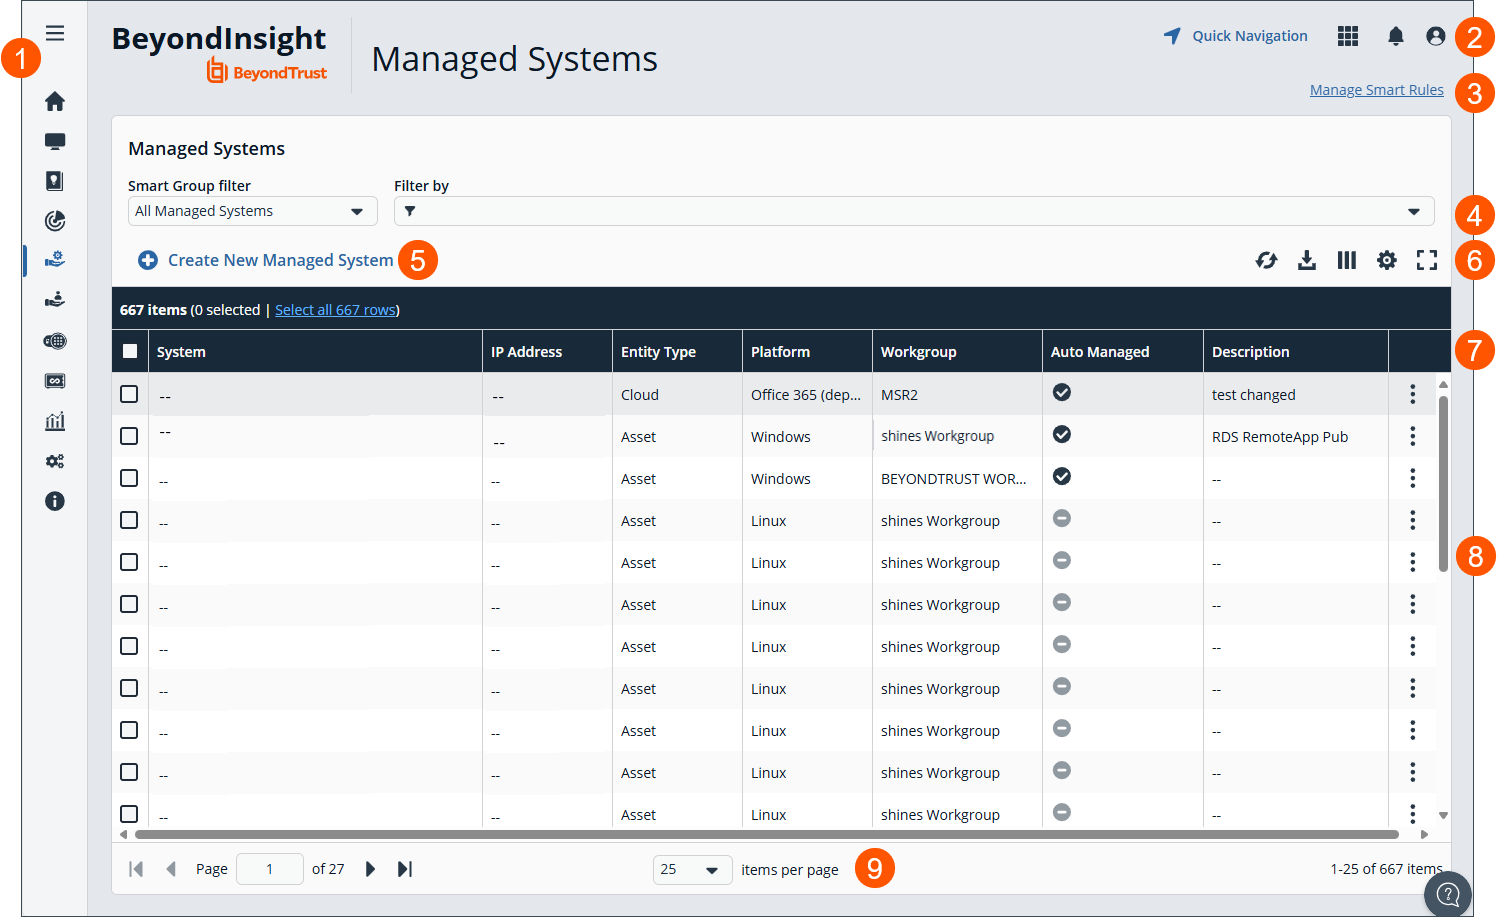
- Left menu: Easy access to all pages in BeyondInsight/Password Safe, including the Home, Assets, Smart Rules, Discovery Scanner, Management Systems, Managed Accounts, Password Safe, Secrets Safe , Analytics and Reporting, Configuration, and About pages.
- Header: Navigate to your favorite pages, view your notifications, access your connected apps, and set your account preferences.
- Select to Manage Smart Rules.
- Filter dropdowns: Select a filter to refine your results.
Filter types
- Smart Group filter: Filter by Smart Group.
- Filter by: Filter by System, IP Address, Entity Type, Platform, Workgroup, Auto Managed, Description, or Change Agent.
- Select to Create New Managed System.
- Grid display preferences: Set display preferences on the Managed Systems grid using the following options represented by icons above the grid:
- Click
 to refresh the list,
  to download the list to a .csv file,
  to select which columns to display on the page,
  to configure your page display, and
 to expand the grid.
- Click
- Managed Systems list columns:
Column Names
- System
- IP Address
- Entity Type
- Platform
- Workgroup
- Auto Managed
- Description
- Change Agent
- Managed Systems grid: Displays information based on filter selections.
- List navigation options: Navigate in the Managed Systems list.
Work with managed systems
Managed systems can be manually created from the Managed Systems page, as well as from the Assets page. Managed systems can also be added using Smart Rules.
View managed system details
You can view details about the managed system, such as:
- Identifying details, attributes, and policies
- Managed accounts on the managed system
- Smart Groups associated with the managed system
- Accounts linked to managed accounts on the managed system
- Public keys related to the managed system
- Functional account for the managed system
To view the details of a managed system:
- From the left menu, click .
The Managed Systems page displays. - Locate the managed system you want to view the details for.
- Click
 > Go to Advanced Details.
The Advanced Details page displays. - Click through the items under Advanced Details to view details on each topic.
For managed systems that are linked to assets, you can click the View Asset link above the Advanced Details pane to view the details of the asset. Click View Managed System to return the Advanced Details for the managed system.
Import an SSH Server key using a Smart Rule
You can import SSH Server keys from a host and accept the key on the Advanced Details for a managed system. Supported key types are RSA, DSA, and ECDSA. From the Smart Rules page, create an asset-based Smart Rule using Actions settings:
- Select Manage Asset Using Password Safe from the dropdown.
- Select a Platform that supports server keys, such as Cisco.
- Select the Functional Account.
- For the Key Enforcement Mode option, choose either Auto Accept Initial Key or Manually Accept Keys.
- Set the other settings as desired or leave as defaults.
- Add another action to Show Asset as Smart Group.
- Click Create Smart Rule.
For more information, see Create a Smart Rule.
Manage the SSH Server keys
After the Smart Rule processes, hosts with SSH Server keys are populated in the Smart Group you created.
An email notification is sent to the Administrators user group when a key is imported and the Key Enforcement Mode is set to Manually Accepted Keys. The email notifies the administrators that a fingerprint requires action, what asset the key is on, and also provides details about the fingerprint.
The Fingerprint Verification email template can be modified from Configuration > Privileged Access Management > Mail Templates.
Accept or deny a key
- From the left menu, click .
The Managed Systems page displays. - Locate the managed system you want to accept or deny a key for.
- Click > Go to Advanced Details.
- Under Advanced Details, select Server Keys.
- Click for the server key you wish to work with.
- If auto approved, no further action is required.
- If manually approved, click Accept or Deny.
- After a key is accepted, from the Functional Accounts tab, click the Test Functional Account button to verify the key with the functional account.
Add a key manually
- From the left menu, click .
The Managed Systems page displays. - Locate the managed system you want to accept or deny a key for.
- Click > Go to Advanced Details.
- Under Advanced Details, select Server Keys.
- Click + Create New Server Key above the grid.
- Click Accept or Deny.
- Select a Key Type.
- Enter a Fingerprint and Description.
- Click Create Key.
- After a key is added, from the Functional Accounts tab, click the Test Functional Account button to verify the key with the functional account.
The fingerprint must be unique. An error message displays if the key is already imported.
Updated about 1 month ago
