
Network | U-Series
The Network page provides centralized access to all network‑related settings for the U‑Series Appliance. Administrators use this page to manage connectivity, remote access, diagnostic tools, and network services that support appliance operation.
From the Network page, you can do the following:
- Enable or restrict Remote Desktop Protocol (RDP) and console access for administrative troubleshooting.
- Run diagnostic tools to verify connectivity, confirm name resolution, or troubleshoot network issues.
- Configure IP settings for each network adapter, including DHCP or static addressing.
- Set proxy server options to support environments that require outbound traffic to route through a proxy.
- Manage Background Intelligent Transfer Service (BITS) throttling to control bandwidth usage during file transfers.
This topic contains the following six sections:
- RDP and Console Access
- Diagnostic Tools
- IP Settings
- Proxy Server
- Background Intelligent Transfer Service (BITS)
- Firewall
Configure RDP settings
The following sections detail how to configure the following network settings for your U-Series Appliance:
- Enable RDP and multi-factor authentication to gain access to your appliance.
- Configure IP settings for your appliance's network adapter.
- Configure proxy server settings for your appliance.
- Set BITS throttle speed
Enable RDP and console access
RDP and console access is disabled by default as a security measure. RDP access is not required for daily use, regardless of licensing or features. BeyondTrust Technical Support can enable RDP access for troubleshooting. RDP and multi-factor activities are tracked with audit log entries in the Security event logs.
When multi-factor authentication is enabled, an activation code from BeyondTrust Technical Support is required to enable RDP and appliance console access. RDP and console access reverts back to being disabled after a 4 hours.
-
Using a web browser, enter <IP>/appliance in the address field.
-
Enter the credentials and click Log In.
-
From the left menu, click
 .
.
The Network page displays. -
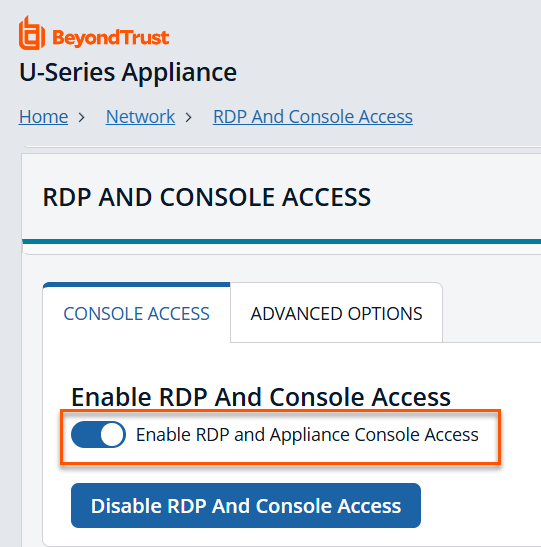
Click the RDP and Console Access card.
-
Slide the Enable RDP and Appliance Console Access toggle to the right to enable it.
-
Click the Advanced Options tab.
-
Slide the Multi-factor Authentication toggle to enable the settings for two-factor authentication when using remote desktop.
-
Click Activate Multi-factor Authentication.
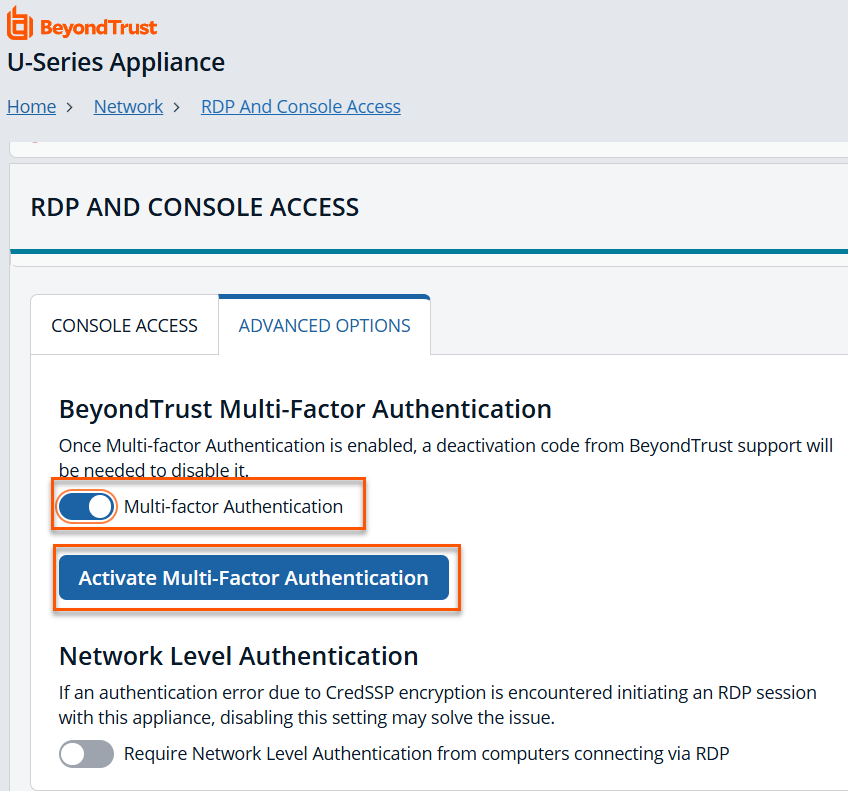
If you need to disable two-factor authentication, you must first contact BeyondTrust Technical Support and request them to generate a time-limited deactivation code for you. You must enter this code before the toggle will switch off.
Diagnose network connectivity issues
You can view network configuration information and use Ping to assist with diagnosing network connectivity issues.
For more information on the Ping command, see Ping.
- From the left menu, click .
The Network page displays. - Click the Diagnostic Tools card.
- To ping a server:
- Select Ping Command.
- Enter the fully qualified domain name, hostname, or IP address in the Server Address field.
- Click Get Results.
- Select Network Configuration to view the results from IPConfig /all.
Set an IP address for the U-Series Appliance
You can obtain an IP address automatically using DHCP, or you can manually configure the IPv4 address.
- From the left menu, click .
The Network page displays. - Click the IP Settings card.
- Select a network card from the list.
- Slide the IPv4 toggle to the right to enable it.
- Click the Automatic (DHCP) Automatically assigns an IP address option.
- If setting the IP manually, enter the IP address, subnet mask, gateway, and DNS information.
- Click Update IP Settings.
Configure proxy settings
You can configure a proxy server for the appliance if one is required for internet access following the below steps. Appliance proxy server settings are synchronized with Configuration > System > Proxy Settings in BeyondInsight. Changing this value on the appliance or within BeyondInsight applies to all proxy-enabled features on the appliance, including BeyondTrust Updater.
- From the left menu, click .
The Network page displays. - Click the Proxy Server card.
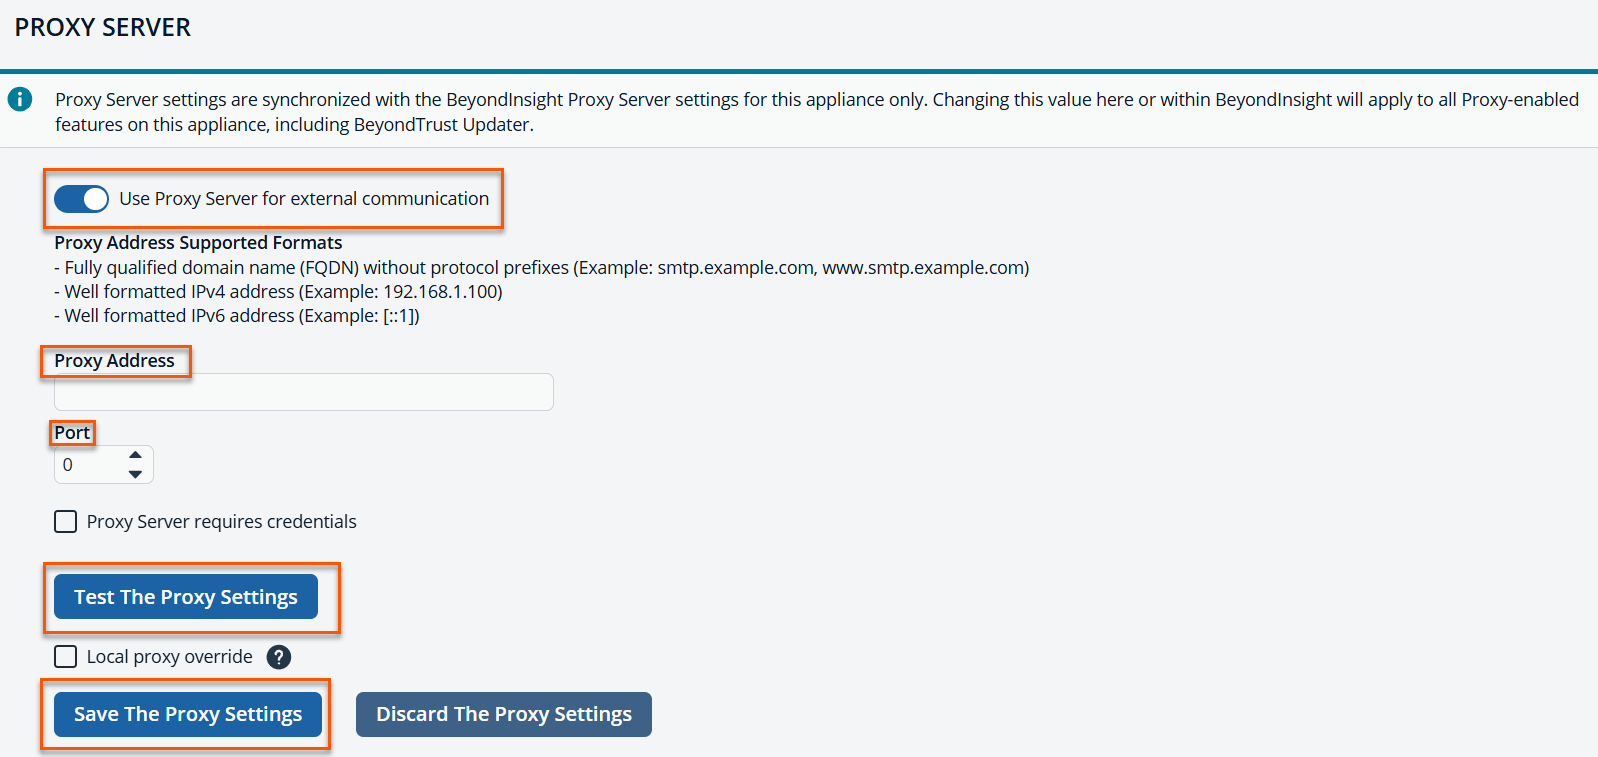
- Slide the Use proxy server for external communication toggle to the right to enable it.
- Enter the FQDN or IP address for the proxy server.
- Enter the port number for the proxy server.
- If the proxy server requires authentication, enter the credentials.
- Click Test The Proxy Settings to ensure a successful connection.
- Select the Local proxy override checkbox to bypass a configured proxy for all addresses that do not contain a period.
- Click Save Proxy Settings.
Manage BITS throttle speed
Background Intelligent Transfer Service (BITS) facilitates the transfer of files between computers using idle network bandwidth. On the appliance, BITS is used to transfer the database when pairing high availability partners and may also be used to transfer session recording files to an archive location. This setting limits the network bandwidth that BITS uses for background transfers. If you do not configure this setting, BITS uses all available unused bandwidth for background transfers.
Settings
- From the left menu, click .
The Network page displays. - Click the BITS card.
- In the BITS Throttle Speed in Mbps field, enter the throttle speed in Kbps.
- Click Save Throttle Speed.
Jobs
To see a list of BITS jobs, click the JOBS tab.
Firewall
The Network > Firewall page allows an administrator to configure firewall‑related functionality for the appliance.
The feature set includes the following:
- Viewing existing firewall rules
- Automatically modifying rules based on appliance configuration
- Running diagnostics that help administrators identify blocked ports
Firewall rules
To see an inbound or outbound firewall rule, do the following:
- From the left menu, click .
The Network page displays. - Click the Firewall card.
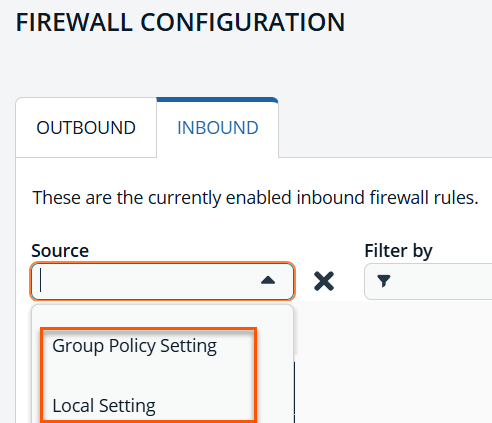
- The Firewall Configuration section displays a separate inbound and outbound firewall rules that apply to the appliance. The page aggregates rules from:
- Group Policy Setting (GPOs)
- Local Setting
Firewall filtering
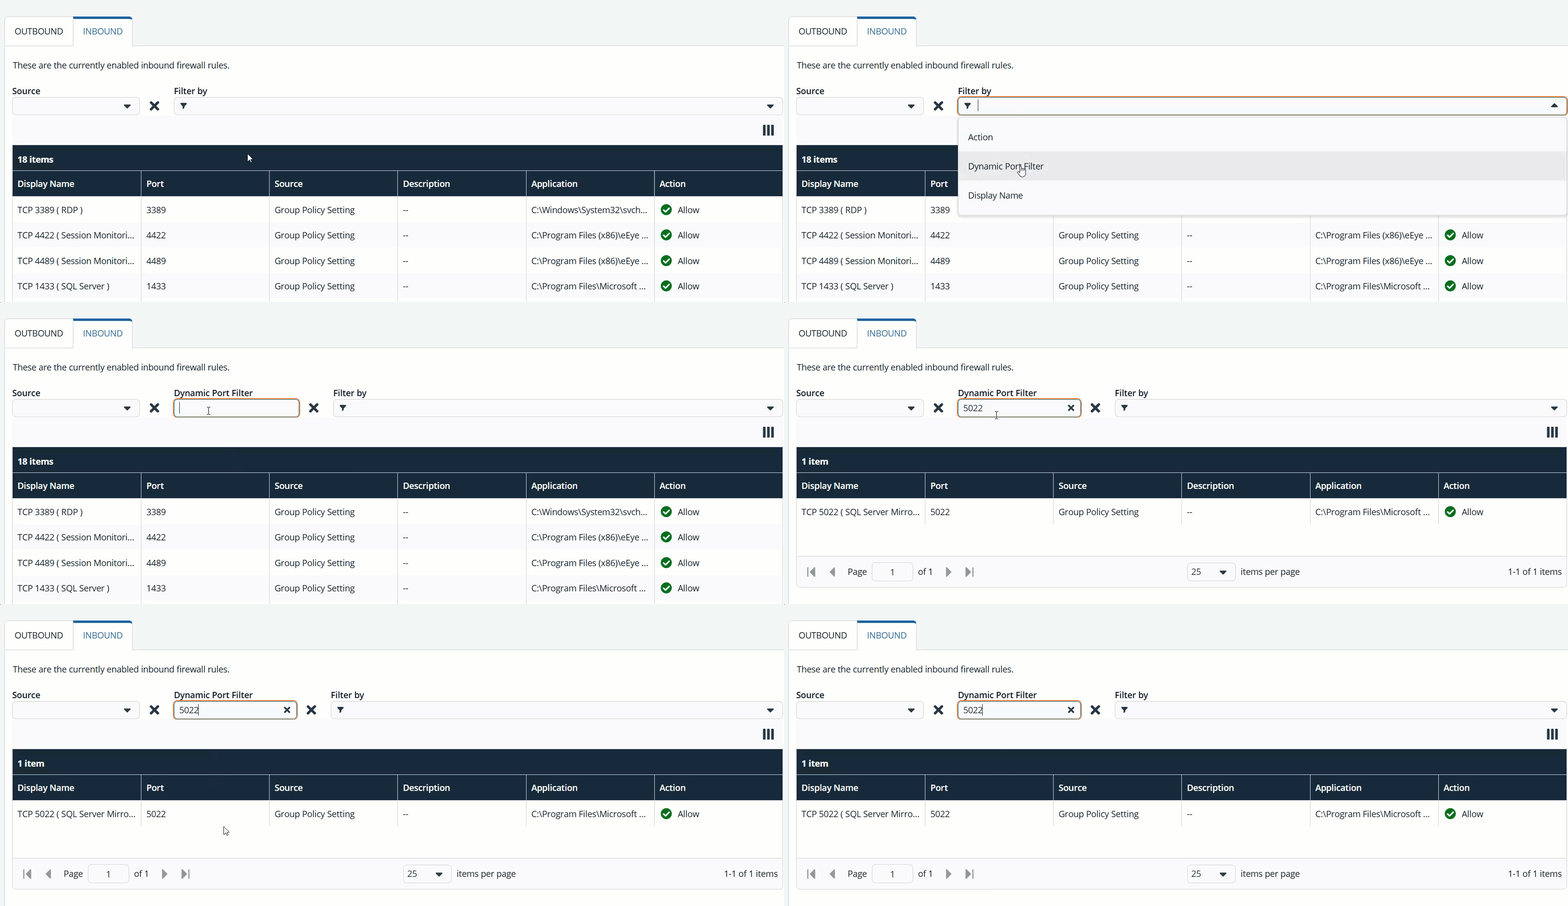
The rules appear in a grid that includes all relevant fields, and you can filter the list using any supported field. For example, when you use the Dynamic Port Filter value and type "5022", the result shows rule(s) related to SQL Server mirroring.
Modify Firewall rules
The appliance automatically adjusts firewall rules when you enable or disable certain appliance features. the appliance blocks that port.
ExampleSQL Server mirroring enabled: The appliance enables the firewall rule for port 5022.
SQL Server mirroring disabled: The appliance blocks the same port to reduce unnecessary exposure.
This automation ensures that firewall behavior remains consistent with appliance configuration.
Firewall diagnostics
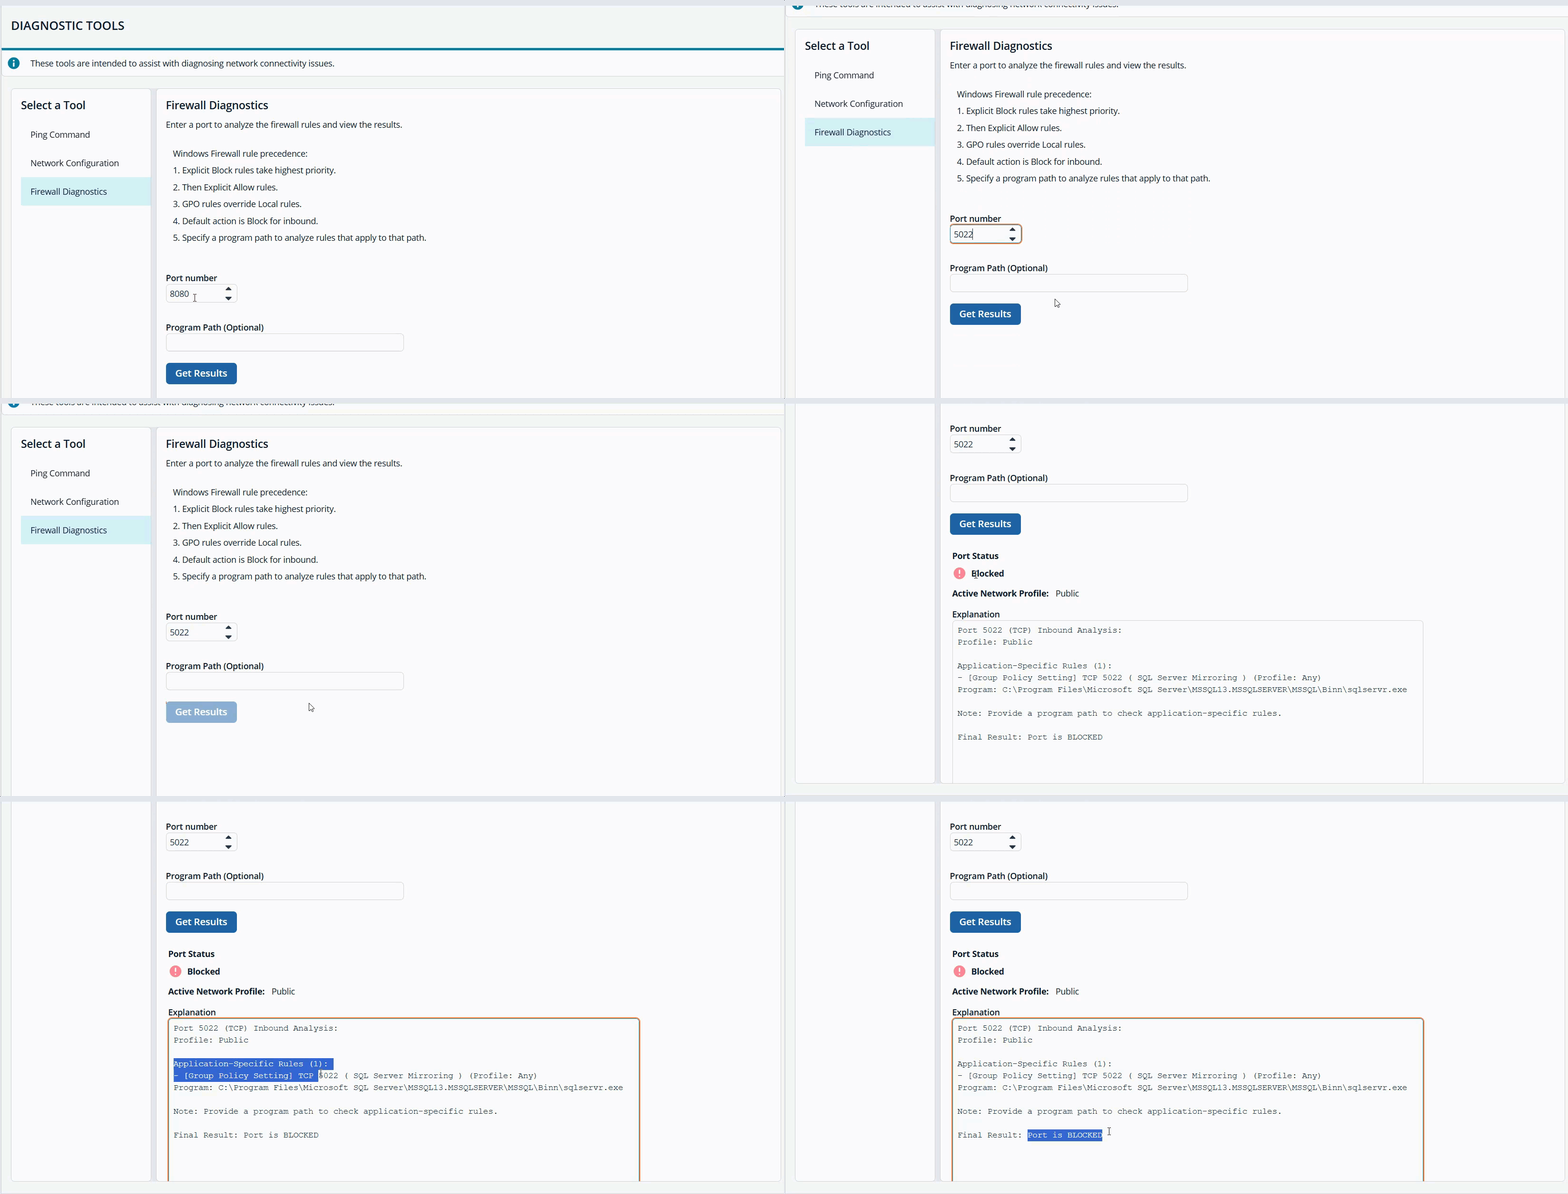
The Firewall Diagnostics section provides a tool that checks whether a specific port is open or blocked. This helps you verify port accessibility during troubleshooting. The system evaluates the port using the active firewall profile. The results indicate whether a rule explicitly blocks or allows the port. When a block rule is detected, the diagnostics panel lists the blocking rule and explains why it applies.
Check Port Status
To check a port status, do the following:
- From the left menu, click .
The Network page displays. - Click the Diagnostic Tools card.
- From the Port number field, type a port number.
- From the Program Path (Optional) field, type a path. This field is optional.
- Click Get Results.
Important informationWindows Firewall applies rules in a specific order of precedence.
Explicit Block rules take highest priority.
Then Explicit Allow rules.
GPO rules override Local rules.
Default action is Block for inbound.
Specify a program path to analyze rules that apply to that path.
A panel displays with the results and the reason why a port is blocked.
Updated 3 months ago
