Secrets Safe: Configure | BI Cloud
Prerequisite
Before you configure Secrets Safe, ensure you understand what Secrets Safe is and the benefits they provide, see Secrets Safe: Overview.
Assign the Secrets Safe feature to a group
Access to Secrets Safe is granted to users by assigning permissions for the Secrets Safe feature to a group in which the users are members.
-
From the left menu, click
 .
.
The Configuration page displays. -
Under Role Based Access select User Management.
The User Management page displays. -
Select the Groups tab.
-
Locate the group you want to assign the Secrets Safe feature to.
-
Click
 > View Group Details.
The Group Details page displays. -
Under Group Details, select Features.
-
In the Features pane, select the Secrets Safe feature.
You can filter the list of features by All Features or Disabled Features, and Feature Name to quickly locate the Secrets Safe feature.
- Click Assign Permissions above the grid:
- Select the appropriate permissions:
- Read-only
- Full control (read and write) – users with full control can create safes
- Disable permissions
Users who are members of the group are granted access to the Secrets Safe page. They must have read+ access in order to view safes.
Create safe
Any user assigned the Secrets Safe feature with full control permissions can create safes. Users that create a safe are automatically granted the Manage Safe permission.
- By default, administrators do not automatically see all safes. They can only see safes they have Read and Write permission to. To view all safes, toggle Show All Safes to on. Safes they don’t have access to are greyed out.
- The Manage Safe permission can be removed by other users with the same permission on that safe, or by BeyondInsight administrators.
To create a new safe:
- From the left menu, click
 .
.
The Secrets Safe page displays. - Under Safes, click Create New Safe +.
- Enter a name for the safe.
- Click Create Safe.
Rename a safe
Users can rename safes that they own.
To rename a safe:
- From the left menu, click
 .
.
The Secrets Safe page displays. - Locate the safe in the Safe panel.
- Click > Rename.
- Enter a new name for the safe, and then click Save Changes.
Delete a safe
Users can delete safes that they own.
To delete a safe:
- From the left menu, click
 .
.
The Secrets Safe page displays. - Locate the safe in the Safe panel.
- Click > Delete.
- Click Delete in the confirmation dialog.
Users must have the Manage Safe permission assigned to them directly, or to a group they’re a member of, to delete or rename a safe.
Add users and groups to a safe, and assign permissions
Any user who is assigned the Manage Safe permission, either directly or through a group, can assign access and permissions to a safe. BeyondInsight administrators can always manage safe permissions regardless of their current access level.
- From the left menu, click
 .
.
The Secrets Safe page displays. - Locate the safe in the Safe panel.
- Click > Go to Advanced Details.
The Advanced Details page displays. The Access Management grid displays users and groups already added to the safe. - Select All Users & Groups from the Show dropdown list:
- For individual users or groups, click > Assign Permissions.
- For multiple users or groups, check the boxes next to the user or group. Click Assign Permissions above the grid.
- For individual users or groups, click
If the selected user/group has no permissions assigned, the bulk delete permissions button is not available
- In the Assign Permissions panel, check the appropriate permissions. Permissions available are:
- Read Secrets and Folders (Required) – this is assigned by default
- Create Secrets and Folders
- Update Secrets and Folders
- Delete Secrets and Folders
- Share Secrets
- Manage Safe (selecting this permissions automatically checks all permissions).
- If required, toggle Set an expiration date to on. Enter an expiry date and time. Expiration defaults to one week from the current date.
When an expiry occurs, expired permissions remain listed in the Access Management grid until a scheduled job, which runs at midnight, removes them.
- If multiple users or groups are selected, you can remove them prior to saving by clicking X to the right of the user/group. If all users/groups are removed, the Assign Permissions side panel closes.
- Click Assign Permissions to save selections.
Manage folders
Users can organize their secrets into subfolders within a safe to make locating a secret more efficient.
Create a folder
To create a new folder:
- From the left menu, click
 .
.
The Secrets Safe page displays. - Select a safe or one of its subfolders.
- Click > Create Folder.
- Enter a name for the folder.
- Click Create Folder.
Rename a folder
- From the left menu, click
 .
.
The Secrets Safe page displays. - Select a folder within a safe.
- Click > Rename.
- Enter a new name.
- Click Save Changes.
Delete a folder
- From the left menu, click
 .
.
The Secrets Safe page displays. - Select a folder within a safe.
- Click > Delete.
- Click Delete on the confirmation message.
Add Secrets to a safe or folder
Permissions are a combination of all permissions given to a user, as well as the permissions they inherit from the groups they belong to.
- Users with full permissions to a safe can create secrets in that safe or in any of the safe’s subfolders.
- Users and Groups with read access to a safe can be assigned ownership to a secret within that safe.
- Owners of a secret have update, share, and delete permissions to that secret.
- Users that own a secret in a safe they do not have read access to will not be able to access that secret.
Add a secret
To add a secret:
- From the left menu, click
 .
.
The Secrets Safe page displays. - Select a safe or one of its subfolders.
- In the Secrets pane, click + Add Secret.
- Select a secret type: Add Credential, Add File, Add Text, or Import Secrets.
The Create New Secrets pane displays. - Fill out the information for each type of secret.
Add Credential
- Enter a Title, Description, Username, and URL (if required).
- Set the password:
- Select Manual Input to manually enter a password.
- Select Auto Generate and select a Password Policy from the list to have the password created based on the defined policy.
To have the Password Policy option available, you must have the Allow use for Secrets Safe option selected from the Configuration > Privileged Access Management Policies
Password Policies page. - Click Generate Password.
- Add a note if you require additional information to display for this credential other than its description. You can add Notes as a column when viewing the list of credentials in the grid, and you can also filter the grid by Notes.
- Click Create Secret.
Add File
- Enter a Title, Description, and URL (if required).
- Drag the file into the Upload File box or click the box to navigate to a file to upload.
- Click Create Secret.
There are no restrictions on file type; however, files must be 5MB or less.
Add text
- Enter a Title, Description, and URL (if required).
- Enter the body of the text.
- Add a note if you require additional information to display for this credential other than its description. You can add Notes as a column when viewing the list of credentials in the grid, and you can also filter the grid by Notes.
- Click Create Secret.
Import secrets
- Select a safe or one of its subfolders.
- In the Secrets pane, click + Add Secret.
- If a confirmation dialog appears, click Import Secrets.
- Drag the file into the Import CSV File box or click the box to navigate to a file to upload.
- Select a folder or create a new folder to save the imported secret to.
- Click Import Secrets.
Import requirements
- Import Secret file type must be CSV
- CSV import functionality is only available if Workforce Passwords is enabled for the user.
- Files must be 200 KB or less.
- CSV files must contain the following:
- CSV (comma is the only supported field separator)
- Header row (the first row in the file is skipped and seconds are processed starting on line two
- Eight columns are required (not all columns are used)
- URL
- Username
- Password
- TOTP (not used)
- Extra (not used)
- Name
- Grouping (not used)
- Fav (not used)
ExampleCSV File - url,username,password,totp,extra,name,grouping,fav
URL Username Password TOTP Extra Name Group Favorite https://www.testsite00001.com TestUser01 password01 TestName001 https://www.testsite00002.com TestUser02 password02 TestName002
View, copy, edit, and delete a secret
Users can view details for their safe’s secrets, such as who owns the secret, when the secret was created and modified, and the folder path for the secret. Users can also copy the username and password for a team secret so they may use it. Secret owners can edit the properties and delete secrets they own. Administrators are limited by their current access level. For example they cannot edit a secret that they are not the owner of if they do not have the update permission. However, administrators can manage user and group access to a safe to change permissions as needed. Any modifications to permissions are audited.
- From the left menu, click
 .
.
The Secrets Safe page displays. - Select a safe or one of its subfolders.
- Locate the secret in the Secrets grid.
- Click to the right of the secret in the Secrets grid. Each secret type, as indicated by its Type icon, has specific actions available from the options menu. Depending on your permissions:
- For credential secrets, you can:
- Copy Username to the clipboard
- Copy Password to the clipboard
- Copy Notes to the clipboard
- View Details of the secret
- Edit Secret - update information, and then click Update Secret
- Share Secret - share the secret to one of the Safes in your Safes pane
- Remove Share - unshare from the safe the secret was shared to
- Delete Secret - click Delete in the confirmation message.
- For file secrets, you can:
- Download File locally
- Copy Notes to the clipboard
- View Details of the secret
- Edit Secret - update information, and then click Update Secret
- Share Secret - share the secret to one of the Safes in your Safes pane
- Remove Share - unshare from the safe the secret was shared to
- Delete Secret - click Delete in the confirmation message.
- For text secrets, you can:
- Copy Text to the clipboard
- Copy Notes to the clipboard
- View Details of the secret
- Edit Secret - update information, and then click Update Secret
- Share Secret - share the secret to one of the Safes in your Safes pane
- Remove Share - unshare from the safe the secret was shared to
- Delete Secret - click Delete in the confirmation message.
- For imported secrets, you can:
- Copy Username to the clipboard
- Copy Password to the clipboard
- Copy Notes to the clipboard
- View Details of the secret
- Edit Secret - update information, and then click Update Secret
- Share Secret - share the secret to one of the Safes in your Safes pane
- Remove Share - unshare from the safe the secret was shared to
- Delete Secret - click Delete in the confirmation message.
- For credential secrets, you can:
Share a link to the secret
Create and share a link to a secret.
- Access to Secrets Safe is required to share a URL to a secret.
- Users you are sending the URL to require permissions to the secret.
- You cannot create a direct link to secrets saved in the Personal folder.
To share a URL for a secret:
- From the left menu, click
 .
.
The Secrets Safe page displays. - Select a safe or one of its subfolders.
- In the Secrets grid, click > Copy Secret Link.
The Distributing a Secret Link dialog box displays. - Click OK.
A cookie is saved. - Send the link to the users.
- When the user clicks the link:
- The View Details page displays for the secret if the user is already logged on to Secrets Safe.
- The Secrets Safe logon page displays if the user is not logged on.
- If the user cannot access Secrets Safe, an error notification displays and their dashboard opens.
- The user can access Secrets Safe but not the safe where the linked secret exists. Their personal folder displays (or all secrets if they don't have Workforce Passwords enabled) and an error notification displays.
Share a secret
Secrets can be shared between safes and folders. Shared secrets inherit the destination safe’s permissions. When secrets are shared, a shared icon displays in the type column in addition to the original type icon.
To share a secret:
- From the left menu, click
 .
.
The Secrets Safe page displays. - Select a safe or one of its subfolders.
- In the Secrets grid, click > Share Secret.
- The Share to Folders panel displays all safes and folders where you have the Create permission assigned.
- Select a safe or folder.
- Click Share. The secret displays in the secrets grid for the associated safe or folder.
Secrets can be shared from the Personal folder, however ownership is locked for secrets shared from a personal folder. You can see the owner’s name, but the Manage Ownership option is hidden.
Remove a shared secret
You can remove a shared secret. The Remove Share option is only available on the original copy of a secret. If selected it removes all shared instances of that secret, while the original copy remains. This requires the Share permission to that secret or ownership of the secret.
Additionally, you can delete individual shared copies of a secret from the safe they were shared to. This is done by selecting the Delete Share option . This requires the Delete permission to that secret or ownership of the secret. You can bulk delete original secrets and shared copies at the same time with multi-select.
- From the left menu, click
 .
.
The Secrets Safe page displays. - Select a safe or one of its subfolders.
- In the Secrets grid, click > Remove Share.
- Click Remove on the confirmation message.
Shared secrets cannot be moved. When editing a shared instance of the secret the option to move that secret is not available.
Move Secrets and Folders
You are able to move secrets within the same safe or different safe.
Summary
When you use the Move Secrets feature the following items are available:
- When you move a folder, it moves all child items (secrets and subfolders) to the destination location
Bulk moving folders is not available
- You can move secrets and folders in and out of the logged in user’s personal folder
- Secrets can be moved individually or in bulk
Required permissions
Move within the same safe
You must have the Update Secrets and Folders permission on the source safe. If you do not have this permission enabled, you can move secrets as long as you have the ownership of all selected secrets. This is the only required permission if you are moving secrets to a different location to the same safe.
Move to a different safe
You must have the Create Secrets and Folders permission in addition to the permissions listed on move within the same safe on the destination safe.
Bulk Move
There is a bulk move option if you have multiple secrets to move.
A Move Secrets button exists and appears when up to 200 secrets are selected. If more than 200 secrets are selected, the button disappears.
TipIf you have more than 200 secrets to move, you can do one of the following:
- Move secrets in batches
- Move the entire folder containing the secrets
The Bulk Move button only appears if you either Update Secrets and Folders permission on the safe or ownership of all selected secrets. If you do not have the Update Secrets and Folders permission and you select a secret without being an owner of it, the button disappears. The button reappears once non-owned secrets are deselected.
Move secrets
To move secrets, do the following:
-
Select the secrets in the list you want to move.
-
Click the Move Secrets button.

A side panel displays as a filtered list. The source safe and those that have that the Create Secrets and Folders permission are shown. -
If you are moving secrets to a different safe, the following warning message displays: _
When moving to a different safe, permissions to folders and secrets may change_.
If you are moving shared secrets, then the following message displays: The secrets being moved contains shared secrets which cannot be moved to other safes. -
Click Move.
A Moving Secrets dialog box displays.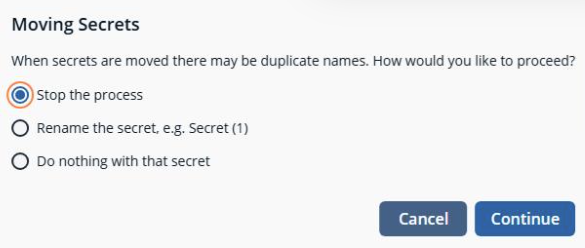
-
From the Moving Secrets dialog box, you can do the following:
- Stop the process- Causes no secrets to be moved
- Rename the secret- Renaming a secret causes any secret with a naming conflict to automatically be renamed. You can also do nothing, however secrets that have a naming conflict are skipped and not moved.
- Do nothing with that secret- There are no naming conflicts, and you can move the secret as it is.
Once you select a shared secret to move, it is filtered in the list and only shows a source safe. The reason is secrets being moved contain shared secrets which cannot be moved to other safes, you cannot move a shared secret outside of the safe.
- Click Continue.
- If you want to see the results of the move, click View Results.
A Move Secrets Results dialog box displays with the number of secrets moved. - Click OK.
Move folders
To move a folder, do the following steps:
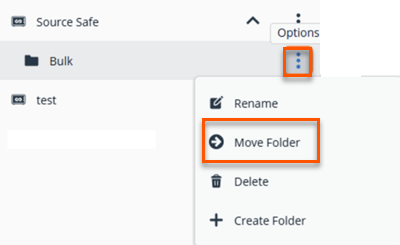
-
In the Secrets grid, right-click the sub-folder and select Move Folder.
Shared secrets cannot be moved between safes. They may only be moved in the same safe.
If a shared secret is selected when the move secret button is pressed the only destinations available will the the source safe (or personal folder if shared secret was there) and it’s child folders.
If a folder move is attempted and it contains shared secrets, the following dialog box displays:

If a folder move is attempted and it contains shared secrets the folders cannot be promoted to safes via a move process.
-
Select the destination folder in the list.
-
Click Move.
The Moving Folders dialog box displays.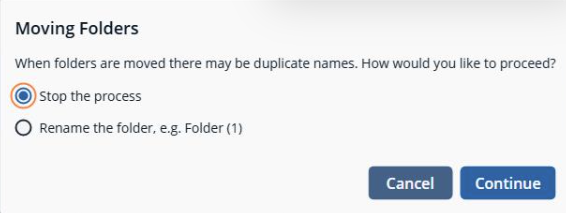
-
From the Moving Folders dialog box, select any one of the options:
- Stop the process- Causes no folders to be moved
- Rename the folder-Renames the folder to avoid naming conflicts.
Safes do not have a Move Folder menu. Safes cannot be demoted from a safe to subfolder of another safe.
-
Click Continue.
Summary for moving folders
When you move folders, the following rules apply:
- Folders can’t be moved if they contain a shared secret. The move fails until all shared secrets are deleted.
- You cannot exceed a maximum folder depth of 6
- Safes cannot be moved or demoted to subfolders
- Folders cannot be promoted to safes
- You can move folders and secrets in and out of personal folders
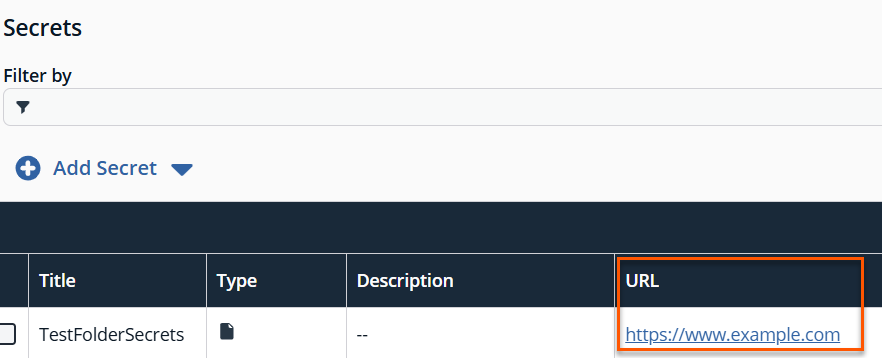
Update to table column
The URL column in the Secrets table now adds a hyperlinked address. If you click the hyperlink, it opens the URL in a new tab in your browser.
Updated Secret Management visibility
Secret records now track the last time the secret’s value is modified. This timestamp is stored separately from other metadata changes, such as updates to names, descriptions, or permissions. By distinguishing value changes from general record updates, administrators gain clearer insight into how recently a secret value is refreshed. This information helps administrators identify secrets that may require rotation and maintain stronger security hygiene across the environment.
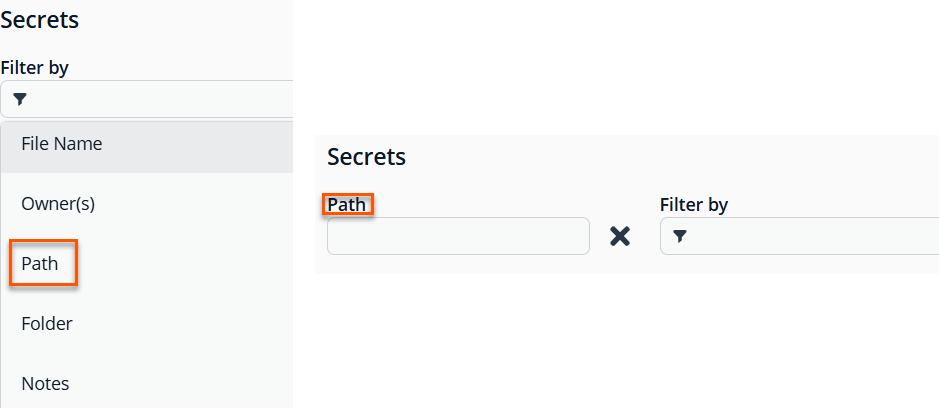
Enhanced folder path support in search functionality
You can now use the Path filter to search for secrets by their full path location. To further refine your results, apply additional filters in the Filter by section, such as Owner, to narrow the scope based on specific criteria.