Accounts tab | PS Cloud
What is the Accounts tab?
The Accounts tab lists the managed accounts for which you have permissions to request access to retrieve passwords and start sessions.
How is it useful?
From this grid, you can initiate an access request for the listed accounts, streamlining the request process. By populating the grid with managed accounts, users can easily see which accounts are available and take action without needing to navigate to other areas of the console You can populate the list of managed accounts in the grid using any one of the following options:
- Click the Browse by Category buttons to filter the list by category.
- Select filter criteria from the Filter by dropdown to filter by selected account properties.
- Search for accounts using the Quick Filter option.
- Click Load All Accounts to load all associated accounts.
How do I access the Accounts tab?
- Use a browser to sign in to your BeyondInsight/Password Safe URL.
This URL is provided in the BeyondTrust welcome email and includes your site URL followed by /login. - From the left menu, click
 .
.
The Password Safe home page displays. - Click the Accounts tab.
The Accounts grid displays.
- For optimum efficiency, the web portal screen resolution should be no less than 1280 × 800 pixels.
- When you first log in to the Password Safe web portal, no accounts are available in the Favorites grid. Click the star next to any account to add it to the Favorites grid. Click Refresh above the grid to update the listed accounts.
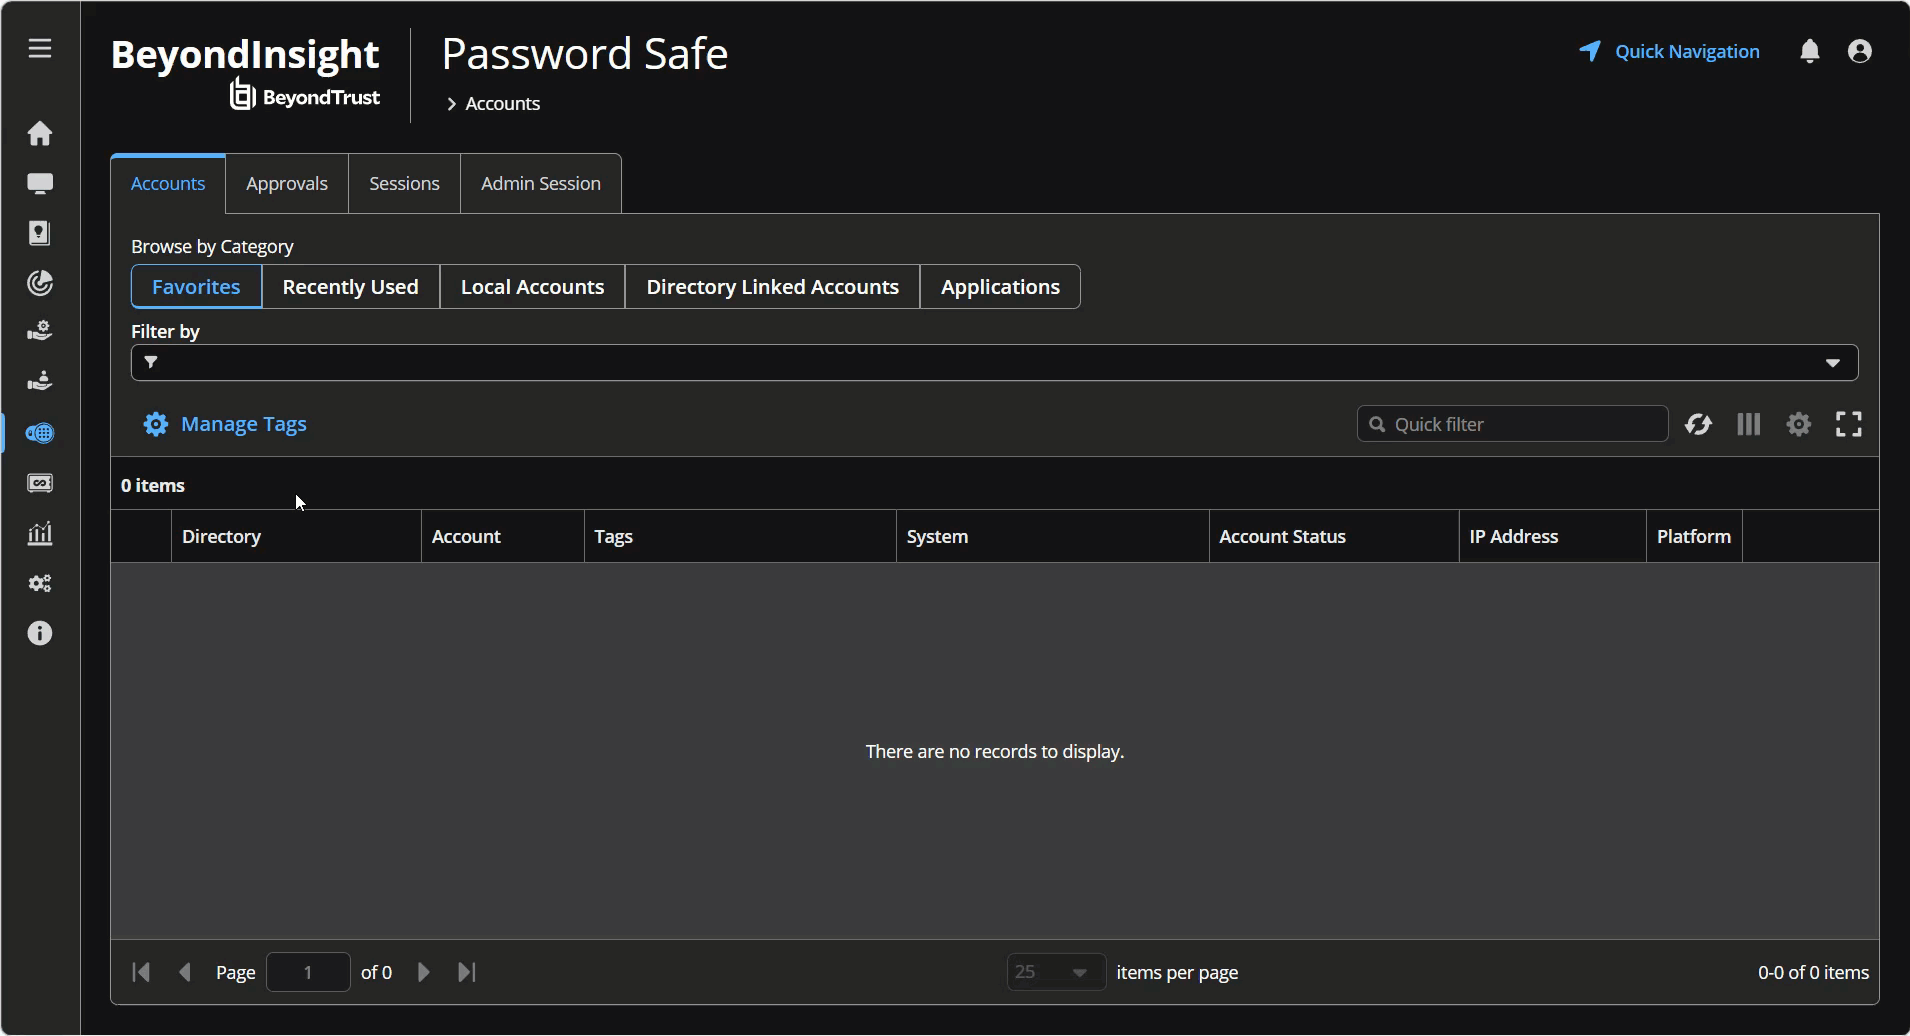
The Accounts grid
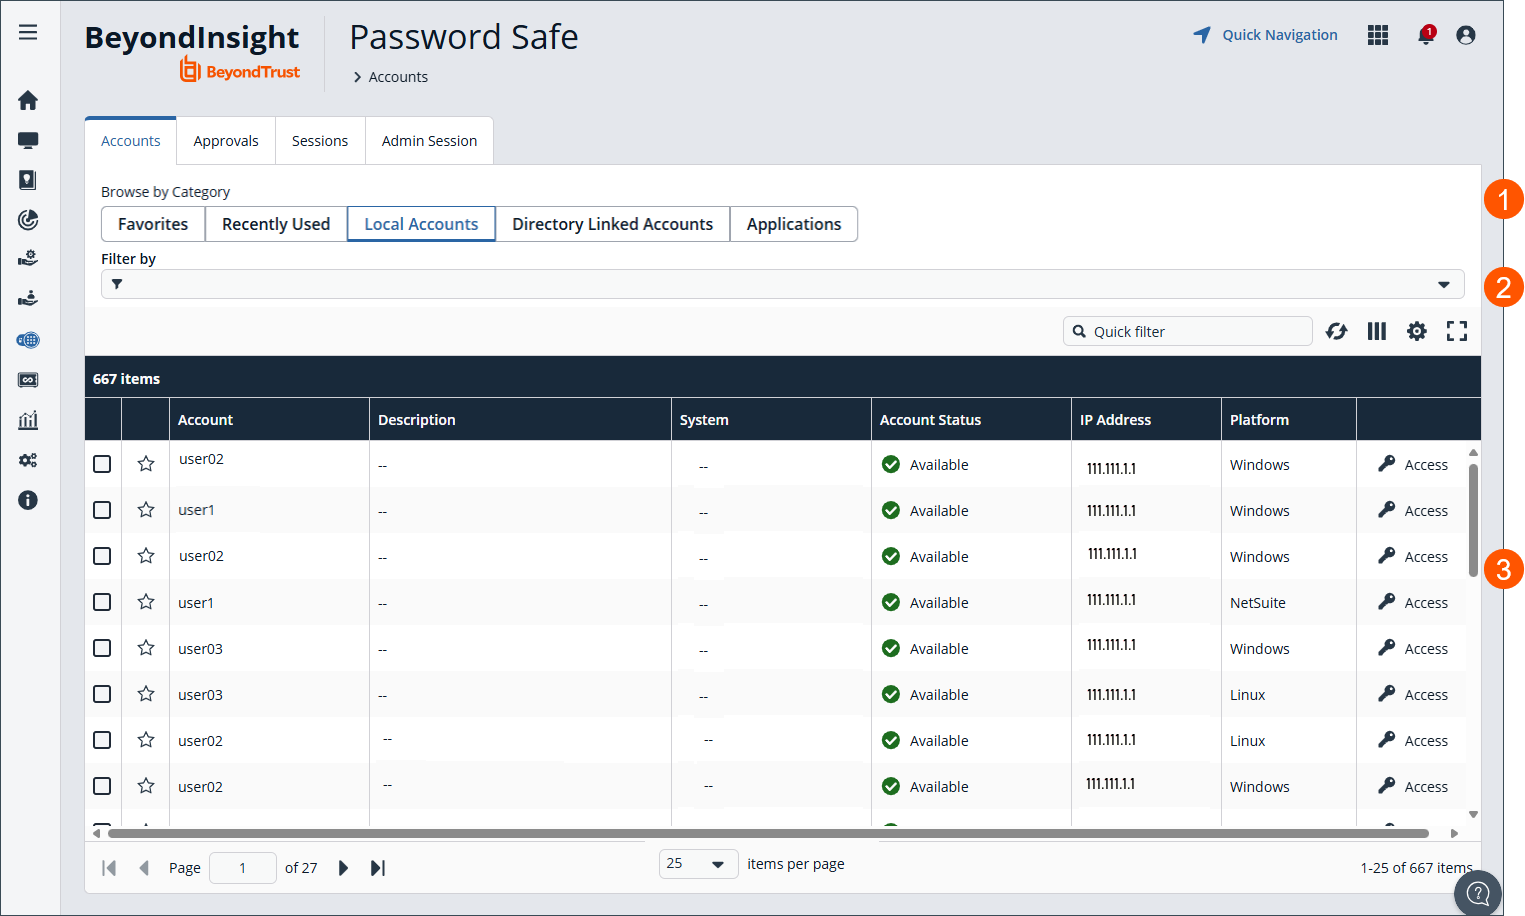
- Browse by different categories to filter results in the grid.
- Select Filter by to further filter results.
- Accounts grid.
Request a password release
To request a password release:
- Click
 to the right of the managed account.
The Access panel displays. - Select the Start Session tab.
- Enter a Reason for the password release.
- Select a ticket system and provide a ticket number if required.
- Check required options under Advanced Request Options.
- Click Start RDP Session. An RDP connection file downloads with a one-time use token that expires based on the Session Initialization timeout settings.
- Run the file to establish a connection to the target system.
- Enter the password that you use to authenticate into Password Safe.
- Click Access for the managed account for which you wish to request a password.
- From the Submit Request tab:
- Set a start date and time for the password to be made available.
- Set the length of time for the password to be available.
- Check Password for the type of access you need.
- Provide a reason for the request. The maximum allowed length is 200 characters.
- Select a ticket system and provide a ticket number.
Reason, Ticket System, and Ticket Number fields might be optional or required, depending upon options configured in the access policy by your Password Safe administrator. Also, if your Password Safe administrator has set a specific ticket system in the access policy, you cannot select a different ticket system with your request.
- Click Submit Request. An email is sent to the approver if email notification is configured. You can view the status of your request from the Requests tab.
Retrieve a password
To retrieve a password:
- Click to the right of the managed account.
The Access panel displays. - Select the Start Session tab.
- Enter a Reason for the password retrieval.
- Select a ticket system and provide a ticket number if required.
- Check required options under Advanced Request Options.
- Click Retrieve Password to display the system account password.
- The password displays in a separate window. The visibility of the password might be limited, with a timer showing remaining time. Click Close Window to close the windows before the timeout.
- Click
 to copy the password to the clipboard.
 - Use the password to log in to the system within the password release time period.
Retrieve a password using Quick Launch
If your access policy is configured for auto-approval for the managed system account you are accessing, Quick Launch is available and allows you to quickly retrieve the password for the managed account, bypassing the approval process. To use Quick Launch:
-
Click
to the right of the managed account. -
From the Quick Launch tab, click Retrieve Password.
-
Click Show to display the password or click
to copy it to the clipboard.
Account tags
You can now create and assign tags directly from the Accounts tab.
Tags help you organize and quickly identify managed account and system pairs using customizable labels. Each tag includes a user-defined name and a color selected from a predefined set, making it easier to visually group related resources.
Users with access to the Accounts tab can create, edit, delete, and assign tags to any accounts they can view. When filtering, tags use OR logic, so any account or managed system pair that includes at least one selected tag appears in the results.
Tags are associated with specific Managed Account and Managed System pairs and do not support column sorting.
Tags are visible to all users. If multiple users have requestor access to the same account, all of them can view and access any tags assigned to that account.
Add a tag
- From the left menu, click .
The Password Safe home page displays.
When opened, the Password Safe page displays the Accounts tab. - Click Manage Tags.
The Manage Tags dialog box displays. - Click Create Tag.
- For Tag Label, provide a unique name. For example, Production.
- For Tag Color, accept the default color or click the dropdown box to select a specific color.
- Click Create Tag.
Edit a tag
-
From the left menu, click
.
The Password Safe home page displays.
When opened, the Password Safe page displays the Accounts tab. -
Click Manage Tags.
The Manage Tags dialog box displays. -
Select a tag from the list and click the pencil icon to edit.
The Edit Tag dialog box displays.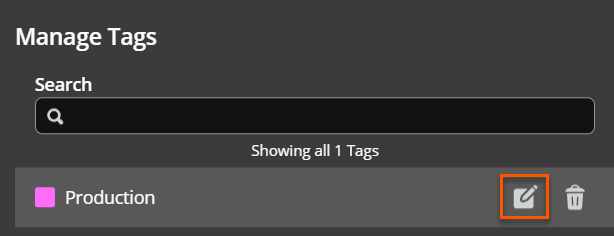
-
Make the necessary changes and click Save Changes.
Delete a tag
-
From the left menu, click
.
The Password Safe home page displays.
When opened, the Password Safe page displays the Accounts tab. -
Click Manage Tags.
The Manage Tags dialog box displays. -
Select a tag from the list and click the trash can icon to delete.
The Edit Tag dialog box displays.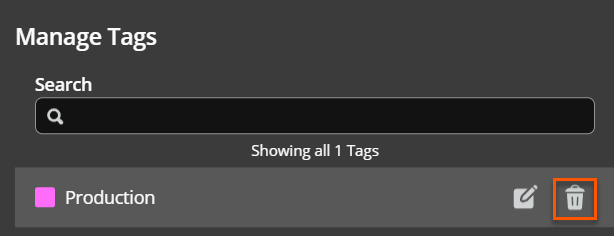
-
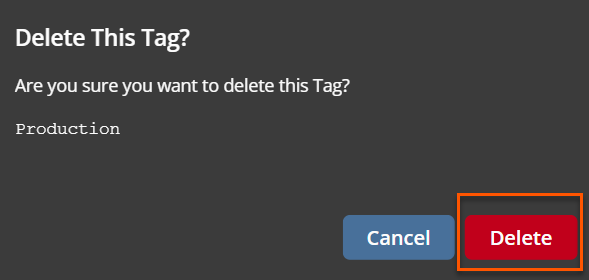
Click Delete from the confirmation dialog box.
ExampleThis example displays how to create, edit, and delete a tag.
Assign a tag to an account
Tags are applied to a local account or managed system pair. To assign a tag to an account do the following:
- From the left menu, click .
The Password Safe home page displays.
When opened, the Password Safe page displays the Accounts tab. - Click the Local Accounts tab.
- Click Load All Accounts.
- From the table, select one or more accounts to assign a tag.
- Click Assign Tags.
The Assign Tags dialog box displays. - Click the appropriate tag to assign.
- Click Save.
The tag is assigned to the account and displays in the Tags column of the table.

The maximum number of tags you can create is 32. Once the limit is met, the following error message displays: The maximum number of tags exist.
Request SSH or RDP Sessions
When configured by your Password Safe administrator, you can request access to a managed system using a remote session. Using the Password Safe request and approval system, you can request remote sessions that use RDP and SSH connection types.
Password Safe acts as a proxy, providing session management to target systems. No passwords are transmitted, allowing inherently secure session management. The below sections detail how to request and start sessions in Password Safe.
Request an RDP session
- Click to the right of the managed account.
The Access panel displays. - Select the Start Session tab.
- Enter a Reason for the RDP session.
- Select a ticket system and provide a ticket number if required.
- Check required options under Advanced Request Options.
- Click Start RDP Session. An RDP connection file downloads with a one-time use token that expires based on the Session Initialization timeout settings. Run the file to establish a connection to the target system.
- Enter the password that you use to authenticate into Password Safe.
- Click Access to the right of the managed account to request a session.
- From the Submit Request tab:
- Set a session start date and time that corresponds with the access policy and is outside of a scheduled maintenance window.
- Set the length of time for the session.
- Check RDP Session for the type of access you need.
- Provide a reason for the request. The maximum allowed length is 200 characters.
- Select a ticket system and provide a ticket number.
Reason, Ticket System, and Ticket Number fields may be optional or required, depending upon options configured in the access policy by your Password Safe administrator. Also, if your Password Safe administrator has set a specific ticket system in the access policy, you cannot select a different ticket system with your request.
- Click Submit Request. An email is sent to the approver if email notification is configured.
Use Direct Connect for RDP session
You can also use the Direct Connect feature to initiate an RDP session. As the requester, you can access the system without ever viewing the managed account's credentials.
To use Direct Connect, you must download the RDP file from the Password Safe web portal. This is a one-time download. Each account and system combination requires that you download the unique RDP file associated with it.
If the requestor is granted approval for RDP sessions, a message displays, stating, Request requires approval. If the request is not approved within 5 minutes, this connection will close. After five minutes, the RDP client disconnects, and then you can send another connection request. When the request is approved, you are automatically connected.
To initiate a Direct Connect RDP session:
- Click to the right of the managed account.
The Access panel displays. - Select the Start Session tab.
- Enter a Reason for the direct connect session.
- Select a ticket system and provide a ticket number if required.
- Check required options under Advanced Request Options.
- Click Start RDP Session. An RDP connection file downloads with a one-time use token that expires based on the Session Initialization timeout settings. Run the file to establish a connection to the target system.
- Run the file to establish a connection to the target system.
- Enter the password that you use to authenticate into Password Safe.
- Find the account in the list. Click Access to the right of the managed account to request a session.
- From the Direct Connect tab, click Download RDP File.
- Run the file to establish a connection to the target system.
- Enter your password that you use to authenticate into Password Safe.
- RDP Direct Connect supports only push two-factor authentication. An access-challenge response is not supported.
- LDAP users that use the mail account naming attribute cannot use RDP Direct Connect.
Start an RDP session without submitting a request
Users who have permissions to bypass the request and approval process for accessing the managed system and Password Safe administrators are able to start sessions and retrieve passwords immediately from the Start Session tab. The Start Session tab does not display for users who do not have permissions to bypass the request and approval process. To start the session:
- Click to the right of the managed account.
The Access panel displays. - Select the Start Session tab.
- Enter a Reason for the RDP session.
- Select a ticket system and provide a ticket number if required.
- Check required options under Advanced Request Options.
- Click Start RDP Session. An RDP connection file downloads with a one-time use token that expires based on the Session Initialization timeout settings. Run the file to establish a connection to the target system.
- Run the file to establish a connection to the target system.
- Enter the password that you use to authenticate into Password Safe.
SSH Direct Connect
Using an SSH client, a user can use the Password Safe Request and Approval system for SSH remote connections. The requester's information, including the Reason and the Request Duration, are auto-populated with default Password Safe settings.
To access a managed account or application using Direct Connect, the requester has to connect to Password Safe's SSH Proxy using a custom SSH connection string with one of the following formats:
- For UPN credentials:
<Requester>+<Username@Domain>+<System Name>@<Password Safe> - For down-level logon names\non-domain credentials:
<Requester>@<Domain\\Username>@<System Name>@<Password Safe>
You can override the default SSH port and enter port 4422. The requester is then prompted to enter their password, which they use to authenticate with Password Safe.
- For UPN credentials:
ssh -p 4422 <Requester>+<Username@Domain>+<System Name>@<Password Safe> - For down-level logon names\non-domain credentials:
ssh -p 4422 <Requester>@<Domain\\Username>@<System Name>@<Password Safe> - For an SSH application:
ssh -p 4422 <Requester>@<Account name>:<Application alias>@<System name>@<Password Safe>
Once the requester is authenticated, they are immediately connected to the desired machine.
Personal Access Tokens
Personal access tokens (PATs) provide a secure alternative to user passwords for authentication. Users create and manage their own tokens for Direct Connect and public API authentication. Administrators can view token metadata and revoke tokens as needed. Pathfinder requires the use of a PAT. You cannot use your password to authenticate.
This functionality applies to On-premises, Cloud, and Pathfinder deployments.
Create a Personal Access Token
To create and manage personal access tokens is performed from your profile settings.
- Click Profile and preferences
 in the upper-right hand corner.
 - Click Account Settings.
- Navigate to Personal Access Tokens.
- Select Create Token.
- Configure the token settings, such as expiration (for example, one day).
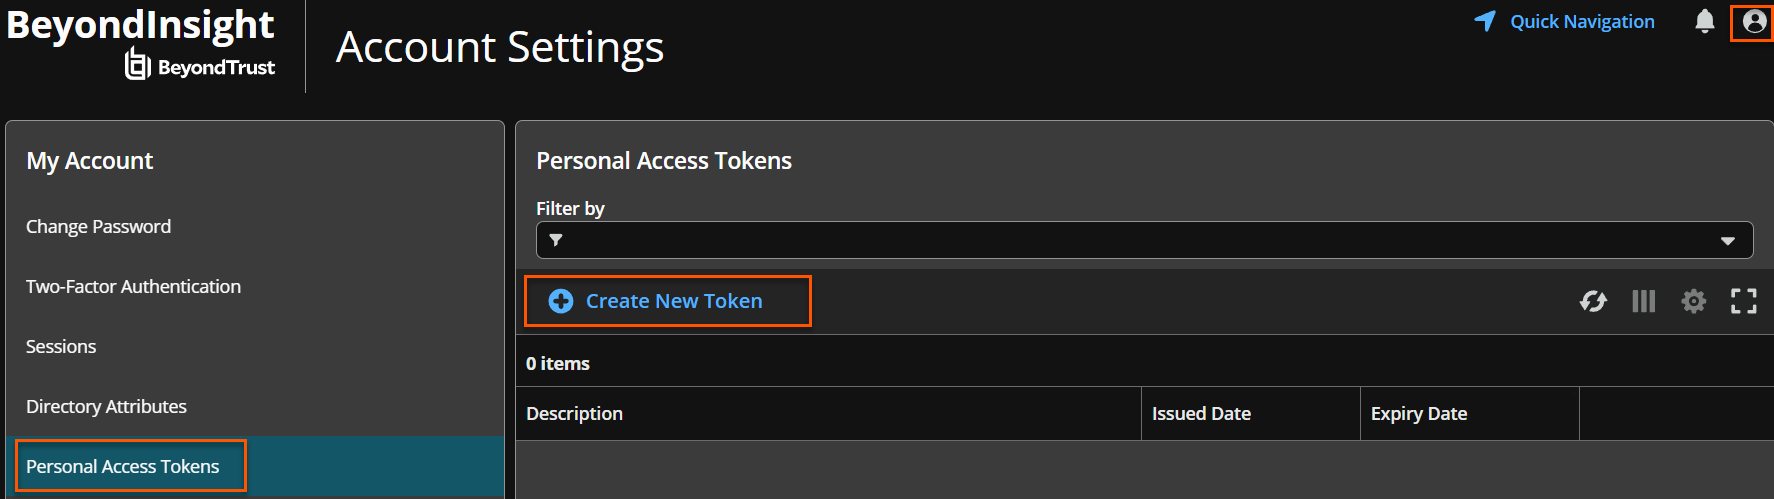
- Copy the token value for immediate use.

- Click Close.
Important informationThe system displays the token value only when you create it. Save the token in a secure location.
View and manage tokens
You can view existing tokens, including expiration details as well revoke tokens at any time.
To view token metadata for an existing token, do the following:
- Click Profile and preferences in the upper-right hand corner.
- Click Account Settings.
- From My Account pane, select Personal Access Token.
The Personal Access Token table displays with metadata (that is, Token Description, Issued Date, Expiry Date, etc.)
Revoke a token
To revoke tokens, do the following:
-
Click Profile and preferences
in the upper-right hand corner. -
Click Account Settings.
-
From My Account pane, select Personal Access Token.
The Personal Access Token table displays. -
Select an existing token from the table.
-
Click Revoke.

-
The following confirmation dialog box displays:
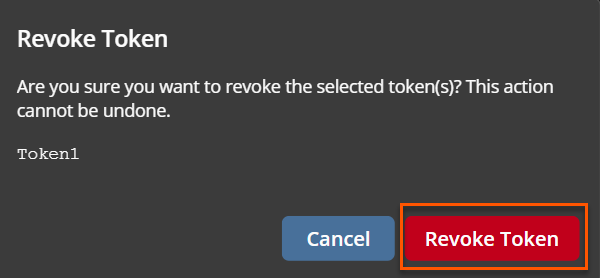
-
Click Revoke Token.
Important informationWhen you revoke a token, it immediately invalidates them. Any connection attempt using the revoked token fails.
Authenticate using a Personal Access Token
Users can authenticate with a personal access token instead of a password. They can use the token for Direct Connect authentication or for Public API authentication.
The platform continues to support password-based authentication, ensuring full backward compatibility across on-premises and cloud environments.
Best practiceUse personal access tokens instead of passwords to improve security and reduce credential exposure.
Administrator capabilities
Administrators manage personal access tokens at both the system and user levels.
View and revoke tokens (System level)
Administrators can review system-wide token metadata across all users. They can also review token metadata for suspicious or unused tokens and select tokens and revoke them as needed.
View and revoke tokens (User level)
Administrators can also manage tokens for individual users by viewing the user’s profile and associated PATs. They can also revoke tokens directly from the user account.
Configuration
Enable or disable Personal Access Tokens
To configure the global settings for PAT, go to Configuration > Authentication Management > Authentication Options.
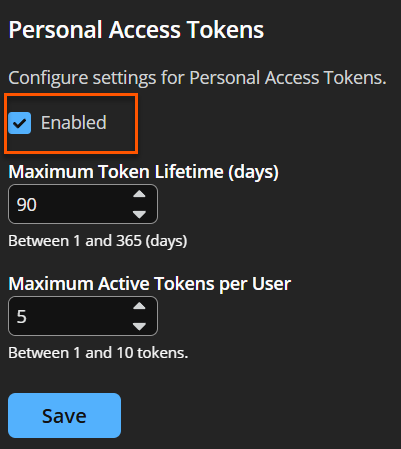
To allow token creation and usage, click Enabled. To disable the feature entirely, unselect the Enabled check box.
Set token policies
To define usage limits and security controls, set either of these settings:
- Maximum Token Lifetime (days) (default: 90 days)
- Maximum Active Tokens per user (default: 5 tokens)
These settings help enforce security and limit the number of active tokens.
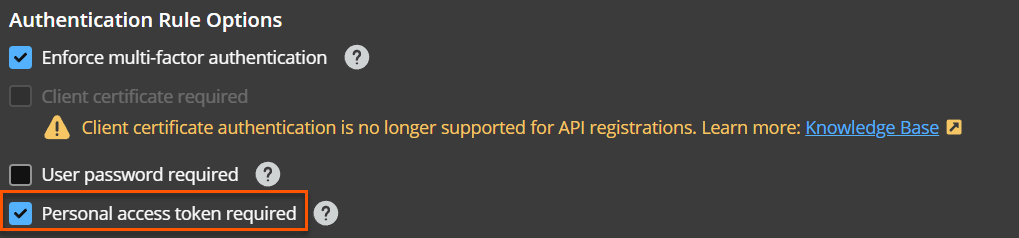
Require tokens for API authentication
To require personal access tokens for public API authentication, you need to select the Personal access token required checkbox. This applies rules that enforce token-based authentication.
Key security considerations
- Use tokens instead of passwords for automated or repeated access.
- Limit token lifetime to reduce exposure risk.
- Revoke unused or suspicious tokens promptly.
- Enforce token usage for API authentication where possible.
Summary
Personal access tokens improve authentication security by replacing passwords with scoped, revocable credentials. Users gain flexibility for Direct Connect and API access, while administrators maintain visibility and control through centralized management and policy configuration.
Updated 3 days ago
