Secrets Safe | BI Cloud

🚧

Important information

Upon upgrade to BeyondInsight/Password Safe 24.3:

  • Ownership: Secrets can now be owned by both users and groups simultaneously. Ownership takes precedence over safe-level permissions, provided the user has read access to the safe.
  • Safes: Root folders are now called safes. They are no longer created or removed by assigning the "Secrets Safe" feature permission.
  • Admin Access: BeyondInsight Administrators no longer have default access to all safes. They must be explicitly assigned permissions to safes and can only see safes they are part of via the team folder group.
    • Any existing API script that rely on administrators having full access to safes will fail unless they are assigned access to the safes.
  • Show All Safes: A new toggle allows administrators to view all safes.
  • Permissions Management: Only BeyondInsight Administrators can manage migrated safe permissions by default. Users and groups can manage safes once granted "Manage Safe" permissions.
  • Read Access: Users can only view safes and their contents if they have read access.
  • Team Folder Group: On upgrade, the group that created a team folder is automatically granted "Create" and "Read" permissions to the new safe. This does not apply to safes created post-upgrade.

What is Secrets Safe?

Secrets Safe is a secure solution for storing and managing secrets in a controlled, auditable environment. Password Safe administrators can assign groups in BeyondInsight to safes. Each safe operates as an isolated space where users can securely manage secrets within that safe.

Key features include:

  • Ownership and Access Control: Ownership of secrets can be managed by anyone who is a current owner of the secret or has the Manage Safe permission. Assignment of permissions is safe-wide and can not be done on individual secrets.
  • Permissions: Safes provide granular control over permissions, allowing users or groups to be assigned specific permissions that define how they can interact with secrets they do not own.
  • Read-only access: Users can view, retrieve, and organize secrets into folders but cannot modify them.
  • Ease of Access: Secrets can be quickly found and accessed using search and filtering tools.

How is Secrets Safe useful?

Secrets Safe minimizes the risk of unauthorized access to secrets. Each safe ensures that secrets are stored securely and accessed only by authorized users. Secrets Safe supports three different types of secrets: credential, file, and text.

How do I access Secrets Safe?

  1. Use a browser to sign in to your BeyondInsight/Password Safe URL.
    This URL is provided in the BeyondTrust welcome email and includes your site URL followed by /login.
  2. From the left menu, click .
    The Secrets Safe page displays.

The Secrets Safe page

Use the Secrets Safe page to view at-a-glance data about your secrets.

Secrets Safe for Cloud Home Page
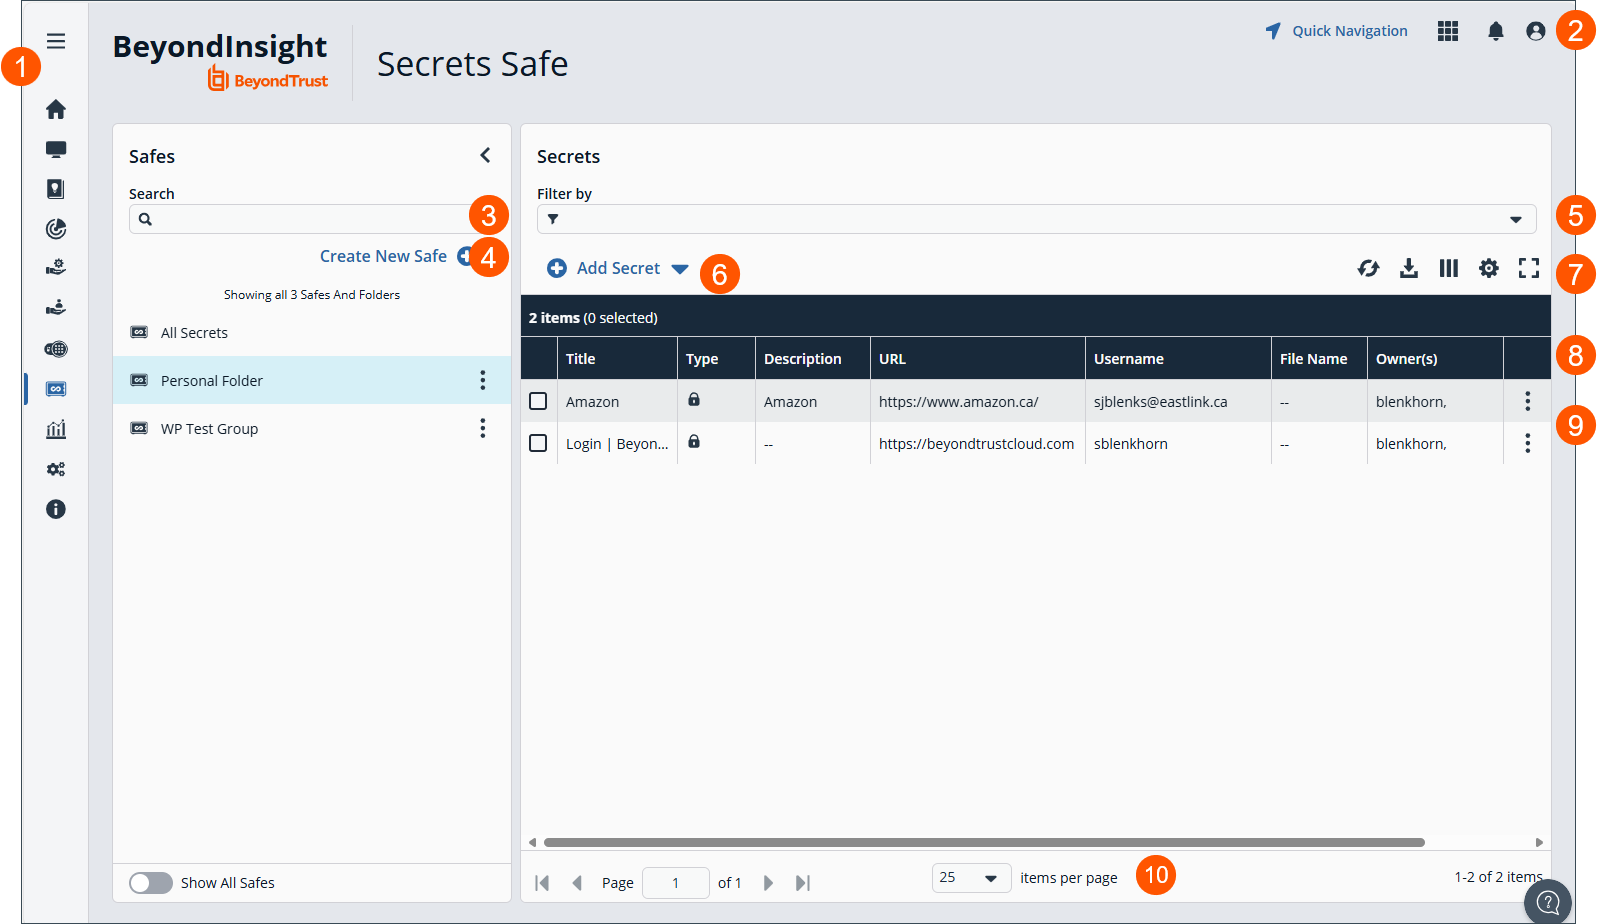
  1. Left menu: Easy access to all pages in BeyondInsight/Password Safe, including the Home, Assets, Smart Rules, Discovery Scanner, Management Systems, Managed Accounts, Password Safe, Secrets Safe , Analytics and Reporting, Configuration, and About pages.
  2. Header: Navigate to your favorite pages, view your notifications, access your connected apps, and set your account preferences.
  1. Safes > Search: View and search for safes.
  2. Create New Safe: click to create a new safe.
  3. Secrets > Filter By: Filter by ID, Title, Type, Description, URL, Username, File Name, Owner(s), Folder, or Notes.
  4. Add Secret: Click to add a new secret.
  5. Grid display preferences: Set display preferences on the Secrets grid using the following options represented by icons above the grid:
    • Click to refresh the list, to download the list to a .csv file, to select which columns to display on the page, to configure your page display, andto expand the grid.
  6. Secrets Safe list columns:
    Column Names
    • ID
    • Title
    • Type
    • Description
    • URL
    • Username
    • File Name
    • Owner(s)
    • Folder
    • Notes

  7. Secrets Safe grid: Displays information based on filter selections.
  8. List navigation options: Navigate in the Secrets Safe secrets list.

Assign the Secrets Safe feature to a group

Access to Secrets Safe is granted to users by assigning permissions for the Secrets Safe feature to a group in which the users are members.

  1. From the left menu, click .
    The Configuration page displays.

  2. Under Role Based Access select User Management.
    The User Management page displays.

  3. Select the Groups tab.

  4. Locate the group you want to assign the Secrets Safe feature to.

  5. Click > View Group Details.
    The Group Details page displays.

  6. Under Group Details, select Features.

  7. In the Features pane, select the Secrets Safe feature.

ℹ️

You can filter the list of features by All Features or Disabled Features, and Feature Name to quickly locate the Secrets Safe feature.

  1. Click Assign Permissions above the grid:
  2. Select the appropriate permissions:
    • Read-only
    • Full control (read and write) – users with full control can create safes
    • Disable permissions

Users who are members of the group are granted access to the Secrets Safe page. They must have read+ access in order to view safes.

Create, rename, and delete a Safe

ℹ️

By default, administrators do not automatically see all safes. They can only see safes they have read+ access to. To view all safes, toggle Show All Safes to on. Safes they don’t have access to are greyed out.

Any user assigned the Secrets Safe feature with full control permissions can create safes. Users that create a safe are automatically granted the Manage Safe permission.

ℹ️

The Manage Safe permission can be removed by other users with the same permission on that safe, or by BeyondInsight administrators.

Create a safe

To create a new safe:

  1. From the left menu, click .
    The Secrets Safe page displays.
  2. Under Safes, click Create New Safe +.
  3. Enter a name for the safe.
  4. Click Create Safe.

Rename a safe

Users can rename safes that they own.

To rename a safe:

  1. From the left menu, click .
    The Secrets Safe page displays.
  2. Locate the safe in the Safe panel.
  3. Click > Rename.
  4. Enter a new name for the safe, and then click Save Changes.

Delete a safe

Users can delete safes that they own.

To delete a safe:

  1. From the left menu, click .
    The Secrets Safe page displays.
  2. Locate the safe in the Safe panel.
  3. Click > Delete.
  4. Click Delete in the confirmation dialog.

ℹ️

Users must have the Manage Safe permission assigned to them directly, or to a group they’re a member of, to delete or rename a safe.

Add users and groups to a safe, and assign permissions

Any user who is assigned the Manage Safe permission, either directly or through a group, can assign access and permissions to a safe. BeyondInsight administrators can always manage safe permissions regardless of their current access level.

  1. From the left menu, click .
    The Secrets Safe page displays.
  2. Locate the safe in the Safe panel.
  3. Click > Go to Advanced Details.
    The Advanced Details page displays. The Access Management grid displays users and groups already added to the safe.
  4. Select All Users & Groups from the Show dropdown list:
    • For individual users or groups, click > Assign Permissions.
    • For multiple users or groups, check the boxes next to the user or group. Click Assign Permissions above the grid.

ℹ️

If the selected user/group has no permissions assigned, the bulk delete permissions button is not available

  1. In the Assign Permissions panel, check the appropriate permissions. Permissions available are:
    • Read Secrets and Folders (Required) – this is assigned by default
    • Create Secrets and Folders
    • Update Secrets and Folders
    • Delete Secrets and Folders
    • Share Secrets
    • Manage Safe (selecting this permissions automatically checks all permissions).
  2. If required, toggle Set an expiration date to on. Enter an expiry date and time. Expiration defaults to one week from the current date.

ℹ️

When an expiry occurs, expired permissions remain listed in the Access Management grid until a scheduled job, which runs at midnight, removes them.

  1. If multiple users or groups are selected, you can remove them prior to saving by clicking X to the right of the user/group. If all users/groups are removed, the Assign Permissions side panel closes.
  2. Click Assign Permissions to save selections.

Manage folders

Users can organize their secrets into subfolders within a safe to make locating a secret more efficient.

Create a folder

To create a new folder:

  1. From the left menu, click .
    The Secrets Safe page displays.
  2. Select a safe or one of its subfolders.
  3. Click > Create Folder.
  4. Enter a name for the folder.
  5. Click Create Folder.

Rename a folder

  1. From the left menu, click .
    The Secrets Safe page displays.
  2. Select a folder within a safe.
  3. Click > Rename.
  4. Enter a new name.
  5. Click Save Changes.

Delete a folder

  1. From the left menu, click .
    The Secrets Safe page displays.
  2. Select a folder within a safe.
  3. Click > Delete.
  4. Click Delete on the confirmation message.

Add Secrets to a safe or folder

Permissions are a combination of all permissions given to a user, as well as the permissions they inherit from the groups they belong to.

  • Users with full permissions to a safe can create secrets in that safe or in any of the safe’s subfolders.
  • Users and Groups with read access to a safe can be assigned ownership to a secret within that safe.
  • Owners of a secret have update, share, and delete permissions to that secret.
  • Users that own a secret in a safe they do not have read access to will not be able to access that secret.

Add a secret

To add a secret:

  1. From the left menu, click .
    The Secrets Safe page displays.
  2. Select a safe or one of its subfolders.
  3. In the Secrets pane, click + Add Secret.
  4. Select a secret type: Add Credential, Add File, Add Text, or Import Secrets.
    The Create New Secrets pane displays.
  5. Fill out the information for each type of secret.

Add Credential

  1. Enter a Title, Description, Username, and URL (if required).
  2. Set the password:
    • Select Manual Input to manually enter a password.
    • Select Auto Generate and select a Password Policy from the list to have the password created based on the defined policy.
    • Click Generate Password.
  3. Add a note if you require additional information to display for this credential other than its description. You can add Notes as a column when viewing the list of credentials in the grid, and you can also filter the grid by Notes.
  4. Click Create Secret.

Add File

  1. Enter a Title, Description, and URL (if required).
  2. Drag the file into the Upload File box or click the box to navigate to a file to upload.
  3. Click Create Secret.

ℹ️

There are no restrictions on file type; however, files must be 5MB or less.

Add text

  1. Enter a Title, Description, and URL (if required).
  2. Enter the body of the text.
  3. Add a note if you require additional information to display for this credential other than its description. You can add Notes as a column when viewing the list of credentials in the grid, and you can also filter the grid by Notes.
  4. Click Create Secret.

Import secrets

  1. If a confirmation dialog appears, click Import Secrets.
  2. Drag the file into the Import CSV File box or click the box to navigate to a file to upload.
  3. Select a folder or create a new folder to save the imported secret to.
  4. Click Import Secrets.

Import requirements

  • Import Secret file type must be CSV
  • CSV import functionality is only available if Workforce Passwords is enabled for the user.
  • Files must be 200KB or less.
  • CSV files must contain the following:
    • CSV (comma is the only supported field separator)
    • Header row (the first row in the file is skipped and seconds are processed starting on line two
    • Eight columns are required (not all columns are used)
      • URL
      • Username
      • Password
      • TOTP (not used)
      • Extra (not used)
      • Name
      • Grouping (not used)
      • Fav (not used)

Example

CSV File - url,username,password,totp,extra,name,grouping,fav

URLUsernamePasswordTOTPExtraNameGroupFavorite
https://www.testsite00001.comTestUser01password01TestName001
https://www.testsite00002.comTestUser02password02TestName002

View, copy, edit, and delete a secret

Users can view details for their safe’s secrets, such as who owns the secret, when the secret was created and modified, and the folder path for the secret. Users can also copy the username and password for a team secret so they may use it. Secret owners can edit the properties and delete secrets they own. Administrators are limited by their current access level. For example they cannot edit a secret that they are not the owner of if they do not have the update permission. However, administrators can manage user and group access to a safe to change permissions as needed. Any modifications to permissions are audited.

  1. From the left menu, click .
    The Secrets Safe page displays.
  2. Select a safe or one of its subfolders.
  3. Locate the secret in the Secrets grid.
  4. Click to the right of the secret in the Secrets grid. Each secret type, as indicated by its Type icon, has specific actions available from the options menu. Depending on your permissions:
    • For credential secrets, you can:
      • Copy Username to the clipboard
      • Copy Password to the clipboard
      • Copy Notes to the clipboard
      • View Details of the secret
      • Edit Secret - update information, and then click Update Secret
      • Share Secret - share the secret to one of the Safes in your Safes pane
      • Remove Share - unshare from the safe the secret was shared to
      • Delete Secret - click Delete in the confirmation message.
    • For file secrets, you can:
      • Download File locally
      • Copy Notes to the clipboard
      • View Details of the secret
      • Edit Secret - update information, and then click Update Secret
      • Share Secret - share the secret to one of the Safes in your Safes pane
      • Remove Share - unshare from the safe the secret was shared to
      • Delete Secret - click Delete in the confirmation message.
    • For text secrets, you can:
      • Copy Text to the clipboard
      • Copy Notes to the clipboard
      • View Details of the secret
      • Edit Secret - update information, and then click Update Secret
      • Share Secret - share the secret to one of the Safes in your Safes pane
      • Remove Share - unshare from the safe the secret was shared to
      • Delete Secret - click Delete in the confirmation message.
    • For imported secrets, you can:
      • Copy Username to the clipboard
      • Copy Password to the clipboard
      • Copy Notes to the clipboard
      • View Details of the secret
      • Edit Secret - update information, and then click Update Secret
      • Share Secret - share the secret to one of the Safes in your Safes pane
      • Remove Share - unshare from the safe the secret was shared to
      • Delete Secret - click Delete in the confirmation message.

Share a link to the secret

Create and share a link to a secret.

  • Access to Secrets Safe is required to share a URL to a secret.
  • Users you are sending the URL to require permissions to the secret.
  • You cannot create a direct link to secrets saved in the Personal folder.

To share a URL for a secret:

  1. From the left menu, click .
    The Secrets Safe page displays.
  2. Select a safe or one of its subfolders.
  3. In the Secrets grid, click > Copy Secret Link.
    The Distributing a Secret Link dialog box displays.
  4. Click OK.
    A cookie is saved.
  5. Send the link to the users.
  6. When the user clicks the link:
    • The View Details page displays for the secret if the user is already logged on to Secrets Safe.
    • The Secrets Safe logon page displays if the user is not logged on.
    • If the user cannot access Secrets Safe, an error notification displays and their dashboard opens.
    • The user can access Secrets Safe but not the safe where the linked secret exists. Their personal folder displays (or all secrets if they don't have Workforce Passwords enabled) and an error notification displays.

Share a secret

Secrets can be shared between safes and folders. Shared secrets inherit the destination safe’s permissions. When secrets are shared, a shared icon displays in the type column in addition to the original type icon.

To share a secret:

  1. From the left menu, click .
    The Secrets Safe page displays.
  2. Select a safe or one of its subfolders.
  3. In the Secrets grid, click > Share Secret.
  4. The Share to Folders panel displays all safes and folders where you have the Create permission assigned.
  5. Select a safe or folder.
  6. Click Share. The secret displays in the secrets grid for the associated safe or folder.

ℹ️

Secrets can be shared from the Personal folder, however ownership is locked for secrets shared from a personal folder. You can see the owner’s name, but the Manage Ownership option is hidden.

Remove a shared secret

You can remove a shared secret. The Remove Share option is only available on the original copy of a secret. If selected it removes all shared instances of that secret, while the original copy remains. This requires the Share permission to that secret or ownership of the secret.

Additionally, you can delete individual shared copies of a secret from the safe they were shared to. This is done by selecting the Delete Share option . This requires the Delete permission to that secret or ownership of the secret. You can bulk delete original secrets and shared copies at the same time with multi-select.

  1. From the left menu, click .
    The Secrets Safe page displays.
  2. Select a safe or one of its subfolders.
  3. In the Secrets grid, click > Remove Share.
  4. Click Remove on the confirmation message.

ℹ️

Shared secrets cannot be moved. When editing a shared instance of the secret the option to move that secret is not available.


©2003-2025 BeyondTrust Corporation. All Rights Reserved. Other trademarks identified on this page are owned by their respective owners. BeyondTrust is not a chartered bank or trust company, or depository institution. It is not authorized to accept deposits or trust accounts and is not licensed or regulated by any state or federal banking authority.