
Directory authentication | Pathfinder
Overview
Pathfinder authenticates directory users through a connected BeyondTrust product instead of connecting directly to Active Directory or LDAP. The connected product acts as the proxy site: Pathfinder sends the credentials to the site through a Resource Broker, the site checks them against your directory, and it then returns the result.
These products can serve as the proxy site:
- Password Safe
- Privileged Remote Access
- Remote Support
You choose one proxy site and product for each directory provider you register.
Prerequisites
Before you begin, make sure you have:
- Administrator access to Pathfinder.
- The directory domain and any required connection details.
- A connected BeyondTrust product configured with an Active Directory or LDAP provider.
- A non-directory (local or SSO) admin account. AD/LDAP-authenticated admins can't configure a directory proxy. The proxy must exist before their accounts can sign in at all.
ImportantThis procedure assumes you have already configured an Active Directory or LDAP provider in your BeyondTrust product. If you have not, complete the appropriate configuration procedure before continuing.
Register the directory provider
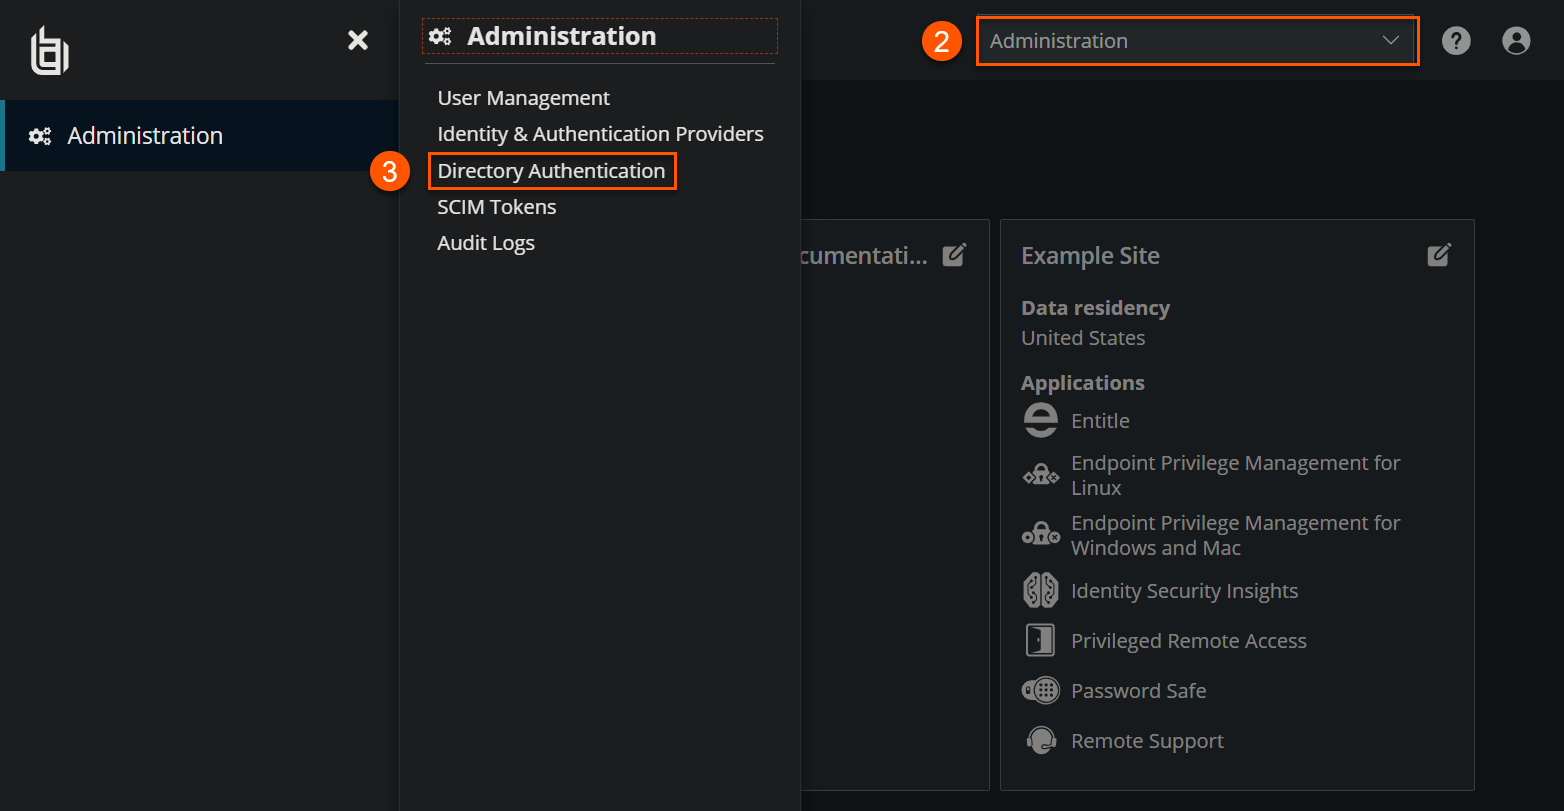
- Log in to Pathfinder as an administrator.
- From the tenant dropdown, select Administration.
- Open the navigation menu and click Directory Authentication.
- On the Directory Authentication page, you can add a new directory provider or edit an existing one.
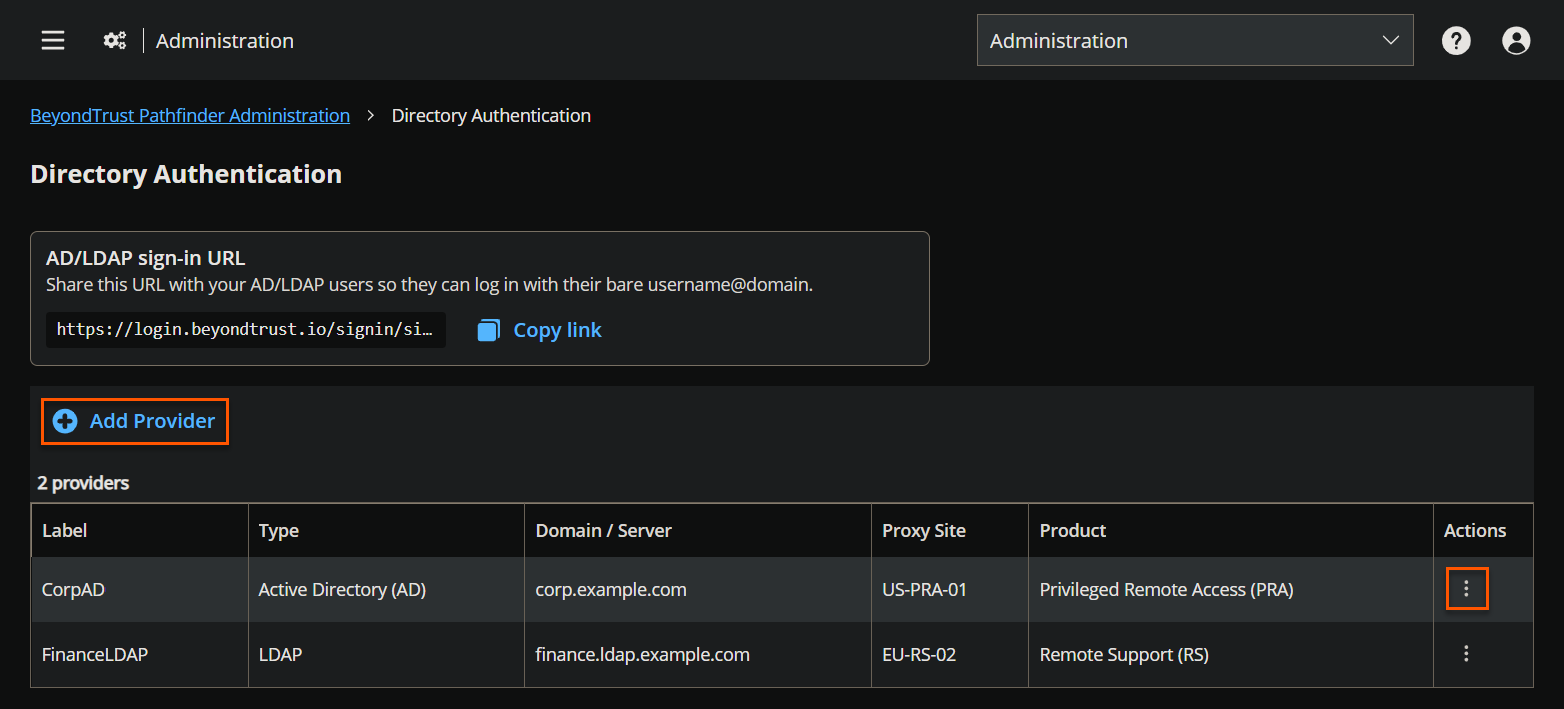
-
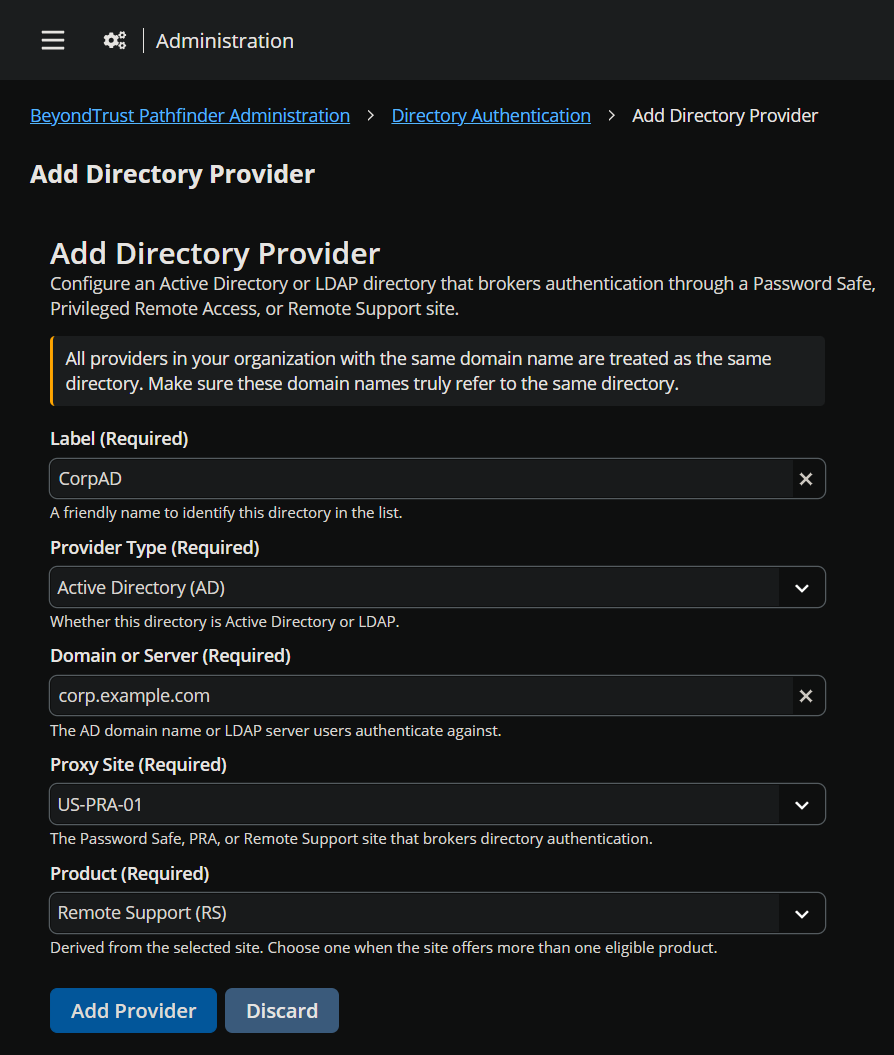
When adding a provider, configure:
- Label
- Provider type
- Domain or server
- Proxy site
- Product
Domain matching is exact, not heirarchical. A provider registered for
corp.localdoes not serve a user who signs in as[email protected]. Register each domain you want to authenticate.
WarningRemoving a provider prevents users who rely on that directory from signing in unless another authentication method is available.
Sign in with a directory account
Directory users sign in at your organization's sign-in URL, not the standard Pathfinder login page. The URL carries your organization ID, which routes the user to the right provider:
https://login.beyondtrust.io/signin/signIn?orgId=your-org-idReplace your-org-id with your organization's ID. Your organization ID also appears at the top right of every Administration page.
Share this URL with your directory users before they try to sign in. At that URL, users enter:
- Their username in
username@domainformat, for example[email protected]. - Their directory password
Pathfinder creates Active Directory and LDAP accounts automatically the first time a user signs in. Invite users manually only if you want to set up their access before their first sign-in.
In Pathfinder, a directory account shows as username@domain.<Org ID>. The organization ID suffix is what makes the account a directory account.
AD/LDAP is the only method these accounts can use; there is no fallback to local or SAML. If the directory server or proxy configuration breaks, affected users can't sign in until it has been restored.
Local accounts can never convert to AD/LDAP accounts, since only directory-provisioned usernames carry the organization ID suffix.
The directory sign-in page has no Forgot password link. Directory users reset their passwords through their own organization's IT process.
Multi-factor authentication for directory users
Directory users can set up Pathfinder-native MFA on top of directory validation, the same way local users do.
- MFA is opt-in for each user. Users enroll from their own profiles after they sign in.
- Once a user enrolls, Pathfinder challenges them for a code at each sign-in.
- Pathfinder can't require MFA for any user type, so you can't mandate it for a group or for your organization.
- Pathfinder can't read MFA settings in the source product. Factors already set up there — TOTP, RADIUS, or Duo — are not migrated, reused, or reported. A directory user starts with no MFA in Pathfinder.
Verify a directory sign-in
Directory sign-ins appear in the Pathfinder audit log.
- Sign in as an administrator and open Administration.
- Open the navigation menu and select Audit Logs.
- Filter by date, or search the User Email or Action columns.
- Select the plus icon on a row to see the detail.
A successful directory sign-in records three events, in this order:
- AD/LDAP directory-auth service token minted
- AD/LDAP directory validate-credentials outcome
- User signed in using AD/LDAP directory authentication
If the first two events appear without the third, the directory rejected the credentials. Expand the validate-credentials row for the reason.
Pathfinder audit logs show directory users as
username@domain.<Org ID>. Product audit logs show only the username. To match an entry across both, compare the username and the time.
Troubleshoot directory sign-in
| Symptom | What to check |
|---|---|
| The user's account is not recognized. | The user is on the standard login page. Send them the sign-in URL that includes your organization ID. |
| The user's account is not recognized. | The username format is wrong, or the domain does not match a registered provider. Domain matching is exact. |
| The user's account is not recognized. | The account is a local account, not a directory account. Local accounts have no organization ID suffix. |
| The sign-in page reports that the authentication service is unavailable. | Both the proxy site and the product instance must be reachable. Confirm that they are online. |
| A user signs in but can't find their organization or data. | Compare the organization ID in the URL the user opened with the organization ID on your Administration pages. They must match. |
| A user signs in but sees only part of a product. | Group roles in that product control what the user sees. Check the user's group and its roles in the product. |
| A directory user wants to reset their password. | Directory passwords are managed by the user's own organization. Send the user to their IT team. |
Updated 7 days ago
