
Password Safe - Cloud implementation | PS Cloud
Learn how to deploy Password Safe Cloud by configuring resource brokers, Smart groups, authentication groups, roles, and access policies.
Prerequisite
Before you begin this topic, make sure you understand the basic concepts, see Password Safe - Getting Started.
Cloud implementation workflow
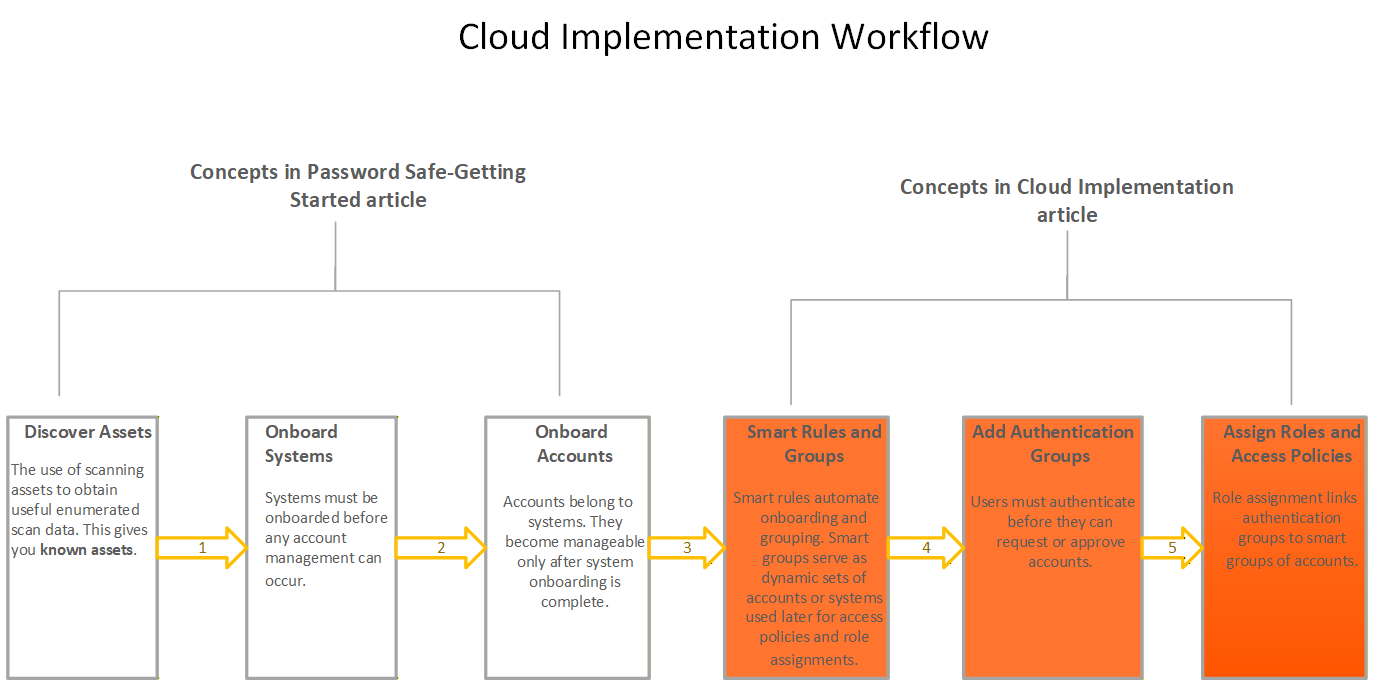
Use the six-step workflow to complete a successful Cloud implementation. The following sections focus on steps 4 through 6. The Password Safe - Getting Started article covers steps 1 through 3.
Why is this important?
When you deploy Password Safe in the Cloud, you streamline privileged access security and management without the overhead of maintaining on‑premises infrastructure. Password Safe Cloud delivers the same core capabilities as the on‑premises and IaaS versions, including privileged password management, privileged session management, and automated account discovery, through a fully managed service in Microsoft Azure.
By implementing a Cloud deployment, you tailor Password Safe Cloud to your organization’s security, compliance, and operational requirements. By configuring features such as resource zones, authentication methods, session controls, and scanning options, you ensure that access to critical systems follows the principle of least privilege and aligns with your internal policies.
Advanced settings also help you scale securely. As your environment grows or becomes more segmented, advanced configuration allows you to maintain centralized control without sacrificing visibility or performance. A consistent configuration pattern reduces risk, simplifies audits, and ensures users can access required resources without exposing credentials or expanding your attack surface.
Use the following sections to review the concepts, requirements, and workflows you need to implement Password Safe in a cloud environment effectively.
Concepts to consider
Resource Brokers
Password Safe Cloud uses resource brokers in resource zones to manage resources across segmented networks.
Cloud-only feature.
Groups
Delegates access to managed systems more effectively.
Role-based access
Role-based access assigns permissions and access rights based on a user’s role in the organization.
Access policies
An access policy defines how often and when users can request passwords, start remote access sessions, or open applications managed by Password Safe.
Password Safe Cloud architecture
Overview
A typical Password Safe Cloud only deployment follows a standard architecture that securely manages credentials and controls access to protected resources. The architecture brings together several core components, clearly defined network boundaries, and secure communication paths.
Core components handle tasks such as storing credentials, brokering access requests, and auditing activity. Network boundaries separate trusted and untrusted environments to reduce risk and limit exposure. Secure communication paths connect users, resource brokers, and managed resources, ensuring that credentials never travel to endpoints and that Password Safe establishes sessions safely.
With the components, boundaries, and communication paths in place, Password Safe Cloud manages access centrally while enforcing security and compliance requirements.
You get a deployment that’s easy to understand, secure by design, and scalable as your environment grows.
Password Safe Cloud deployment model
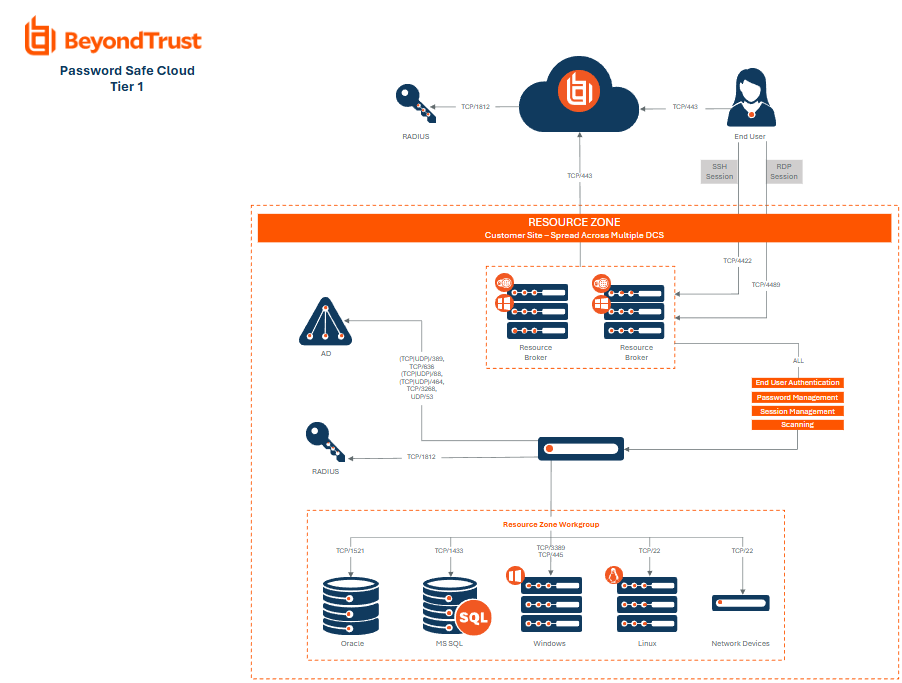
The following diagram shows a typical Password Safe Cloud only deployment.
Use the diagram to see how end users connect through Password Safe Cloud to access protected resources using resource zones, resource brokers, and secure communication paths. The diagram also highlights network boundaries and key protocols that enable secure authentication, session brokering, and resource access.
Resource brokers
Important information
- Resource brokers and zones apply only to Cloud deployment.
- Install resource brokers and zones before you complete any other deployment steps.
Password Safe Cloud uses resource brokers in resource zones to manage resources across segmented networks. When you configure resource zones effectively, you get centralized control over resource allocation, stronger security, and better support for compliance requirements. Effective configuration simplifies resource management and gives you added peace of mind.
The Broker provides authentication to the Password Safe interface, asset and account discovery through the discovery scanner, credential management, and session proxies. You may install up to 200 resource brokers across all Resource Zones. Install each broker on a customer-provided and managed Windows Server x64 2016 or later. Download the Resource Broker software from Password Safe Cloud, and then install the software with a unique key to communicate with a Resource Zone.
Use a resource zone to group resources on your network. You can create up to 51 resource zones to support your network segmentation needs, although a single zone is often enough for smaller or less complex environments. Password Safe Cloud requires at least one resource zone.
By default, Password Safe Cloud creates a resource zone named Default. The Default zone acts as a catch-all for all domains and workgroups in your network. You can’t edit or remove the Default resource zone.
Download and install a resource broker
- From the left menu, click
 .
.
The Configuration page displays. - Under Privileged Access Management Agents select Resource Zones.
The Resource Zones page displays. - Click Show Install Key.
- Click
 to the right of the key to copy to clipboard. You need the install key in step 9.
 - Click Download Installer.
- Copy the downloaded BeyondTrust.Agents.Bootstrapper.exe file to the Windows server where you want to install the resource broker, and then click to run the file.
- Click Install.
- Click Next on the welcome screen.
- Paste the Install Key that you copied in step 3 into the Install Key field, and then click Next.
- Select a resource zone from the Zone list, and then click Next.
- Check the box to accept the license agreement terms, and then click Next.
- Click Next to install to the default folder or click Change to install to a different folder, and then click Next.
- Click Install to begin the installation.
- Click Finish to complete the Setup Wizard.
- Click Close on the Installation Successfully Completed screen.
- Go to the BeyondInsight home page to validate the dynamic dashboard has updated the Resource Zones and Resource Brokers tiles for the newly installed resource broker.
For more information about resource brokers, see Resource brokers.
Smart rules and Smart groups
Before you configure access, review how Password Safe uses groups.
Password Safe uses two types of groups to manage access and authentication:
- Smart Groups: Organize assets, accounts, and managed systems, and serve as the basis for role assignment. When you allocate access to accounts for a Requestor, Smart Groups determine what assets, accounts, and managed systems that Requestor can access.
- User Groups: Configure User Groups in User Management to define the users who sign in to BeyondInsight. User Groups specify how users authenticate to the system, for example, through Active Directory, local accounts, LDAP, or Entra ID.
The following guidance focuses on Smart Groups.
Review how Smart rules and Smart groups work together to keep your environment organized.
Smart rules automate onboarding and grouping. Smart groups serve as dynamic sets of accounts or systems used later for access policies and role assignments.
Why Smart groups matter
If you administer Password Safe, Smart groups play a big part in your day‑to‑day work.
Use Smart groups for:
- Role assignments
- Access policies
- Auditing scopes
- Session recording scopes
- Scanning (starts in version 26.1)
Example
| Smart Rule purpose | Example Condition | Resulting Smart Group |
|---|---|---|
| Onboard Windows accounts | OS = Windows | Windows Local Accounts |
| Group Linux servers | OS = Linux | Linux Asset Group |
| Identify domain assets | Source = Directory Query | Domain Systems Group |
Tip
- For onboarding at scale, create smart rules with narrow, meaningful criteria. Narrow criteria keep smart groups clean and predictable.
- Avoid overly broad smart rules such as All accounts that contain admin in the name.” Overly broad criteria can unintentionally onboard service accounts or critical system users.
For a more in depth understanding of Smart rules and groups, see Understanding Smart Rules and Smart Groups.
Add authentication groups
Users must authenticate before requesting or approving accounts. Password Safe supports the following:
- Active Directory
- Entra ID
- LDAP
- Local groups
Authentication group types
Password Safe supports several authentication group types, and each works best in a specific scenario. As an admin, knowing the differences helps you pick the right one for your environment.
Here’s a simple breakdown to guide you.
| Group Type | When to use | Requirements |
|---|---|---|
| Active Directory | Most deployments | Requires a bind account |
| Entra ID | Cloud-native environments | Azure AD integration |
| LDAP | Non-AD directory platforms | Schema alignment |
| Local | Testing or simple setups | No directory needed |
Onboard and regularly rotate any bind account you use for browsing to meet security expectations.
Add an Active Directory group
To create an Active Directory group in BeyondInsight:
- Use a browser to sign in to your BeyondInsight/Password Safe URL.
The BeyondTrust welcome email provides the URL, which includes your site URL followed by /login. - From the left menu, click
 .
.
The Configuration page displays. - Under Role Based Access, select User Management.
The User Management page displays. - From the Groups tab, click + Create New Group.
- Select Add an Active Directory Group.
- Select a credential from the list.
If you require a new credential, click Create New Credential to create one. Password Safe adds the new credential to the list of available credentials.
- If the Domain field does not automatically populate, enter the name of a domain or domain controller.
- After you enter the domain or domain controller credential information, click Search Active Directory. Password Safe displays a list of security groups in the selected domain.
The default filter, an asterisk (*), returns all groups. For performance reasons, Password Safe retrieves a maximum of 250 groups from Active Directory.
- Set a filter on the groups to refine the list, and then click Search Active Directory.
ExampleSample filters:
- a_ returns all group names that start with "a"
- _d returns all group names that end with "d"
- _sql_ returns all groups that contain "sql" in the name
- Select a bind group, and then click Add Group.
- Password Safe adds the group and sets it to Active but does not provision or synchronize it with AD. Synchronization with AD to retrieve users begins immediately.
- After the group syncs with AD, you can view the users in the group by selecting Users from the Group Details pane.
- Use the filters above the grid to narrow down the list of users that the grid displays by Type, Username, Name, Email, or Domain, or to show users outside the group.
- By default, new groups do not have any permissions. You must assign permissions on features and smart groups after creating a new group.
Assign Requester and Approver roles
Role assignment links authentication groups to smart groups of accounts. At this step, users gain access to the accounts you manage.
| Role | Allows a user to: |
|---|---|
| Requestor | See eligible accounts Request access Launch RDP/SSH sessions (depending on the policy) |
| Approver |
|
Assign a Requester role
-
Set a browser to sign in to your BeyondInsight/Password Safe URL.
The BeyondTrust welcome email provides the URL, which includes your site URL followed by /login. -
From the left menu, click
.
The Configuration page displays. -
Under Role Based Access, select User Management .
The User Management page displays. -
Select the requester AD or local group.
-
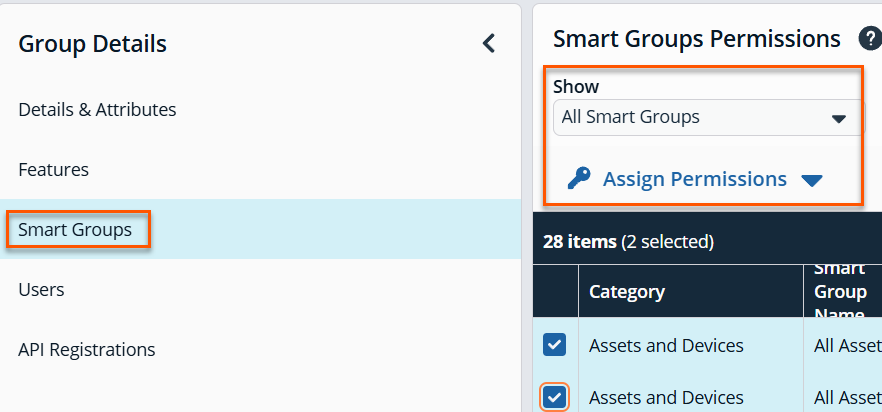
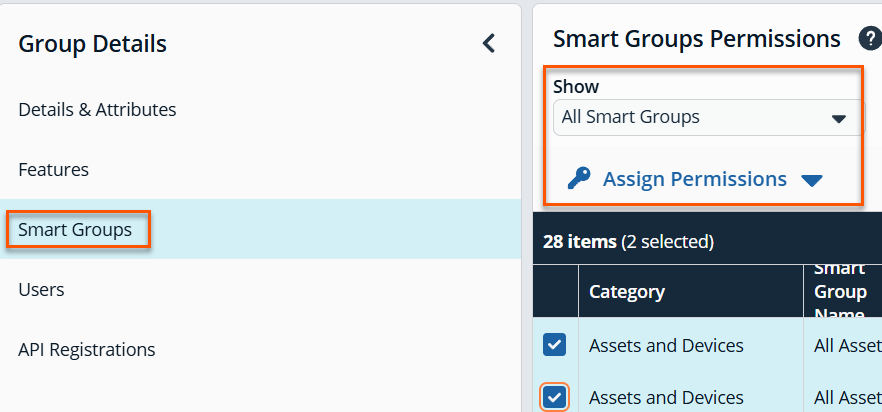
From the Group Details pane, select Smart Groups.
-
Under the Smart Group permissions section, click the Show filter.
-
Select All Smart Groups.
-
From the table grid, select the appropriate permissions.
-
Click Assign Permissions.
-
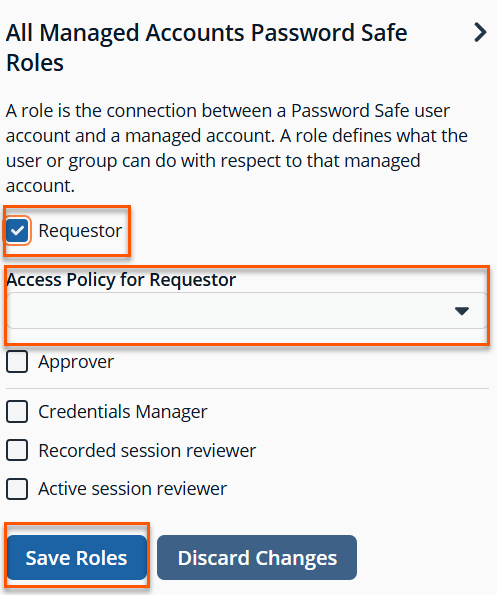
Right click the ellipsis and select Assign Password Safe roles.
-
Select the Requestor role.
-
Select Access Policy for Requestor.
-
Click Save Roles.
TipAssign requester roles to groups, not individuals. Group-based assignments prevent administration complexity over time.
Assign an Approver role
-
Use a browser to sign in to your BeyondInsight/Password Safe URL.
The BeyondTrust welcome email provides the URL, which includes your site URL followed by /login. -
From the left menu, click
.
The Configuration page displays. -
Under Role Based Access, select User Management .
The User Management page displays. -
Select the approver directory group.
-
From the Group Details pane, select Smart Groups.
-
Under the Smart Group permissions section, click the Show filter.
-
Select All Smart Groups.
-
From the table grid, select the appropriate permissions.
-
Click Assign Permissions.
-
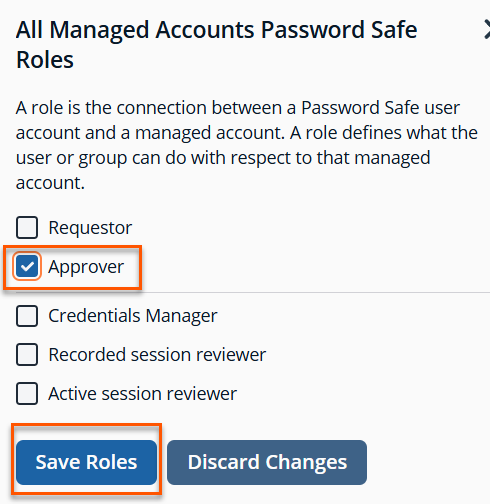
Right click the ellipsis and select Assign Password Safe roles.
-
Select the Approver role.
-
Click Save Roles.
Important informationIf a group requiring approval has no approvers, requesters see the following message:
No approvers are assigned to this request.
Requesters cannot proceed.
Example: Two Accounts, Two Policies
| Account | Smart Group | Policy | User Experience |
|---|---|---|---|
| joesmith_local (Windows) | Windows_Group | Default (Mon–Fri, No Visibility) | No password view; launch sessions only |
| helendavis_admin (Linux) | Linux_Group | 24/7 + Approval | Must wait for approver before launching sessions |
TipUse separate Smart groups for different access behaviors to keep your policy assignments clean and easier to audit.
Access policies
An access policy controls when and how often requestors can request passwords. The policy also defines whether approval rules automatically approve requests and whether requestors can start remote access sessions or open applications managed by Password Safe. You apply access policies to account-based smart groups to manage requestor access.
Use Access Policies to define:
- Allowed request hours
- Whether requestors can view passwords
- Whether requests require approval
- Whether requestors can use quick launch
- Whether RDP/SSH sessions need approval
Select an access policy when you configure Requester role.
Create an access policy
- Use a browser to sign in to your BeyondInsight/Password Safe URL.
The BeyondTrust welcome email provides the URL, which includes your site URL followed by /login. - From the left menu, click .
The Configuration page displays. - Under Privileged Access Management Policies, select Access Policies.
The Access Policies page displays. - In the Access Policies pane, click Create New Access Policy.
- Enter a name for the policy.
- Click Create Access Policy.
- On the Basic Details tab:
- Enter a description for the policy.
- Enable the Email Notifications option to send emails when the policy receives a request.
Recipients may receive a large number of email notifications. Use this option selectively. You cannot add multiple addresses at once. Add each email address one at time by clicking Add Another Email.
-
Select the Schedule tab.
-
Click Create Schedule.
-
Configure the recurrence, time, and date settings for the policy.
- Enable the Enable Location Restrictions option, and then select a location from the list.
- If applicable, select an address from the X-Forwarded-For list. This field contains an allowed X-Forwarded-For header value added by an F5 load balancer or proxy. Password Safe uses address groups to verify whether the list contains the IP address. Password Safe ignores the URL and named host. If the X-Forwarded-For field has a value of Any, Password Safe does not require or verify an X-Forwarded-For header. When you configure this field, the X-Forwarded-For header must include a value from the list of IPs in the address group.
For a new configuration, this error message can appear in the log:
CheckLocationAllowed: XForwardedForHeaderValue 1.1.1.1 is not registered/trusted. Add this XForwardedForHeaderValue to the TestGroupName Address group
- If applicable, select an address from the X-Forwarded-For list. This field contains an allowed X-Forwarded-For header value added by an F5 load balancer or proxy. Password Safe uses address groups to verify whether the list contains the IP address. Password Safe ignores the URL and named host. If the X-Forwarded-For field has a value of Any, Password Safe does not require or verify an X-Forwarded-For header. When you configure this field, the X-Forwarded-For header must include a value from the list of IPs in the address group.
- Select the type of access to permit: View Password, RDP, SSH, or Application.
- For each selected access type, configure the required parameters. Review the parameter descriptions in the table:
- Enable the Enable Location Restrictions option, and then select a location from the list.
| Parameter | Description |
|---|---|
| Approvers | Select the number of approvers required to permit access. Check Auto Approve if the requests do not require any approvers. |
| Allow API Rotation Override | Check this option for View Password access, to allow API callers such as Password Safe Cache to override the Change Password After Any Release managed account setting for view-type requests. |
| Approvers | Select the number of approvers required to permit access. Check Auto Approve if the requests do not require any approvers. |
| Allow API Rotation Override | Check this option for View Password access, to allow API callers such as Password Safe Cache to override the Change Password After Any Release managed account setting for view-type requests. |
| API Only Access | Check this option for View Password access to enable API callers, such as Password Safe Cache or Privileged Remote Access, to retrieve passwords through the API, while restricting requestors from viewing these passwords through the web console. |
| Record | Check the box to record the session. |
| Keystroke Logging | Password Safe can log keystrokes during RDP, SSH, and application sessions. Uncheck the boxes for each policy type to disable keystroke logging for that type. |
| Enhanced Session Auditing | Enhanced session auditing applies to RDP and application sessions. Password Safe turns on enhanced session auditing by default. Click the toggle to turn off enhanced session auditing. |
| Concurrent | Set the number of sessions permitted at a time. Check Unlimited to permit the user any number of connections to occur at the same time. |
| Sign out on Disconnect | Check this box to automatically sign out the user when the connection to the session disconnects or the session window closes. This option applies only to RDP and RDP application sessions and works only with Enhanced Session Auditing enabled. If an Active Sessions reviewer terminates the session, Password Safe signs out the session regardless of the access policy setting. |
| Force Termination | Check this box to close the session when the time period expires. When you also select Sign out on Disconnect, Password Safe signs out the user from the session. This check box applies to RDP, SSH, and application sessions. When the session exceeds the Requested Duration entered on the Requests page in the web portal, Password Safe ends the session if you check the Force Termination box for the access policy. Configure the default and maximum release durations on the Managed Accounts page and Managed System Settings page. |
| RDP Admin Console | Select this option to show the RDP Admin Console check box on RDP-based requests. This option allows administration of a Remote Desktop Session host server in console mode (mstsc /admin). Use this option when the host has reached the remote session limit. Using the RDP Admin Console allows you to use a remote session without requiring other sessions to disconnect. Running a remote session using the RDP Admin Console disables certain services and functionality, such as, but not limited to:
|
| Connection Profile | Select a profile from the list or click Manage Connection Profiles to open the Connection Profiles page and create a new profile. |
Under Policy Options:
- To require a reason for Password Safe requests, enable Reason is required for new requests.
- To require a ticket number for a ticketing system, enable Require a ticket system and a ticket number for requests.
- After you enable the ticket option, select the Ticket System from the dropdown. If you leave the Ticket System as User Selected, users can select any ticket system from the list when making a request. If you select a specific ticket system for this option, users cannot change the ticket system when making a request.
-
Click Create Schedule. If you have not marked the access policy as available, Password Safe prompts you to activate it now.
-
Assign the access policy to a user group:
- In the Edit pane, select the Assignees tab.
- Click Manage Assignees. The User Management page displays.
- Select the Groups tab.
- Locate the group in the grid.
- Click
 > View Group Details.
 - From the Group Details pane, select Smart Groups.
- Locate the Smart Group in the grid.
- Click > Edit Password Safe Roles.
- Check Requestor.
- Select the access policy you just created from the dropdown.
- Click Save Roles.
-
Confirm the Assignees tab for the access policy you just created lists the group as an assignee.
For more information on how to configure an access policy, see Access policy.
Summary
A cloud implementation succeeds when you follow this workflow in this order:
- Discover and onboard systems
- Onboard accounts
- Use Smart rules to automatically create and maintain Smart groups
- Add Authentication groups
- Assign Requestor and Approver roles
- Apply Access policies
Following this sequence helps you avoid drift and unnecessary troubleshooting. You onboard resources the same way each time, your rules generate the right groups, and your policies land correctly. A consistent sequence keeps your environment consistent and secure.
Updated about 1 month ago
