Accounts | PS Pathfinder
What is the Accounts tab?
The Accounts tab lists the managed accounts for which you have permissions to request access to retrieve passwords and start sessions.
How is it useful?
From this grid, you can initiate an access request for the listed accounts, streamlining the request process. By populating the grid with managed accounts, users can easily see which accounts are available and take action without needing to navigate to other areas of the console You can populate the list of managed accounts in the grid using any one of the following options:
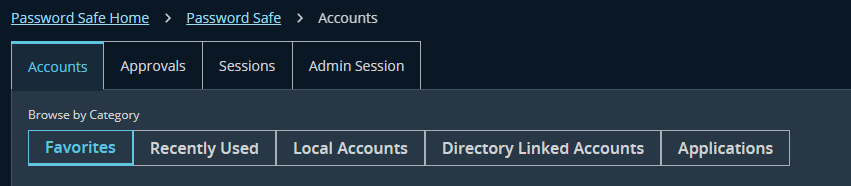
- Click the Browse by Category buttons to filter the list by category.
- Select filter criteria from the Filter by dropdown to filter by selected account properties.
- Search for accounts using the Quick Filter option.
- Click Load All Accounts to load all associated accounts.
How do I access the Accounts tab?
- Sign into app.beyondtrust.io with your credentials.
The BeyondTrust Pathfinder Home displays. - At the top right of the page, select your site from the drop-down.
- Select the Password Safe tile from your list of available applications.
The Password Safe Home page displays. - At the top left of the page, click
 > Password Safe > Password Safe Accounts.
The Accounts home page displays.
- For optimum efficiency, the web portal screen resolution should be no less than 1280 × 800 pixels.
- When you first log in to the Password Safe web portal, no accounts are available in the Favorites tab. Click the star next to the account to add it to the Favorites tab. Click Refresh above the grid to update the listed accounts.
Request a password release
- At the top left of the page, click > Password Safe > Password Safe Accounts.
The Accounts home page displays. - Load the accounts in the grid by clicking a category or using the filter options, and then click Load All Accounts.
- Click
 to the right of a managed account to request a session.
 - Enter a Reason for the password release.
- Select a ticket system and provide a ticket number if required.
- Check required options under Advanced Request Options.
- Click Start RDP Session. An RDP connection file downloads with a one-time use token that expires based on the Session Initialization timeout settings.
- Run the file to establish a connection to the target system.
- Enter the password that you use to authenticate into Password Safe.
- Click Access for the managed account for which you wish to request a password.
- From the Submit Request tab:
- Set a start date and time for the password to be made available.
- Set the length of time for the password to be available.
- Check Password for the type of access you need.
- Provide a reason for the request. The maximum allowed length is 200 characters.
- Select a ticket system and provide a ticket number.
- Click Submit Request. An email is sent to the approver if email notification is configured. You can view the status of your request from the Requests tab.
Reason, Ticket System, and Ticket Number fields might be optional or required, depending upon options configured in the access policy by your Password Safe administrator. Also, if your Password Safe administrator has set a specific ticket system in the access policy, you cannot select a different ticket system with your request.
Retrieve a password
Passwords approved for release can be displayed at any time (and as often as needed) during the release duration. After the password is approved, an email notification is sent to the requestor's email account. The requestor can then retrieve the password.
To retrieve a password:
- At the top left of the page, click > Password Safe > Password Safe Accounts.
The Accounts home page displays. - Click
 to the right of the managed account.
The Access panel displays. - Select the Start Session tab.
- Enter a Reason for the password retrieval.
- Select a ticket system and provide a ticket number if required.
- Check required options under Advanced Request Options.
- Click Retrieve Password to display the system account password.
- The password displays in a separate window. The visibility of the password might be limited, with a timer showing remaining time. Click Close Window to close the windows before the timeout.
- Click
 to copy the password to the clipboard.
 - Use the password to log in to the system within the password release time period.
Retrieve a password using Quick Launch
If your access policy is configured for auto-approval for the managed system account you are accessing, Quick Launch is available, allowing you to quickly retrieve the password for the managed account, bypassing the approval process. To use Quick Launch:
- At the top left of the page, click > Password Safe > Password Safe Accounts.
The Accounts home page displays. - Click
 to the right of the managed account.
 - From the Quick Launch tab, click Retrieve Password.
- Click Show to display the password or click
 to copy it to the clipboard.
Request SSH or RDP Sessions
When configured by your Password Safe administrator, you can request access to a managed system using a remote session. Using the Password Safe request and approval system, you can request remote sessions that use RDP and SSH connection types.
Password Safe acts as a proxy, providing session management to target systems. No passwords are transmitted, allowing inherently secure session management. The sections below detail how to request and start sessions in Password Safe.
Request an RDP session
- At the top left of the page, click > Password Safe > Password Safe Accounts.
The Accounts home page displays. - Click
 to the right of the managed account.
The Access panel displays. - Select the Start Session tab.
- Enter a Reason for the RDP session.
- Select a ticket system and provide a ticket number if required.
- Check required options under Advanced Request Options.
- Click Start RDP Session. An RDP connection file downloads with a one-time use token that expires based on the Session Initialization timeout settings. Run the file to establish a connection to the target system.
- Enter the password that you use to authenticate into Password Safe.
- Click Access to the right of the managed account to request a session.
- From the Submit Request tab:
- Set a session start date and time that corresponds with the access policy and is outside of a scheduled maintenance window.
- Set the length of time for the session.
- Check RDP Session for the type of access you need.
- Provide a reason for the request. The maximum allowed length is 200 characters.
- Select a ticket system and provide a ticket number.
- Click Submit Request. An email is sent to the approver if email notification is configured.
Reason, Ticket System, and Ticket Number fields may be optional or required, depending upon options configured in the access policy by your Password Safe administrator. Also, if your Password Safe administrator has set a specific ticket system in the access policy, you cannot select a different ticket system with your request.
Start an RDP session without submitting a request
Users who have permissions to bypass the request and approval process for accessing the managed system and Password Safe administrators are able to start sessions and retrieve passwords immediately from the Start Session tab. The Start Session tab does not display for users who do not have permissions to bypass the request and approval process. To start the session:
- At the top left of the page, click > Password Safe > Password Safe Accounts.
The Accounts home page displays. - Click
 to the right of the managed account.
The Access panel displays. - Select the Start Session tab.
- Enter a Reason for the RDP session.
- Select a ticket system and provide a ticket number if required.
- Check required options under Advanced Request Options.
- Click Start RDP Session. An RDP connection file downloads with a one-time use token that expires based on the Session Initialization timeout settings. Run the file to establish a connection to the target system.
- Run the file to establish a connection to the target system.
- Enter the password that you use to authenticate into Password Safe.
Start an admin session
Users who have full control permissions for the Password Safe Admin Session feature and Password Safe administrators can open ad-hoc RDP and SSH sessions without going through the request process, using an Admin Session.
- At the top left of the page, click > Password Safe > Password Safe Accounts.
The Accounts home page displays. - Select the Admin Sessions tab.
- Fill out the form as required.
- Click Connect.
Admin sessions also allow you to select a node associated with another region to act as a proxy for the session. This is useful in larger environments when assets you need to access are in your region.
Admin sessions are recorded by default. If your administrator has enabled the option, a Record Session check box displays on the form, giving you the option to record the session or not.
