Assets: Configure | BI Cloud
Prerequisite
Before you configure Assets, ensure you understand what Assets are and the benefits they provide, see Assets: Overview.
Configure Functional Account Requirements in Azure
Follow the steps below to set up Entra ID for use with BeyondTrust Password Safe.
- Create enterprise application
- Configure app registration
- BeyondTrustPassword Safe configuration
- Create a second enterprise application
Accounts can be managed with or without multifactor authentication enabled in Azure.
Create enterprise application
Create this enterprise application to map to the Application (Client) ID for the functional account.
- In Microsoft Azure, go to Enterprise Applications.
- Select New application.
- Select Create your own application.
- Name your application.
- Select the application type (App you're developing).
- Click Create.
- Update the name if necessary.
- Select the Supported Account Types (this directory only).
- Click Register.
- Under Properties, disable Assignment required and Visible to users.
- Click Save.
Configure app registration
- In Overview section, copy the Application (Client) ID and Directory (Tenant) ID. These are needed later to configure the Password Safe functional account.
- In the Authentication section, enable Allow public client flows.
- Click Save.
- In the Certificates and secrets section, click New client secret.
- Enter the Description and an expiration date.
- Click Add.
- Copy the secret Value. This is needed later to configure the Password Safe functional account.
The value is displayed only once, immediately after adding the new secret.
- In the API permissions section, add Microsoft Graph.
- Select type Application permissions.
- Add Microsoft Graph application permissions UserAuthenticationMethod.ReadWrite.All, Domain.Read.All, Group.Read.All, and User.EnableDisableAccount.All.
- If User.Read is not already added, select Delegated permissions and add it.
- Click Add Permissions.
- Click Grant admin consent for for your organization.
- Click Yes on the confirmation message.
- From the main menu, select Roles and administrators.
- Select the Helpdesk administrator role.
- Click Add assignments.
- Assign the application to the Helpdesk administrator role.
This completes configuration in Microsoft Azure. The remaining steps are done in BeyondTrust Password Safe.
BeyondTrust Password Safe configuration
-
From the left menu, click
 .
.
The Configuration page displays. -
Under Privileged Access Management select Functional Accounts.
The Functional Accounts page displays. -
Click Create New Functional Account.
-
For the Entity Type, select Directory.
-
For the Platform, select Microsoft Entra ID.
-
Select the Azure scope: Public or US Government (supports Azure GCC High).
-
Enter the Username in UPN format.
-
Enter the previously saved values for the Application (Client) ID, Tenant ID, and Client Secret.
-
Set the Alias.
-
Click Create Functional Account
-
From the left menu, click
 .
.
The Managed Systems page displays. -
Click Create New Managed System.
-
For the Entity Type, select Directory.
-
For the Platform, select Entra ID.
-
Enter the Domain.
-
Select the Functional Account created above, and select the Account Name Format.
-
Click Create Managed System.
The Managed Account can be created manually or by using a Smart Rule.
Create the Managed Account manually.
- Select the Managed System created above.
- Click
 the right of the Managed System.
 - Select Create New Managed Account.
- Enter the Username in UPN format, and enter ObjectId for the User and UPN.
- Create the Managed Account using a Smart Rule.
- Accounts can be onboarded by using Group Name or UPN (starts with/ends with) filters.
Manage assets
The Assets page allows you to review details about your assets quickly by filtering your assets by last update time, type of asset, domain, operating system, technical solutions applied to the asset (for example, an asset is a scanned host or database host), DNS name, Workgroup, and IP address.
Click  to modify which columns to display in the grid.
To maintain a manageable database size, assets and scan data is purged every 30 days. We recommend running discovery scans at least every 30 days to refresh asset data.
Review asset details
Depending on the scan settings, information might not be detected and included in the scan results. If the following scan settings are turned on, more accurate scan results can be expected:
- Perform Local Scanning
- Enable WMI Service
- Enable Remote Registry Service
To review high-level detail information for assets:
- Click
 > View Details.
To view advanced detail information for assets:
- Click > Go to Advanced Details.
Advanced Details - General data
- Details & Attributes: Displays details about the asset such as: IP address, DNS name, domain, system name, system description, Workgroup, date the asset was added and updated, the operation system, etc.
- Accounts: If the asset is linked to a managed system, the managed accounts on that system are listed in the grid.
Click the View Managed System link above the grid to view the advanced details for the managed system that is linked to the asset. To return to the advanced details for the asset, click the View Asset link.
- IIS Application Pools: Displays IIS Application Pools discovered on the asset on the last successful scan of the system.
- Databases: Displays the databases that are on the asset and allows you to add a database.
- Smart Groups: Displays the Smart Groups that the asset is associated with.
Scan data
By default, the current snapshot of scan data is selected. You can select other available snapshots to load the data for that date. Scan snapshots are purged from the database every 30 days.
- Ports: Displays the open port number, protocol, and description.
- Scheduled Tasks: Displays information about scheduled tasks for a particular asset, including task name, task to run, last time the task ran, schedule type, etc.
- Services: Displays discovered services, including name, description, state, logon details, startup type, and dependencies.
- Software: Lists all software discovered on the asset, including version.
- Users: Includes several attributes for user accounts, including: name, privileges, password age, last logon date, password expiry status, group membership, and status of the account, and allows you to filter by these attributes.
Create assets manually
Assets are added to BeyondInsight through discovery scans. Assets can also be manually added from the Assets page.
To manually add assets:
-
From the left menu, click
 .
.
The Assets page displays. -
Select All Assets from the Smart Group filter dropdown.
-
Click + Create New Asset.
The Create Asset panel displays.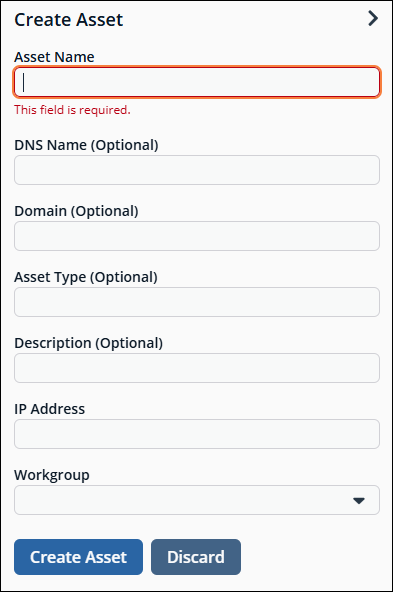
-
Complete the Create Asset form.
-
Click Create Asset.
- New assets created in any Smart Group other than All Assets might not appear under the selected Smart Group if the Smart Rule criteria is not met or until the Smart Rule processes. We recommend that you create new assets using the All Assets Smart Group.
- A manually added asset can have its basic information edited, such as Name, DNS Name, Domain, Asset Type, IP Address,, and Workgroup. Asset attributes cannot be edited at the individual asset level at this time. If this is necessary, Smart Rules can be used to modify the attributes associated with an asset.
Delete assets
You can remove assets from the Assets grid immediately. Assets removed from the grid are deleted from the BeyondInsight database during the nightly data purge.
To remove an asset:
- From the left menu, click .
The Assets page displays. - Check the box to the left of every asset you want to delete.
Use the filters above the grid to narrow down your list of assets to those targeted for deletion, and then press ctrl + A to select all assets in the grid to delete at once.
- Click
 above the grid.
 - Click Delete on the confirm deletion message.
Asset tools
BeyondInsight provides a set of tools to help you organize assets for scanning.
Depending on the number of assets that you want to scan or the critical nature of some of your assets, consider organizing the assets using address groups or Active Directory queries which can be part of a Smart Rule.
The following list provides examples on ways you can use these tools:
- Create an IP address group that organizes assets by a range of IP addresses, including CIDR notation and named hosts.
- Use an Active Directory query that will organize assets by organizational unit. Create a Smart Rule and use the query as your selection criteria.
- Change the properties for assets, and then use the attributes as the selection criteria in the Smart Rule.
Scans can return a lot of information. To help you review scan results, you can create filters and set preferences on the Assets page to easily review scan results.
Address group
Create an address group
When creating a Smart Rule, you can create an address group to use as an IP address filter. An address group can contain included or excluded IP addresses. IP addresses are entered as a
- Single IP address
- IP range
- CIDR Notation
- Named host
- The BeyondInsight user must be a member of the Administrators group or be assigned the Full Control permission on the Asset Management and the applicable Smart Rule Management feature(s) to be able to create and edit Smart Rules.
- Users assigned Read Only permissions on these features may only view the details of Smart Rules.
Create an Always address group
You can create an address group and name it Always. The Discovery Scanner is designed to recognize this address group name and includes the group in every scan, regardless if the group is selected in the scan job. The address group can include and exclude IP addresses.
The next time a scan runs, the address group is synchronized with the Discovery Scanner. The IP addresses, whether they are included or omitted, are considered part of the running scan.
ExampleIf the Always address group is configured with 10.10.10.60 and buffett-laptop (omitted), it scans 10.10.10.50 and buffett-laptop. The results are as follows:
- The scan includes 10.10.10.60 since this IP address was added to the Always address group.
- The scan excludes buffett-laptop since this asset was explicitly omitted in the Always address group.
- 10.10.10.50 is scanned as usual.
If an asset was scanned and later added to the Always address group as Omit, the asset is not scanned but might be displayed in the report. This only occurs with some reports.
-
From the left menu, click
.
The Configuration page displays. -
Under Discovery Management select Address Groups.
The Address Groups page displays. -
Click Create New Address Group +.
-
Name the address group Always.
-
Click Create Address Group.
-
Select the Always address group.
-
From the Addresses in Group pane, click Create New Address + to manually add the IP addresses.
The Create New Address pane displays.- Select type from the Type list.
- Enter the IP addresses, CIDR Notation, or host name, depending on which type you selected.
- Enable Omit this entry to excluded addresses.
- Click Create Address.
Or click Import Addresses to import them into the group using a file.
The Import Addresses pane displays.- Enable the Overwrite all existing addresses option, if desired.
- Click Drag and drop or click to select files to upload to navigate to the import file.
- Click Import.
The list in your import file depends on your particular needs. The list can contain all IP addresses that you wish to exclude. To exclude IP addresses, use the format: 192.x.x.x (1).
Create a Smart Rule based on an address group
When configuring an address group, you can choose to create a Smart Rule based on the address group.
- From the left menu, click .
The Configuration page displays. - Under Discovery Management select Address Groups.
The Address Groups page displays. - From the Address Groups pane, click
 for the address group.
 - Select Create Smart Rule.
- Leave the default name, or name the Smart Rule as desired.
- Select the appropriate option to make the Smart Rule available to all user groups, or to administrators only.
- Click Create Smart Rule.
- A message stating Smart Rule has been created for this Address Group appears.
To view this new Smart Rule:
- From the left menu, click .
The Configuration page displays. - Under General select Smart Rules.
The Smart Rules page displays. - Navigate to the new Smart Rule.
Directory query
Create a directory query
You can create an Active Directory or LDAP query to retrieve information from Active Directory or LDAP to populate a Smart Rule. To work with directory queries, the BeyondInsight user must be a member of the Administrators group or assigned the Asset Management permission.
Create a new directory query or clone an existing query as follows:
-
From the left menu, click
.
The Configuration page displays. -
Under Role Based Access select Directory Queries.
The Directory Queries page displays. -
Click Create New Directory Query
or
Click
next to an existing query and select Clone. -
From the Directory Type list select Active Directory or LDAP.
Cloned queries keep the same directory type as the query being cloned.
-
Enter a name in the Title field.
-
Select a stored credential for running this query
or
Click Create New Credential to be taken to the Directory Credentials page where you can add a new one.
At minimum, the credential must have Read permissions on the computer assets you are enumerating.
- Enter the directory path for the Query Target, or click Browse to search for a path and add it.
- Select a scope to apply to the container.
- Select an object type.
- Enable or disable the Dynamically refresh results each use option.
- Provide a Name and Description or use the * wild card character to match multiple values for the Basic Filter.
- Click Test to ensure the query returns expected results.
We recommend you preview results before saving the query.
- Click Create Directory Query.
- A warning message displays the following: Creating or modifying Directory Queries can have a significant impact to the onboarding Smart Rules that use this query. Are you sure you want to save this Directory Query?
- Click Confirm to create the query.
- Click Cancel to return to the query form to make changes.
- If you did not test the query (step 15), a warning message displays the following: Are you sure you want to save this Directory Query without previewing the results?
- Click Confirm to create the query without testing it.
- Click Cancel to return to the query form to make changes or test the query before saving it.
Update a directory query
Update an existing directory query as follows:
- From the left menu, click .
The Configuration page displays. - Under Role Based Access select Directory Queries.
The Directory Queries page displays. - Click to the right of the query.
- Select Edit from the menu.
- Modify query details as necessary.
- Click Test to ensure the query returns expected results.
We recommend you preview results before saving the query.
- Click Update Directory Query.
- A warning message displays the following: Creating or modifying Directory Queries can have a significant impact to the onboarding Smart Rules that use this query. Are you sure you want to save this Directory Query?
- Click Confirm to update the query.
- Click Cancel to return to the query form if wish to make changes.
- If you did not test the query after making changes, a warning message displays the following: Are you sure you want to save this Directory Query without previewing the results?
- Click Confirm to save the updated query without testing it.
- Click Cancel to return to the query form if you wish to make changes or test the query before saving it.
If you’re changing the Query Target, we recommend testing the query before saving the changes to ensure the changes are working the way you expect. Any Smart Rules using that query will use the new target list the next time the rule processes.
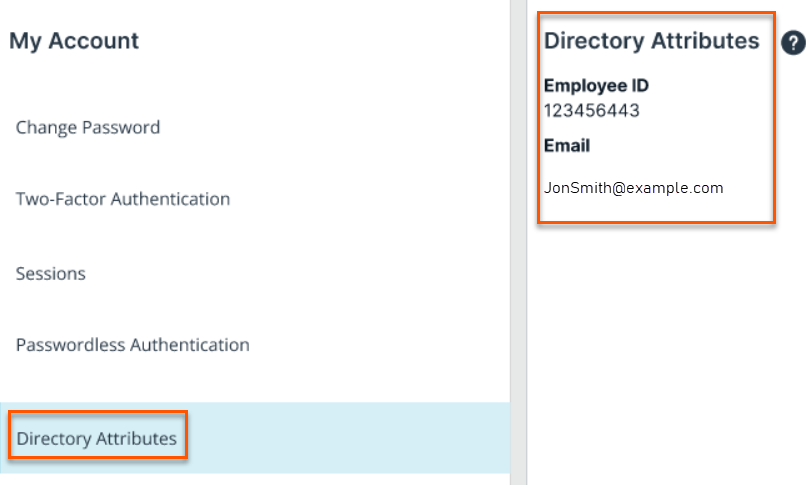
Directory attributes
If the current logged in user has synced directory attributes, the directory attributes display when you click Directory Attributes on the Account Settings panel. If you do not have synced directory attributes, the following message displays: Directory Attributes have not been setup for this account.
Attributes and attribute types
Attributes can be used to label assets, and you can set attributes for each asset in a group using a Smart Rule. BeyondInsight ships with a default set of attributes that can be customized, except for the Criticality type, and you can also add new attribute types and attributes to meet your requirements.
Add a new attribute type
- From the left menu, click .
The Configuration page displays. - Under General select Attributes.
The Attributes page displays. - Click + Add New Attribute Type.
- Type a name for the attribute type.
- Press the Enter key.
Add a new attribute
- Click
 to the left of the desired attribute type to expand its attributes.
 - Click + Add New Attribute.
- Type a name for the attribute.
- Press the Enter key.
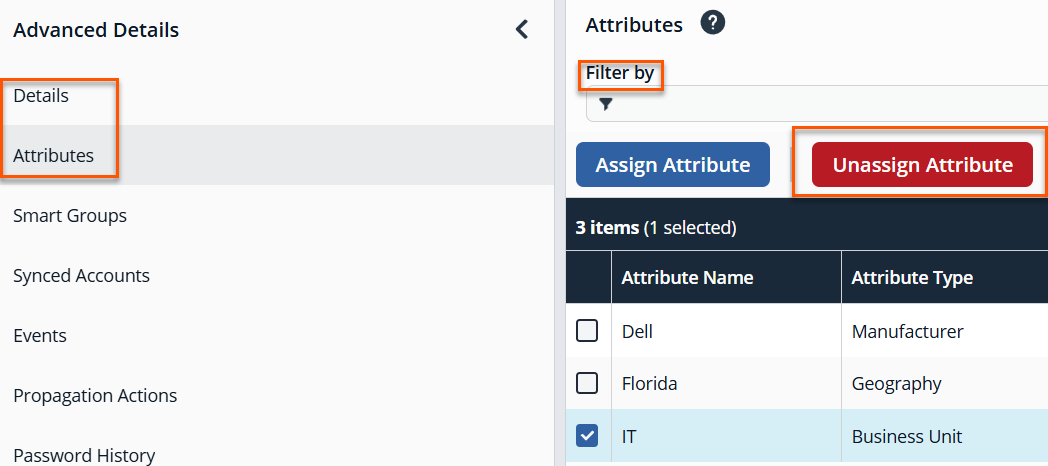
Attributes enhancements
To improve administrative efficiency and streamline workflows, an editable Attributes section has been added to the Advanced Details panel. This applies to the Managed Account and Asset settings. This enhancement allows users to view and update asset and managed accounts attributes directly, without navigating away from the current page.
Key Changes
-
The Details & Attributes (current data) tab has been renamed to Details (current data) to reflect its updated scope.
-
Custom attributes no longer appear in the Details tab within the Advanced Details panel. Instead, they are now accessible and editable in the new Attributes section.
-
There are also two new columns added to the table: Attribute Name and Attribute Type. These columns support filtering to facilitate faster data access and management.
-
In previous versions, the only way to assign or unassign attributes from assets or managed accounts was via smart rules. Now, there is an Unassign Attribute button available.
-
A new informational message has been added to the Attributes configuration page for managed accounts and assets. This message includes a link that directs users to the relevant configuration page for additional details.
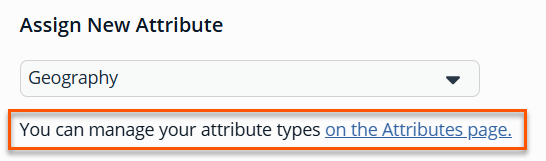
For this message to display, you need the Full Control permission set on the Attribute Management feature.
These updates provide a more centralized and intuitive experience for managing asset and managed account metadata, aligning with user expectations and administrative workflows.
