SSH Key authentication with Password Safe Cloud
What is an SSH Key?
An SSH key is a secure credential used by the Secure Shell (SSH) protocol to authenticate users and create an encrypted, secure connection between a client and a remote server.
How is it useful?
Applying SSH Key authentication on a managed system is a secure alternative to using password authentication. By implementing SSH Key authentication you can establish a more secure method of user authentication that eliminates the vulnerabilities associated with password-based access. This approach enhances the overall security of your system, reduces the risk of unauthorized access, and provides a reliable way to protect sensitive information. SSH Key authentication is set on the functional account and managed account properties.
SSH Key authentication is supported on the following systems: Linux, AIX, HP-iLO, HP-UX, DRAC, MAC OSX, Solaris, Juniper, and RACF.
Generate and distribute the key
You can generate keys using puttygen.exe on Windows systems and ssh-keygen on Unix-based systems. Consult the system documentation for other platforms.
ExampleHow to generate a 2048-bit RSA key pair with ssh-keygen. The user account used to perform the scan is admin.
# ssh-keygen –t rsa -m PEM
Generating public/private rsa key pair.
Enter file in which to save the key (/home/admin/.ssh/id_rsa):
/home/admin/.ssh/retina_rsa
Enter passphrase (empty for no passphrase):
Enter same passphrase again:
Your identification has been saved in /home/admin/.ssh/retina_rsa.
Your public key has been saved in /home/admin/.ssh/retina_rsa.pub.
The key fingerprint is:
7f:5f:e3:44:2e:74:3c:c2:25:2b:82:7c:f8:0e:2a:da
/home/admin/.ssh/retina_rsa contains the RSA authentication identity of the user and should be securely transferred to the system running your scanner.
The file /home/admin/.ssh/user_rsa.pub contains the RSA public key used for authentication. The contents of this file should be added to the file ~/.ssh/authorized_keys on all machines that the user wishes to scan using public key authentication.
Create a functional account with SSH Key authentication
Before you can create the account you must generate a private key. Copying or importing a key is part of setting the functional account properties with SSH Key authentication.
-
Use a browser to sign in to your BeyondInsight/Password Safe URL.
This URL is provided in the BeyondTrust welcome email and includes your site URL followed by /login. -
From the left menu, click
 .
.
The Configuration page displays. -
Under Privileged Access Management, select Functional Accounts.
The Functional Accounts page displays. -
Click + Create New Functional Account.
The Create New Functional Account panel displays.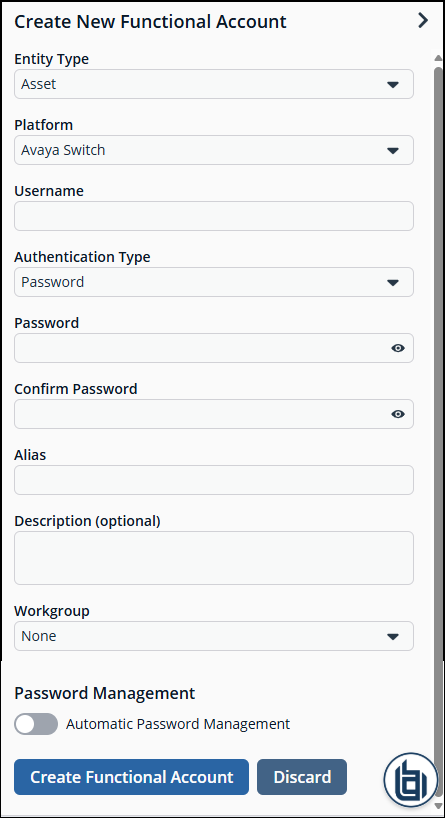
-
Select Asset from the Entity Type dropdown.
-
Select a platform.
-
Select the elevation if required.
-
Enter the username and password.
-
From the Authentication Type dropdown, select SSH Key.
-
Upload the SSH key file.
-
Provide an alias and description.
-
Click Save New Account.
Create a functional account on the Unix or Linux platform
Create an account on the Unix or Linux platform with a name like functional_account.
Ensure that the su command is available on the platform.
To assign necessary privileges to the functional account, invoke the command sudo visudo in the terminal and place the following lines under the root ALL=(ALL) ALL line:
Be sure to add sudo elevation to the functional account on the managed system. These commands are adjusted to reflect password changes and SSH Key changes and are OS-specific.
MAC OSX
functional_account ALL=(ALL) NOPASSWD: /usr/bin/grep, /usr/bin/sed, /usr/bin/tee, /usr/bin/passwdUBUNTU/REDHAT
functional_account ALL=(ALL) NOPASSWD: /usr/bin/grep, /usr/bin/sed, /usr/bin/tee, /usr/bin/passwdSOLARIS
functional_account ALL=(ALL) NOPASSWD: /usr/bin/grep, /usr/bin/cp, /usr/bin/tee, /usr/bin/sed, /usr/bin/passwd, /usr/bin/rmHPUX
functional_account ALL=(ALL) NOPASSWD: /usr/bin/grep, /usr/bin/cp, /usr/bin/sed, /usr/bin/tee, /usr/bin/passwd, /usr/bin/rmAIX
functional_account ALL=(ALL) NOPASSWD: /usr/bin/grep, /usr/bin/pwdadm, /usr/bin/tee, /usr/bin/passwd, /usr/bin/sed, /usr/bin/cp, /usr/bin/rmTest the functional account
The key can be tested from the managed system.
- Use a browser to sign in to your BeyondInsight/Password Safe URL.
This URL is provided in the BeyondTrust welcome email and includes your site URL followed by /login. - From the left menu, click
 .
.
The Managed Systems page displays. - Locate the managed system in the grid.
- Click
 > Go to Advanced Details.
 - Under Advanced Details, select Functional Accounts.
- In the Functional Account pane, click Test Functional Account.
Set SSH Key on the managed account
An alternate and secure way to set up a managed account is with SSH Key authentication.
To create a managed account with SSH Key authentication:
- Use a browser to sign in to your BeyondInsight/Password Safe URL.
This URL is provided in the BeyondTrust welcome email and includes your site URL followed by /login. - From the left menu, click .
The Managed Systems page displays. - Locate the managed system in the grid.
- Click > Create New Managed Account.
- From the Authentication Type dropdown, select SSH Key.
An existing SSH private key can be added but not required to have key rotation.
- Configure all other settings as required.
- Click Create Account.
SSH Key auto management
A SSH Key policy is set on a managed system that supports SSH Key authentication.
The Auto-Managed SSH Key option enables SSH Key auto-management to take place when the credential for the account is changed, either manually or scheduled. It follows the same schedule as password changing.
Generating a new SSH public/private key pair results in the removal of the old public key (if there is one) from the authorized_keys file and appends the new public key.
Get the public key
- Use a browser to sign in to your BeyondInsight/Password Safe URL.
This URL is provided in the BeyondTrust welcome email and includes your site URL followed by /login. - From the left menu, click
 .
.
The Managed Accounts page displays. - Locate the managed account in the grid.
- Click
 > Public Key.
If a public key has been supplied, a popup displays the current public key.
Create a SSH Key policy
Password Safe ships with a default SSH Key policy:
- Type: RSA
- Bit size: 2048
- Encryption: Auto Managed Passphrase is Default Password Policy
You can change the settings for the default policy but you cannot delete the policy.
Optionally, you can create additional policies.
- Use a browser to sign in to your BeyondInsight/Password Safe URL.
This URL is provided in the BeyondTrust welcome email and includes your site URL followed by /login. - From the left menu, click .
The Configuration page displays. - Under Privileged Access Management Policies, select SSH Key Policies.
The SSH Key Policies page displays. - Click Create SSH Key Policy.
- Enter a name.
- Enter a description.
- Select a Key Type: RSA or DSA.
- Check Encryption Enabled.
- Select a password policy.
- Click Update SSH Key Policy.
