Vault accounts | PRA Pathfinder
What is the Vault Account page?
Credential accounts are added, edited, and managed on the Vault > Accounts page. When you add accounts, it enables users with the correct roles to access the account credentials for injections and rotations
How is the Vault Account page useful to my organization?
BeyondTrust Vault for Secure Remote Access mitigates the risk of shared privileged account credentials by enabling secure credential management, including credential discovery, masking, injection, and rotation.
BeyondTrust Vault fits seamlessly into your service desk workflow by integrating directly with the Secure Remote Access solution. This allows administrator accounts to access systems without exiting BeyondTrust. With just one click in the Secure Remote Access console, users can select the correct credential and log directly in to a remote system that keep your privileged accounts more secure.
Important information about accounts
Vault can import, rotate, and manage up to 100,000 accounts.
The Vault Accounts page
On the Vault>Accounts page, you can add a Vault account, rotate credentials, and search for accounts. There are two tabs available on this page, Shared and Personal .
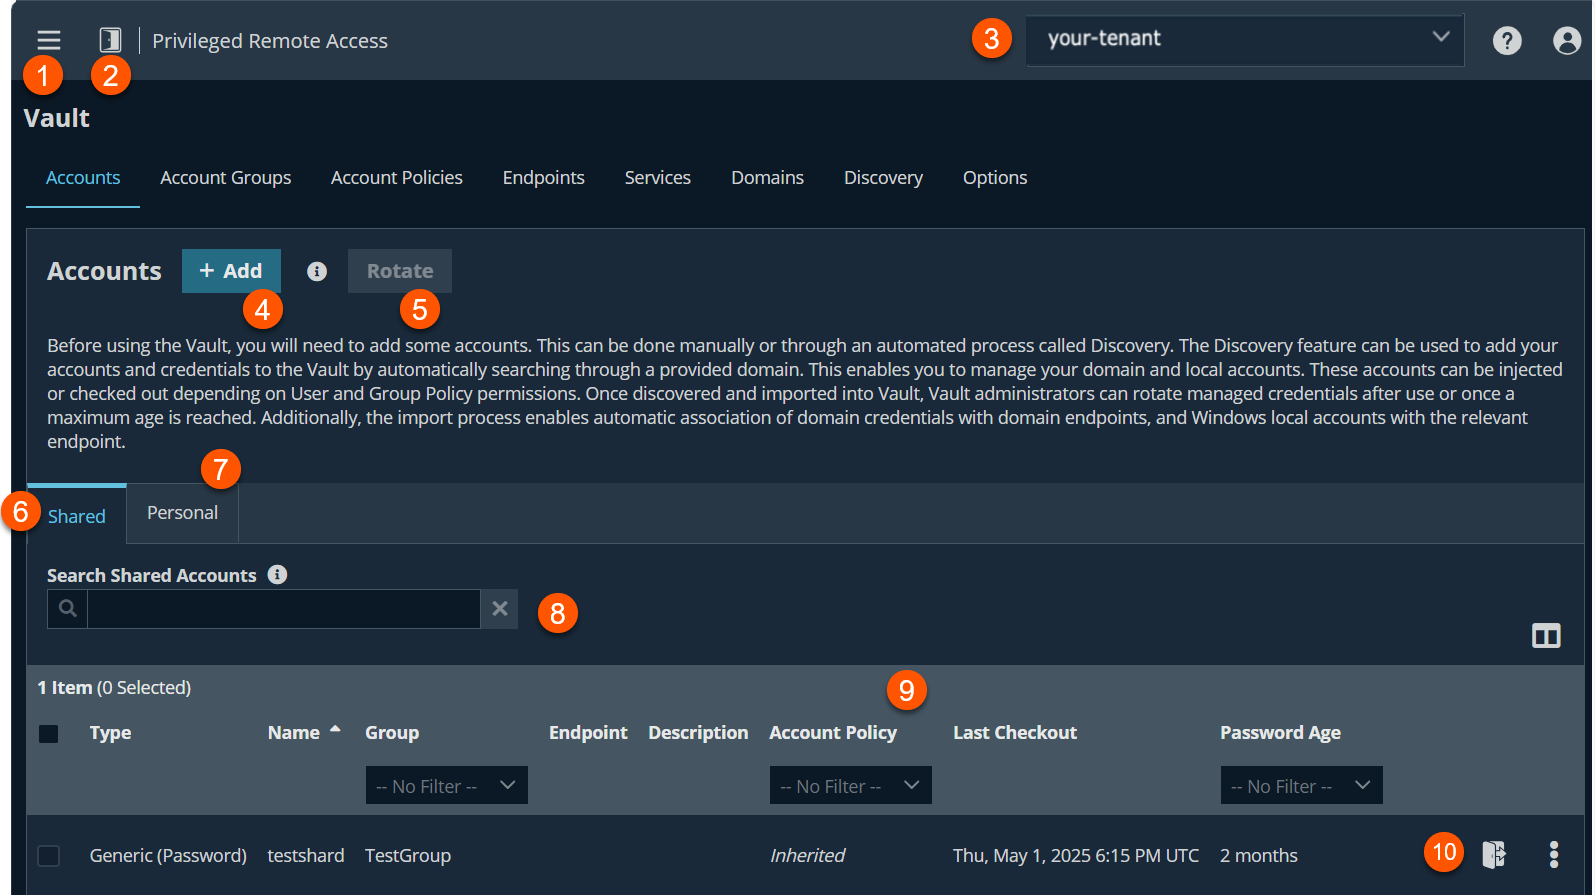
- Left menu: Easy access to all pages in Privilege Remote Access, including Status, Consoles & Downloads, My Account, Configuration, Jump, Vault, Console Settings, Users & Security, Reports, Management, and Appliance pages.
- Status: Opens the Status page.
- Header: Change your tenant site, manage your profile, and access documentation.
-
Add- Adds a new vault account.
-
Rotate- Rotates privileged credentials. You must select an existing account in the list for Rotate to become available.
-
Shared tab- Use this tab to manually create a credential account. This account can be used by all users who have been assigned to the account with the Inject or the Inject and Check Out Vault account role.
-
Personal tab- Use this tab to create a personal account. This account can be used only by the account owner (the user who created the account). You can create up to 50 personal accounts.
-
Filter- Select a Name, Description, or Endpoint to search a Shared account. Select a Name or Description to search a Personal account.
-
Vault Account list columns: The list varies depending on the type of account you are using. Not all columns are displayed.
Shared account columns
- Type: The type of account (that is, generic password, single token, private key, etc.).
- Name: Unique name of the account.
- Username: The username of the account.
- Group: The name of the group you want the account to be in.
- Endpoint: The size of the policy (in KB).
- Account Policy: Select an existing policy or specify a custom policy.
- Last Checkout: Display when date/time when the policy was last checked out.
- Password Age: Displays the age of the policy.
- Name: Unique name of the account.
- Owner: The owner name of the account.
- Description: Unique description of the account.
- Password Age: Displays the age of the policy.
Personal account columns
Status column
A Status column displays when at least one of the accounts has a warning, error, or checked-out status to indicate. Accounts managed by Entra ID are identified in the Status column, as well as an alert if there is no service principal for the account. Accounts that run a Windows service are indicated as Service Account in the Status column. Multiple statuses for an account are stacked and displayed in different colors. You can hover over a specific status to view more details about it.
Click Select visible columns
above the grid to customize the columns displayed in the grid.
The Status column is auto hidden when none of the accounts have a status set.
For additional information, see:
Add a shared generic account
Once you add an account, users with defined roles can access the injection and rotation account credentials.
-
Sign into app.beyondtrust.io.
The BeyondTrust Home page displays. -
From the main menu, click Privileged Remote Access > Vault.
The Vault page opens and the Accounts tab displays by default. -
Click Add.
-
Select Shared Generic Account.
The Add Shared Account page displays. -
In the Name field, enter a name for the account.
-
In the Description field, enter a useful description for the account.
-
In the Authentication section, select the type of authentication the account uses. Each selection has different requirements:
Authentication type Steps Username and Password - Enter the username.
- Enter and confirm the password.
- Select a specific policy for the account or leave Account Policy set to the default value of Inherit Policy Settings, in which case the account inherits the policy settings of the account group. If no account group is selected for the account, the account inherits the policy settings set for the global default account policy on the Vault > Options page.
Single Token - Enter and confirm the value. Use this account type to store a secret such as an API Key that does not have an associated username or ID.
- Select a specific policy for the account or leave Account Policy set to the default value of Inherit Policy Settings, in which case the account inherits the policy settings of the account group. If no account group is selected for the account, the account inherits the policy settings set for the global default account policy on the Vault > Options page.
Private Key - Enter the username.
- Enter the SSH private key. Only keys in OpenSSH formats are valid.
- Enter the SSH Key Passphrase.
When you create the account, enter the SSH private key and passphrase. It is validated when the account is saved. The account cannot save if the key is invalid, not in an accepted format, or cannot be decrypted with the provided passphrase.
After you save the account, edit the account to view details for the public key, and copy the public key. The public key details can also be queried with an API.
SSH Private Key with Certificate - Enter the username.
- Enter and confirm the password.
- Select a specific policy for the account or leave Account Policy set to the default value of Inherit Policy Settings, in which case the account inherits the policy settings of the account group. If no account group is selected for the account, the account inherits the policy settings set for the global default account policy on the Vault > Options page.
ℹ️ Keys must be in the new OpenSSH "PKCS8" format and typically begin with the text BEGIN OPENSSH PRIVATE KEY or BEGIN ENCRYPTED PRIVATE KEY. As of OpenSSH version 7.8, this is the default format created by ssh-keygen. Keys in other formats may first need to be converted to PKCS8 by running ssh-keygen -e -f input.key -m PKCS8
A public key is generated after the account is saved and can be viewed and copied by editing the account.
SSH Certificate Authority - Enter the username.
- Select if the private key is generated by Secure Remote Access or you will upload your own key.
- If uploading your own key, enter the key and passphrase. The private key cannot be modified or retrieved. Only keys in OpenSSH formats are valid.
X.509 Parent Certificate Authority - Enter the username.
- Enter a description.
- For the Authentication, select X.509 Parent Certificate Authority
- For Private Key Options, select Generated by or Upload .
- The Subject DN field supports the following values:
- CN: Common Name
- C: Country Name
- ST: State or Province Name
- L: Locality Name
- O: Organization Name
- OU: Organizational Unit Name
- SN: Serial Number
- DC: Domain Component
- For Expiry, select the number of years. The default value is 2.
- For Key Algothrim, select the appropriate level. The default value is 4096.
- For Digest Signature Algorithm, select the appropriate level. The default value is 256.
X.509 Client Certificate When checked out or injected, the Client Certificate's details are used to generate a new key pair and X.509 Certificate that can be used for Client Validation or Authentication. The generated X.509 is signed by the Parent Certificate Authority with a short time to live.
To use this type, either the Parent Certificate Authority's public X.509 Certificate (or another trust in the chain) must be added to the endpoints store for client trust.
After the account is created and saved, select the Edit action and copy the public key. It starts with cert-authority. Add this public key to the endpoint's SSH configuration as a trusted CA or in an account's known Hosts file, so that the endpoint trusts certificates signed by the CA.
-
Select an Account Group from the list to add this account to a group. If no account group is selected, the account is automatically added to the Default Group.
When you add a credential account to an account group, it lets all users who have been assigned to that group to use this credential. If an account group is not selected, you must add account users individually to this new credential and assign their role.
-
If you are not adding this new credential account to an account group, add users and their Vault role individually in the Account Users section.
Users can be assigned one of two member roles:- Inject: Users with this role can use this account in Secure Remote Access sessions (default value).
- Inject and Checkout: Users with this role can use this account in Secure Remote Access sessions and can check out the account on Support for Admins. The Checkout permission has no effect on generic SSH accounts.
The Vault Account Role is visible in the list of users added to the Vault Account.
Important information
Vault Account Role Precedence: Vault Account Roles can be assigned to both users and group policies. This means the same user can have different roles for a single Vault account. One role can be assigned by the user's group policies, while a different role can be assigned by the user's explicit access to the Vault Account.
In such cases, the system uses the most-specific role for that user. Therefore, the system lets the role assigned on the Edit Vault Account page override the role assigned on the user's group policy. When the role is overridden in such a way, the word overridden appears on the Edit Vault Account page for the user's group policy membership. This behavior is consistent with the order of precedence for Jump Item Roles. User accounts with the Allowed to Administer Vault permission are implicitly allowed to access every Vault account.
-
Select the type of Jump Item Associations for the account. The Jump Item Associations setting determines which Jump Items the account is associated with, so the account is available only for relevant target computers in the console during credential injection attempts.
Select one of the following types:
Jump Item Association Type Description Inherited from the Account Group Associations for this account are determined by the associations defined in this account's Account Group. Any Jump Items This account can be injected within any session started from a Jump Item in which the account is applicable. The applicable accounts are the following: - Local Accounts- discovered on a Vault Endpoint are available for injection on Jump Items targeting the Endpoint.
- Domain Accounts- are available for injection on Jump Items targeting Vault Endpoints on the Domain.
- All Domain Accounts- are available for injection on Jump Items targeting remote systems that do not match a Vault Endpoint.
- Shared Generic Username & Password Accounts- are available for injection into all Jump Items.
- Shared Generic SSH Accounts- are available for injection into all Shell Jump Shortcuts.
- Shared Generic Token Accounts- are available for injection into all Kubernetes Cluster Tunnel Jump Shortcuts.
ℹ️ Personal Jump Items are not supported..
No Jump Items This account cannot be injected into any session started from a Jump Item. Jump Items Matching Criteria This account can be injected only within sessions started from Jump Items that match the criteria you define, in which the account is applicable. The applicable accounts are the following: - Local Accounts- discovered on a Vault Endpoint are available for injection on Jump Items targeting the Endpoint.
- Domain Accounts- are available for injection on Jump Items targeting Vault Endpoints on the Domain.
- All Domain Accounts- are available for injection on Jump Items targeting remote systems that do not match a Vault Endpoint.
- Shared Generic Username & Password Accounts- are available for injection into all Jump Items.
- Shared Generic SSH Accounts- are available for injection into all Shell Jump Shortcuts.
- Shared Generic Token Accounts- are available for injection into all Kubernetes Cluster Tunnel Jump Shortcuts.
ℹ️ Personal Jump Items are not supported..
If the Jump Item Attributes section is configured, this list will be combined with any Jump Items that match the criteria.
The following Jump Methods are supported:- Jump Client
- Remote RDP
- Remote Jump
- Shell Jump
- Protocol Tunnel Jump
- Web Jump
Injection is not supported for the following items:- Personal Jump Items
- TCP Tunnel Protocol Tunnel Jump Shortcuts
- IP Tunnel Protocol Tunnel Jump Shortcuts
You can define a direct association between Vault accounts and specific Jump Items by selecting the Jump Items from the list and then click Add Jump Item.
If configured, the account is available for injection for any Jump Items that match the specified attribute criteria in addition to any specific Jump Items you added as matching criteria.
Local accounts are available for injection within the endpoints on which they were discovered.
You can further define the association between Vault accounts and Jump Items by specifying matching criteria. Each of the following values have a maximum length of 64 characters and can contain a maximum of 32 values.
The different Jump Item attributes are the following:
-
Name: This filter is matched against the value that appears in the Name column of the Jump Item in the console.
-
Hostname / IP: This filter is matched against the value that appears in the Hostname / IP column of the Jump Item in the console.
-
Tag: This filter is matched against the value that appears in the Tag column of the Jump Item in the console.
-
Comments: This filter is matched against the value that appears in the Comments column of the Jump Item in the console.
For example, a list of filter criteria is:
| Criteria | Result |
|---|---|
| value | matches the field exactly. |
| value* | matches the field as a prefix. |
| *value | matches the field as a suffix. |
| **value** | matches if the field contains the value |
- Click Save.
Add a personal generic account
Personal generic accounts may be used only by the account owner (the user who created the account).
-
Sign into app.beyondtrust.io.
The BeyondTrust Home page displays. -
From the main menu, click Privileged Remote Access > Vault.
The Vault page opens and the Accounts tab displays by default. -
Click Add.
-
Select Personal Generic Account.
The Add Personal Account page displays. -
In the Name field, enter a name for the account.
-
In the Description field, enter a useful description for the account.
-
In the Authentication section, select the type of authentication the account uses. Each selection has different requirements:
Authentication type Steps Username and Password - Enter the username.
- Enter and confirm the password.
- Select a specific policy for the account or leave Account Policy set to the default value of Inherit Policy Settings, in which case the account inherits the policy settings of the account group. If no account group is selected for the account, the account inherits the policy settings set for the global default account policy on the Vault > Options page.
Single Token - Enter and confirm the value. Use this account type to store a secret such as an API Key that does not have an associated username or ID.
- Select a specific policy for the account or leave Account Policy set to the default value of Inherit Policy Settings, in which case the account inherits the policy settings of the account group. If no account group is selected for the account, the account inherits the policy settings set for the global default account policy on the Vault > Options page.
Private Key - Enter the username.
- Enter the SSH private key. Only keys in OpenSSH formats are valid.
- Enter the SSH Key Passphrase.
When you create the account, enter the SSH private key and passphrase. It is validated when the account is saved. The account cannot save if the key is invalid, not in an accepted format, or cannot be decrypted with the provided passphrase.
After you save the account, edit the account to view details for the public key, and copy the public key. The public key details can also be queried with an API.SSH Private Key with Certificate - Enter the username.
- Enter the SSH private key. Only keys in OpenSSH formats are valid.
- Enter the SSH Key Passphrase.
- Enter the certificate. Only public certificates in OpenSSH formats are valid.
A public key is generated after the account is saved and can be viewed and copied by editing the account.
-
Click Save.
After the account is created and saved, select the Edit action and copy the public key. It starts with cert-authority. Add this public key to the endpoint's SSH configuration as a trusted CA or in an account's known Hosts file, so that the endpoint trusts certificates signed by the CA.
Vault administrators can view personal accounts but cannot edit them, inject them, or view their passwords. Only the user who created the personal account can modify, inject, or view the account's password. Users can create up to 50 Vault personal accounts.
Credentials
Credentials refer to the digital evidence used to verify and authenticate a user's identity or access rights to systems, networks, applications, or data. These typically include usernames and passwords, but can also encompass more advanced methods like security tokens, digital certificates, or encryption keys.
With BeyondTrust Vault, you can check in or out credentials, rotate credentials, or provide credential injection to remote systems during support sessions.
Rotate credentials
Frequently rotating or changing privileged credentials is considered a security best practice. Credentials stored in BeyondTrust Vault can be set to automatically rotate after each use and can be manually rotated at any time.
Three actions trigger the automatic rotation of domain credentials:
- Manually checking in a credential from the Admin interface.
- Leave a session in which credential injection has been used.
- The password reaching its maximum age when scheduled password rotation is enabled.
The algorithm Vault uses to generate passwords is based on National Institute of Standards and Technology (NIST) framework.
Rotate credentials manually
- Sign into app.beyondtrust.io.
The BeyondTrust Home page displays. - From the main menu, click Privileged Remote Access > Vault.
The Vault page opens and the Accounts tab displays by default. - Select the account you want to rotate.
- Click Rotate.
The Rotate Summary displays. - Click Start Rotation.
Once rotation is complete, the Password Age information updates with a time stamp of a few seconds.
Checkout credentials
Stored passwords can be retrieved for use outside of a Secure Remote Access session. The Remote Support for Admin interface allows you to manually check out a password for a shared account, or view and copy a password for a personal account.
Check a shared account out and in
-
Sign into app.beyondtrust.io.
The BeyondTrust Home page displays. -
From the main menu, click Privileged Remote Access > Vault.
The Vault page opens and the Accounts tab displays by default. -
From the Shared tab, locate the account you wish to check out.
-
Click Check Out
 .
. -
The Account Password dialog appears, and you can see the password in plain text for one minute when you click Reveal .
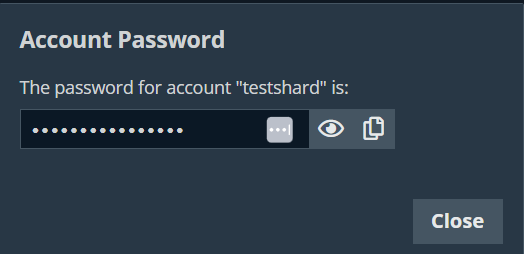
During that time, you can copy the password when you click the Copy icon  .
.
-
For SSH Certificate Authority accounts, the signed public key and the private key display. Users must authenticate within five minutes. The credentials can also be accessed via API using the bt vault subcommand of the Command Line Interface.
When an account is checked out, it's indicated in the Status column. You can hover over the Checked Out status to see who has it checked out.
-
When you are finished using a credential, return to the Accounts page, and then click Check In to check the password back in to BeyondTrust Vault.
-
For SSH Certificate Authority accounts, there is no need for check in, as the credentials are unique for each check out or injection.
If you check in a domain credential with automatic rotation configured, the password automatically rotates.
Non-administrative users can view and modify only credentials for which they have access.
Check out a service account
The process for checking out service accounts is the same as other accounts; however, the password must be manually set by the administrator before checking out the account.
View and copy a personal account password
-
Sign into app.beyondtrust.io.
The BeyondTrust Home page displays. -
From the main menu, click Privileged Remote Access > Vault.
The Vault page opens and the Accounts tab displays by default. -
From the Personal tab, locate the account you wish to check out.
-
Click View Password
 .
. -
The Account Password dialog appears, and you can see the password in plain text for one minute.

During that time, you can copy the password when you click the Copy icon .
Only the owner of a personal account is able to view its password. A Credential Used event is logged when the owner views the password. Vault administrators can view this activity in a Vault report.
Credential injection
Credentials stored in BeyondTrust Vault can be used to log in to remote systems during support sessions. Ensure the BeyondTrust Vault has been configured and accounts are imported or manually added for the console to use credential injection.
Credential injection is available for:
- Elevating sessions
- Logging into remote Windows systems
- Answering a User Account Control (UAC) prompt
- Running a special action
Credential injection is not available for Mac or Linux Jump Clients.
This feature is not supported for ARM-based Windows systems.
Add credential injection
- While in a session in the console, you can inject credentials by clicking the key icon
 at the top of the toolbar.
 - A dialog box appears, allowing you to click on the dropdown icon to select a credential from the list, or type in part of the account name to filter credentials to select from.
- If multiple accounts have the same name, you can select credential by account (user name).
- Select the appropriate credentials.
The console retrieves the selected credentials from BeyondTrust Vault and injects them into the session.
For SSH Certificate Authority accounts, the time to live (TTL) is five hours. If you are in a Shell Jump session that exceeds five hours and need to perform an action that requires re-authentication, such as stopping all shells and starting again, the action fails.
Favorite credentials for injection
After you have used a set of credentials to log into an endpoint, the system stores your preferred credentials for the endpoint and the context in which they were used (that is, to log in, to perform a special action, to elevate, or to push) in the B Series Appliance database. The next time you use a credential to access the same endpoint, the credential injection menu makes a recommendation for which credentials to use. The credentials are displayed at the top of the credentials list, under Recommended Accounts, followed by any remaining credentials. If no credential history exists for an endpoint, the B Series Appliance displays all possible credentials, grouped by accounts that are associated with the Jump Item and not associated with the Jump Item. Jump Item associations for accounts and account groups are configured in Admin interface.
Tip
The credential list recommends no more than five credentials.
Automatic and scheduled maintenance for credentials
To configure passwords for Vault accounts to automatically rotate after each use, enable the Automatically Rotate Credentials after Check In Rules option in the account policy being used for the account.
You can schedule password changes for Vault accounts by enabling the Scheduled Password Rotation Rules option in the account policy being used for the account.
- Service accounts running in a failover cluster environment cannot be rotated. The error "Failover Cluster detected. Unable to change the run-as password for the service <service_name>" appears when a rotation attempt is made and Rotation Failed is indicated in the Status column for the service.
- Services using a Microsoft Graph account as the Run As account cannot be rotated.
- Services that have dependent services cannot be rotated, due to the risk of services within the service chain not restarting successfully.
- You can define the password length for passwords generated during rotation for Windows and Entra ID Domain Services domain and local accounts from the Vault > Options page.
For more information, see the following:
- Account policies, see Vault account policies
- Rotating credentials for protected users, see Configure user permissions to rotate protected credentials
Search Selected Account Group
You can filter the list of available accounts by using the Search Selected Account Group box. Based on the account type, you can use different criteria.
For a Shared account, select Name, Description, or Endpoint to search. For a Personal account, select Name or Description to search.
Edit a Vault account
-
Sign into app.beyondtrust.io.
The BeyondTrust Home page displays. -
From the main menu, click Privileged Remote Access > Vault.
The Vault page opens and the Accounts tab displays by default. -
Select the appropriate account type and then follow the steps:
Vault account Steps Shared - Select the account you want to edit.
- Click the ellipsis.
- Select Edit.
- Modify the account as necessary.
- Click Save.
Personal - Select the account you want to edit.
- Click the pencil to edit the account.
- Modify the account as necessary.
- Click Save.
Delete a Vault account
-
Sign into app.beyondtrust.io.
The BeyondTrust Home page displays. -
From the main menu, click Privileged Remote Access > Vault.
The Vault page opens and the Accounts tab displays by default. -
Select the appropriate account type and then follow the steps:
Vault account Steps Shared - Select the account you want to edit.
- Click the ellipsis.
- Select Delete.
- Click Yes.
Personal - Select the account you want to edit.
- Click the trash can.
- Click Yes.
Updated 3 months ago
