Okta and EPM config guide
Configuring Okta for use with EPM for Windows and Mac has two components that work together. Set up both for Okta group filtering to work.
You need both: the connector resolves Okta groups when you author the policy, and identity authentication provides the verified group membership that the endpoint evaluates at runtime. Setting up the connector alone lets you reference Okta groups in a policy, but those filters do not match users until identity authentication is also configured.
Before you begin
Create two applications in Okta:
- One for the connector; an API Services app.
- One for end-user identity verification; an OIDC Native app.
Then add their details to EPM:
- Connector details at Configuration > Directory Service Settings > Okta.
- Identity verification details in the Policy Editor at Utilities > Identity Provider (IdP) Settings > Identity Authentication.
Prerequisites
Okta account filters require EPM for Windows and Mac 26.2 or later on the endpoint.
Earlier versions ignore Okta filters; existing Microsoft Entra ID filters are unaffected, so mixed-version estates keep working.
Set up the Okta connector
Create an Okta API Services app
For EPM to query Okta groups, a communication channel between EPM and Okta must exist. This requires an API Services app in Okta.
- Sign in to Okta Admin (
https://<domain>-admin.okta.com). - Go to Applications > Create App Integration > API Services > Next; name it e.g.
EPM Connector. - Under General > Client Credentials: set Client authentication = Public key / Private key, add a key, save the private key (JWK JSON).
- Ensure DPoP header required is unchecked (else token requests fail
invalid_dpop_proof). - Under Okta API Scopes: grant
okta.users.read+okta.groups.read. - Assign Read-only Administrator role. Note the Client ID and Okta Domain (no
https://, no-admin).
If the Read-only Administrator role is not assigned, Validate Settings can still succeed but group searches return
403 E0000006.You do not have permission to perform the requested action.
Add the Okta connector in EPM
-
Select Configuration > Directory Service Settings and select the Okta tab.
-
Switch on Enable Okta Integration.

-
Under Configure Okta, enter the Client ID, the Private Key (JWK), and the Okta Domain (for example
your-domain.okta.com— without https:// and without -admin). -
Select Validate Settings, then Save Changes.
Group-data fallback to EPM applies to Microsoft Entra ID only. If Okta group querying fails, the client does not fall back to EPM .
Update the app registration to use the new issuer
In your native app's OIDC configuration (Applications > Applications), update the issuer URL to point to the custom authorization server:
https://{yourOktaDomain}/oauth2/{authServerId}
The exact issuer URI is on the Settings tab of your new authorization server. The native app registration itself (client ID, redirect URIs, grant types) does not need to change.
Configure the EPM-WM Policy Editor
There are two parts to setting up a policy to use Okta, identity authentication and the workstyle account filter
Add Okta groups to a workstyle account filter
The flow is the same for Windows and Mac.
-
In the Policy Editor, open a workstyle and go to Account Filters.
-
Click Add Accounts from Search.
-
In the connector dropdown, select Okta. Okta supports groups only.
-
Enter a name in the account name filter field to search your Okta instance.
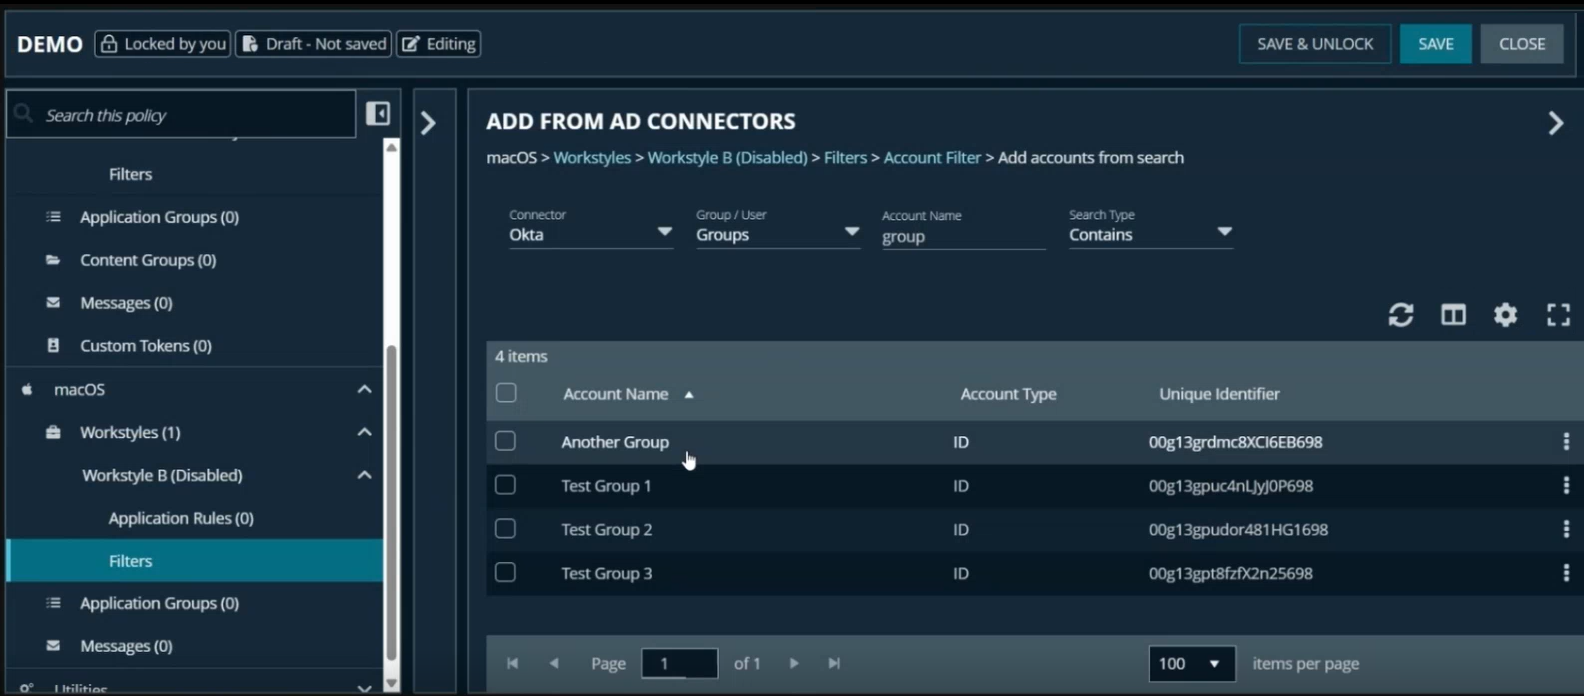
-
Select the groups you want to add and confirm.
- Accounts can be deleted but not edited.
Set up identity authentication
Identity authentication lets endpoint users verify their identity through Okta, so policies can enforce access based on Okta group membership.
After setup, users select the Verify Identity link on the endpoint and confirm their identity through Okta. A prompt appears in EPM dialog boxes to guide users who have not yet verified their identity when a policy requires it.
The Okta connector is required to filter workstyles by group name after a user's identity is verified. Alternatively, enter the group ID (
00g…) by hand in the policy.
Register the Okta app and authorization server
Register the OIDC native app
- In Okta, go to Applications > Create App Integration > OIDC - OpenID Connect > Native Application (public client, PKCE).
- Sign-in redirect URI:
- macOS:
com.beyondtrust.pmfm://idp - Windows:
http://127.0.0.1:port_number
- macOS:
- Grant type: Authorization Code
Note the Client ID (the 0oa… value). You will enter this in the Policy Editor.
Create a custom authorization server
We recommend a custom authorization server to ensure the tokens Okta issues are RSA signed, which EPM requires to validate them. Enterprise Okta admins may already have a custom authorization server. Any one works, as long as the groups scope and claim below are added to it.
- Go to Security > API > Authorization Servers > Add Authorization Server.
- Enter a Name and an Audience. The Audience is a URI identifying your resource server, e.g.
api://epm-wm. This becomes theaudclaim in issued tokens. Make a note of it as you will need it in your app's token validation configuration. - Click Save.
A custom authorization server ensures Okta issues RSA-signed tokens, which EPM requires for validation. Enterprise tenants may already have a suitable custom authorization server. Any will work provided the groups scope and claim are configured on it.
The server's issuer URI is shown on the Settings tab: https://<your-okta-domain>/oauth2/<authServerId>. Note the URI, you need to add it in the Policy Editor.
Add an access policy and rule
Without at least one access policy and rule, the server will not issue tokens.
- Go to the Access Policies tab within your new authorization server.
- Click Add Policy, give it a name, and assign it to The following clients. Type or select your native app registration.
- In the policy, click Add Rule:
- Grant types: Select Authorization Code and Refresh Token
- User is: Any user assigned the app (or restrict to a group)
- Token lifetimes: You can use the defaults
Add a groups scope
- Go to the Scopes tab of your authorization server.
- Click Add Scope, set the name to groups, and save.
Add a groups claim
This is required for Okta group memberships to appear in tokens and be usable for policy filtering in EPM-WM.
- Go to the Claims tab > Add Claim.
- Set:
- Name:
groups - Include in token type: ID Token > Always
- Value type: Groups
- Filter: Matches regex
.*(to include all groups) - Include in: Any scope
- Name:
Assign groups
Under the app's Assignments, assign the user groups used in your policy. Groups are sent to EPM when users verify their identities.
Important informationThe groups claim must return group IDs, not group names. The
"group.id"argument ingetFilteredGroupsis what makes the claim emit Okta group IDs (00g…). Policies store the group ID, so if the claim returns names instead, the filters never match and group-based policy silently fails to apply.
Important informationThe function name is exactly
getFilteredGroups; noGroups.prefix, no dot before the parenthesis. A malformed expression causes Okta to silently omit the claim.The claim field is limited to 1,024 characters / 100 groups per token. For longer lists, store IDs in the app profile:
getFilteredGroups(app.profile.groupAllowlist, "group.id", 100)set via the Okta Apps API.
Configure identity authentication in the Policy Editor
The flow is the same for Windows and Mac.
-
In the Policy Editor, go to Utilities > Identity Provider (IdP) Settings > Identity Authentication.
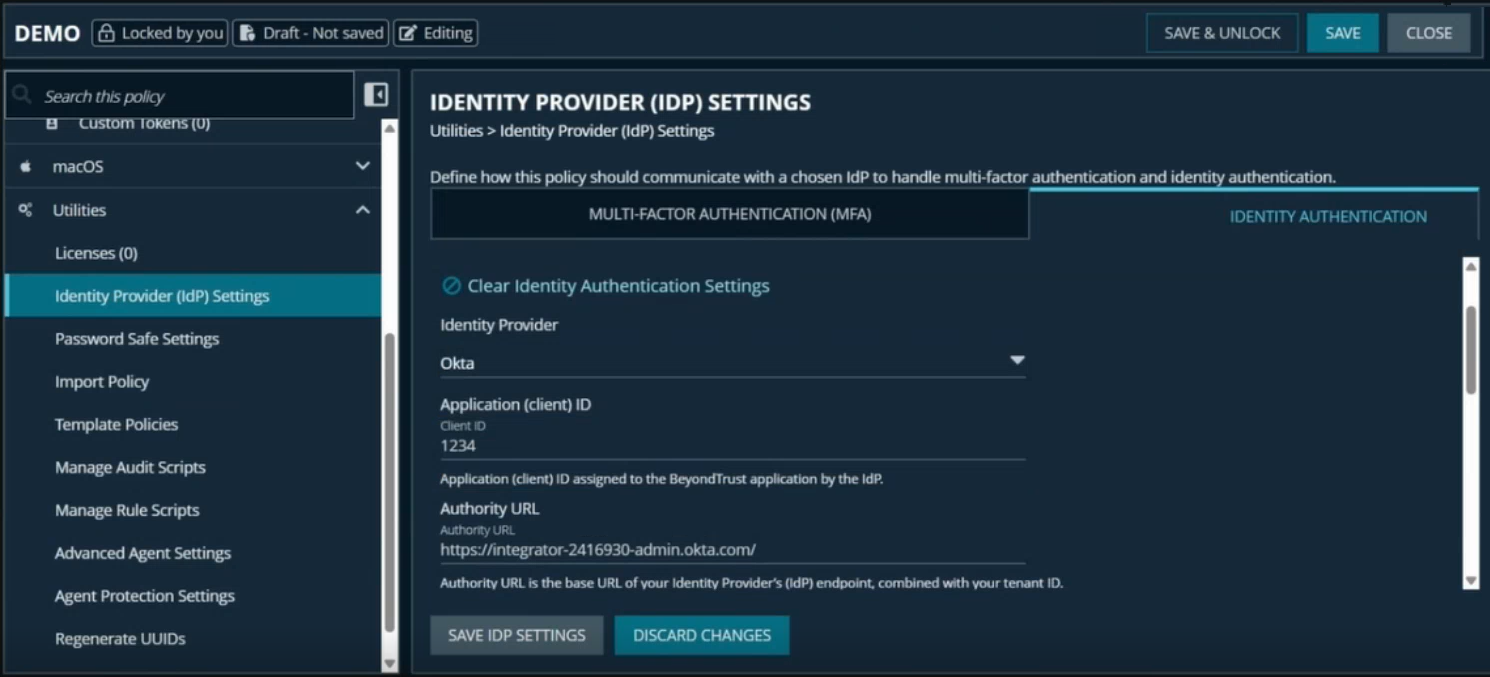
-
Add Application (client) ID: the
0oa…Client ID of your Okta native app. -
Add the Authority URL: your custom authorization server's issuer:
https://<your-okta-domain>/oauth2/<authorizationServerId>. Shown on the server's Settings tab; there is no/v2.0/suffix. -
Redirect URI: must match the redirect URI configured in your Okta app.
Format:http://127.0.0.1:{port}(Windows) orcom.beyondtrust.pmfm://idp(Mac) -
Select Save IdP Settings.
When do groups update?
Group membership is read from the token when the user signs in. It also refreshes automatically on the configurable group-refresh interval (the same setting used for Microsoft Entra ID), so Okta group changes are picked up in the background without the user having to sign in again.
End-user experience after policy is pushed
Windows
- On an endpoint with no verified identity, affected applications are blocked.
- The user selects the option to verify their identity via Okta and completes authentication.
- Once verified, applications that match the user's Okta group membership are allowed to elevate and run.
Mac
- On an endpoint with no verified identity, affected applications are blocked.
- The user signs in through the identity prompt and enters their credentials.
- Once signed in, the UI updates to reflect the verified state.
- Applications that match the user's Okta group are allowed to run.
- Group membership is matched by group ID, not group name.
