Computer Groups | EPM-WM Cloud
What are Computer groups?
Computer groups are logical groupings of the computers in your EPM-WM application.
What is a default computer group?
You can set a computer group as a default computer group so that when you add new computers to EPM-WM, they are automatically assigned to that group, and automatically receive the group's policies.
How are they useful?
Sorting your computers into groups helps you enforce policies and compliance across multiple computers.
The Computer Groups page
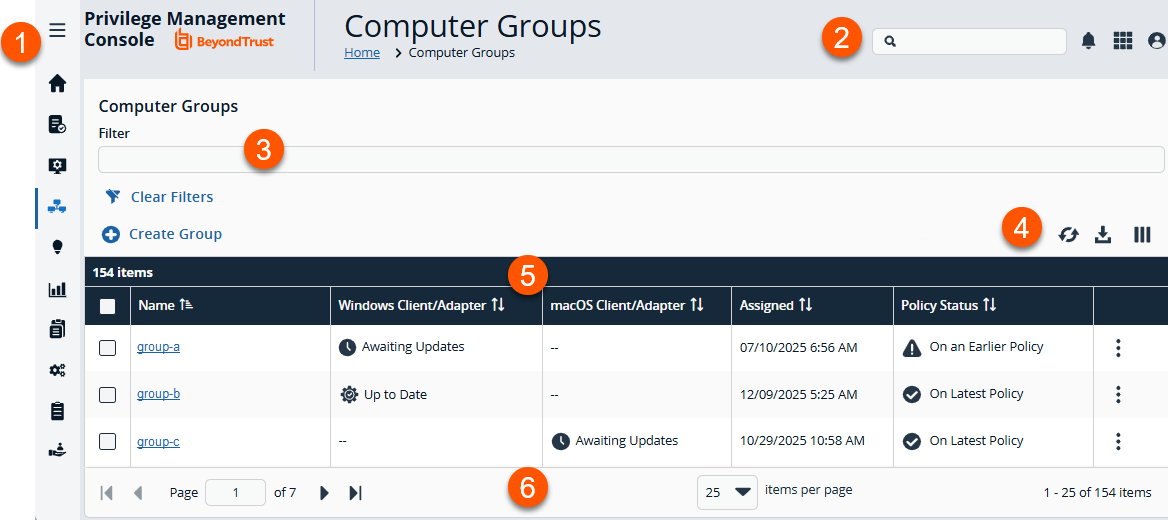
- Left menu: Easy access to all pages in Endpoint Privilege Management, including the Home, Policies, Computers, Computer Groups, Management Rules, Analytics, Just-in-Time Access Management, Configuration, Auditing, and User Management pages.
- Header: Enter keywords to run a global search across computer groups, policies, computers, and users, view your notifications, change your site language, change your time zone, and log out of EPM for Windows and Mac.
- Filters: Select a filter to refine your results. Click Clear Filters to remove all filters from your results.
Filter types
- Name: Enter all or part of a policy name.
- Created: The date the group was created.
- Policy: The name of the policy assigned to the computer group.
- Policy Status: The state of the policy, such as On an Earlier Policy or On Latest Policy.
- Windows/Client/Adapter: The date the computer last checked in with
-
List options: Click
 to refresh the list,
 ![Download icon in [%=Products.PMAb%] SaaS.](https://files.readme.io/4184083cd292ef8bdfd540e7050b85eb3c303c586674e267bbfbb608cbe5ab83-download.png) to download the list to a .csv file, and
to download the list to a .csv file, and  to select which columns to display on the page.
 - Computer Groups list columns: Not all columns display in the image above.
Column names
- Name: The computer group name.
-
Created: The date the group was created.
-
**Active Computers:**The number of computers in the group.
-
Windows Client/Adapter: The state of the client/adapter version, such as Up to Date, Awaiting Updated, Update Failed, Manual Updates.
-
Policy: The name of the policy assigned to the computer group.
-
Assigned: The date the policy was assigned.
-
Policy Status: The state of the policy, such as On an Earlier Policy or On Latest Policy.
-
Description: The detail provided when creating the group.
-
Users: A list of users associated with that computer group.
-
All Computers: The number of computers that are members in the group.
-
- List navigation options: Navigate the Computer Groups list by moving forward or backward and setting the number of items to display per page.
Create a group
- From the left menu, click
 .
.
The Computer Groups page displays.
- Click Create Group.
The Create Group panel displays. - Enter a Group Name.
- Optionally, enter a Description.
- Click Create Group.
Your group is created and displays in the list.
View a group's details
- From the left menu, click .
The Computer Groups page displays.
- Locate a group you want to view.
- Click
 > View Group Details.
The Group Details page displays. - View the properties, updates, roles, users, and group activity from the left panel.
Set a group as the default group
- From the left menu, click .
The Computer Groups page displays.
- Locate a group you want to set as default.
- Click > Set as Default.
A confirmation message displays. - Click Set as Default.
The group is marked as the default group, and new computers added to EPM-WM are automatically added to this group.
Edit a group's name and description
- From the left menu, click .
The Computer Groups page displays.
- Locate a group you want to edit.
- Click > Edit Group.
The Edit Group panel displays. - Edit the Group Name and/or the Description.
- Click Save Group.
The group's name and description update.
Manage a group's client and adapter updates
When you push a policy out to computers in a group, that policy is delivered via software (a "client") on that machine. When a new update is available to a client, you can update them across all computers in a group via the Updates page.
- From the left menu, click .
The Computer Groups page displays.
- Locate a group for which you want to update clients.
- Click > View Group Details.
The View Group Details page displays. - In the left panel, click Updates.
The Updates page displays.
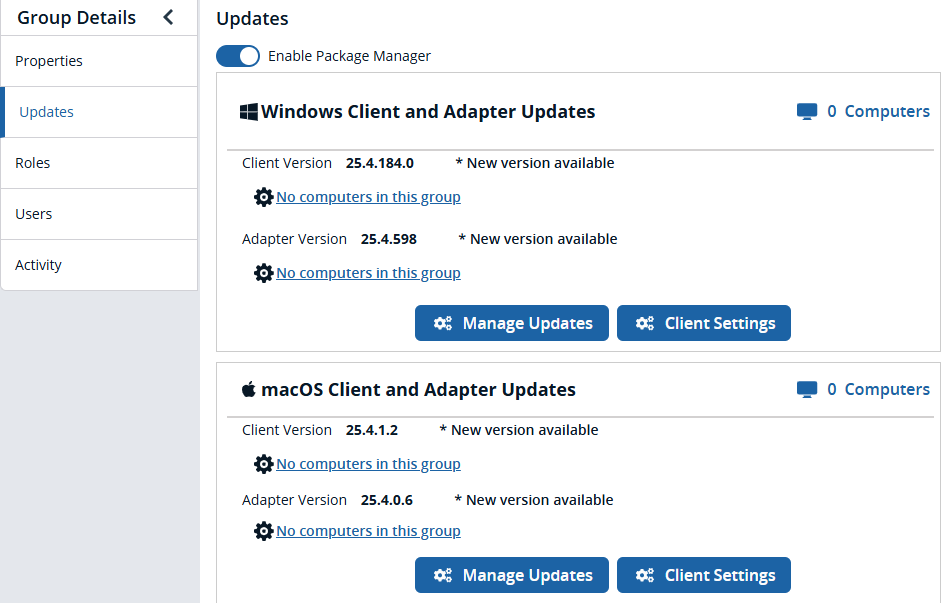
- In either the Windows Client and Adapter Updates or macOS Client and Adapter Updates section, click Manage Updates.
The Manage Updates panel displays. - Select your update option:
- Latest version: Updates the computers in the group to the latest client version.
- Other version: Updates the computers in the group to a client version you select from the list. Only supported client versions display.
- Click Save Changes.
The clients automatically update across all computers in the computer group.
Assign a policy to a group
- From the left menu, click .
The Computer Groups page displays.
-
Locate the group to which you want to assign a policy.
-
Click
> Edit Policy Assignment.
The Edit Policy Assignment panel displays. -
Select a policy to apply.
-
Select one of the policy's revisions to apply.
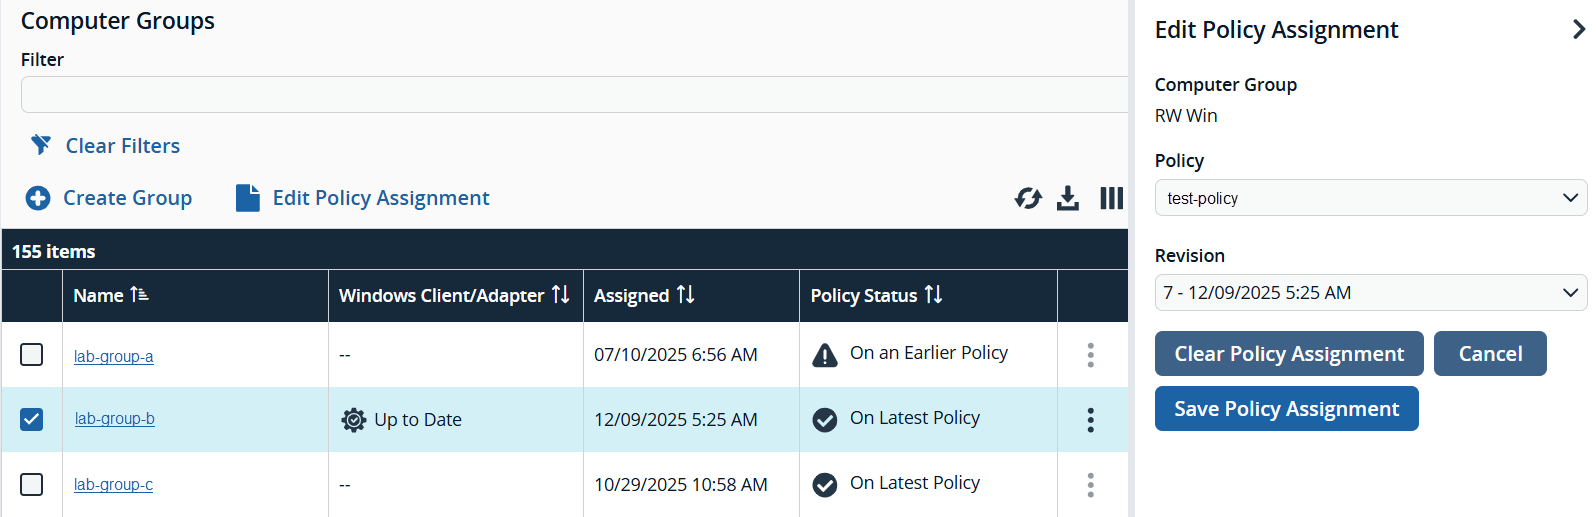
-
Click Save Policy Assignment.
The policy assigns to the computer group.
Remove a policy from a group
Removing a policy from a computer group removes the policy rules for all computers in that group.
- From the left menu, click .
The Computer Groups page displays.
- Locate the group from which you want to remove a policy.
- Click > Edit Policy Assignment.
The Edit Policy Assignment panel displays. - Click Clear Policy Assignment.
The policy is removed from the selected computer group.
View a "policy assigned" date
Important information
- If you are investigating a computer with a policy status of Awaiting Policy, you can view the date and time a policy was assigned to the group. This can help you determine when computers are out of compliance.
- BeyondTrust recommends computers be investigated if they remain in an Awaiting Policy state for more than 2 days.
- From the left menu, click .
The Computer Groups page displays.
-
Locate a group you want to view.
-
Click
> View Group Details.
The Group Details page displays with the Properties page open by default. -
In the Properties list, locate the Assigned date and time stamp.
The Assigned date displays the most recent policy assignment.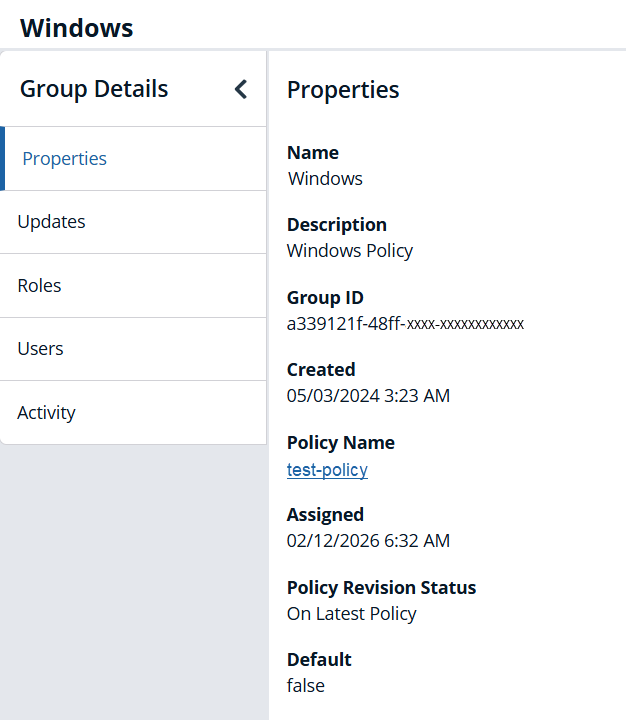
Download a list of computer groups
- From the left menu, click .
The Computer Groups page displays.
- Optionally, filter your computer groups list to a specific set of groups.
- Click
 to download the list to a .csv file.
The list of groups downloads to your machine.
Delete a group
WARNINGDeleting a computer group is an unrecoverable operation.
Important information
- You can only delete a computer group if it has no computers assigned to it.
- A group cannot be deleted when selected in a management rule.
- From the left menu, click .
The Computer Groups page displays.
- Locate the group you want to delete from the list.
- Click
 > Delete Group.
A confirmation message displays. - Click Delete Group.
The group is deleted.
Updated 1 day ago
