Policies | EPM-WM Cloud
Permissions required
To create, edit, or view policies, you must have a role of Administrator, Policy Administrator, or be a user with the Policy Manager permission.
What is a policy?
A policy is an XML file that defines the application rules, definitions, and messages used by EPM-WM to protect access to your organization's computers.
How are policies useful?
Policies are installed on computers within your organization and enforce least-privilege access, enhance security, and ensure compliance. Policies are tailored to control user permissions, manage applications, and mitigate risks across both Windows and Mac operating systems.
The Policies page
Use the Policies page to view at-a-glance data about your active and inactive policies.
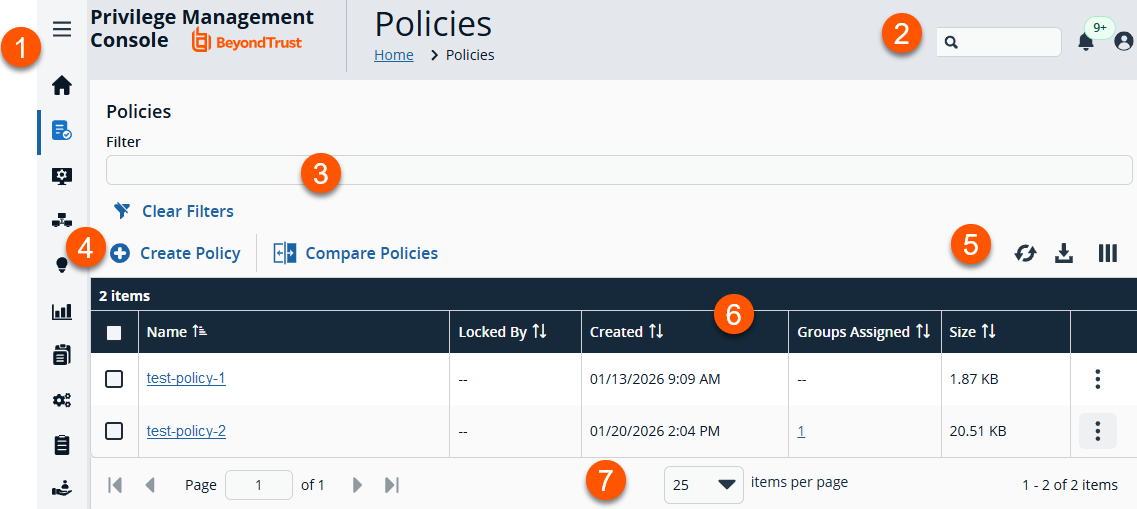
- Left menu: Easy access to all pages in Endpoint Privilege Management, including the Home, Policies, Computers, Computer Groups, Management Rules, Analytics, Just-in-Time Access Management, Configuration, Auditing, and User Management pages.
- Header: Enter keywords to run a global search across computer groups, policies, computers, and users, view your notifications, change your site language, change your time zone, and log out of EPM for Windows and Mac.
-
Filters: Select a filter to refine your results. Click Clear Filters to remove all filters from your results.
Available filters
-
Name: Enter all or part of a policy name.
-
Locked By: Enter an email address to view all policies locked via that account.
-
Created: Select a date from the date selector that displays to the left of the Filter drop-down to view all policies created on that day.
-
-
Create Policy: Click to create a new policy.
-
List options: Click
 to refresh the list,
 ![Download icon in [%=Products.PMAb%] SaaS.](https://files.readme.io/4184083cd292ef8bdfd540e7050b85eb3c303c586674e267bbfbb608cbe5ab83-download.png) to download the list to a .csv file, and
to download the list to a .csv file, and  to select which columns to display on the page.
 -
Policy list columns: Not all columns display in the image above.
Column names
-
Name: The policy name.
-
Locked By: If a policy is locked, this displays the email of the user last locked it.
-
Created: The date and time stamp when the policy was created in your environment.
-
Groups Assigned: The number of computer groups that have the policy assigned to them. Clicking the link displays the Computer Groups page highlighting the groups assigned that policy.
-
Size: The size of the policy (in KB).
-
Revisions: The total number of revisions recorded for the policy.
-
Users: The total number of users who can create, edit, and/or view the policy.
-
Period Locked: If a policy is locked, this displays the period (in days or months, if longer than 3 weeks) when the policy was last locked.
-
Last Modified: Displays the date and time the policy was last modified.
-
-
List navigation options: Navigate in the Policy list.
Create a policy
You can create a policy with the Policy Editor or upload one via an XML file.
Create a policy using the Policy Editor
QuickStart template for macOS or Windows
You can use one of the available QuickStart templates, and customize it for your policy requirements.
QuickStart templates contain Workstyles, Application Groups, Messages, and Custom Tokens configured with Endpoint Privilege Management and Application Control.
QuickStart templates include:
- QuickStart for Windows: A Windows policy template preconfigured with Workstyles, Application Groups, messages, and Custom Tokens.
- QuickStart for Mac: A Mac policy template preconfigured with Workstyles, Application Groups, and messages.
- Server Roles: A Server Roles policy preconfigured with Workstyles, Application Groups, and Content Groups to manage different server roles such as DHCP, DNS, IIS, and Print Servers.
- From the left menu, click
 .
.
The Policies page displays.
- Click Create Policy.
The Policy Creator page displays.
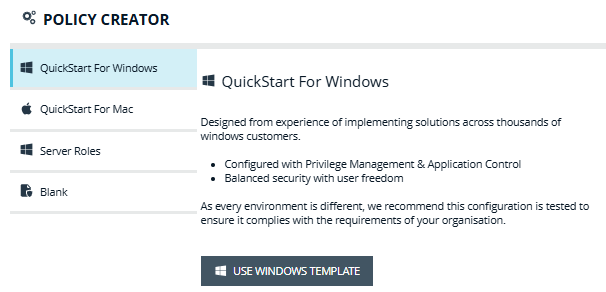
- Select a QuickStart template, or select Blank to create a policy without any preconfigurations.
- Enter a Policy Name and Policy Description.
- Click Create Policy.
The policy is created, and the Workstyles page displays for your new policy. - Optionally, configure the workstyle, application groups, application rules, and other policy configurations as required for your organization.
Create a new policy using file upload
When creating a new policy in EPM-WM, you can upload an XML policy file.
- From the left menu, click .
The Policies page displays.
- Click Create Policy.
The Policy Creator page displays. - Select a QuickStart template, or select Blank to create a policy without any preconfigurations.
- Enter a Policy Name and Policy Description.
- Click Create Policy.
The policy is created, and the Workstyles page displays for your new policy. - In the left panel, click Utilities to expand the menu.
- Click Import Policy.
The Import Policy page displays. - Select either Merge Policy or Overwrite Policy.
Because this is a new policy, the options have the same behavior. - Click Drag and drop or click to select a File to upload, or click the blank box, to attach your policy XML file.
- Click Upload File.
The file uploads and replaces the new policy with the settings defined in the XML file.
Open a policy
Open a policy to view its configuration in read-only mode.
- From the left menu, click .
The Policies page displays.
- Locate the policy you want to open.
- Click
 > Open Policy.
The Policy Editor opens, and the Workstyles page displays by default. You can view the policy's configuration in read-only mode.
View a policy's details
- From the left menu, click .
The Policies page displays.
- Locate the policy you want to view.
- Click > View Policy Details.
The Policy Details page displays. - View the policy properties, revisions, drafts, roles, users, and activity. If a policy has more than one revision, you can compare revisions.
Edit a policy's properties
Important information
- You can only edit a policy's properties if that policy is unlocked.
- If a policy is locked, the username of the person who locked it displays in the Policy Properties panel. Changes cannot be made to locked policies; contact the user to unlock the policy.
- From the left menu, click .
The Policies page displays.
- Locate the unlocked policy you want to edit from the list.
- Click > Edit Properties.
The Policy Properties panel displays. - Edit the Policy Name and Policy Description.
- Click Save Policy Properties.
The policy properties save.
Edit a policy's configuration
Important information
- When you edit a policy, the policy is locked.
- Other policy administrators cannot access the policy to change the properties when the status is Locked.
- You can edit more than one policy at a time if you need to navigate between policies (for example, to copy settings in one policy to another).
You can edit a policy using the Policy Editor or using an XML file.
Edit a policy using the Policy Editor
- From the left menu, click .
The Policies page displays.
- Locate the policy you want to edit from the list.
- Click > Edit & Lock Policy.
The Policy Editor opens, and the Workstyles page displays by default. The policy locks to other EPM-WM users. - Edit the policy's configuration.
- Once you complete all updates, click Save & Unlock.
A Save Revision and Unlock panel displays. - Optionally, enter Annotation notes about the policy changes.
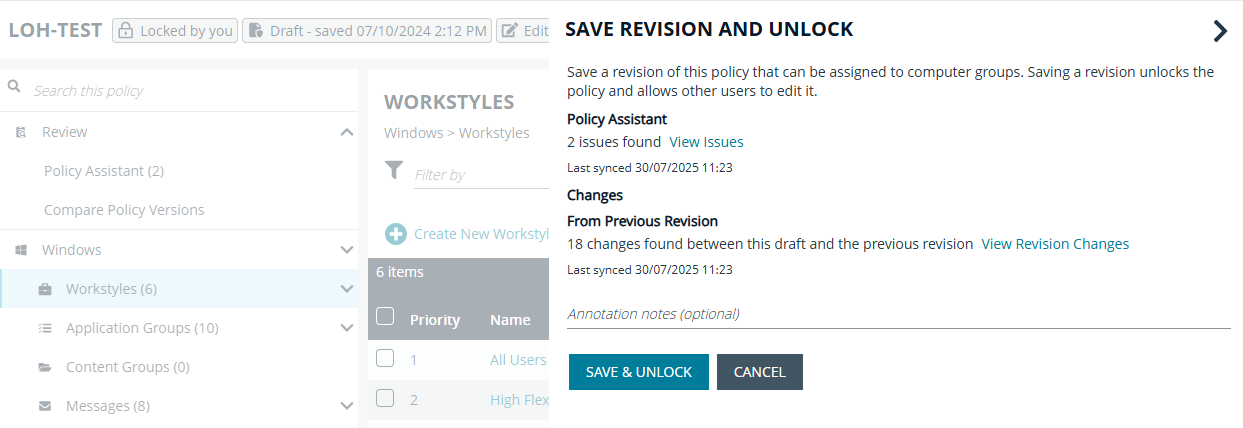
- Select View Issues or View Revision Changes to see more information about possible changes you'd like to make before proceeding.
- Click Save & Unlock.
The policy updates to the assigned groups and unlocks in EPM-WM.
Edit a policy using file upload
- From the left menu, click .
The Policies page displays.
- Locate the policy you want to edit via an XML file.
- Click > Download Latest Revision.
An XML file with the latest revision of the policy downloads to your machine. - Edit the policy's configuration inside of the XML file.
- Save the XML file.
- On the Policies page, locate the policy again.
- Click > Upload Revision.
The policy's Import Policy page displays.The updated policy is recognized as a new revision based on a unique identifier in the XML.
Each time the policy is uploaded, the policy revision number changes.
- Click Merge Policy to merge your XML file with the existing policy, or click Overwrite Policy to overwrite it.
- Click Upload File.
If the XML file passes validation, the policy updates and the Auto Assign Policy to Groups dialog box displays. - Select the computer group(s) you want the revised policy assigned to.
- Click Apply to Groups.
The revised policy is assigned to the selected group(s).
Assign a policy to one or more computer groups
Assigning a policy to a computer group enforces the policy rules for all computers in that group.
- From the left menu, click .
The Policies page displays.
- Locate the policy you want to assign.
- Click > Assign Policy to Groups.
The Assign Policy to Groups panel displays. - Select the revision to apply.
- Optionally, select the top option in the list (## items) to apply the selected policy to all groups.
- Optionally, search for and select individual Groups to apply the revision to specific groups.
- Click Assign Policy.
The policy assigns to the selected computer group(s).
Remove a policy from one or more groups
Removing a policy from a computer group removes the policy rules for all computers in that group.
- From the left menu, click .
The Policies page displays.
- Locate the policy you want to remove from one or more computer groups.
- Click > Assign Policy to Groups.
The Assign Policy to Groups panel displays. - Select the policy revision you want to remove from groups.
- Optionally, select the top option in the list (## items) to remove the policy from all groups.
- Optionally, search for and select individual Groups to remove the policy from specific groups.
- Click Clear Policy.
The policy is removed from the selected computer group(s).
Download a policy's latest revision
Download a policy's latest revision to make changes to it in an XML file, instead of using the Policy Editor in EPM-WM.
- From the left menu, click .
The Policies page displays.
- Locate the policy you want to download.
- Click > Download Latest Revision.
An XML file with the latest revision of the policy downloads to your machine.
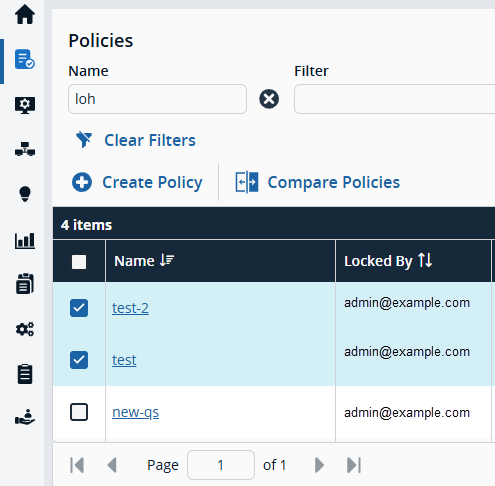
Compare policy versions
You can compare two policy versions to facilitate troubleshooting, assist with audit trails, and more.
Comparing policies is also available in the Policy Editor.
- From the left menu, click .
The Policies page displays.
-
Locate and select the policies you want to compare from the Policies list.
-
At the top of the list, click Compare Policies.
The Compare Policies page displays. -
Select a base policy and revision number you want to compare.
-
Select the policy and revision number you want to compare to the base policy.
-
Click Compare.
The comparison displays with color-coded changes between the selected policies.
Promote a policy
- From the left menu, click .
The Policies page displays.
-
Locate the policy you want to view.
-
Click
> View Policy Details.
The Policy Details page displays. -
In the left panel, click Revisions.
The Revisions page displays. If there is a revision eligible for promotion, the actions menu ()displays. -
Click
> Promote to Latest Revision.
A Promote Policy to Latest Revision dialog box displays. -
Optionally, enter notes for future reference.
-
Optionally, you can select Yes, auto assign latest revision to group(s) to update the policy to all groups assigned to that policy.
Important information- To auto-assign a policy revision to one or more groups, you must have policy assignment permissions to all groups affected by the policy.
- If you have insufficient access permissions, the auto-assign policy feature does not display.
-
Click Promote to Latest.
The selected policy revision is promoted and, if applicable, automatically assigned to the selected computer groups.
Force unlock a policy's latest revision
WARNINGForce unlocking a policy is an action with permanent changes, and cannot be undone. When you force unlock a policy:
- the policy reverts to the previous version, and
- the user account that locked the policy can no longer save changes to the policy.
Important information
- You must be an Administrator or Policy Administrator to force unlock a policy.
- We recommend you download the latest revision of the policy prior to performing a force unlock.
- From the left menu, click .
The Policies page displays.
- Locate the policy you want to force unlock.
- Click > Revert & Discard Changes.
The Revert & Discard panel displays. - Click Revert & Discard.
A confirmation message displays. - Click Revert & Discard.
The policy unlocks, reverts to the previous version, and the user account that locked the policy can no longer save changes to the policy.
Delete a policy
WARNINGDeleting a policy is an unrecoverable operation. When you delete a policy, you also delete all policy revisions associated to it.
Important information
- The policy must be unlocked. The Delete option is not available when the policy is locked.
- If the policy you want to delete is assigned to one or more groups, you can assign a different policy and revision to that group.
- If the policy you want to delete is assigned to one or more groups and you choose not to assign a different policy and revision to that group, the computers in that group will no longer be controlled by a policy.
- From the left menu, click .
The Policies page displays.
- Locate the policy you want to delete.
- Click > Delete.
A confirmation message displays. - Click Delete Policy.
The policy and all revisions are deleted.
