API settings | EPM-WM Cloud
The management API requires a secure account. Create an account in the EPM-WM Configuration area.
For authentication information to access the API, see the EPM-WM API Guide.
Create an API account
When using the EPM Management API, you must set up an account that is used to authenticate access to the API.
Not all API users will require full access to the API. Permissions can be assigned at a granular level and to only those API endpoints the user requires access to.
API endpoints
API endpoints and their methods
Audit
- /AuthorizationRequestAudits
- /ActivityAudits
Insight
- /AppSwitcher
Assigning Full Access to the Insight endpoint results in Read access to Management and Audit endpoints.
Management
- /Computers
- /File
- /Groups
- /Policies
- /Roles
- /Users
- /AcceptedDomains
- /Tasks
- /GlobalRoles
- /About
- /AuthenticationProvider
- /ApiAccounts
Reporting
- /Events
SCIM
- /scim
JIT (formerly URM)
- /AdminAccessRequest
- /AuthorizationRequest
Create the account
To create the account:
-
Click the Configuration menu, and then click API Settings.
-
Click Create an API Account.
-
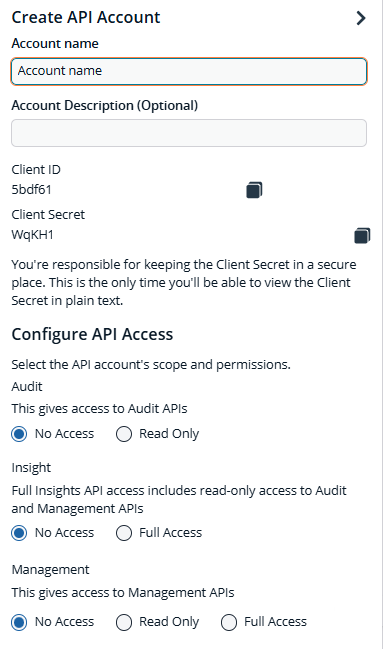
Enter a name and description.
The Client ID and Client Secret are automatically generated. The secret is only visible when initially generated for security reasons.
You can use the copy icons to copy the values to the API tool you are using. You can access these after the account is created as well.
-
Set the permissions for the account.
- No Access: No permissions are granted to that endpoint.
- Read Only: HTTP GET permissions are granted.
- Full Access: All HTTP permissions are granted.
Not all access options are shown in the following screen capture.
- Click Save API Account.
Generate a client secret
- Click the Configuration menu, and then click API Settings.
- Click the Generate new Client secret icon for the API account you use to access the API.
- Click Generate Secret.
- The client secret is displayed in the Client Secret column. Copy the secret to the authorization page of the API.
View API account details
View the API account details to see a snapshot of the account properties. The details include:
- Name and description
- Client ID
- Client Secret
- Access permissions
Edit an API account
On the edit page for an API account, you can:
- Change the account name and description
- Copy the client ID
- Generate a client secret
- Change API access
To edit an account:
- Click the Configuration menu, and then click API Settings.
- Select Edit API Account from the menu.
- Change the properties, and click Save API Account.
Delete an API account
- Click the Configuration menu, and then click API Settings.
- Click the trash can icon to delete the account.
- Click Delete Anyway on the confirmation dialog box.
