Management Rules | EPM-WM Cloud
What are management rules?
Management rules define when EPM-WM automatically archives, deletes, or deactivates computers, as well as when to run a system purge of local AD connectors.
What are system management rules?
System management rules are preconfigured rules.
System management rules
A standard user requires delegated access to this feature. For more information, see User management.
Important information about management rule processing
- The order of the rules in the list determines the priority and when the rules run.
- When creating rules, consider the conditions in the rule before setting the order. If the action in one rule is set to Delete, and the action in another rule is set to Archive, set the archiving rule to run first.
- A delete rule only deletes computers when the computers are already archived (by another rule).
- A rule triggers when a computer matches on all conditions configured in a rule.
- The properties configured in a rule are joined with and logic.
- If you want to use or logic, create two rules. If the condition is not triggered on the first rule, then it triggers on the second rule.
The Management Rules page
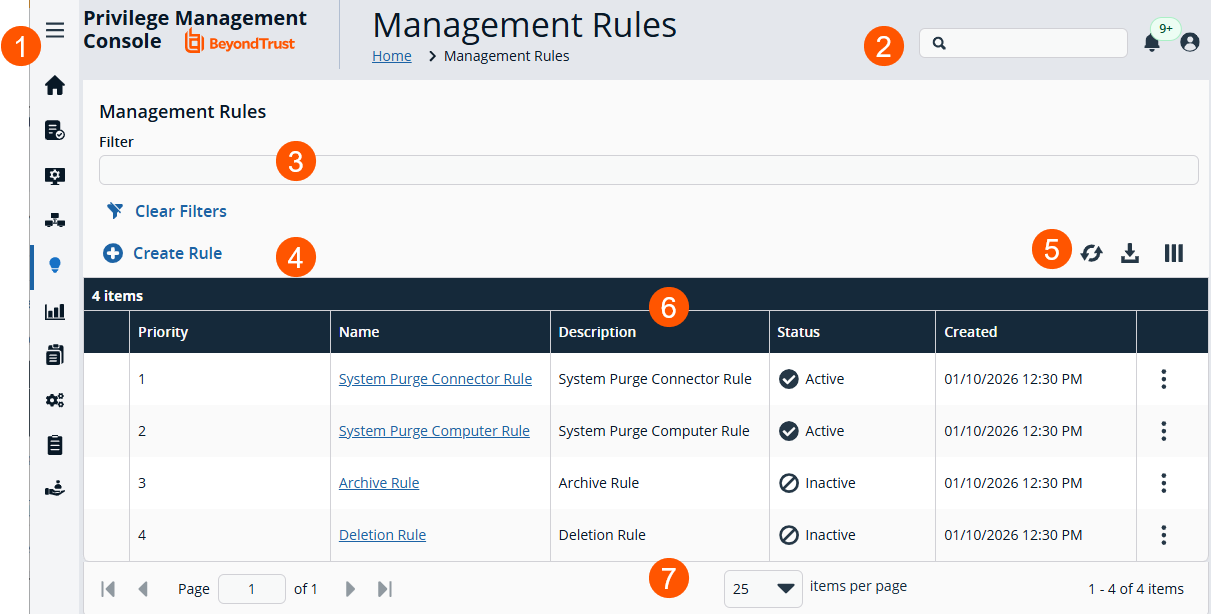
- Left menu: Easy access to all pages in Endpoint Privilege Management, including the Home, Policies, Computers, Computer Groups, Management Rules, Analytics, Just-in-Time Access Management, Configuration, Auditing, and User Management pages.
- Header: Enter keywords to run a global search across computer groups, policies, computers, and users, view your notifications, change your site language, change your time zone, and log out of EPM for Windows and Mac.
- Filters: Select a filter to refine your results. Click Clear Filters to remove all filters from your results.
Filter types
- Name: Search for all or part of a management rule name.
- Status: Search by a rule's current status (Active or Inactive).
- Created: Select the date(s) when the rule was created.
- Last executed: Select the date(s) when the rule was last run.
- Create Rule: Click to open the Create Rule page.
-
List options: Click
 to refresh the list,
 ![Download icon in [%=Products.PMAb%] SaaS.](https://files.readme.io/4184083cd292ef8bdfd540e7050b85eb3c303c586674e267bbfbb608cbe5ab83-download.png) to download the list to a .csv file, and
to download the list to a .csv file, and  to select which columns to display on the page.
 - Management Rules list columns: Not all columns display in the image above.
Column names
- Priority: The policy name.
Name: The rule name.
Description: The description provided when the rule is created.
Status: The state of the management rule (Active or Inactive).
Created: The date and time the rule was created.
Last Executed: The date and time the rule last ran.
- List navigation options: Navigate the Management Rules list by moving forward or backward and setting the number of items to display per page.
Edit a system rule
You can only edit specific settings within system rules.
- From the left menu, click
 .
.
The Management Rules page displays.
- Locate the system rule you want to edit.
- Click
 > Edit Rule Details.
The Edit Rule Details page displays. - Edit the following:
- For the Archive Rule: any rule property
- For the Deletion Rule: any rule property
- For the System Purge Computer Rule: the number of days before deactivating computers (default is 7 days)
- For the System Purge Connector Rule: change the number of days since a connector was deleted
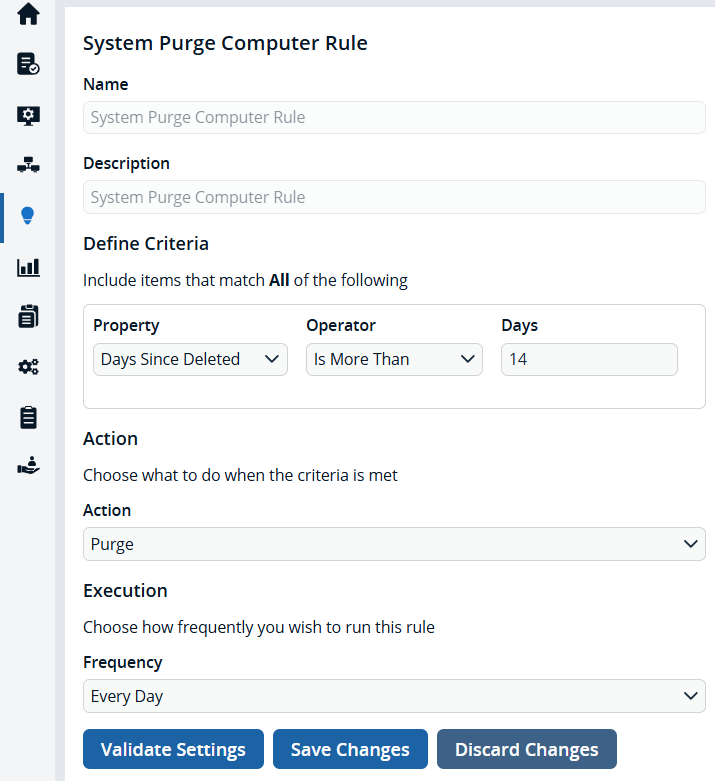
- Click Validate Settings.
A confirmation message displays. - Click Save Changes.
Your changes save and, if you selected to execute it immediately, runs.
Create a new custom rule
- From the left menu, click .
The Management Rules page displays.
- Click Create Rule.
The Create Rule page displays. - Add a name.
- Optionally, add a description.
- Select a Property to define one or more conditions.
Select the computer property you want to trigger the rule on a computer. The list of properties available includes all computer properties collected by EPM-WM. A rule triggers when a computer matches on all of the conditions configured in a rule.
- Select an Action (Archive, Delete, or Move).
- Set the Frequency.
Choose On Demand if you do not want the rule to automatically run at regular intervals.
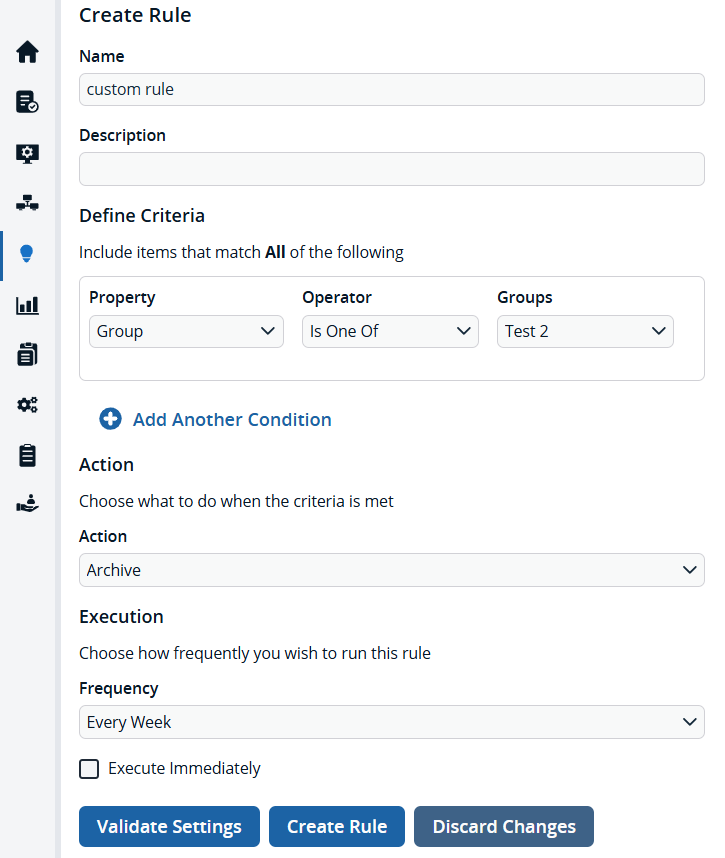
- Optionally, check Execute immediately if you want to run the rule immediately upon saving.
- Click Validate Settings. Validating rules ensures there are no conflicts in the conditions set, and verifies properties are not used twice in the same rule.
A confirmation message displays. - Click Create Rule.
The custom rule saves and, if you selected to execute it immediately, runs.
Auto assign computers to a group
Computers are added to the Default group during the initial registration if a group ID is not provided. Create a management rule using the Move action to move those computers to a designated group.
Select the following options when creating the management rule:
- In the Criteria section, select an option from the Property list. Any property can be selected.
- From the Action list, select Move.
- From the Destination Computer Group, select the group where the computers will be members.
- From the Frequency list, select On Computer Registration. This option is only available for the Move action.
Edit a custom rule
- From the left menu, click .
The Management Rules page displays.
- Locate the rule you want to edit.
- Click > Edit Rule Details.
The Edit Rule Details page displays. - Edit the name, description, criteria, action, and/or frequency.
- Click Validate Settings.
A confirmation message displays. - Click Save Changes.
Your changes save and, if you selected to execute it immediately, runs.
Activate or deactivate a rule
You can activate or deactivate both system and custom rules.
- From the left menu, click .
The Management Rules page displays.
- Locate the rule you want to activate or deactivate.
- Click either > Activate Rule or > Deactivate Rule.
A confirmation message displays. - In the confirmation message, click either Activate Management Rule or Deactivate Management Rule.
The rule activates or deactivates as selected.
Reorder your rules
Important informationRules run in the priority order you set on the Management Rules page.
- From the left menu, click .
The Management Rules page displays.
-
Locate and click the row of the rule you want to reorder.
-
Click Move Up, Move Down, Move to Top, or Move to Bottom.
The rule reorders and priority status is reassigned in numerical order from the top down.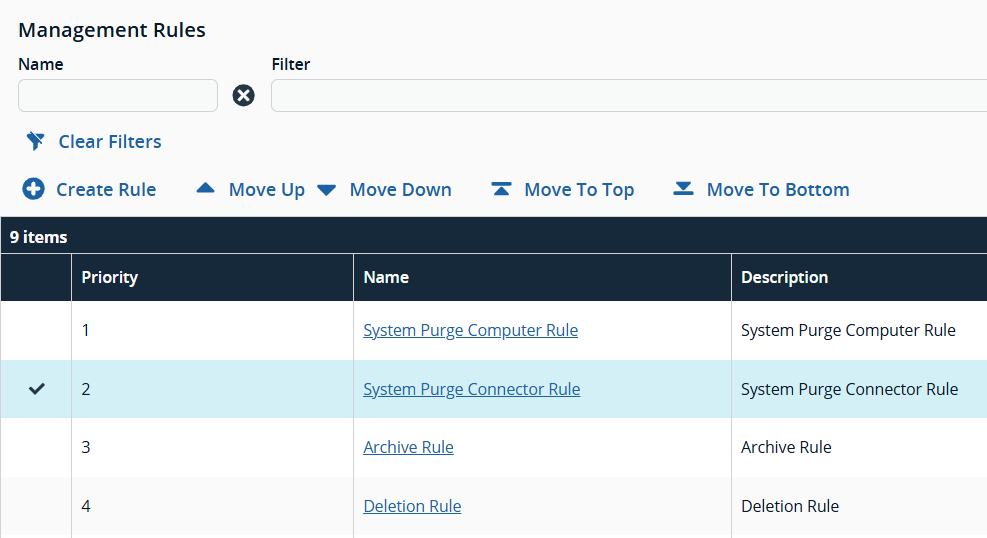
Delete a rule
WARNINGDeleting a rule is an unrecoverable operation.
You cannot delete: System Purge Computer or System Purge Connector system rules.
- From the left menu, click .
The Management Rules page displays.
- Locate the rule you want to delete from the list.
- Click
 > Delete.
A confirmation message displays. - Click Delete Management Rule.
The rule is deleted.
Updated 4 months ago
