SIEM settings | EPM-WM Cloud
Configure SIEM settings to send audit event data to an accessible SIEM provider.
There can only be one SIEM tool configured. If you choose to add details for a new SIEM tool, existing settings data will be lost.
Events are queued and sent in batches in one-minute intervals. This is not configurable. A folder is created where the batches are saved. You can open and download the batch file, which stores the event data in JSON format.
Starting in EPM 23.1, the ECS mappings are updated for SIEM integrations.
If you previously configured SIEM settings and selected the ECS format, then there are two ECS format menu items: ECS - Elastic Common Schema and ECS - Elastic Common Schema (Deprecated). To update to the new ECS schema, select ECS - Elastic Common Schema, and then click Validate Settings.
For a list of supported events in 23.1 and later, see EPM ECS events.
Event types
Events include computer, activity, and authorization requests. Events are sent in the selected format (CIM or ECS).
For SIEM integrations using the CIM (Deprecated) format or ECS - Elastic Common Schema, we only support a subset of all event types (see the table below).
Events logged by Endpoint Privilege Management
| Event ID | Description |
|---|---|
| 100 | Process has started with admin rights added to token. |
| 101 | Process has been started from the shell context menu with admin rights added to token. |
| 103 | Process has started with admin rights dropped from token. |
| 104 | Process has been started from the shell context menu with admin rights dropped from token. |
| 106 | Process has started with no change to the access token (passive mode). |
| 107 | Process has been started from the shell context menu with no change to the access token (passive mode). |
| 109 | Process has started with user’s default rights enforced. |
| 110 | Process has started from the shell context menu with user’s default rights enforced. |
| 112 | Process requires elevated rights to run. |
| 113 | Process has started with Custom Token applied. |
| 114 | Process has started from the shell context menu with user’s Custom Token applied. |
| 116 | Process execution was blocked. |
| 118 | Process started in the context of the authorizing user. |
| 119 | Process started from the shell menu in the context of the authorizing user. |
| 120 | Process execution was canceled by the user. |
| 199 | Process execution was blocked, the maximum number of challenge / response failures was exceeded. |
Configure AWS S3 bucket
You must configure the S3 bucket details before you can configure the SIEM integration in EPM-WM. In AWS, set up the bucket and access to the bucket. This includes:
- Create a bucket. When creating the bucket be sure to note the bucket name and region. You need to enter the information when configuring the settings in EPM-WM.
- Create an access policy. When creating the access policy, the permissions required for the integration include:
- List: ListAllMyBuckets
- Write: PutObject
- Read: GetBucketAcl, GetBucketLocation, GetUser and SimulatePrincipalPolicy
- Add a user. When attaching a user to a policy, be sure to select Programmatic access as the access type and Attach existing policies directly as the permission type. Copy the Access ID and secret access key to a file; you need to enter the details when configuring the settings in EPM-WM.
For more information, see AWS documentation:
Add the AWS S3 bucket in EPM
- Select Configuration, and then select SIEM Settings.
- Select Enable SIEM Integration to turn on the feature.
- From the Integration Type list, select S3
- Enter the details for your storage site:
- Access Key ID: Enter the value created when you added the user.
- Secret Access Key: Enter the value created when you added the user.
- Bucket: Enter the name of the S3 bucket.
- Region: Select or search for the name of the region where your storage bucket resides.
- Select the data format: CIM - Common Information Model or ECS - Elastic Common Schema.
- Select Server-Side Encryption to encrypt files sent to the S3 bucket using the default AWS encryption key.
- Click Validate Settings to test the connection to your storage site.
- Click Save Settings.
If you no longer want the SIEM integration active, click Enable SIEM Integration to turn the feature off.
Add Splunk to EPM
- Select Configuration, and then select SIEM Settings.
- Select Enable SIEM Integration to turn on the feature.
- From the Integration Type list, select Splunk.
- Enter the details for your Splunk configuration:
- Hostname. Do not include https:// in the hostname.
- Index
- Token
- Select the data format: CIM - Common Information Model or ECS - Elastic Common Schema.
- Click Validate Settings to test the connection to Splunk.
- Click Save Settings.
Add Microsoft Sentinel to EPM
- Select Configuration, and then select SIEM Settings.
- Select Enable SIEM Integration to turn on the feature.
- From the Integration Type list, select Sentinel.
- Enter the details for your Sentinel configuration:
- Workspace ID: Enter the Sentinel workspace ID. In Sentinel, the workspace ID is located in this path: Settings > Workspace Settings > Agents Management.
- Workspace Key: Enter the primary key. In Sentinel, the workspace key is located in this path: Settings > Workspace Settings > Agents Management.
- Custom Log Table Name: The table is listed under the Custom Logs category in Azure Sentinel. A _CL suffix is automatically appended to the end of the custom log table name. A custom log is created if the table name does not exist.
- Select the data format: CIM - Common Information Model or ECS - Elastic Common Schema.
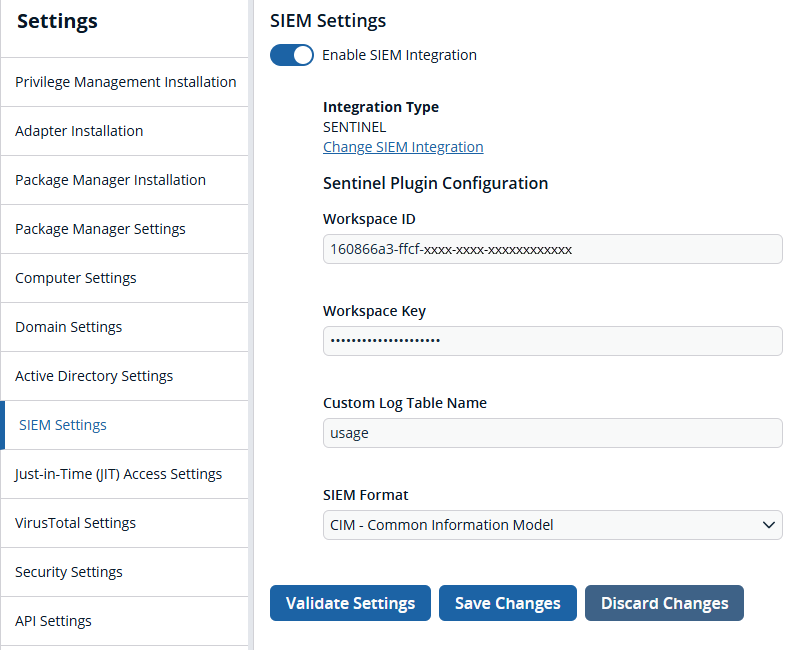
- Click Validate Settings to test the connection to Sentinel.
- Click Save Settings.
Add QRadar to EPM
Important informationWe recommend using our integration app to integrate EPM and QRadar.
For more information, see Integrate BeyondTrust EPM + IBM QRadar.
To configure QRadar in EPM:
- Select Configuration, and then select SIEM Settings.
- Select Enable SIEM Integration to turn on the feature.
- From the Integration Type list, select QRADAR.
- Enter the details for your QRadar configuration:
- Hostname. Do not include https:// in the hostname.
- Port
- Cert: This is the client certificate required when sending events to a syslog server using mutual TLS (mTLS) authentication.
- Key: This is the mTLS client certificate private key. The private key must be generated as PKCS #8.
- Select the data format: CIM - Common Information Model or ECS - Elastic Common Schema.
- Click Validate Settings.
- Click Save Changes to confirm and save.
You must create an API account so QRadar can make API calls to EPM. The account requires read-only access to Audit and Reporting APIs.
