Users | EPM-WM Cloud
In the role-based access control (RBAC) system, the role assigned to a user dictates the features the user can access.
Main menu items and icons that appear on the left depend on the permission assigned to a user. For example, if you only assign access to policies for a standard user, when logging in the user sees only the Home and Policies menu items.
About roles and resources
A user can be assigned roles and customized permissions. Permissions you can customize for each user are outlined in the Resources section.
Resources
Computer groups
The computer group permissions can be assigned to a user, for either all groups or individually selected groups.
| Permission | Menu access to | Description |
|---|---|---|
| Manage Application Access requests | Home and Just-in-Time (JIT) Access Management | User can approve or deny Just-in-time (JIT) application access requests for the selected Computer Groups. Additionally, the permission provides access to the New JIT Application Access Requests tab in Notification Preferences. |
| View Application Access requests | Home and Just-in-Time (JIT) Access Management | User can view JIT application access requests for the selected Computer Groups. |
| Manage Admin Access requests | Home and Just-in-Time (JIT) Access Management | User can approve or deny JIT Admin access requests for the selected Computer Groups. Additionally, the permission provides access to the New JIT Admin Requests tab in Notification Preferences. |
| View Application Access requests | Home and Just-in-Time (JIT) Access Management | User can view JIT Admin access requests for the selected Computer Group. |
| Assign Policy to Group | Home, Policies, and Computer Groups | User can view policies and computer groups, and assign policies and revisions to selected computer groups. |
| Analyze Group | Home, Computer Groups and Analytics | User can view data analytics for selected computer groups. Access to Analytics 1.0 is restricted. A user requires the Analyze Groups permission for all groups for a user to see Analytics 1.0. |
| Create Groups | Home and Computer Groups | User can create, edit, and view selected group properties. |
| Edit Group | Home and Computer Groups | User can view and edit selected computer group properties. |
| View Group | Home and Computer Groups | User can only view selected computer groups. This option is automatically selected when any of the other options are selected. |
Policies
The following policies permissions can be assigned to a user, for either all policies or individually selected policies.
| Permission | Access to | Description |
|---|---|---|
| Create Policies | Home and Policy | User can create, edit, and view selected policies. |
| Edit Policy | Home and Policy | User can view and edit selected policies. |
| View Policy | Home and Policy | User can only view selected policies. This option is automatically selected when the edit option is selected. |
Configuration settings
As an administrator, delegate access to configuration settings so that the user only sees the resources they need access to. A user can be assigned edit and view permissions on each of the configuration areas of EPM-WM (select Configuration from the main menu).
- Edit Setting permission: A user can access and change settings for a particular configuration setting.
- View Setting permission: A user can see but not interact with settings.
The user will not see the configuration setting if neither edit nor view is selected.
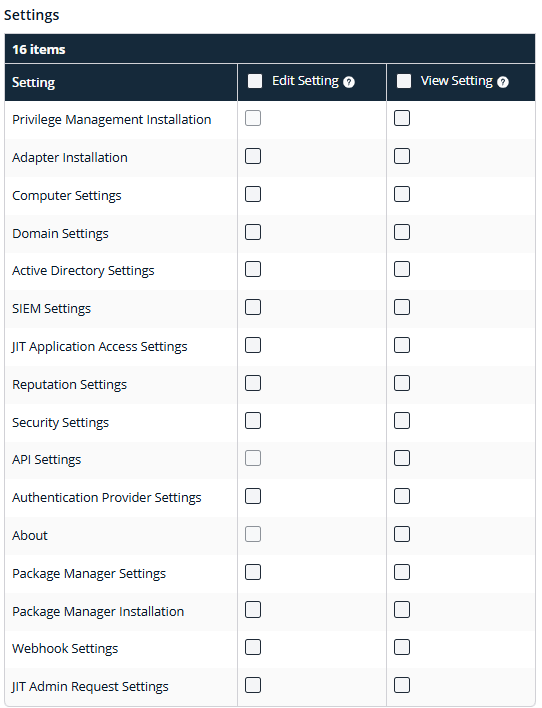
The About configuration setting cannot be assigned edit permissions. All users can see About information but they cannot change the information.
The Users page
Use the Users list to view at-a-glance data about users in EPM-WM.
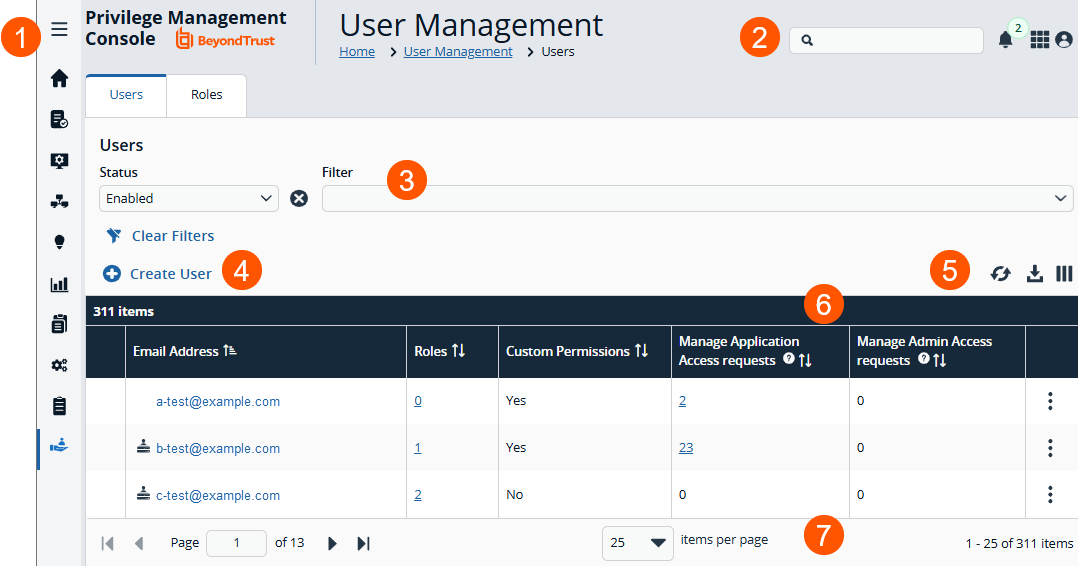
- Left menu: Easy access to all pages in Endpoint Privilege Management, including the Home, Policies, Computers, Computer Groups, Management Rules, Analytics, Just-in-Time Access Management, Configuration, Auditing, and User Management pages.
- Header: Enter keywords to run a global search across computer groups, policies, computers, and users, view your notifications, change your site language, change your time zone, and log out of EPM for Windows and Mac.
-
Filters: Click the drop arrow to select a filter type. The selected filter displays to the left of the drop-down. Click Clear Filters to remove all filters and search results.
Filter types
- Email Address
-
Is Administrator
-
Last Seen
-
Language
-
-
Create User: Click to create a new user.
-
List options: Click
 to refresh the list,
 ![Download icon in [%=Products.PMAb%] SaaS.](https://files.readme.io/4184083cd292ef8bdfd540e7050b85eb3c303c586674e267bbfbb608cbe5ab83-download.png) to download the list to a .csv file, and
to download the list to a .csv file, and  to select which columns to display on the page.
 -
Users list columns: Not all columns display in the image above.
Column names
- Email Address: The email account used to register the user.
- Roles: Indicates the number of roles assigned to the user.
- Custom Permissions: Indicates if there are custom permissions assigned to the user.
- Manage Application Access requests: User can approve or deny JIT application access requests for the selected computer groups.
- View Application Access requests: User can view JIT application access requests for the selected computer groups.
- Manage Admin Access requests: User can approve or deny JIT admin access requests for the selected computer groups.
- View Admin Access requests: User can view JIT admin access requests for the selected computer groups.
- Assign Policy to Groups: The number of computer groups the user can assign policy to.
- Edit Groups: The number of computer groups the user can edit.
- View Groups: The number of computer groups the user can view information for.
- Analyze Groups: The number of computer groups the user can view data analytics on.
- Edit Policies: The number of policies the user can edit.
- View Policies: If a policy is locked, this displays the period (in days or months, if longer
than 3 weeks) when the policy was last locked. - View Settings: The number configuration settings the user has permission to view.
- Last Logged In: The time and date the user last logged on to the console.
- Create Groups: Indicates if the user has permission to create computer groups.
- Create Policies: Indicates if the user has permission to create policies.
- Edit Settings: Indicates if the user has permission to edit configuration settings.
- Status: The status of the user account: enabled or disabled.
- Language: The language preference selected in account preferences.
-
List navigation options: Navigate in the Users list.
Create a user
Workflow for creating a user:
- Add user details
Select your preferred method for applying permissions to the account. Roles and customized permissions can be combined.
- Create a user and assign roles
- Create a user and select permissions to customize access
Add the user details
The user details include general information: email address, language, time zone, and date format.
To add user details:
- On the sidebar menu, select User Management.
- Click Create User.
- In the User Details section, enter the email address.
- Optionally, set language, time zone, and date format.
- Select one of the following:
- Assign roles to user
- Customize permissions for a user
Assign roles
After adding the initial account information,
- Select Assign roles.
- Select one or more roles.
- Select Create User.
Customize permissions for a user
After adding the initial account information,
- Select Customize permissions.
- Under Computer Groups, select either All Computer Groups, or select individual groups and roles.
- If you select All Computer Groups, select one or more permissions from the Computer Groups Permission list. The user will have the role(s) across all existing and future computer groups. The View Groups role is automatically selected with any of the other options.
- To select individual groups and permissions, check the boxes for the permissions to apply to each group. Use a filter to narrow the scope of groups displayed.
- Under Policies, select either All Policies, or select individual policies and permissions.
- If you select All Policies, select one or more permissions from the Policies Permission list. The user will have the permissions across all existing and future policies. The View Policies permission is automatically selected with any of the other options.
- To select individual policies and permissions, check the boxes for the permissions to associate with each policy. Use a filter to narrow the scope of policies displayed.
- Under Settings, select the configuration items the user needs access to.
- Click Create User.
Assign roles
After adding the user details, you are ready to assign roles.
Before continuing with role assignment, be sure to review available roles or create a custom role with preferred permissions for your user's responsibilities.
Select from preconfigured roles or create a role.
To assign roles:
- On the sidebar menu, select User Management.
- Navigate to a user, and then select Assign Roles from the menu.
- On the Assign Role to Users panel, select the roles to assign to the user account.
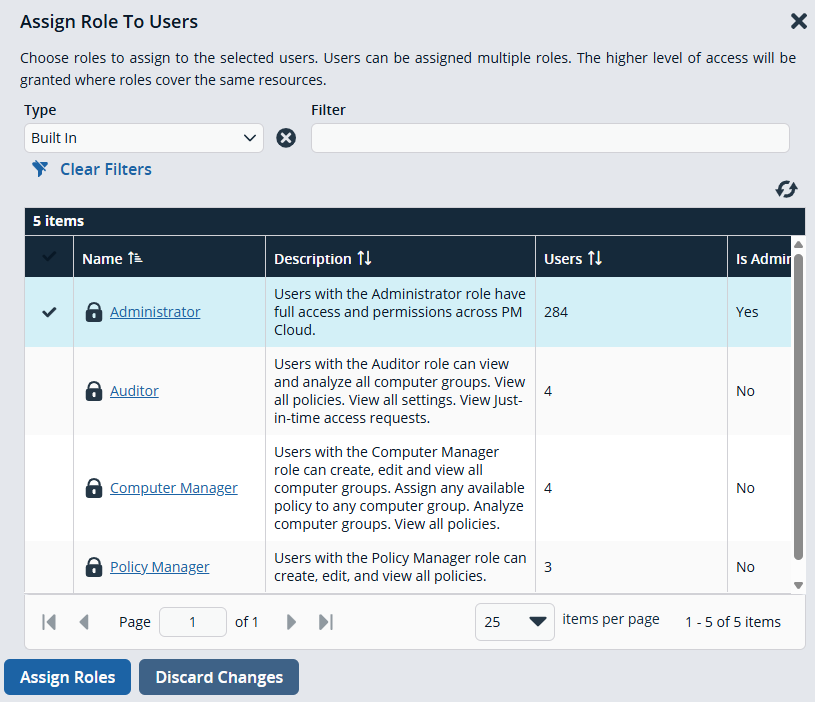
- Select Assign Roles.
Resend an email invite
An email invitation can be resent to a user that has not accepted their invite to the EPM-WM portal.
On the Users page, select the user, and then select Resend Email Invite.
There is no limit on how many times an invitation can be sent to a user.
Edit a user's profile
As an administrator user, you can edit user account properties including roles and resources for a user account.
- On the sidebar menu, click Users.
- Locate the user account you want to edit. Use the filter option to reduce the list size.
- Select Edit User from the menu.
- Click Next: Roles and Resources.
- Make the role and resources changes, and then click Save Changes.
If you remove all access for a user account, the user can log in, but cannot access any resources. A message indicates to contact their administrator to request access to EPM-WM.
View a user's details
You can view information about a user account such as: email address, create date, and status.
To get a quick at-a-glance view of recent activities for a user, click the Activity tab. You can see the event time, audit type, and summary information on the action that occurred.
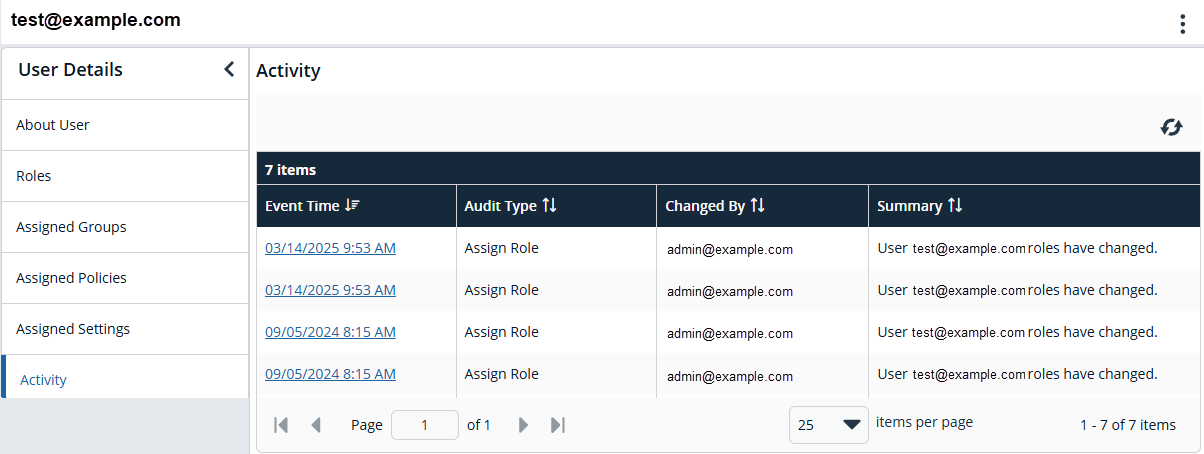
The information displayed on the User Details page varies depending on the user role and responsibilities.
Change the properties for a user account such as email address, date format, and time zone. The changes will take effect the next time you log on to EPM-WM. You can also change these properties from the user account menu.
Disable a user's account
Disable a user's account when they no longer require access to EPM-WM or if they leave the company.
- Go to the Users main page.
- Select the user account, and then select Disable from the menu.
If you need to reinstate the user account, select Enable from the menu to reverse the action.
Delete user accounts
Delete users no longer requiring access to EPM-WM.
- Deleting a user account removes all personal identification information (PII).
- Removes the user name and email address from the EPM database.
- Requires admin access.
- The delete action displays in auditing for tracking purposes.
- Deleting a policy user displays as blank when viewing the policy details (revisions and drafts). Any policy drafts by that user are discarded when the account is deleted.
To delete user accounts:
- On the sidebar menu, select User Management.
- Select the Users tab.
- Find the user account in the list and select Delete from the menu. Alternatively, delete a user account on the User Details page (User Management > View User Details).
- Confirm the action when prompted.
Updated 1 day ago
