Configure passwordless authentication | BI On-prem
What is passwordless authentication?
Passwordless authentication is a method of verifying a user’s identity without requiring a traditional password.
How is it useful?
Passwordless authentication strengthens security, simplifies login, and reduces administrative effort, all while protecting against one of the biggest weaknesses in cybersecurity, passwords.
BeyondTrust supports FIDO2-certified authenticators to securely log in to BeyondInsight without entering your password. Roaming authenticators, such as YubiKeys, and platform integrated biometric authenticators, such as Windows Hello are supported.
Passwordless authentication is available only for local BeyondInsight users. Support for Active Directory, LDAP, and Entra ID directory users is planned for a future release.
Enable passwordless authentication
-
Open a browser and enter the URL for your Password Safe instance: https://<hostname>/WebConsole/index.html.
-
Enter your username and password.
-
From the left menu, click
 .
.
The Configuration page displays. -
Under Authentication Management, select Authentication Options.
The Authentication Options page displays. -
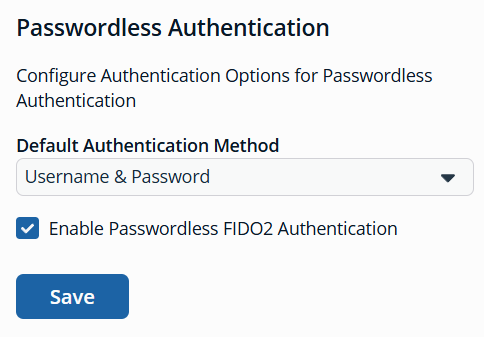
Under Passwordless Authentication:
-
Select the Default Authentication Method. This sets the default method displayed when logging into the console.
-
Check Enable Passwordless FIDO2 Authentication to enable it for BeyondInsight instance.
-
Click Update Passwordless Authentication Settings to save.
-
Register a passwordless authenticator
-
In the top-right corner of the console, click
 > Account Settings.
The Account Settings page displays. -
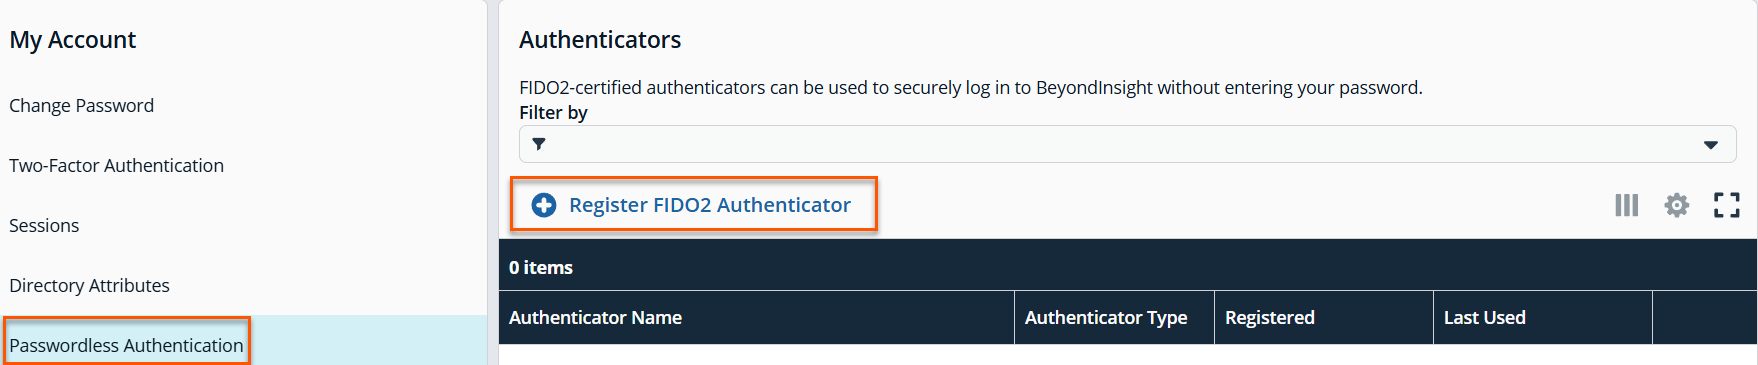
Under My Account, click Passwordless Authentication.
-
Click + Register FIDO2 Authenticator.
-
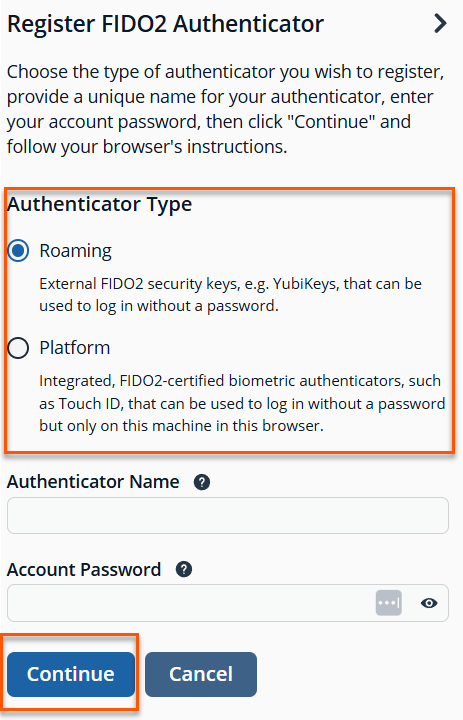
Select the type of authenticator you wish to register: Roaming or Platform.
-
Enter a unique name for your authenticator.
-
Enter your BeyondInsight account password.
-
Click Continue and follow your browser's instructions.
View and manage passwordless authenticators for users
- Open a browser and enter the URL for your Password Safe instance: https://<hostname>/WebConsole/index.html.
- Enter your username and password.
- From the left menu, click .
The Configuration page displays. - Under Role Based Access, select User Management.
The User Management page displays. - Select the Users tab.
- Click
 above the grid.
 - Select Passwordless FIDO2 Authenticators from the list to add that column to the grid.
- The number of FIDO2 authenticators for each user is displayed in the column.
- Locate a user in the grid.
- Click
 > View User Details.
 - Under User Details, select FIDO2 Authenticators.
- From the FIDO2 Authenticators grid, you can see the type of authenticator for each user, along with when it was registered, and last used.
Delete an authenticator for a user
- Open a browser and enter the URL for your Password Safe instance: https://<hostname>/WebConsole/index.html.
- Enter your username and password.
- From the left menu, click .
The Configuration page displays. - Under Role Based Access, select User Management.
The User Management page displays. - Select the Users tab.
- Locate a user in the grid.
- Click > View User Details.
- Under User Details, select FIDO2 Authenticators.
- Locate the authenticator name in the grid.
- Click > Delete.
Updated 4 months ago
