Managed Accounts: Overview | BI Cloud
What are managed accounts?
Managed accounts are privileged credentials stored, rotated, and audited to secure access to critical systems. They can be a local or an Active Directory user account on the managed system.
How are managed accounts useful?
Managed accounts provide centralized control, security, and automation for user accounts on managed systems. With managed accounts, access policies can be enforced and the risk of unauthorized access is reduced.
How do I access managed accounts?
- Use a browser to sign in to your BeyondInsight/Password Safe URL.
This URL is provided in the BeyondTrust welcome email and includes your site URL followed by /login. - From the left menu, click
 .
.
The Managed Accounts page displays.
The Managed Accounts page
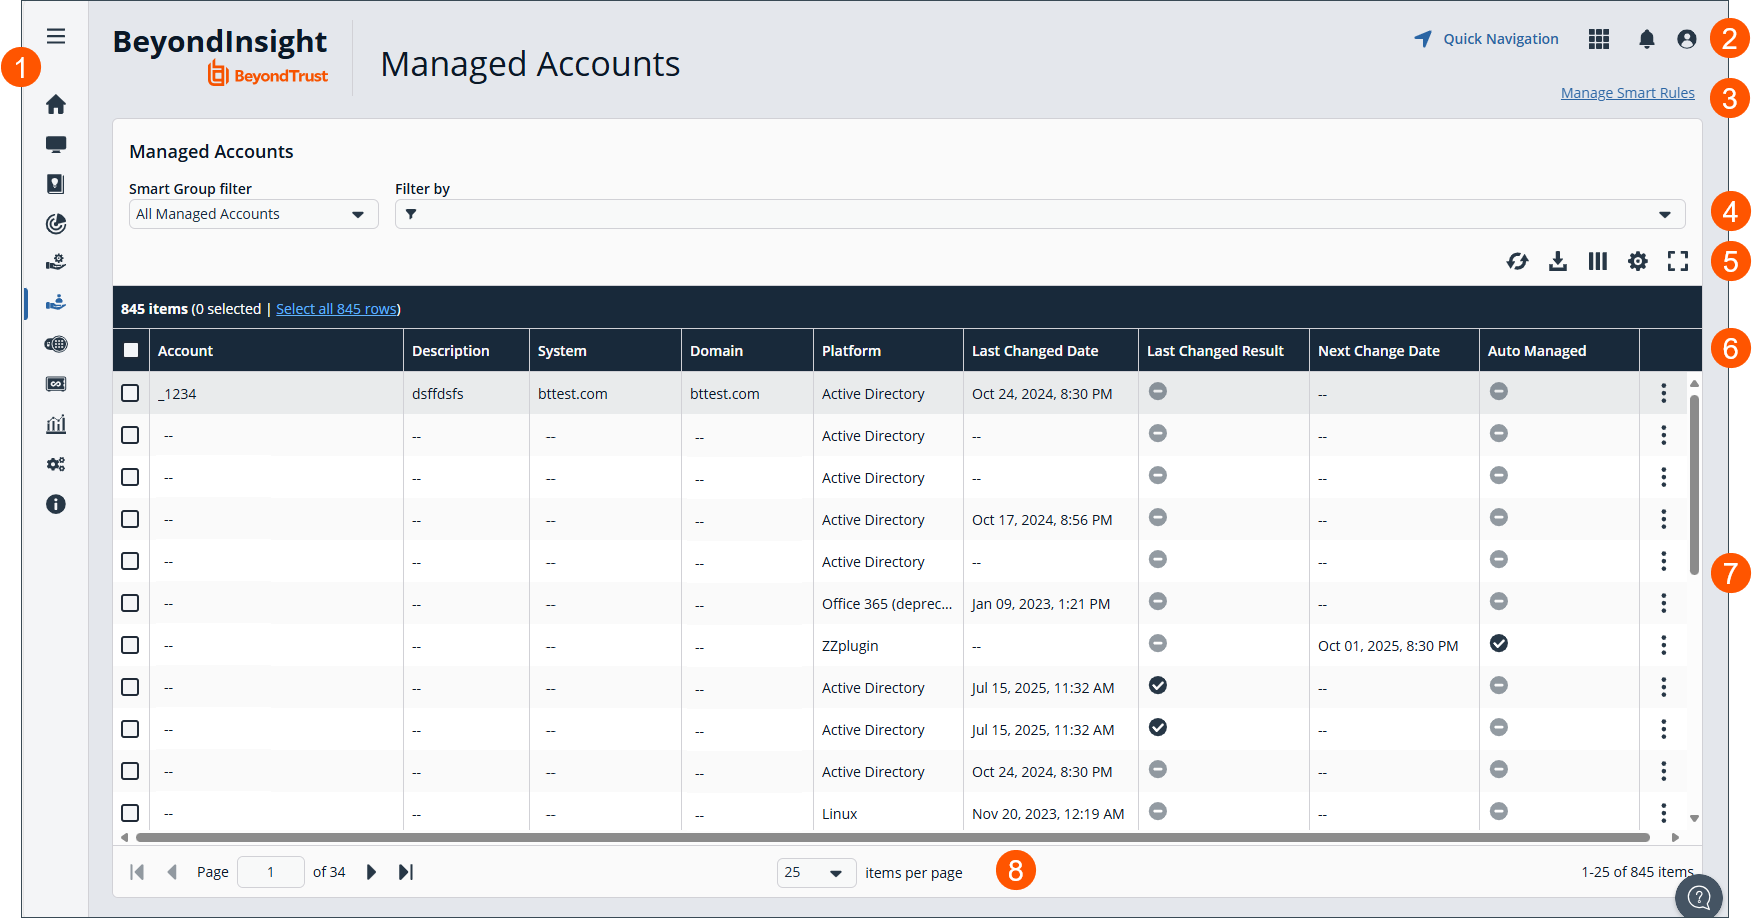
- Left menu: Easy access to all pages in BeyondInsight/Password Safe, including the Home, Assets, Smart Rules, Discovery Scanner, Management Systems, Managed Accounts, Password Safe, Secrets Safe , Analytics and Reporting, Configuration, and About pages.
- Header: Navigate to your favorite pages, view your notifications, access your connected apps, and set your account preferences.
- Select to Manage Smart Rules.
- Filter dropdowns: Select a filter to refine your results.
Filter types
-
Smart Group filter: Filter by Smart Group.
-
Filter by: Filter by Account, Description, System, Domain, Platform, Last Changed Date, Last Changed Result, Next Change Date, Auto Managed, Disabled at Rest, API Enabled, Mapped to User, Change Agent, Change Password After Release, Check Password, Instance Name, Release Notification Email, Reset Password on Mismatch, Use Self, Use for Scanning, Workgroup, or AD/LDAP Queries.
-
- Grid display preferences: Set display preferences on the Managed Accounts grid using the following options represented by icons above the grid:
- Click
 to refresh the list,
  to download the list to a .csv file,
  to select which columns to display on the page,
  to configure your page display, and
 to expand the grid.
- Click
- Managed Accounts list columns:
Column Names
- Account
- Description
- System
- Domain
- Platform
- Last Changed Date
- Last Changed Result
- Next Change Date
- Auto Managed
- Disabled at Rest
- API Enabled
- Mapped to User
- Change Agent
- Change Password After Release
- Check Password
- Instance Name
- Release Notification Email
- Reset Password on Mismatch
- Use Self
- Use for Scanning
- Workgroup
- AD/LDAP Queries
- Managed Accounts grid: Displays information based on filter selections.
- List navigation options: Navigate in the Managed Accounts list.
Why use managed accounts?
These accounts are essential for automating credential management and enforcing access policies. Some examples of managed accounts are:
- Windows Administrator
- Linux Root
- Microsoft Exchange Administrator
- Database Administrator
Add Managed Accounts
The most efficient and commonly used method for adding managed accounts is by leveraging Smart Rules. These rules automate the assignment process based on predefined criteria, reducing manual effort and ensuring consistency. An example of two use cases for managed accounts is:
- Add an Active Directory managed accounts using a Smart Rule
- Add a known local administrator managed accounts using a Smart Rule
Add an Active Directory managed accounts using a Smart Rule
You can create a Smart Rule that discovers and adds Active Directory accounts to Password Safe, using the below procedure. The procedure also shows how to link domain accounts to the system.
- From the left menu, select Smart Rules.
- From the Smart Rule type filter list, select Managed Account.
- Click Create Smart Rule.
- Select the Selection Criteria as applicable:
- Asset Smart Group: Select a Smart Group from the list.
- Child Smart Rule: Select a Smart Rule you want to filter the child Smart Rules from.
- Dedicated Account: Select an account filter from the list. Enter a keyword to search on.
- Directory Query: Choose to Include or Exclude accounts from Directory Query.
- Select a query from the list or click Create New Directory Query to open the form and create a new query.
- Provide the frequency for the query to run. Leave the entry as 0 for a one time run.
- Enable the Discover accounts for Password Safe Management option to discover accounts when the Smart
Rule processes. - Select a Domain from the list.
- Managed Account Fields: This filter only applies to existing managed accounts.
- Select a filter: Account Name, Create Date, Description, Domain Name, Last Change Date or Last Change Result.
- Select an expression, and then enter a keyword to search on, for example, WIN for Windows.
- Managed System Fields: The Smart Rule is filtered according to the managed system you select.
- Select a filter: System Name, Create Date, Last Update Date.
- Select an expression, and then enter a keyword to search on, for example, WIN for Windows.
- Platforms: Select a platform or check Select All.
- User Account Attribute: Select the attribute from the list and then provide the filter condition and value for that attribute. For each attribute filter, select Yes for Discover accounts for Password Safe Management, and then select a Smart Group to search in.
- Privilege: Select is one of or is not one of. Select All or one, or a combination of Administrator, Guest, or User.
- SID: Select an expression, and then enter a keyword to search on.
- Account Name: Select an expression, and then enter a keyword to search on.
- Password Age: Select an expression, and then select age parameters to search on.
- In the Actions section, select Manage Account Settings to add the accounts that match on the criteria to Password Safe. The settings are the same as when you add the accounts manually.
- Under Actions, click the link to Add another action, and then select Show managed account as Smart Group.
- Click Create Smart Rule.
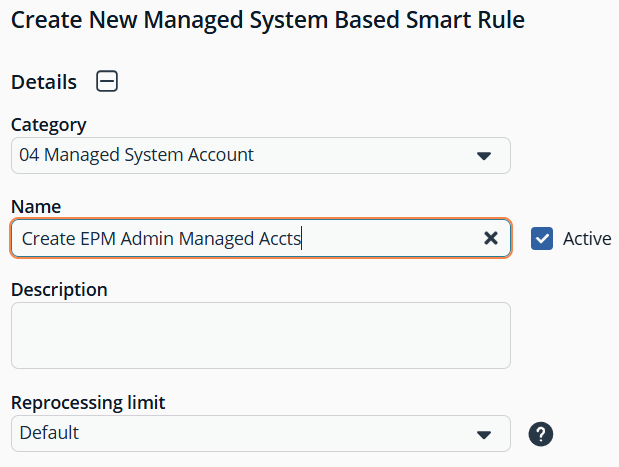
Add a known local administrator managed accounts using a Smart Rule
It can be useful in some cases to onboard well-known local administrator accounts, such as the Windows administrator or the Linux root account, from endpoints into Password Safe without the need to run a discovery scan against the endpoints. You can create a managed system Smart Rule that uses the Create Managed Account on each system action to accomplish this.
A use case in which this is useful is when you have Endpoint Privilege Management (EPM) clients in your environment. You can create a managed system Smart Rule to add local accounts as managed accounts from the EPM client endpoints so that a password rotation event exists when the EPM agent requests it.
Preconfiguring managed accounts eliminates the need to manually configure and initiate a discovery scan after the EPM agent submits a request. This saves time and streamlines the onboarding process.
To accomplish this, you create the following Smart Rule:
-
From the left menu, click Smart Rules.
-
From the Smart Rule type filter list, select Managed System.
-
Click Create Smart Rule.
-
From the Category dropdown, select Managed Systems.
-
Provide a name and description.
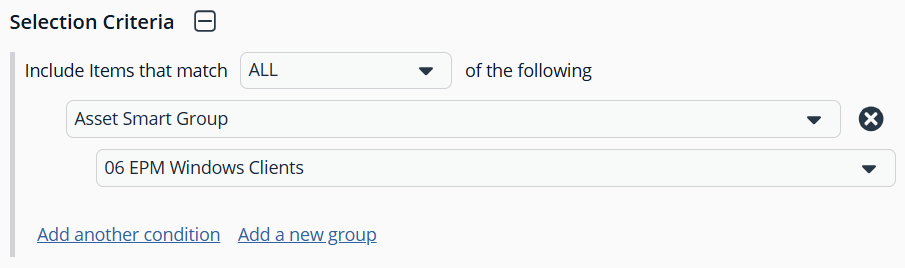
- For the Selection Criteria, select Asset Smart Group and Endpoint Privilege Management Clients from the dropdowns.
- For Actions, select Show managed system as Smart Group and Create Managed Account on each system from the dropdowns.
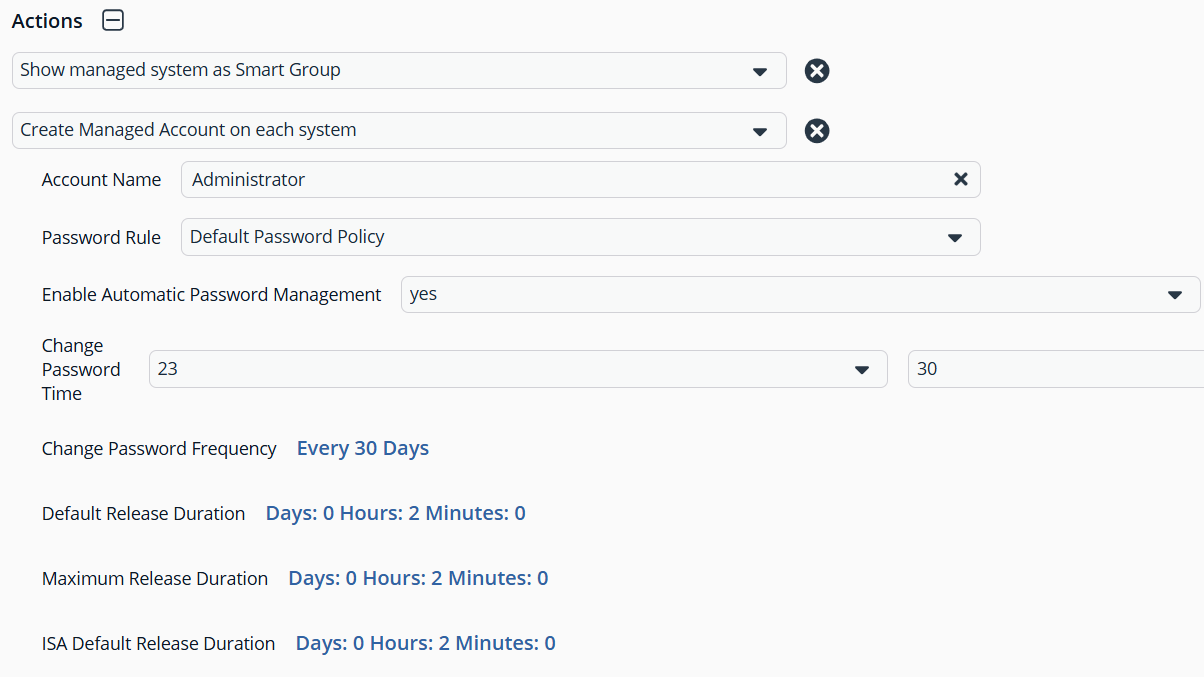
- Leave the remaining settings for Actions as default or modify as required.
- Click Create Smart Rule.
Administrator is the default account name, because that is standard for Windows systems. You can modify the name if you have configured something other than default standard local administrator account name in your environment. You can also add multiple Create Managed Account on each system actions if you have additional local admin accounts you wish to manage with Password Safe.
TipTo view the contents of a new or edited Smart Rule, once it has been saved, click View Results. You are taken to the associated grid, where the contents of the Smart Rule are listed. If the Smart Rule is actively processing when View Results is clicked, a banner displays letting you know it is still processing.
For configuration of Managed Accounts, see Managed Accounts: Configure.
