
CrowdStrike Falcon | Insights
Many organizations use CrowdStrike Falcon and its security information and event management (SIEM) product, Next-Gen SIEM, to give their security teams visibility into critical assets and risk. This page explains how to forward Identity Security Insights detections and recommendations to CrowdStrike Falcon using a webhook.
Identity Security Insights correlates events across BeyondTrust products and identity providers before it sends them. Insights therefore sends far fewer events than each BeyondTrust product sends when it reports to CrowdStrike directly.
The integration has three parts:
- Create a parser in CrowdStrike so Falcon understands the payload
- Create a data connector that receives the payload
- Create a webhook in Insights that sends it.
Requirements
- Access to a site that has an Insights app
- An Identity Security Insights account with administrator privileges
- A CrowdStrike Falcon account with Next-Gen SIEM enabled
- Permissions in CrowdStrike to create parsers and data connectors
Create a parser in CrowdStrike Next-Gen SIEM
The parser tells Falcon how to read the JSON that Insights sends, and adds the static metadata that identifies BeyondTrust as the source.
- In CrowdStrike, go to Next-Gen SIEM > Data onboarding > Parsers.
- Click Add new parser.
- Enter a name for the parser, such as BeyondTrust Identity Security Insights.
- Enter the following parser definition:
// #region PREPARSE
/************************************************************
****** Parse timestamp and log headers
****** Extract message field for parsing
****** Parse structured data
************************************************************/
parseJson() | parseTimestamp(field=timestamp, format="MM/dd/yyyy HH:mm:ss", timezone="UTC")
// #endregion

// #region METADATA
/************************************************************
****** Static Metadata Definitions
************************************************************/
| Parser.version := "1.0.0"
| Vendor := "BeyondTrust"
| event.module := "Identity Security Insights"
| Cps.version := "1.0.0"
| ecs.version := "8.11.0"
// #endregion

// #region NORMALIZATION
/************************************************************
****** Parse unstructured data (i.e. message field)
****** Normalize fields to data model
************************************************************/
| event.type[0] := "alert"
| event.kind := "Detection"
| event.reason := "Suspicious Activity or Condition"
// #endregion- Add the following test data to validate the parser:
{
  "fields": {
    "log": {
      "level": "DEBUG",
      "logger": "Test Parser"
    },
    "timestamp": "10/28/2024 12:10:50",
    "message": "Some message",
    "client": {
      "address": "10.2.31.21",
      "domain": "Test"
    },
    "service": {
      "name": "Unit Test 3ABC - user service",
      "type": "Test Parser"
    }
  },
  "event": {
    "id": "abc123"
  }
}- Save the parser.
The test data must use the same field structure as the webhook template later on this page. If you change the structure of one, change the other to match.
Create a data connector in CrowdStrike Next-Gen SIEM
- In CrowdStrike, go to Next-Gen SIEM > Data onboarding.
- Select HEC / HTTP Event Connector.
- Enter a name for the connector, such as
BeyondTrust Identity Security Insights. - Assign the parser you created in the previous section.
- Save the connector.
- Copy the API URL and API Key. You need both to configure the webhook in Insights.
ImportantThe API key is shown once. Store it securely before you leave the page.
Create a webhook integration for CrowdStrike Falcon
-
Select
 > Insights > Integrations.
The Integrations page displays the available integrations. -
Click Webhooks.
The Summary page displays. -
Click Create Integration.
The Configure Integration page displays. -
To create the webhook, enter the following:
- Webhook Name: Enter your desired name, such as
CrowdStrike Falcon. - Webhook URL: Enter the API URL you copied from the CrowdStrike data connector.
- Authorization Type: Select Bearer.
- Token: Enter the API key you copied from the CrowdStrike data connector.
- Webhook Template: Enter the following JSON template.
- Webhook Name: Enter your desired name, such as
{
  "fields": {
    "log": {
      "level": "%%severity%%",
      "logger": "BeyondTrust - Identity Security Insights"
    },
    "timestamp": "%%timestamp%%",
    "message": "Summary: %%definitionSummary%% \n Internal Insights ID: %%incidentId%% \n Tenant ID: %%tenantId%% \n Incident Type: %%incidentType%% \n Severity: %%severity%% \n Definition ID: %%definitionId%% \n Source: %%source%% \n Location: %%location%% \n Entity Types: %%entityType%% \n Entity Names: %%entityName%% \n Timestamp: %%timestamp%% \n Link: %%link%%",
    "client": {
      "address": "%%source%%",
      "domain": "%%location%%"
    },
    "service": {
      "name": "%%entityName%%",
      "type": "%%entityType%%"
    }
  },
  "event": {
    "id": "%%incidentId%%"
  }
}-
Click Create Integration to save the webhook.
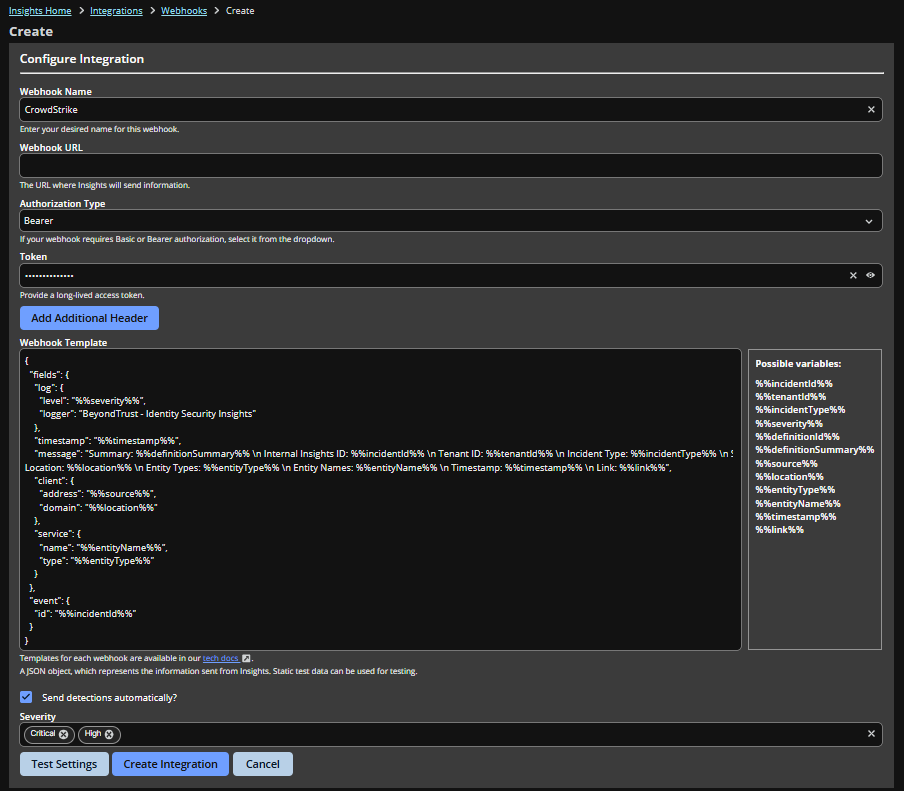
For a full list of the variables you can use in the template, see Webhooks.
Test the CrowdStrike Falcon webhook
- Edit the configured webhook and click Test Settings.
The message Configuration successfully tested displays. If the request fails, review every entry to confirm the API URL and API key are correct. - In CrowdStrike, search your third-party data for the Source you configured.
- Confirm that the test event from Identity Security Insights is present and searchable.
Send webhooks dynamically
After you configure the webhook, you can trigger it manually from any detection or recommendation.
- Go to Home > Detections or Home > Recommendations.
- Open a detection or recommendation, or open its Quick View panel.
- Click Take Action, then click your CrowdStrike Falcon webhook.
When you trigger the webhook, Insights sends the context of that detection or recommendation to CrowdStrike Falcon.
Updated about 2 months ago
