
Databricks | Insights
Prerequisites
Before you configure the Databricks connector, ensure the following requirements are met.
Databricks access
- Account Admin role in your Databricks account.
- Admin role in all Databricks workspaces.
- MANAGE access to all workspaces' secret scopes.
- (Optional) Databricks CLI installed on the machine where you will run the setup script. See Install or update the Databricks CLI.
Identity Security Insights access
- Administrator access to Identity Security Insights.
- Your Insights site is provisioned and active.
ImportantThird-party documentation is subject to change. Updates might not be reflected in BeyondTrust documentation. For the most up-to-date information, visit the websites linked in this topic.
Configuration paths
Before you begin, identify the configuration options that apply to your environment. Your selections determine which steps you complete.
Service principal setup method
| Method | When to use |
|---|---|
| Setup script (recommended) | You can run a PowerShell script on a local machine with access to your Databricks account. The script creates the service principal, generates credentials, and assigns permissions. |
| Manual configuration | The setup script fails or cannot be used in your environment. You manually create the service principal and assign permissions using the Databricks console and CLI. |
Installation method
Select this method during connector creation.
| Method | When to use |
|---|---|
| Databricks CLI (recommended) | Databricks CLI is installed, or can be installed, on the machine where you run the setup script. |
| REST API | You cannot install Databricks CLI and prefer to use REST API calls for setup. |
Step 1: Create the connector in Insights
- From Insights Home, select
 > Connectors.
The Connectors page displays. - Click Total configured.
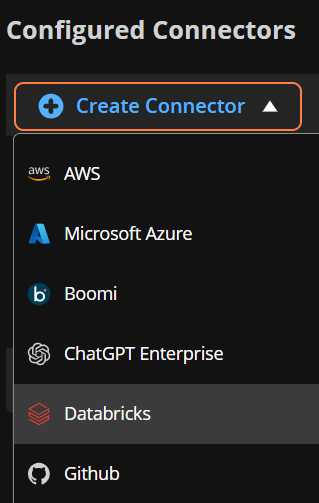
- Click Create Connector and select Databricks from the list.
- Provide a human-readable name for the Databricks connector in the Connector Name field.
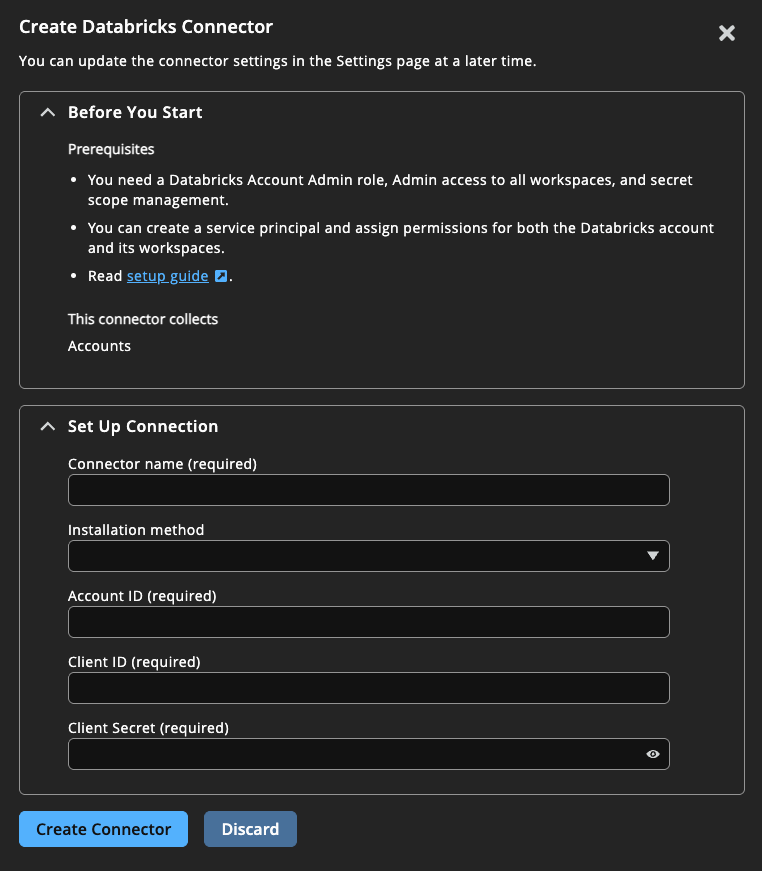
- Select an installation method:
- Databricks CLI (recommended if you can install Databricks CLI)
- REST API
- Download the PowerShell script and run it on the local machine.
Keep this panel open. You return to this page after running the script to enter credentials.
Step 2: Run the setup script
Run the downloaded PowerShell script on a local machine with access to your Databricks account.
The script:
- Creates the service principal in Databricks (if it does not already exist)
- Creates a client secret for the service principal (optional)
- Assigns the following permissions to the service principal:
- Account Admin in Databricks account
- Admin role in all Databricks workspaces
- MANAGE scope for all workspaces' secret scopes
If you selected Databricks CLI as the installation method, ensure Databricks CLI is available on the machine before running the script. See (Install or update the Databricks CLI | Databricks Documentation).
Once the script completes, record the output values. You need these for the Final step.
- Account Id
- Client Id
- Client Secret
If the script completed successfully, proceed directly to the Final step.
Step 3: Create the Service Principal manually
Skip this step if the setup script completed successfully in Step 2.
Create Service Principal
- Click User management on the sidebar.
- On Service Principals tab, click Add service principal.
- Enter BT-Insights-Databricks-SP service principal’s name.
- Click Add service principal.
For more information, see Manage service principals | Databricks Documentation.
Create credentials for Service Principal
- In the sidebar, click User management.
- On the Service principals tab, find and click the username.
- Select Credentials & secret tab.
- Click Generate secret.
- Enter the secret lifetime, e.g.: 365 and click Generate.
- Record the Client Id and Secret.
Step 4: Assign permissions manually
Skip this step if the setup script completed successfully in Step 2.
Assign Account Admin role to Service Principal
- In the sidebar, click User management.
- On the Service principals tab, find and click the username.
- Select Roles tab.
- Select Account admin to activate.
For more information, see Manage service principals | Databricks Documentation.
Assign Admin role to service principals for all workspaces
- On the menu on the left, navigate to Workspaces.
- Do the following step for each workspace:
- Click on workspace name.
- Navigate to Permissions tab.
- Click Add permissions.
- Search for BT-Insights-Databricks-SP.
- Select Admin for Permission.
- Click Save.
Assign MANAGE scope to all workspaces' secret scopes
Databricks CLI is required for this section. For more information, see Databricks CLI documentation.
- Obtain the Databricks Account ID by clicking on the user profile located in the top right corner of the Databricks account portal.
- Log in to Databricks account:
databricks auth login --host <https://accounts.cloud.databricks.com> --account-id {AccountId} - List all workspaces:
databricks account workspaces list --output json - For each workspace that is not in FAILED state:
- Get workspace deployment_name from the output above
- Log in to each workspace
databricks auth login --host https://{workspace_deployment_name}.cloud.databricks.com --profile {workspace_deployment_name} - List all secret scopes
databricks secrets list-scopes --profile {workspace_deployment_name} - For each secret scope
- Assign secret scope MANAGE permission to service principal
databricks secrets put-acl {scope_name} {sp_client_id} MANAGE --profile {workspace_deployment_name}
- Assign secret scope MANAGE permission to service principal
Final Step: Complete the connector in Insights
-
Return to the Create Databricks Connector panel in Insights.
-
Enter the following:
- Account ID: Your Databricks account ID (e.g., 123e4567-e89b-12d3-a456-426614174111)
- Client ID: The Databricks service principal application ID.
- Client Secret: The Databricks service principal secret value.
-
Click Create Connector.
Navigate to > Connectors > Total Configured to confirm the connector was successfully created and review connector settings.
Updated 2 months ago
