Microsoft Azure | Insights
Prerequisites
-
Enable auditing in Azure (Microsoft's Audit documentation)
-
Minimum Microsoft Entra ID P1 license
Azure access
You must sign in as an Azure Global Administrator during setup.
Before running the install script, go to Entra ID → Properties (EntraID Properties) and toggle Access management for Azure resources to Yes.
This is a temporary requirement. You will toggle this back to No in the cleanup steps after the script runs.
AI security (if applicable)
For each environment in your Power Platform admin center:
- Dataverse is enabled in the environments being added (Microsoft documentation: Add a Microsoft Dataverse database)
- You are a System Administrator for the environment (Microsoft documentation: Manage high-privileged admin roles)
- All Azure Foundry resources are accessible by the app (Foundry Network Settings)
PowerShell module
The Az module is required.
☁️ Using CloudShell?
Azis preinstalled. Skip this requirement.
If using local PowerShell on Windows: Install Azure PowerShell
Common configuration setup
You must pick one of the combinations below
-
CloudShell
-
Local PowerShell
-
CloudShell + Event Hub (more than 20k users)
-
Local PowerShell + Event Hub (more than 20k users)
Step 1 · Create the connector in Insights
- From Insights Home, select ☰ → Connectors.
- Click Create Connector and select Microsoft Azure. Enter a human-readable name.
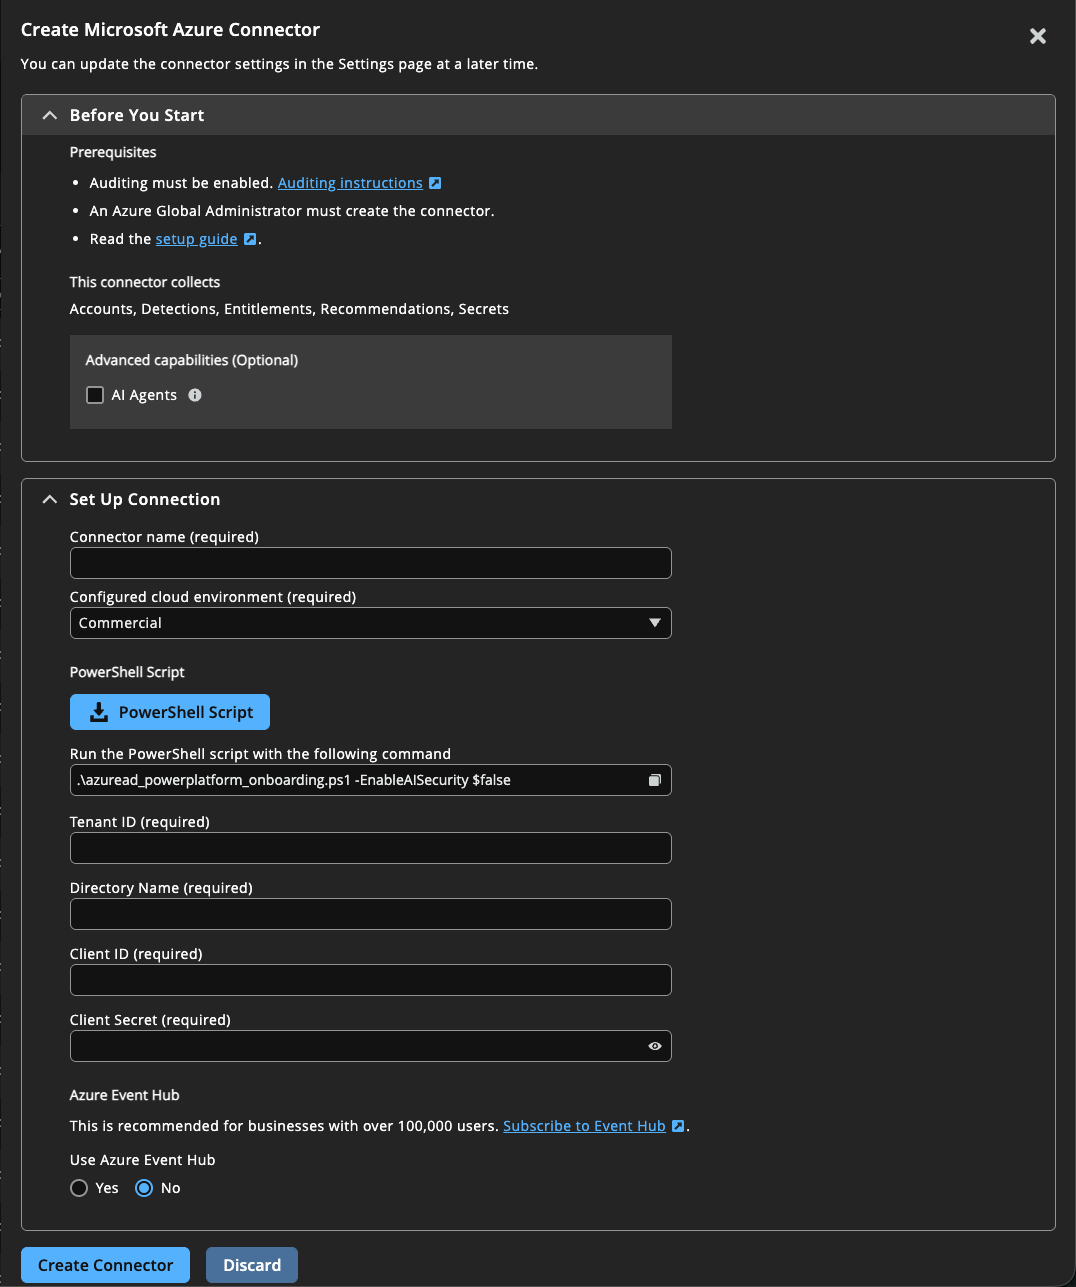
-
Select your cloud environment. Use your Azure portal login URL to identify it.
Azure Portal URL Cloud Environment https://portal.azure.com Commercial / GCC https://portal.azure.us GCC High / DoD
FedRAMP compliance noticeInsights Commercial is not FedRAMP-compliant. Do not use it with Azure Government Community Cloud (GCC), Azure GCC High, or Azure Government DoD — doing so may cause data residency issues and loss of compliance.
- Click the sign-in link in Insights to open the Microsoft Azure Portal as a Global Administrator.
- In Entra ID, go to Properties and toggle Access management for Azure resources to Yes.
Step 2 · Select Advanced Capabilities (Optional)
- Make your selection for Advanced Capabilities (Optional)
- AI Agents
You must be a System Administrator in each Power Platform Environment. See the prerequisites before proceeding.
- AI Agents
Step 3 · Install using the connector script
Choose the method that fits your environment:
Option A · Azure CloudShell (recommended)
- Open Azure CloudShell and sign in:
Connect-AzAccount -UseDeviceAuthentication- Download the Azure onboarding script from Insights, then upload it to CloudShell using the upload button in the CloudShell toolbar.
- Run the command shown in Insights for your selection.
- Copy the tenant ID, directory name, client ID, and client secret from the script output into the corresponding fields in Insights.
- Remove the script from CloudShell:
Remove-Item -Path "./azure_onboarding.ps1"Option B · Local PowerShell
-
Ensure the
Azmodule is installed. See Azure PowerShell documentation. -
Open PowerShell as a standard user and sign in:
Connect-AzAccount- Verify and set your tenant context. View all directories you have access to:
Get-AzTenantIf scripts must be digitally signed in your environment, first run:
Set-ExecutionPolicy -Scope Process -ExecutionPolicy Bypass
- Download the Azure onboarding script from Insights and run it using the command shown for your selection.
- Copy the tenant ID, directory name, client ID, and client secret from the script output into the corresponding fields in Insights.
Step 4 · Grant admin consent
Required for all installation methods.
- In the Azure Portal, navigate to Azure Services → Microsoft Entra ID.
- Select App Registrations in the left menu.
- Select the BT-SP-Connector application.
- In the API permissions section, select Grant admin consent.
- Confirm your selection.
Step 5 · Select Azure Event Hub option
Do you have 20,000+ users and access to Azure Event Hub?
-
No → Select No from the Use Azure Event Hub dropdown, then click Create Connector. Proceed to the Cleanup section below.
-
Yes → Select Yes from the dropdown, complete the Event Hub steps below, then click Create Connector. Proceed to the Cleanup section below.
Step 6 · Setup Azure Event Hub (optional)
If you selected No in the previous step, skip these instructions.
-
In Insights, copy the Insights-generated Azure Event Hub script.
-
In the shell environment, paste and run the Insights-generated Azure Event Hub script.
-
Once complete, copy the Fully Qualified Hub Namespace, Blob Container Url, and Hub Name in a secure location for use in the following step.
-
Follow Microsoft's procedure to stream logs to an event hub.
-
Within the Azure Diagnostics settings, select the following log Categories to stream:
- SignInLogs
- NonInteractiveUserSignInLogs
- ServicePrincipalSignInLogs
- ManagedIdentitySignInLogs
-
Within Azure's Destination details section, select Stream to an event hub, and select the Fully Qualified Hub Namespace and Hub Name you saved in step 3, above.
-
In Insights, enter the Fully Qualified Hub Namespace, Blob Container Url, and Hub Name in the appropriate fields.
-
Click Create Connector.
The connector is created and displays in your Configured tab on the Connector page.
Final step · Cleanup
WarningComplete these steps before closing this guide. Both items pose a security risk if left in place.
Once you confirm the connector is created and toggled on:
- In Entra ID → Properties, toggle Access management for Azure resources back to No.
- Confirm the onboarding script has been removed from your shell environment. If you haven't already done this, run:
Remove-Item -Path "./azure_onboarding.ps1"Troubleshooting
Network access for Microsoft Foundry (optional)
This setup is only needed if you enable AI Agents
By default, Foundry environments are set to All networks, which is sufficient for Insights App access. If this is your setup, no additional changes are needed.

If not, go through these steps:
- For each of your Foundry environments, navigate to your environment and select Networking under the Resource Management menu.
- On the Firewalls and virtual networks tab, select Selected Networks and Private Endpoints.
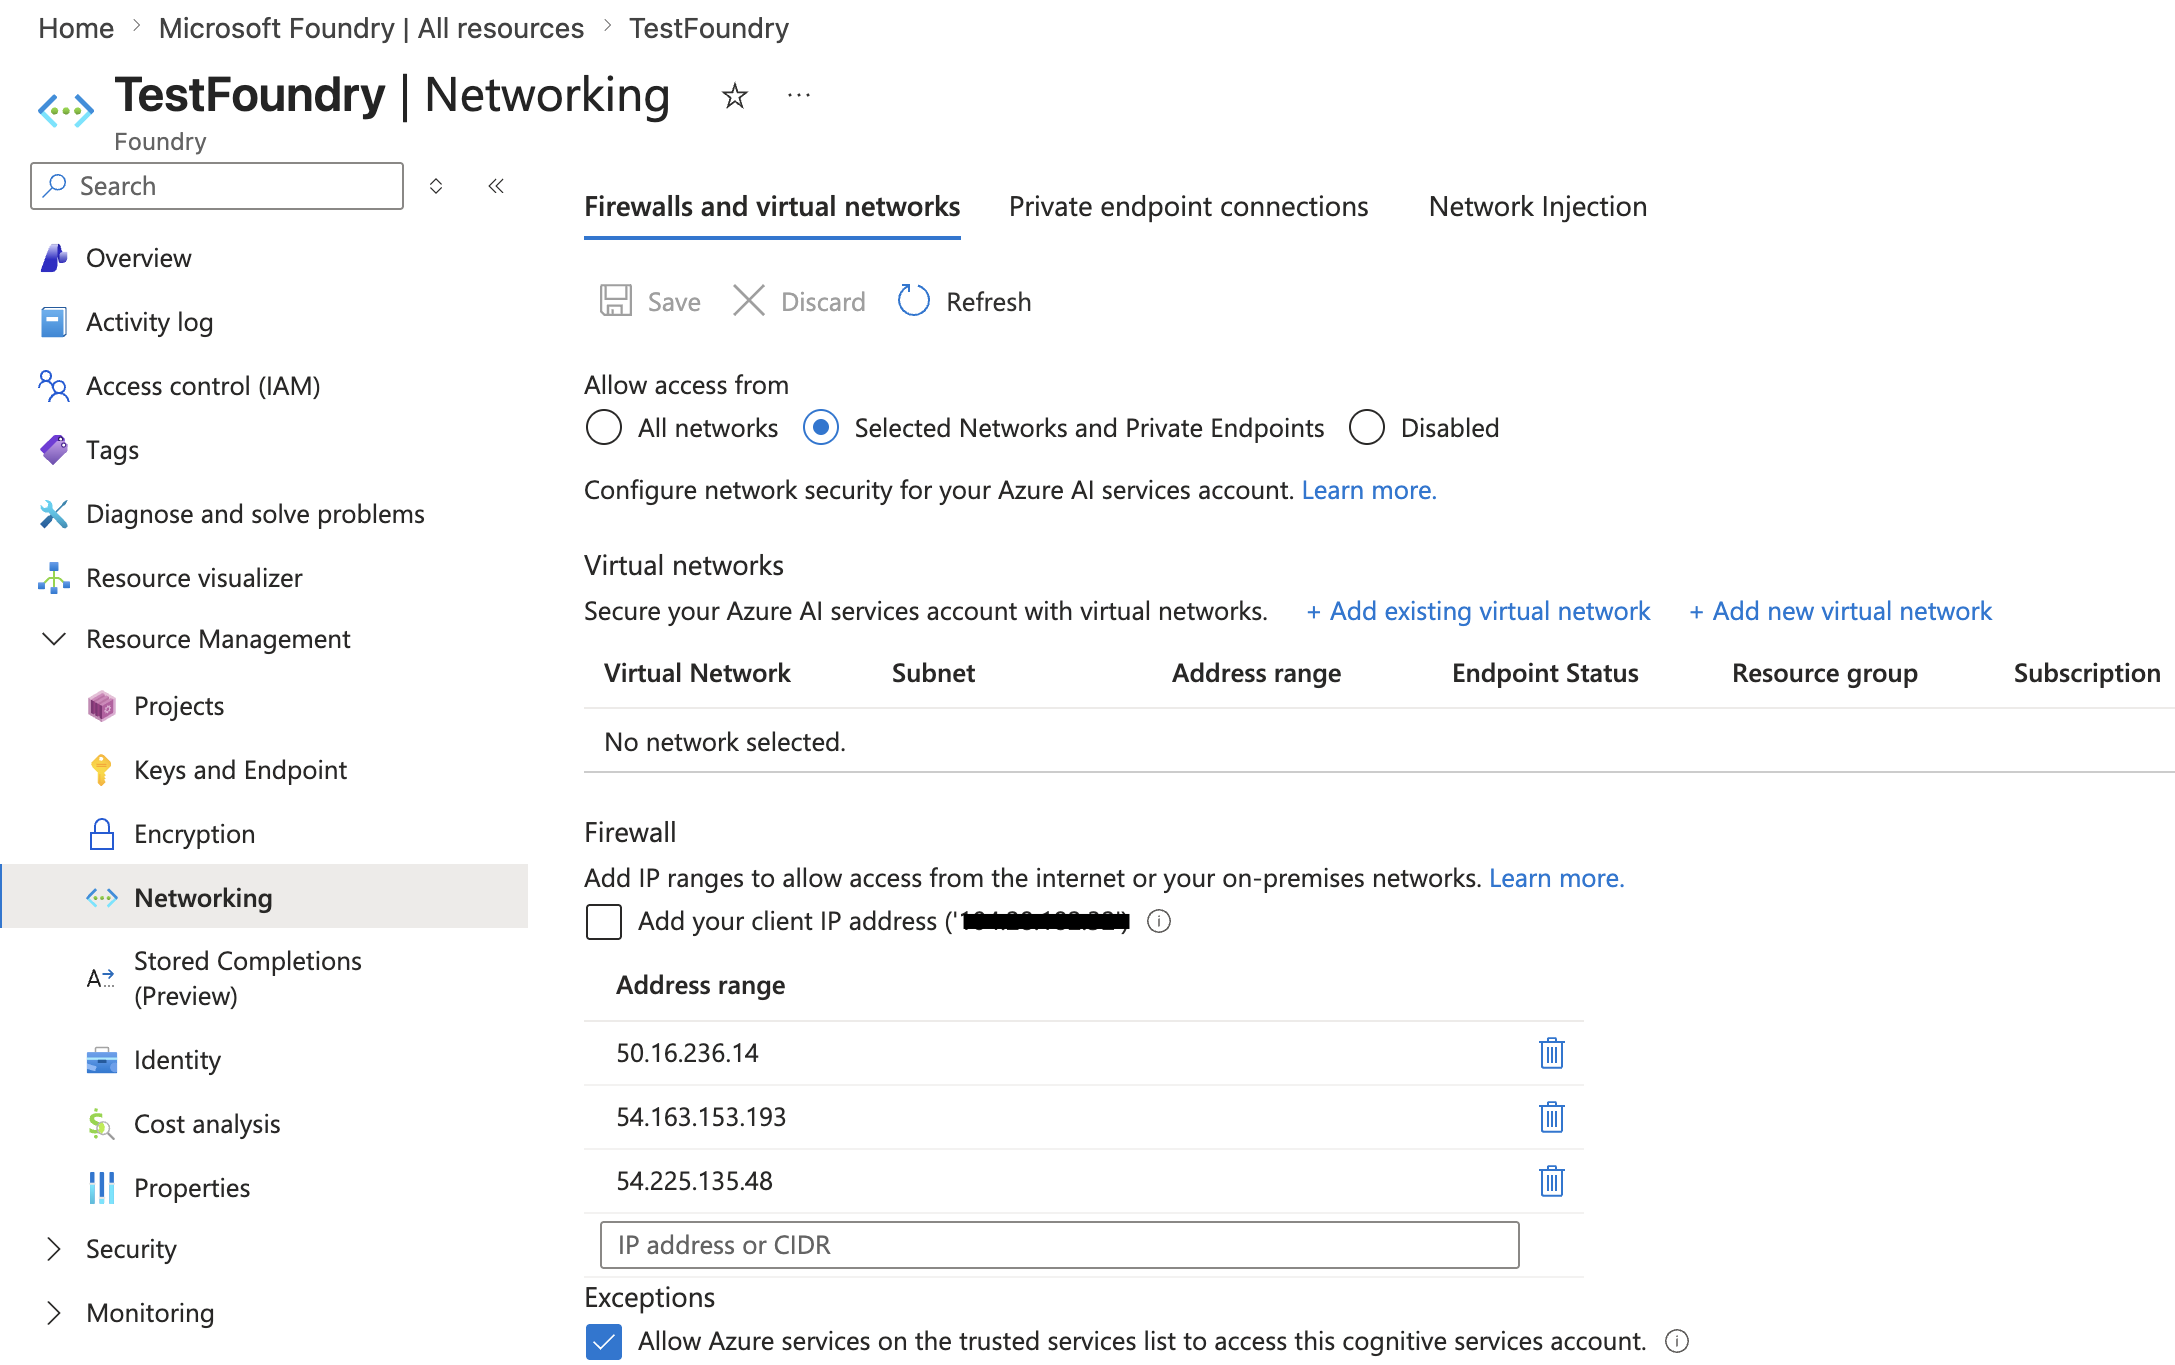
- Under Firewall, add the BeyondTrust Insights IP addresses:
50.16.236.14
54.163.153.193
54.225.135.48 - Click Save.
For non-US environments, use the IP addresses listed:
| Region | IP Addresses |
|---|---|
| US | 50.16.236.14, 54.163.153.193, 54.225.135.48 |
| EU | 3.72.126.244, 3.78.41.126, 3.125.93.216 |
| UK | 18.130.205.142, 18.133.85.99, 18.135.255.23 |
| CA | 35.182.121.100, 3.97.211.0, 3.96.180.135 |
| IN | 65.2.101.179, 52.66.21.171, 3.108.43.201 |
| AU | 52.64.252.137, 54.252.35.200, 54.153.250.211 |
Check your connector health
You may need to update your client secret if it is expired.
These steps are used when it is time to refresh the app registration secret.
Microsoft Azure steps
- In Microsoft Azure, use the search box to search for Microsoft Entra ID and select it from the results.
- Under the Manage section in the left menu, select App registrations.
- Locate and select the BT-SP-Connector application under All applications. Note the Application (client) ID for reference.
- Under the Manage section, select Certificates & Secrets.
- Select + New client secret, provide a description and set an expiry date according to your company's guidelines, then click Add.
- Copy the Secret Value and store it in a secure location.
Insights steps
- From the top left of any page in Insights, click
 > Insights > Connectors. The Connectors page displays.
 - Locate and select the Microsoft Azure connector in the Configured Connectors list that requires attention.
- Navigate to the Settings tab, confirm the Client ID matches the one from the Azure steps, and paste in the Secret Value.
- Select Save Changes.
For information only
Required roles and permissions
The following read-only roles are required for this connector. You do not need to manually grant these roles, as this is managed by the connector install script.
| Service | Permissions / Roles |
|---|---|
| Microsoft Graph |
|
| Office 365 Management APIs |
|
| Management Groups |
|
| Custom RBAC Role |
|
| Power Platform Security Role |
|
