
Salesforce | Insights
Learn how to create a Salesforce connector in BeyondTrust Identity Security Insights.
Prerequisites
Before you configure the Salesforce connector, ensure the following requirements are met.
Salesforce access
- You have System Administrator access to your Salesforce organization.
- You can create external client applications under App Manager.
- You can create users and custom profiles.
- A Salesforce license is available for the integration user.
Identity Security Insights access
- You have administrator access to Identity Security Insights.
ImportantThird-party documentation is subject to change. Updates might not be reflected in BeyondTrust documentation. For the most up-to-date information, refer to Salesforce documentation.
Step 1: Find your Salesforce domain
Salesforce login domains vary by org type — production, sandbox, QA, lab, and Developer Edition environments each use a different URL. Retrieve the exact login domain so you can enter it correctly when creating the connector.
- Log in to Salesforce as a System Administrator in the org you want to connect.
- In the top-right corner of Lightning Experience, click the gear icon (⚙), then select Setup. The Setup page opens in a new tab.
- In the Quick Find box on the left side of the Setup page, enter My Domain, then select My Domain under Company Settings.
- On the My Domain page, locate the Current My Domain URL field. Copy this value. You will enter it in the connector's Domain field.
Ensure the URL you copy ends with
.salesforce.com. If it does not, confirm with the Salesforce admin that you are viewing the correct field.
Step 2: Create custom profile
- Navigate to the Setup page by clicking on the gear icon.
- From Setup, enter Profiles in the Quick Find box, and select Profiles.
- Click New Profile.
- On the Clone Profile page:
- Select Minimum Access - Salesforce for existing profile.
- Enter BT Insights Connector as the profile name.
- Click Save.
- On the new profile page, under System, select System Permissions.
Activate the following:- System
- API Enabled
- API Only User
- Customize Application: Requires View Setup and Configuration, Manage Custom Permissions
- Manage Auth. Provider: Requires Manage Users, Author Apex
- Manage Package Licenses
- Modify Metadata Through Metadata API Functions
- View All Data: Requires Read and View All on all standard and custom objects, View Setup and Configuration, View All Forecasts, View Event Log Files, View Dashboards in Public Folders, View Reports in Public Folders, View Login Forensics Events, View Real-Time Event Monitoring Data
- View all External Client Apps
- View Roles and Role Hierarchy
- View Setup and Configuration: Requires View Roles and Role Hierarchy
- View Devices* (only available if Mobile Device Tracking feature is enabled)
- Users
- View all Users
- System
- Click Save.
Step 3: Create an integration user
- From Setup, in the Quick Find box, enter Users, and then select Users.
- Click New User.
- Enter the details:
- First name: BT Insights Connector
- Last name: User
- Enter an email address and a unique username in the form of an email address. By default, the username is the same as the email address.
- Record the username to use it later.
- User License: Salesforce
- Profile: BT Insights Connector
- Click Save.
Step 4: Create external client application
- From Setup, in the Quick Find box, enter App Manager, and then select App Manager.
- Click New External Client App.
- On the New External Client App page:
- Enter external client app name: BT Insights Connector
- Enter contact email
- Under API (Enable OAuth Settings), check Enable OAuth
- Under App Settings
- Callback URL: Any URL starts with HTTPS as it won’t be used (https://localhost:8080)
- OAuth Scopes
- Select Manage user data via APIs (api) in Available OAuth Scopes
- Click the top triangle/arrow to move scope to Selected OAuth Scopes
- Under Flow Enablement
- Check Enable Client Credentials Flow
- Under Security, ensure that all checkboxes are unchecked.
- Click Create.
Configure the external client app policies
- On newly created External client app page
On the Policies tab, click Edit - Scroll to OAuth Flows and External Client App Enhancements, check Enable Client Credentials Flow.
- Run As (Username): Enter the username of the integration user created earlier.
- Click Save.
Record the consumer key and secret
- On the Settings page, navigate to OAuth Settings
- Under App Settings, click Consumer Key and Secret
- Verify identity (if requested).
- Record Consumer Key and Consumer Secret. You need these for the final step.
Final step: Create the connector in Insights
- From Insights Home, select
 > Connectors.
The Connectors page displays. - Click Total configured.
- Select Create Connector > Salesforce.
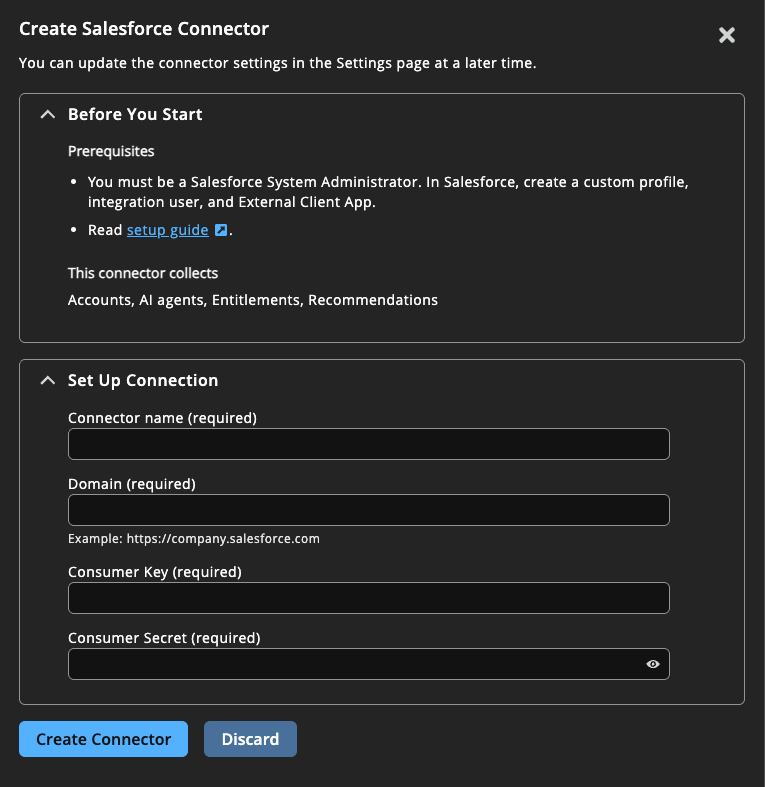
- Provide the following information to connect to Salesforce:
- Name: A human-readable name for your Salesforce connector, typically the Salesforce org name.
- Domain: Your Salesforce domain, e.g., https://your-domain.salesforce.com.
- Consumer Key: Copy the Consumer Key recorded in Step 4.
- Consumer Secret: Copy the Consumer Secret recorded in Step 4.
- Click Create Connector.
Navigate to > Connectors > Total Configured to confirm the connector was successfully created and review connector settings.
Updated about 1 month ago
