
BeyondTrust Password Safe (cloud) | Insights
Learn how to create a Password Safe connector in BeyondTrust Identity Security Insights (Insights).
The Password Safe connector gives Insights visibility into your organization's privileged account landscape:
- Insights periodically collects identity and account data from Password Safe, including managed accounts, managed systems, user roles, and vault accounts. This data populates the Insights dashboards and feeds identity analytics, detections, and recommendations.
- When you generate an Insights installation key in Password Safe (requires Password Safe 24.1.1 or later), the Password Safe event service forwards discovery scan results to Insights as they occur. This gives Insights immediate visibility into newly discovered accounts and systems across your network.
Insights connectors support both cloud and on-premises instances.
For Password Safe cloud information, see BeyondTrust Password Safe (on-prem).
Prerequisites
Before you configure the Password Safe connector, ensure the following requirements are met.
BeyondTrust Password Safe access
- Administrator access to Password Safe.
- Password Safe 24.1.1 or later is installed (required for installation key support).
- You can create API registrations in BeyondInsight.
- You can create users and groups with role-based access in Password Safe.
Identity Security Insights access
- Administrator access to Identity Security Insights.
- Your Insights site is provisioned and active.
Network requirements
The Insights IP addresses for your region are allowlisted in BeyondInsight. See Step 1 for the full IP list.
Configuration path
Before you begin, identify the configuration options that apply to your environment. Your selections determine which steps you complete.
| Path | When to use |
|---|---|
| Password Safe Cloud | Your Password Safe instance is cloud-hosted on BeyondTrust Cloud |
| Password Safe On-Premises | Your Password Safe instance is deployed on-premises in your own infrastructure. See BeyondTrust Password Safe (on-prem). |
If using Password Safe Cloud on the Pathfinder platform, see the Pathfinder-specific note in Step 2.
Step 1: Create an API Registration in BeyondInsight
-
Log in to BeyondInsight.
-
From the left menu, select Configuration > General > API Registrations.
-
Click Create API Registration.
-
Select API Key Policy from the dropdown.
-
Enter the API's details:
- Enter a name for the new registration.
- Select your desired rule options.
- Optionally, check the User password required box to add a password for the connector.
-
Add Authentication Rules (one for each Insights IP address for your region):
-
Under Authentication Rules, click Add Authentication Rule.
-
From the Type drop-down menu, select Single IP Address.
-
Add the IP addresses for your region:
Region IP addresses US 50.16.236.14, 54.163.153.193, 54.225.135.48 EU 3.72.126.244, 3.78.41.126, 3.125.93.216 UK 18.130.205.142, 18.133.85.99, 18.135.255.23 CA 35.182.121.100, 3.97.211.0, 3.96.180.135 IN 65.2.101.179, 52.66.21.171, 3.108.43.201 AU 52.64.252.137, 54.252.35.200, 54.153.250.211 - Determine the location of your site by clicking Administration on the Insights Home page.
- For FedRAMP connectors, refer to the IP address shown on the Create Connector page.
-
Click Create Rule.
-
Repeat for all remaining IP addresses.
-
-
On the registration's details page, check the Active box.
-
Click Create Registration.
The API is registered. Record the API Key. You need the key in Step 4.
Step 2: Create a user in Password Safe
We recommend creating a new user dedicated to Identity Security Insights. Because this user allows Insights to access Password Safe, a dedicated account is easier to manage and audit.
Standard Password Safe Cloud
- Log in to Password Safe.
- From the left menu, select Configuration > Role Based Access > User Management.
- Click Users.
- Click +Create New User.
- Click Create a New User.
- Enter all Identification fields (required). Optionally, enter the user's contact information.
- Select an Activation Date and an Expiration Date for the user account.
- Check User Active to activate the user account.
- Set Two-Factor Authentication to None.
- Click Create User.
The user is created and ready for group assignment in Step 3.
Password Safe Cloud on Pathfinder
If your Password Safe Cloud instance is on the Pathfinder platform, create the user as follows:
- Sign in to app.beyondtrust.io.
- At the top right of the page, click your site name to display a drop-down menu.
- Select Administration.
- From the top left of the page, select
 > Administration > User Management.
 - Click Invite User.
- Select specific sites and associated applications for the user to access.
- Click Invite User.
Then complete the standard Password Safe user creation:
- Log in to Password Safe.
- From the left menu, select Configuration > Role Based Access > User Management.
- Click Users > +Create New User > Create a New User.
- Enter all Identification fields (required). Optionally, enter the user's contact information.
- Select an Activation Date and an Expiration Date for the user account.
- Check User Active to activate the user account.
- Set Two-Factor Authentication to None.
- Click Create User.
The user is created and ready for group assignment in Step 3.
Step 3: Create and configure a group in Password Safe
- Sign in to Password Safe.
- From the left menu, select Configuration > Role Based Access > User Management.
- Click Groups.
- Click Create a New Group.
- Enter a group Name and Description.
- Click Create Group.
Assign the user to the group
- Under Group Details, select Users.
- From the Show drop-down list, select Users not assigned.
- Locate the user created in Step 2 (or an existing user you wish to use).
- Click Assign User.
Configure API access for the group
- Under Group Details, select API Registrations.
- Check the box next to the API registration created in Step 1.
Assign feature permissions to the group
- Under Group Details, select Features.
- From the Show dropdown menu, select All Features.
- Select the following features:
- Analytics and Reporting
- Asset Management
- Password Safe Account Management
- Password Safe Role Management
- Password Safe System Management
- Ticket System
- User Accounts Management
- Click Assign Permissions > Assign Permissions Read Only.
- Click User Audits > Assign Permissions Full Control.
Assign read-only permissions to all Smart Groups
- Under Group Details, select Smart Groups.
- From the Show dropdown menu, select All Smart Groups.
- Select ALL Smart Group.
- Click Assign Permissions, and select Assign Permissions Read Only.
Assign All Assets Smart Group roles
- Under Group Details, select Smart Groups.
- From the Show dropdown menu, select All Smart Groups.
- Select the All Assets Smart Group.
- Click the vertical ellipsis button (⋮) for the All Assets Smart Group.
- Select Edit Password Safe Roles.
- Check the Auditor box.
- Click Save Roles.
Step 4: Create the connector in Insights
-
From Insights Home, select
> Connectors. -
Click Total configured.
-
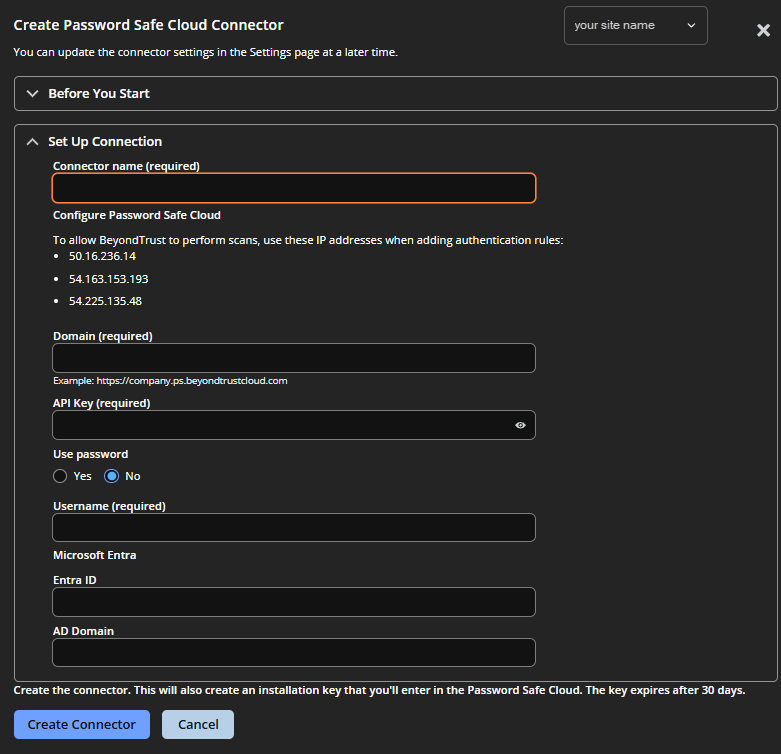
Click + Create Connector > Password Safe Cloud.
-
Enter the connector details:
-
Name: A human-readable name for your Password Safe Cloud connector.
-
Domain: Your Password Safe Cloud domain (e.g.,
https://company.ps.beyondtrustcloud.com). -
API Key: Paste the API key created in Step 1.
-
Use password: Select Yes or No based on whether the User password required option is enabled in your API registration.
To check: In Password Safe, navigate to Configuration > General > API Registrations. In the Details panel, check the Authentication Rules Options section.
-
Username: Enter the username of the user created in Step 2 (or the existing user assigned to the group in Step 3).
-
-
Click Create Connector.
ImportantAn installation key displays. Do not close this panel until you complete the Final step.
- Copy the installation key.
Final step: Enable the installation key in Password Safe
- Open Password Safe Cloud.
- From the left menu, click Configuration > Identity Security Insights > Connect to Identity Security Insights.
- In the Connector Key field, paste the installation key copied in Step 4.
- Click Update Settings.
- Confirm the toggle is Enabled.
Verify the connector (optional)
- In Identity Security Insights, select > Connectors.
- Click Total configured.
- Locate Password Safe Cloud in the list.
- Click the vertical ellipsis button (⋮) > View Connector.
- Review connector settings and confirm the status.
Updated 2 months ago
