
Okta | Insights
Prerequisites
Before you configure the Okta connector, ensure the following requirements are met.
Okta access
- You have administrator access to your Okta organization.
- You can create app integrations (API Services type) in Okta.
- You can grant OAuth 2.0 API scopes and manage administrator roles and resource sets.
Identity Security Insights access
- Administrator access to Identity Security Insights.
- Your Insights site is provisioned and active.
Step 1: Create a new app integration
Ensure you are logged in to your Okta account as an administrator.
- In Okta, navigate to Applications, and click Create App Integration.
- Click API Services, enter the name BT Insights - Connector, and click Save.
- Okta provides a Client ID under Client Credentials. Save your Client ID for use in Insights.
Step 2: Configure client authentication
- Navigate to Client Credentials and click Edit.
- Select Public key / Private key next to Client authentication.
- Select Add key, then Generate new key.
- Select PEM under Private key.
Only one key can be active at a time.
- Click Copy to clipboard, save your key for use in the next step, and click Done when finished.
Step 3: Grant API scopes
- Navigate to Okta API Scopes, and grant access to the following:
- okta.apiTokens.read
- okta.apps.read
- okta.authenticators.read
- okta.behaviors.read
- okta.devices.read
- okta.groups.read
- okta.idps.read
- okta.inlineHooks.read
- okta.logs.read
- okta.networkZones.read
- okta.orgs.read
- okta.policies.read
- okta.roles.read
- okta.threatInsights.read
- okta.trustedOrigins.read
- okta.users.read
If you have API Access Management enabled in your Okta environment, also grant access to: - okta.authorizationServers.read
Step 4: Disable Proof-of-Possession requirement
- Navigate to General Settings and click Edit.
- Uncheck Require Demonstration of Proof-of-Possession (DPoP) header in token requests.
- When finished, click Save.
Step 5: Create a new role and resource set
- In the Okta console, navigate to Security, and select Administrators.
- Select Roles > Create new role, and provide the role a name of Identity Security Insights.
- Under Identity and Access Management, select the View roles, resources, and admin assignments option.
- Click Save role.
- Navigate to Resources, and select Create new resource set.
- Provide the resource set a name of Identity Security Insights.
- Click Add resource set.
- In the search field, choose Identity and Access Management, and select the following:
- All Identity and Access Management resources
- Click Save resource set.
Step 6: Add the administrator role to Insights
- Navigate to Applications, and select your new BT Insights - Connector app.
- Go to Admin Roles > Edit Assignments.
- Select the new Identity Security Insights role and Identity Security Insights Resource set.
- Click Add assignment.
- Select the Read-only Administrator role.
- Click Save changes.
Final step: Create connector in Insights
- From Insights Home, select
 > Connectors.
The Connectors page displays. - Click Total configured.
- Click Create Connector and select Okta from the list.
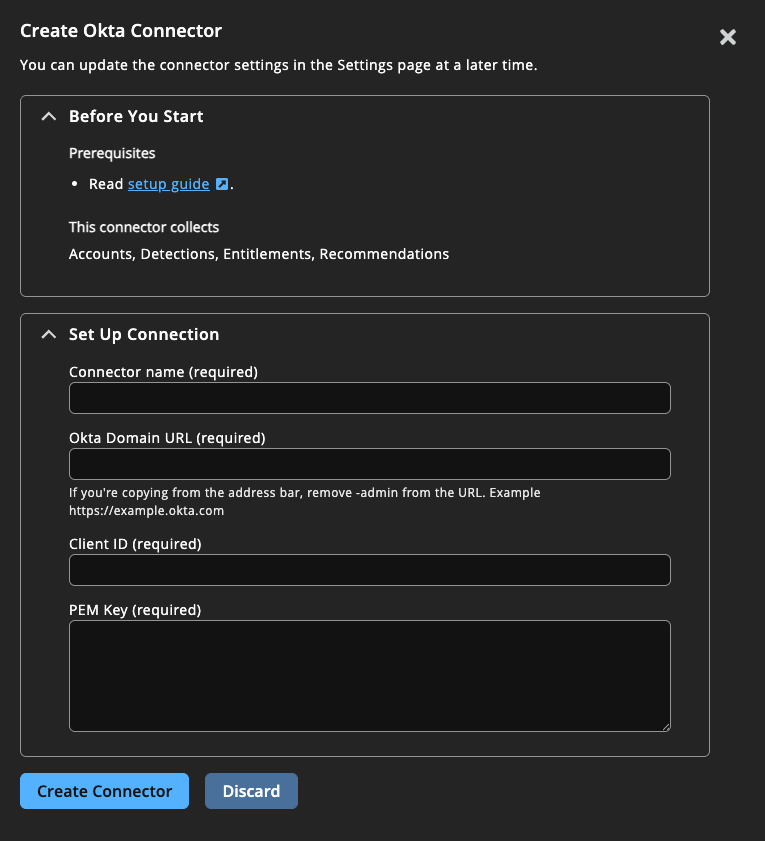
- Provide the following information to connect to Okta:
- Configuration Name: A human-readable name for your Okta connector.
- Domain: Your full Okta domain, e.g., subdomain.okta.com. If copying your domain from the address bar, remove the -admin ending (e.g., subdomain-admin.okta.com).
- Client ID: Paste the Client ID provided in your Okta configuration (Step 1).
- PEM Key: Paste the PEM key generated in your Okta configuration (Step 2).
- Click Create Connector.
Navigate to the Configured Connectors panel (Menu > Connectors > Total Configured) to confirm the connector is successfully created and review any connector settings.
Updated about 1 month ago
