Install EPM for Windows and Mac on BeyondInsight | BI On-prem
BeyondInsight and U-Series appliance are the on-premises solution for Endpoint Privilege Management for Windows and Mac deployments.
Important informationStarting in U-Series Appliance version 4.2, the EPM Policy Editor and Privilege Management reporting (PMR) are installed on appliances. No manual installation of these components is required on your part.
Configure the features you want to use on the Features editor.
Configure U-Series Appliance
Appliances can be set up across your environment, each one configured to host one or more roles. We recommend working with your BeyondTrust representative to determine the appliance architecture best suited for your estate. This is especially important if you plan to integrate Endpoint Privilege Management into an existing U-Series Appliance-BeyondInsight-Password Safe deployment.
The following information is supplementary guidance when installing and configuring a U-Series Appliance.
For more information, see U-Series Appliance Technical Documentation.
Primary/secondary deployment model
An example deployment model for a U-Series-BeyondInsight-Endpoint Privilege Management integration includes two appliances.
- Primary appliance: Hosts the reporting server and the BeyondInsight management console.
- Secondary appliance: Hosts the BeyondTrust event server that can manage policy distribution.
In this example model, you can deploy the event server in a variety of locations, including internet facing, if you want to support on and off-network devices.
The appliance can support up to 10,000 endpoints and additional event servers can be added to increase the capacity.
The following sections provide high-level configuration details.
Primary U-Series Appliance
Before proceeding with the setup of the primary appliance, keep the following considerations in mind:
- On a primary appliance, ensure the management console and reporting roles are enabled. In an architecture with more than one appliance, enable the management console role on only one appliance.
- When the SQL Server database resides on the primary appliance, then you must configure access to the remote database so secondary appliances can connect to the database. Set remote access on the SQL Server Database role.
To configure a primary appliance:
- Complete the appliance deployment and configuration wizards, taking the appropriate steps to achieve the objectives outlined above.
Event server appliance
A U-Series Appliance can be set up as an event server to serve policy to your estate.
Before proceeding with the setup of the event server appliance, keep the following configuration details in mind when going through the deployment and configuration wizards:
- You must activate the Event Collector role either during the configuration wizard or later in the U-Series Appliance software.
- Disable roles that are configured on the primary: BeyondInsight Management Console, BeyondInsight Analysis Services, and Analytics and Reporting - Reporting Service.
- When an appliance is acting as the event server, then you must set up remote database settings on the primary appliance.
To configure an appliance as an event server:
- Complete the appliance deployment and configuration wizards, taking the appropriate steps to achieve the objectives outlined above.
Install using OAuth
Starting in BeyondInsight 24.1 and Endpoint Privilege Management 24.3, the components can be configured to communicate via OAuth. Using OAuth simplifies attaching endpoints to BeyondInsight. As long as the BeyondInsight server is configured with a publicly trusted HTTPS certificate, this can now be accomplished without adding any certificates to the endpoint.
To continue using the self-signed certificate generated by the BeyondInsight server, follow the instructions in Install using certificates before proceeding with deploying OAuth. Certificates in this configuration are used only for HTTPS/TLS communication; and adding the client authentication certificate to the endpoint during installation is no longer required.
Starting in EPM for Mac 25.2, OAuth is supported. Add Activation ID and Activation Key in the BeyondInsight packages when creating in the Rapid Deployment Tool.
Install EPM with an OAuth activation secret
Complete instructions to set up OAuth are provided in Configure OAuth authentication for agents doc:.
-
From the left sidebar, click Configuration.
-
Under Authentication Management, click Installer Activation Keys.
-
To use the key generated by the system:
- Select System Generated Key.
- Select the Installer Type: Endpoint Privilege Management Agent.
- Copy the installation command, make any necessary edits, and use it when deploying the agent.
-
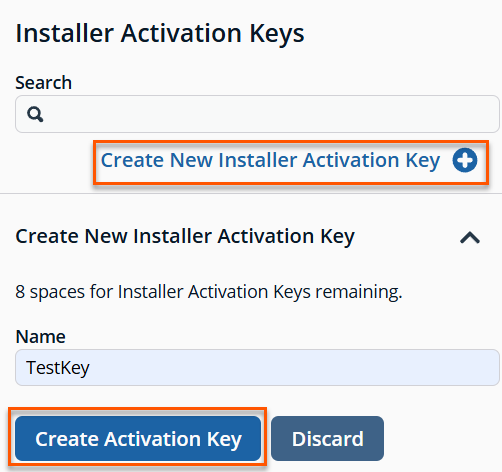
To create a new installer key:
-
Click Create New Installer Activation Key +.
-
Enter a name for the key.
-
Click Create Activation Key.
-
Select the Installer Type: Endpoint Privilege Management Agent.
-
Copy the installation command, make any necessary edits, and use it when deploying the agent.

-
When creating an installer activation key for Endpoint Privilege Management:
- Confirm the exact file name of the MSI (x86 vs x64).
Once the endpoint communication is established with BeyondInsight, the activation key is no longer required. We recommend deleting it.
If you delete the key and an endpoint stops working and must be reconfigured, create a new installer activation key before uninstalling and reinstalling the client.
Install using certificates
Configuring using OAuth is the preferred method.
We recommend installing the BeyondInsight client certificate before installing the Endpoint Privilege Management for Windows client.
Generate client certificate MSI
- On the BeyondInsight server, go to C:\Program Files (x86)\eEye Digital Security\Retina CS.
- Run REMEMConfig.exe to open the BeyondInsight Configuration Tool.
- Click the Generate Certificate.msi link. A command prompt opens, indicating the MSI is being generated.
- Once the prompt closes, the MSI appears in the C:\Program Files (x86)\eEye Digital Security\Retina CS\Utilities\msi directory.
Deploy the certificate MSI
After you generate the certinstaller.msi, you must deploy and install the MSI on each machine you want to communicate with BeyondInsight, using administrator rights. You can deploy the MSI using the following methods.
Use command prompt
- Add a copy of the certinstaller.msi to the machine
- Run cmd.exe as administrator
- Run the following command: msiexec /i certinstaller.msi
Create a group policy
Use the Group Policy Management Console (GPMC) to deploy certificate packages to your client computers.
- To deploy the certificate MSI package, copy the certificate MSI package to an accessible location.
- Click Start > Control Panel > Administrative Tools > Group Policy Management to open the GPMC. If the GPMC is not already installed, it can be downloaded from www.microsoft.com/en-us/download.
- In the GPMC, click Forest > Domains > Mydomain > Group Policy Objects.
- To create a new GPO, right-click Group Policy Objects, and click New.
- Enter a name for the GPO and click OK. Alternatively, you can add configurations to an existing GPO.
- Right-click the GPO and click Edit to launch the Group Policy Management Editor to configure settings for the GPO.
- In the Group Policy Management Editor, click Computer Configuration > Policies > Software Settings.
- Right-click Software Installation and click New > Package.
- Select the certificate MSI installer package, and click Open.
- Select Assigned and click OK. After a brief delay, the name of the software to be installed is displayed in the Details pane of the Group Policy Management Editor.
- If the name does not appear, right-click Software Installation and click Refresh until it does.
- To modify installation settings, double-click the item name in the display pane.
- To remove an item, right-click the item name and select All Tasks > Remove.
Restart each client computer to initiate the installation. This can be done manually or by using Group Policy mechanisms.
Use an enterprise software management tool (such as SCCM)
Be sure to consult the guides for the management tool you use.
After you deploy the client certificate, confirm it is on the system:
- Run the Microsoft Management Console (MMC) as administrator.
- Go to File > Add/Remove Snap-in.
- From the Snap-in menu, select Certificates, and click Add >.
- In the Certificates snap-in dialog, select Computer account.
- Choose Local computer: (The computer this console is running on). Click Finish.
- In the MMC Console, expand Console Root > Certificates (Local Computer).
- Expand both the Personal > Certificates directory and the Trusted Root Certification Authorities directory to ensure the eEyeEmsClient client certificate is listed.
If the certificates are not present, it is possible they were incorrectly installed in the Certificates (Current User) store. If you find them there, delete them and uninstall certinstaller.msi from Programs & Features (appwiz.cpl) before repeating these steps.
Install Endpoint Privilege Management for Windows
For BeyondInsight integration with Endpoint Privilege Management for Windows, you must set the BIMODE installer variable to 1. In the majority of cases, only the URL of your BeyondInsight Event Service must be specified. For context, example installation strings are provided below.
Example
PrivilegeManagementForWindows_x64.exe /v"BIMODE=1
BEYONDINSIGHTURL=https://example.com/EventService/Service.svc"
Example
msiexec.exe /i PrivilegeManagementForWindows_x64.msi BIMODE=1
BEYONDINSIGHTURL="https://example.com/EventService/Service.svc"
If you are using a custom certificate or workgroup, you can specify non-default values as additional install variables, as shown in the following examples.
Example
PrivilegeManagementForWindows_x64.exe /v"BIMODE=1
BEYONDINSIGHTURL=https://example.com/EventService/Service.svc BEYONDINSIGHTCERTNAME=CertExample
BEYONDINSIGHTWORKGROUP=BeyondTrust WorkGroup"
Example
msiexec.exe /i PrivilegeManagementForWindows_x64.msi BIMODE=1
BEYONDINSIGHTURL="https://example.com/EventService/Service.svc" BEYONDINSIGHTCERTNAME="CertExample"
BEYONDINSIGHTWORKGROUP="BeyondTrust WorkGroup"
The following table details the available installer variables and their default values.
The installer variables are located in the HKEY_LOCAL_MACHINE\SOFTWARE\Avecto\Privilege Guard Client registry key.
| Name | Default | Installer Variable Name |
|---|---|---|
| BeyondInsightUrl | [Empty] - You must specify this | BEYONDINSIGHTURL |
| BeyondInsightCertName | eEyeEmsClient | BEYONDINSIGHTCERTNAME |
| BeyondInsightWorkgroup | BeyondTrust Workgroup | BEYONDINSIGHTWORKGROUP |
| BeyondInsightHeartbeatIntervalMins | 720 | |
| BeyondInsightPolicyIntervalMins | 90 |
The default values of BeyondInsightPolicyIntervalMins and BeyondInsightHeartbeatIntervalMins can be shortened for testing purposes (low numbers of machines). Be aware that decreasing these values increases load on the BeyondInsight Event Service server.
Important informationWhen updating the clients on an existing deployment of BeyondInsight and Endpoint Privilege Management for Windows, the registry keys from the previous install is removed. Any previously specified variables in the install string must be restated in an upgrade.
Install the Endpoint Privilege Management for Mac client
The client and the adapter are obtained from BeyondTrust after purchasing Endpoint Privilege Management with BeyondInsight, and may be distributed to the endpoints using the method of your choice, including Mobile Device Management (MDM), such as Jamf or AirWatch.
You can create a settings package to set the adapter's configuration on all endpoints by using the Endpoint Privilege Management for Mac Rapid Deployment Tool.
The installer filenames, where x.x.x.x represents the version:
- PrivilegeManagementForMac_x.x.x.x.pkg
- BIAdapter_x.x.x.x.pkg
To install the Endpoint Privilege Management for Mac client:
- Double-click the PrivilegeManagementForMac_x.x.x.x.pkg file.
- Click Continue on the Introduction page.
- On the Software License Agreement page, click Continue and then click Agree to agree to the terms and conditions
- (Optional) To change the installation destination, click the Change Install Location button. The Destination Select page allows you to choose from viable installation location options. Click Continue.
- Click the Install button on the Installation Type page. If prompted, enter your admin credentials to continue. Click OK if the Installer.app needs permission to modify passwords, networking, or system settings.
- The Summary page shows that the installation was successful. Click Close to complete the installation.
Verify security settings
Ensure Endpoint Privilege Management for Mac files have correct access.
Set Allow on com.beyondtrust.endpointsecurity.systemextension
After the agent and adapter are installed, ensure the security on the Endpoint Privilege Management system extension is set to Allow.
For com.beyondtrust.endpointsecurity.systemextension, go to System Preferences > Security & Privacy > General, and then select Allow.
Verify privacy settings
The following Endpoint Privilege Management for Mac files require the privacy settings Full Disc Access and Files and Folders:
- com.beyondtrust.interrogator
- PrivilegeManagement
- defendpointd
- com.beyondtrust.endpointsecurity.systemextension
To confirm the settings:
- Go to System Preferences > Security & Privacy > Privacy, and then select Full Disk Access. Ensure the Endpoint Privilege Management files are listed.
- Select Files and Folders and confirm the Endpoint Privilege Management files are listed.
Verify Finder Extensions is enabled
One way to confirm Finder Extensions is on, go to the Applications folder and verify the Endpoint Privilege Management shield icon is next to the applications.
Install the BeyondInsight Adapter
The best practice to deploy the BeyondInsight adapter is to use the Rapid Deployment Tool.
However, you can choose the deployment method. Examples include: Mobile Device Management methods (such as Jamf or AirWatch), manual configuration, download from a shared resource, etc.
- Double-click the BIAdapter_x.x.x.x.pkg file.
- Click Continue on the Introduction page.
- On the Software License Agreement page, click Continue and then click Agree to agree to the terms and conditions.
- Click the Install button on the Installation Type page. If prompted, enter your admin credentials to continue. Click OK if Installer.app needs permission to modify passwords, networking, or system settings.
- The Summary page shows that the installation was successful. Click Close.
Confirm the endpoint is connected
The Endpoint Privilege Management endpoint can check in and send events to BeyondInsight after the settings file is configured.
If you can access the machine running the BeyondInsight server, use one of the following methods to confirm the endpoint has checked in:
- Go to Assets > Endpoint Privilege Management to see if the endpoint is displayed.
- Configure the Activity Monitor to show all processes, as BIAdapter runs as user _defendpoint.
- Run the following SQL query:
select from AssetPBDInfo
select from AssetPBDInfoEx
To force a policy update for a client getting an update for the first time, you can restart the BeyondInsight Adapter. In the Activity Monitor, restart the BIAdapter process.
The default time for the policy update and for the heartbeat is six hours. These values can be changed on the BeyondInsight server, and the policy can be applied to the endpoint, but this policy is not applied until the initial 6 hour period has elapsed. Manually changing the RCSHeartbeatInterval and RCSPolicyValidationInterval values also causes the endpoint to check in more often. Enter the values in minutes.
If you can access the endpoints, you can use either of the following methods to determine if they have checked in:
- Open the Console and filter on subsystem: com.beyondtrust.BIAdapter. Ensure that Info and Debug Messages are on. Logs about the connection are displayed in real time. You can check when the next policy validation is scheduled and the next heartbeat request.
- Open the Activity Monitor. The BIAdapter service is displayed as running.
Install and upgrade BeyondInsight and Password Safe to use OAuth
OAuth authentication is available for EPM for Mac in version 25.2.
New Password Safe install
When creating the package in the Rapid Deployment Tool, add values for Activation ID and Activation Key to use OAuth authentication.
Password Safe with BeyondInsight already configured to use OAuth
With endpoints already using BeyondInsight configured with OAuth, the Password Safe install copies the settings file from /Library/Application Support/BeyondTrust/Defendpoint to /Library/Application Support/BeyondTrust/PasswordSafe. OAuth activation will be complete.
Upgrade Password Safe from mTLS to OAuth
- Upgrade the Password Safe client first.
- Deploy the settings file from the Rapid Deployment Tool to restart the Password Safe client. Activation using OAuth will be complete.
Upgrade the BeyondInsight adapter
- Upgrade the adapter.
- Install the Rapid Deployment Tool settings package file to apply the OAuth settings.
- Installing the settings file restarts the adapter. OAuth settings will then be applied.
Verify endpoints are registered in BeyondInsight
After deploying your Endpoint Privilege Management endpoints, ensure BeyondInsight is receiving heartbeats and information from them. Once they check in, the endpoints are shown as entries on the Assets grid in BeyondInsight, and the Endpoint Privilege Management Agents grids.
Install the Policy Editor
Use BTUpdater on the U-Series appliance to install the Policy Editor.
Install Endpoint Privilege Management Reporting
Use BTUpdater on the U-Series appliance to install Privilege Management Reporting (PMR).
Configure Reporting
After installing the Endpoint Privilege Management Reporting components, configure the database, assign permissions to users to access reports, and configure the Policy Editor to raise events in BeyondInsight.
Configure the database
Important informationIf you change your SQL Server port or Endpoint Privilege Management Reporting database configuration, restart the Reporting Gateway service and Event Collector service to pick up the changes.
Named instances
If using a named instance, the SQL Connection Options field must be used to provide a connection string to the PMR database.
If the SQL Server named instance is listening on a dynamic port, use the instance name in the connection string without a port number because the allocated port number which SQL Server is listening on can change. The SQL Server Browser service must be running to locate the dynamic port.
Example
jdbc:jtds:sqlserver://SERVERNAME/BeyondTrustReporting;instance=INSTANCENAMEIf the SQL Server named instance is listening on a static port, either the instance name can be used (with the SQL Server Browser Service running), or the port number can be supplied directly in the connection string.
Example
jdbc:jtds:sqlserver://SERVERNAME:STATICPORTNUMBER/BeyondTrustReportingIf using an external BI Event Collector it is recommended to use the Microsoft JDBC driver as specified in SQL Connection Options, using either the instance name or the port number.
To configure the reporting database:
- Sign in to the BI console and navigate to Configuration > Endpoint Privilege Management > Endpoint Privilege Management Reporting Database Configuration.
- Enter the database connection settings fields:
- Server: Enter the hostname or IP address of the database server where the PMR database was installed. If the database is to be used within a U-Series High Availability Pair configuration, set the Server field to "localhost" to maintain the database connection after failover.
If using external event collector worker nodes, do not enter localhost even if the PMR database is hosted on the same server as the BI management server. PMR events do not flow through these nodes to the PMR database unless the DNS hostname or IP address is used here.
- Port: Enter a port number to communicate to your SQL Server instance. The port number range is between 1024 – 49151 inclusive.
- Database Name: Enter the name of the PMR database specified when you ran the PMR database installer.
- Report Reader SQL User: Enter the username of the report reader user specified when you ran the PMR database installer.
- Report Reader SQL Password: Enter the password of the report reader user specified when you ran the PMR database installer.
- Event Collector SQL User: Enter the username of the event collector user specified when you ran the PMR database installer.
- Event Collector SQL Password: Enter the password of the event collector user specified when you ran the PMR database installer.
- Reporting Gateway URL: Enter the server name where the reporting gateway service and PMR UI were installed. This can be set to localhost or 127.0.0.1. In some instances localhost certificates can be impacted by proxies, in which case use 127.0.0.1.
- Reporting Gateway Port: Enter the port number on which the reporting gateway service runs PMR UI. This can be left as the default in most cases.
- Event Collector URL: Enter the server name where the event collector service and event collector were installed.
This can be set to localhost or 127.0.0.1. In some instances localhost certificates can be impacted by proxies, in which case use 127.0.0.1.
- Event Collector Port: Enter the port number on which the event collector service runs event collector. This can be left as the default in most cases.
- SQL Connection Options: This is an advanced setting that allows custom parameters to be appended to the SQL connection string to the PMR database, or changing the default driver used for connectivity to the PMR database.
- Click Test Connection to test the connection to the PMR database.
- Click Update Settings.
- Restart the following services:
- BeyondTrust EPM Event Collector Service
- BeyondTrust EPM Reporting Gateway Service
- BeyondTrust EPM Web Policy Editor Service
- From the left navigation in the BI console, verify that Reports is now listed under Endpoint Endpoint Privilege Management.
For more information on SQL connection options, see Configure advanced SQL and event collector settings.
Assign permissions to users to access reports
To view Endpoint Privilege Management Reporting in BI, the user must belong to a user group that has (at a minimum) the following permissions set:
- Management Console Access (Read Only permission)
- Endpoint Privilege Management - Reporting (Read Only permission)
To use the Add to Policy functionality in PMR, the user must belong to a user group that has (at a minimum) the following permissions set:
- Endpoint Privilege Management (Read Only permission)
- Endpoint Privilege Management - Policy Editor (Full Control permission)
- If the user only has Read Only permissions, the Add to Policy button does not display in BI.
- For more information on how to set up users, groups, and assign feature permissions in BeyondInsight, see Role-based access.
Configure EPM policy editor to raise events
- From the left navigation in the BI console, under Endpoint Endpoint Privilege Management, click Policies.
- Create a new policy or edit an existing policy:
- To create a new policy:
- Click Create Policy above the grid.
- Enter a name for the policy and select the appropriate workgroup from the dropdown.
- Click Create Policy.
- Select a template and continue to step 3.
- To edit an existing policy:
- Click the vertical ellipsis for the policy.
- Select Edit & Lock Policy and continue to step 3.
- To create a new policy:
- Create a workstyle or edit an existing workstyle:
- To create a new workstyle:
- Click Create New Workstyle above the grid.
- Enter a name and description for the workstyle.
- Click the toggle to enable the workstyle.
- Click Create Workstyle.
- From the left navigation, expand Workstyles.
- Expand the newly created workstyle.
- Click Application Rules and continue to step 4.
- To edit an existing workstyle:
- From the left navigation, expand Workstyles.
- Expand the desired workstyle.
- Click Application Rules and continue to step 4.
- To create a new workstyle:
- Create or edit an application rule, and at the bottom of the Application Rule panel, set the following:
- Under Auditing, set Raise a Local Event to On.
- Under Reporting Options, toggle the options to enable them. The options are:
- BeyondInsight Events: Enable this option to configure endpoint clients to raise events which can be viewed from the Endpoint Privilege Management Events grid in BI and in reports in BeyondInsight Analytics & Reporting in the Endpoint Endpoint Privilege Management folder.
- Reporting Events: Enable this option to configure endpoint clients to raise events which can be viewed from the Endpoint Endpoint Privilege Management Reporting page in BI. To view these reports in BI:
- From the left navigation, click Menu, and then click Reports under Endpoint Endpoint Privilege Management.
- We recommend using the Reporting Events option, because PMR contains more detail in the events and provides advanced functionality such as Add to Policy. The Add to Policy feature provides a convenient way to add applications to Endpoint Privilege Management policies. Enabling both reporting options results in a greater load on the server and additional resources may be required to handle the load.
- You must enable reporting options for every application rule for which you want to raise events.
- For more information on how to install and configure the BeyondTrust Endpoint Privilege Management for Windows clients in BeyondInsight, see Install using Oauth.
Configure advanced SQL and event collector settings
The below sections detail how to configure optional advanced SQL and event collector settings for your PMR in BI integration.
SQL connection options (including SSL configuration)
The SQL Connection Options field, available in the Endpoint Privilege Management > Endpoint Privilege Management Reporting Database Configuration form in BI, allows custom parameters to be appended to the SQL connection string. These can be used to configure functionality such as SSL encryption for the PMR database connection.
If the full connection string is provided in this field, these connection details are used instead of the Server and Database Name fields in the form.
By default the jTDS driver is used for connectivity to the PMR database. The jTDS connection string can be added to the SQL Connection Options field using the following format:
jdbc:jtds:<server_type>://<server>
[:<port>][/<database>]
[;<property>=<value>[;...]]
There are many optional parameters that can be appended to the jTDS connection string using the property=value; format. For example, to require that SSL is used for the connection using the jTDS driver, append the following to the jTDS connection string in the SQL Connection Options field:
ssl=requireFor environments with external BI event collector worker nodes, if using SSL, we recommend using the Microsoft JDBC driver rather than the jTDS driver, because some issues have been found with the jTDS driver over external connections when using SSL.
To use the Microsoft driver, provide the connection string in the SQL Connection Options field in the following format:
jdbc:sqlserver://[serverName[\instanceName][:portNumber]][;property=value[;property=value]
Important informationDo not include the user and password custom parameters in the SQL connection string, because these are populated from the Report Reader SQL User and Report Reader SQL Password fields.
For information on the optional parameters that can be added to the SQL Connection Options field, see The jTDS Project Frequently Asked Questions.
For information on the connection string format and the optional parameters it supports for the JBDC driver, see Building the connection URL.
For information on configuring SSL encryption for the Microsoft JDBC driver, see Connecting with encryption.
SQL Always On availability group support
The PMR database supports running within a SQL Always On availability group. This prevents the CopyFromStaging scheduled job from running on the secondary replica in the availability group, so that it only ever runs on the primary replica.
- You must use the Microsoft JDBC driver for the SQL connection. The default jTDS driver does not work with SQL Always On.
- The SQL recovery model for the database must be set to Full.
Important informationWhen using the full recovery model, ensure that best practice is followed to back up the PMR database transaction log. Frequently running CopyFromStaging causes the transaction log to quickly use up disk space.
- Install the PMR database on the primary replica server, and then add the database to the availability group. The database is then replicated to the secondary replica.
- Use the SQL Agent job (PGInsertData) to run the CopyFromStaging stored procedure, not the Service Broker job. The Service Broker can be unreliable restarting after failover. The Service Broker is currently the default job when installing the PMR database.
- Users are only created on the primary replica. You must create users on the secondary replica and synchronize the SIDs between the replicas. In a failover scenario, PMR loses the connection to the database if the accounts are not created on the secondary replica.
Follow the steps below to switch to using the SQL Agent job to run CopyFromStaging.
CopyFromStaging SQL server agent configuration
To switch to the SQL Server Agent job after installing the PMR database, take the following steps:
- Execute the Create_ER_Database_Agent.sql script against the PMR database on the primary replica. This removes the Service Broker queue and creates the SQL Server Agent job on the primary node.
- Configure read-only access to the secondary replica of the Always On availability group by setting Readable secondary to Yes. This is required for the next step.
- Execute the Create_ER_Database_Agent.sql script against the PMR database on the secondary replica.
Provided the script has been run on the primary replica first, it does not attempt to make any changes to the database on the secondary replica, as the removal of the Service Broker queue has already been replicated across from the primary to the secondary. Running this script only creates the SQL Server Agent job on the secondary replica. This job runs on the secondary but does not execute the CopyFromStaging stored procedure unless failover occurs, and this becomes the primary replica.
- Remove the read-only access to the secondary replica (set Readable secondary to No).
- In the Endpoint Privilege Management Reporting Database Configuration form in BI, set the Server field to point to the PMR database in the Always On availability group, using the availability group listener address instead of the primary replica server address. The listener forwards any calls to the primary replica.
For more information on configuring read-only access to the secondary replica of the Always On availability group, see Configure read-only access to a secondary replica of an Always On availability group.
Install and configure external event collector worker nodes
- Ensure the BI event collector worker node is installed and configured.
- Ensure all steps detailed in the above sections for installing and configuring PMR in BI have been followed.
- Verify that PMR is displaying reports in BI and that it is receiving events from an endpoint that is configured to point to the BI event collector on the BI management server. This is to verify that the end-to-end process is working and that events can flow from the endpoint to the BI event collector on the BI management server, then to the PMR event vollector, and finally to the PMR database.
- Ensure the PMR database connection setting configured in the BI console is using the DNS hostname or IP address for the PMR database server, and not localhost or 127.0.0.1. Otherwise, the external event collectors are not able to communicate with the PMR database.
- Run the BeyondInsight.EPM.EventCollector.Services MSI on each event collector worker node.
This must be installed in its default location for the PMR in BI integration to work.
- Run the BeyondTrust EventCollector MSI on each external event collector worker node. The event collector service starts automatically as part of the upgrade.
- Configure an endpoint to point to an external event collector node and raise events. Confirm they can be seen in the PMR reports.
For more information on BI Event Collectors, see Configure U-Series Appliance.
Troubleshoot
EndpointUtility.exe tool
A diagnostics tool, EndpointUtility.exe, is available with Endpoint Privilege Management for Windows installed files. Using the tool, you can:
- Diagnose the cause of connection problems. The tool offers actions to remedy the issue.
- Request an immediate policy update from BeyondInsight.
The tool does not require any elevated rights to run; any authenticated user on the system can use the tool.
Use the EndpointUtility.exe tool
Arguments
Management platform argument:
/bi: BeyondInsight
Task arguments:
/c: Test connection
/p: Force policy
Test connection
Run the following commands to send a test message to the BeyondInsight instance. The test results are displayed in the console window.
The registry settings used to connect to BeyondInsight are displayed first, followed by the result of the test message.
If Endpoint Privilege Management for Windows is installed in the default location, run the following from the command line:
"C:\Program Files\Avecto\Privilege Guard Client\EndpointUtility.exe" /bi /cPowerShell:
& "C:\Program Files\Avecto\Privilege Guard Client\EndpointUtility.exe" /bi /cPossible test connection results
| Result | Remedy |
|---|---|
| Connection Successful | NA |
| Defendpoint BeyondInsight Adapter cannot be contacted. | Reinstall BeyondTrust Endpoint Privilege Management with BIMODE=1 and correct parameters for; BEYONDINSIGHTURL (and optionally BEYONDINSIGHTCERTNAME and BEYONDINSIGHTWORKGROUP). |
| BeyondInsight Client Certificate Name could not be found. | Check the value of BEYONDINSIGHTCERTNAME in the registry and verify that the certificate is installed in and accessible from the correct certificate store |
| BeyondInsight Connection refused. | Check the value of BEYONDINSIGHTURL in the registry and that you have installed the correct BeyondInsight client certificate. |
| BeyondInsight URL not specified | Provide a value for BEYONDINSIGHTURL in the registry |
| BeyondInsight could not be contacted | Check the value of BEYONDINSIGHTURL in the registry, and network and firewall settings |
Force policy
Run the following commands to force a policy update on endpoints from BeyondInsight.
If Endpoint Privilege Management for Windows is installed in the default location, run the following command from the Windows command prompt:
"C:\Program Files\Avecto\Privilege Guard Client\EndpointUtility.exe" /bi /pWindows PowerShell:
& "C:\Program Files\Avecto\Privilege Guard Client\EndpointUtility.exe" /bi /pForce update policy for end users
End users can check and force a policy update to their computer from the system tray. Using this option reduces the time it takes to update a policy.
- In the system tray, click the Endpoint Privilege Management icon.
- Click Check for Policy Update.
One of the following notifications can appear:
- Update Finished to notify the user that a policy update has been applied.
- No Updates Found if the current policy is already up to date.
- Unable to Check for Updates if the computer cannot reach the management platform.
Use the capture config utility
Run the BeyondTrust Capture Config Utility from the command line either locally or remotely using the EndpointUtility.exe.
If you are running a version of Endpoint Privilege Management for Windows earlier than 22.3, follow the steps described in KB0017213.
Initiate the capture config utility from the command line
If you are running this on a remote machine, proceed to Run remotely and silently using PowerShell.
To initiate the utility:
-
Open PowerShell as admin.
-
Change directory (cd) to the Endpoint Privilege Management for Windows install location. By default, this is C:\Program Files\Avecto\Privilege Guard Client (include the **'**s in your command, as below).
cd 'C:\Program Files\Avecto\Privilege Guard Client' -
(Optional). Use the command below to create a new folder, or proceed to step 4 if you already have a folder created on the machine. Replace `Chosen Path` with the path you want the new folder to reside in, and replace `Chosen Name` with the preferred name for the folder. For example, the case reference number.
$output = New-Item -Path \`Chosen Path\` -Name \`Chosen Name\` -ItemType directory -
Run the capture config script with the command below. Replace `Desired .zip name` with the preferred name for the logs, which is exported to a ZIP file.
If you opted to use a preexisting folder (or did not use the $output variable in the previous command), remove $output and type the path to the existing folder, and the desired name of the log file which is exported to a new ZIP file with that name. See the examples below.
.\EndpointUtility.exe /cc $output \`Desired .zip name\`OR
.\EndpointUtility.exe /cc \`Path to folder\` \`Desired .zip name\`Replace `path to folder` with the path to the existing folder, and then replace `Desired .zip name` with the preferred name for the log export.
-
A ZIP file is output to the chosen location, with your specified reference or filename.
Run remotely and silently using PowerShell
To produce the Config Capture on a remote session, use the PSSession commands as below:
-
Open PowerShell as admin.
-
Run the command below (replace `machine name` with the name of the remote machine).
Enter-PSSession -ComputerName \`machine name\` -
cd to the Endpoint Privilege Management for Windows install location. By default, this is C:\Program Files\Avecto\Privilege Guard Client (include the **'**s in your command).
cd 'C:\Program Files\Avecto\Privilege Guard Client\' -
(Optional). Use the command below to create a new folder on the remote machine, or proceed to step 5 if you already have a folder created on the remote machine. Replace `Chosen Path` with the path you would like the new folder to reside in, and then replace `Chosen Name` with the preferred name for the folder. For example, the case reference number.
$output = New-Item -Path \`Chosen Path\` -Name \`Chosen Name\` -ItemType directory -
Run the capture config script with the command below. Replace `Desired .zip name` with the preferred name for the logs, which is exported to a ZIP file.
If you opted to use a preexisting folder (or did not use the $output variable in the previous command), remove $output and type the path to the existing folder, and the desired name of the log file which is exported to a new ZIP file with that name. See the examples below.
.\EndpointUtility.exe /cc $output \`Desired .zip name\`OR
Replace `Path to folder` with the path to the existing folder, and then replace `Desired .zip name` with the preferred name for the log export.
.\EndpointUtility.exe /cc \`Path to folder\` \`Desired .zip name\`
The screen PowerShell command remains with the cursor "-" for a few minutes while the command is in progress This is normal; do not close the window.
A success message then displays.
- Open File Explorer and navigate to the remote directory you chose in steps 3 and 4, and then copy the ZIP folder to your machine.
Important informationIf you run the command below without first copying the logs, you must re-do this process to collect the logs again.
- (Optional). To remove the logs from the remote machine once you have copied the ZIP file, run the command below.
Remove-Item -Path $output -Force -RecurseFor more information, see KB0016797.
