Identity providers | EPM-L
BeyondTrust Pathfinder supports connecting to your third-party single sign-on applications. Configuring an identity provider allows members of your organization secure and authorized access to BeyondTrust applications, allowing you to centrally manage accounts, passwords, and identity verification in a manner familiar to both your users and security team.
You can use any IdP that supports SAML and single sign-on. We have provided documentation as examples to use as guidance when configuring your IdP.
You must:
- be a Pathfinder administrator to access identity provider features, and
- have Pathfinder and your identity provider dashboard open to complete setup.
Authentication methods
There are only two authentication methods available for SAML (Does not apply to local users)
Method #1: Create a user locally
Users created locally in Pathfinder (Invited) before Single Sign-On (SSO) via SAML is configured; authentication through the Pathfinder URL is immediately available upon SAML setup.
The admin can set user permissions at time of invite.
Method #2: Authentication through SSO provider
Users not pre-provisioned in Pathfinder, initial authentication must be performed through their SSO provider using (IdP Initiated Auth). This process triggers account provisioning in Pathfinder. After the account is created, subsequent logins can be completed directly via the Pathfinder URL, which will forward to their IdP.
For example, for Entra/Azure users, they should navigate to My Apps and open the SAML app for Pathfinder that they've configured to complete the IdP initiated authentication. After this, they should be able to login directly to Pathfinder since the account will have then been created/provisioned.
The second method is particularly suited for large-scale deployments or user onboarding, wherein administrators pre-create all accounts in their IdP. In this scenario, each user will authenticate through the IdP first to provision their account in Pathfinder before logging in through the Pathfinder URL for future access.
If the admin configures default access rules that will reduce admin involvement with SAML user auth.
How SAML authentication works in Pathfinder
When a SAML IdP is configured in Pathfinder, it is associated with a specific domain.
- If a user attempts to log in using an email address that matches this domain, Pathfinder automatically initiates SAML authentication in the background.
- If the domain does not match any configured SAML IdP, Pathfinder defaults to local authentication—provided the user account exists in the system.
Default access rules
Use default access rules to define baseline product or application access for end users upon their initial login via SAML Single Sign-On (SSO). These rules are applied universally across all IdPs configured in your organization and are triggered only during a user's first SAML-based login.
Users can initiate this login either through the Pathfinder login URL or directly from their IdP application portal. In both cases, the default access rules are enforced only during the initial SAML authentication.
To configure default access rules:
- Sign into login.beyondtrust.io.
The BeyondTrust Home page displays. - At the top right of the page, click your site name to display a drop-down menu.
- Select Administration.
The BeyondTrust Pathfinder Administration page opens and displays each available site as a tile. - Go to Administration > Identity & Authentication Providers.
- Expand the default access rules.
- Select a role from list: Standard User or Administrator. Standard users cannot access administration features.
- Select one or more sites and the applications in a site your users must access.
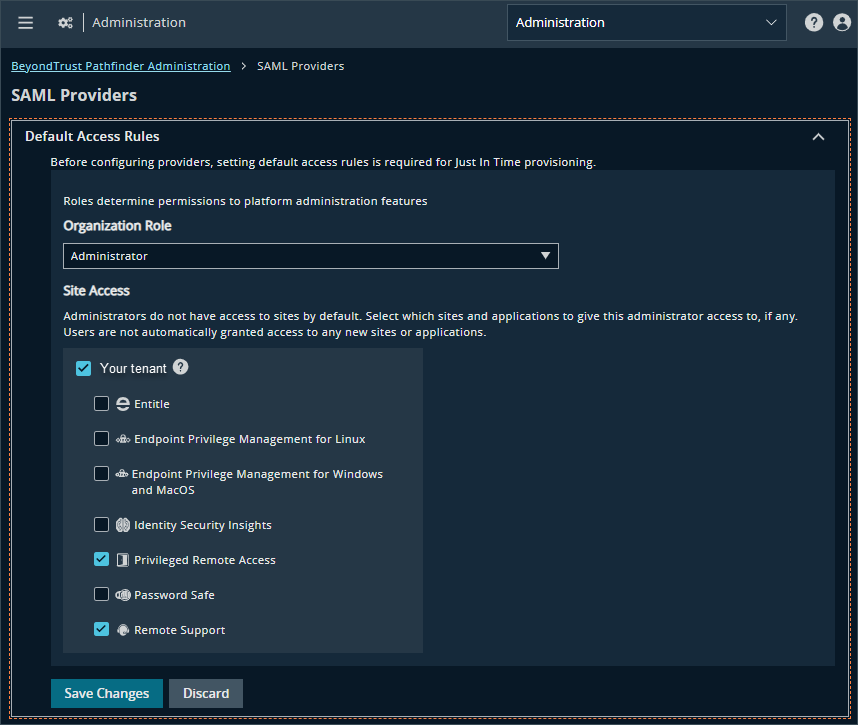
- Click Save Changes.
Configure group claims to use with Pathfinder applications
If your organization is configured to authenticate with a SAML Identity Provider, user groups can be passed. Pathfinder applications can retrieve user groups information from the Identity Provider to use in the applications.
For information on setting up the identity provider, see their respective documentation:
- Microsoft: Add group claims to tokens for SAML applications using SSO configuration
- Okta: Define group attribute statements
How to configure
The identity provider must be configured to provide a SAML assertion called Groups.
The examples below use the group name pws_sso and we are sending that in the claim/assertion so the Pathfinder applications can retrieve user groups information from the Identity Provider.
How to allow multiple groups through a SAML claim
AD groups synced to Azure AD (option #1)
In your identity provider:
To pass all your groups through the claim, in the Group Claims section:
- Select Security groups as the group type to include in the claim.
- Select sAMAccountName from the Source attribute list. If sAMAccountName doesn't work try using Cloud-only group display names.
- Select the Customize the name of the group claim check box and enter groups as the name.
AD groups synced to Azure AD (option #2)
If you use option #2, ensure your groups are added to the SAML application under the Users and groups section in the Azure SAML application.
In your identity provider:
To pass all your groups through the claim, in the Group Claims section:
- Select Groups assigned to the application as the group type to include in the claim.
- Select sAMAccountName from the Source attribute list. If sAMAccountName doesn't work try using Cloud-only group display names.
- Select the Customize the name of the group claim check box and enter groups as the name.
Cloud only groups
Ensure your groups are added to the SAML application under the Users and groups section in the Azure SAML application.
In your identity provider:
To pass all your groups through the claim, in the Group Claims section:
- Select Groups assigned to the application as the group type to include in the claim.
- Select Cloud-only group display names from the Source attribute list.
- Select the Customize the name of the group claim check box and enter groups as the name.
Manually set up an IdP
You can use any IdP that supports SAML and single sign-on. We have provided documentation as examples to use as guidance when configuring your IdP.
Microsoft Entra ID
Important informationWe recommend importing metadata to configure the IdP.
Importing metadata is preferred over manual setup.
Create application in Microsoft Entra ID
To begin adding Microsoft Entra ID as an identity provider, you must create a new application in Microsoft Azure.
- Open Azure and ensure you are logged in as an administrator.
- Use the search box to search for Microsoft Entra ID and select it from the results.
- Select Enterprise applications from the main menu or search.
- Select New application, then Create your own application.
- In the Create your own application panel, provide a human-readable name (e.g., BeyondTrust App), select Integrate any other application you don't find in the gallery (Non-gallery), and click Create.
- You are redirected to the overview page for your new application. From this page, select Set up single sign-on under Manage.
- Choose SAML and then Basic SAML Configuration:
- Click Edit and configure:
- Identifier (Entity ID): The URL of Pathfinder: app.beyondtrust.io.
- Reply URL: A temporary placeholder URL to complete the app creation. This value will be edited with a URL generated by BeyondTrust Pathfinder in a later step.
- Click Edit and configure:
- Click Save.
Add identity provider
To register an identity provider, it must be created in BeyondTrust Pathfinder.
- Sign into login.beyondtrust.io.
The BeyondTrust Home page displays. - At the top right of the page, click your site name to display a drop-down menu.
- Select Administration.
The BeyondTrust Pathfinder Administration page opens and displays each available site as a tile. - Provide the following information in the Add Identity Provider panel:
- Provider Name: The name of your SSO service, or a human-readable name for reference (e.g., Microsoft Entra ID).
- Binding Type: Select Post from the dropdown.
- Domain Name: Your organization’s email domain (e.g., example.com). The Domain Name field is an important part in the SAML authentication process. When a user logs on, the domain specified by the user is validated against the value in this field. If the domains align, the SAML authentication process is initiated. However, if the domains do not match, local authentication takes place, bypassing SAML.
To test settings, leave the Domain Name field blank. See Test IdP Configuration. - Service Provider Entity ID: Pathfinder's URL (app.beyondtrust.io).
Ensure that the Service Provider Entity ID matches the Identifier (Entity ID) configured in your Azure application.
Provide Microsoft credentials
Once you create your Microsoft Azure application, Microsoft Azure generates several values required to complete setup.
- Within the dashboard, open your app configuration from Step 2, if it is not already open (search for Enterprise applications, and click your new app).
- Click Single sign-on for your new BeyondTrust app.
- Under SAML Certificates, click Download beside Federation Metadata XML.
- Open the XML file and provide the following values to the Add Identity Provider panel (opened in Step 1):
- Copy the entityID from the top line of the document, and paste the value into the Identity Provider Entity ID field.
- Copy the encoded certificate between the tags of the document, and paste the certificate into the tab labeled Certificate 1.
- Close the XML document.
- In your Azure app configuration, under Set up for your application, copy the Login URL. On the Add Identity Provider panel, paste the Login URL value into the field labeled Identity Provider Sign-On URL.
- On the Add Identity Provider panel, click Add Identity Provider.
Update Azure single sign-on URL
The application now generates a unique single sign-on URL to use with Microsoft Azure. To provide this URL to Microsoft Azure, follow the below steps:
-
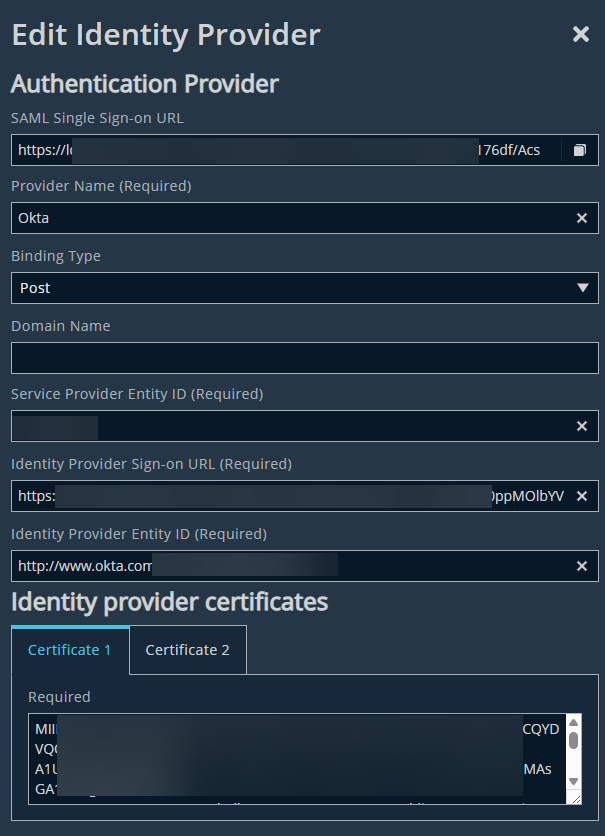
In the Identity & Authentication Providers dashboard, click Actions to the right of your newly configured identity provider and select Edit Provider.
-
Copy the SAML Single Sign-On URL.
The field, SAML Single Sign-On URL, only displays after the initial save of the identity provider. The value in the field is an auto-generated URL and is used as the Redirect URL or Reply URL for your SAML application.
-
In your Azure app configuration (in Azure, search for Enterprise applications, and click your new BeyondTrust app), select Edit under Basic SAML Configuration.
Reply URL: Remove your placeholder single sign-on URL value, and paste the value generated by BeyondTrust Pathfinder.
-
Click Save.
Okta
Important informationWe recommend importing metadata to configure the IdP.
Importing metadata is preferred over manual setup.
Create application in Okta
To begin adding Okta as an identity provider, you must create a new application for your BeyondTrust app in Okta.
- Open your Okta tenant dashboard and ensure you are logged in as an administrator.
- Navigate to Applications > Applications and click Create App Integration.
- Select SAML 2.0 and click Next.
- Enter a human-readable app name, such as BeyondTrust App, and then click Next.
- In the Configure SAML step, provide the following information:
- Single sign-on URL: A temporary placeholder URL to complete the app creation. This value will be edited with a URL generated by BeyondTrust Pathfinder in a later step.
- Audience Restriction/URI: app.beyondtrust.io
- Name ID Format: Select EmailAddress.
- Application Username: Select Okta username.
- Click Next when complete.
- Select your customer type on the Feedback screen, and then click Finish.
Add identity provider in BeyondTrust Pathfinder
To register an identity provider, it must be created in BeyondTrust Pathfinder.
- Sign into login.beyondtrust.io.
The BeyondTrust Home page displays. - At the top right of the page, click your site name to display a drop-down menu.
- Select Administration.
The BeyondTrust Pathfinder Administration page opens and displays each available site as a tile. - Provide the following information in the Add Identity Provider panel:
- Provider Name: The name of your SSO service, or a human-readable name for reference (e.g., Okta).
- Binding Type: Select Post from the dropdown.
- Domain Name: Your organization’s email domain (e.g., example.com). The Domain Name field is an important part in the SAML authentication process. When a user logs on, the domain specified by the user is validated against the value in this field. If the domains align, the SAML authentication process is initiated. However, if the domains do not match, local authentication takes place, bypassing SAML.
To test settings, leave the Domain Name field blank. See Test IdP Configuration. - Service Provider Entity ID: Configured as app.beyondtrust.io. Ensure that the Service Provider Entity ID matches the Audience URI configured in your Okta application (app.beyondtrust.io).
- Paste the Okta Identity Provider Single Sign-On URL into the BeyondTrust Pathfinder Identity Provider Sign-On URL field.
- Paste the Okta Identity Provider Issuer value into the BeyondTrust Pathfinder Identity Provider Entity ID field.
- Create your name claim using the following information:
- http://schemas.xmlsoap.org/ws/2005/05/identity/claims/givenname
The Value is user.firstName - http://schemas.xmlsoap.org/ws/2005/05/identity/claims/surname
The Value is user.lastName
- http://schemas.xmlsoap.org/ws/2005/05/identity/claims/givenname
When adding the group attribute, use the following settings in the section Group Attribute Statements (optional):
Name: Groups (must be plural)
Name format: Unspecified
Filter: Matches regex with the value .*
- In Okta, copy the certificate encoding between the text BEGIN CERTIFICATE and END CERTIFICATE, and paste the certificate into the BeyondTrust Pathfinder tab labeled Certificate 1.
Connect Okta to Pathfinder
Once your Okta application is created, Okta generates several values required to complete setup.
- In your Okta dashboard, navigate to Applications > Applications and select your new BeyondTrust app from the list.
- In the Sign On tab, click View SAML setup instructions on the right side.
- Okta displays a list of items required to finish configuration. The items must be copied from the Okta dashboard and pasted into the BeyondTrust Pathfinder Add Identity Provider panel (opened in Step 1).
- In the BeyondTrust Pathfinder Add Identity Provider panel, click Save Settings.
Update Okta single sign-on URL
BeyondTrust Pathfinder now generates a unique single sign-on URL to use with Okta. To provide this URL to Okta, follow the below steps:
-
Within the Identity & Authentication Providers page in the BeyondTrust Pathfinder dashboard, click Actions to the right of your newly configured identity provider and select Edit.
Copy the SAML Single Sign-On URL.
The field, SAML Single Sign-On URL, only displays after the initial save of the identity provider. The value in the field is an auto-generated URL and is used as the Redirect URL or Reply URL for your SAML application.
-
In your Okta dashboard, navigate to Applications > Applications and select your newly configured BeyondTrust app.
- Under General > SAML Settings, click Edit.
- In the General Settings tab, click Next.
- In the Configure SAML tab, remove your placeholder single sign-on URL value, and paste the value generated by BeyondTrust Pathfinder.
-
Click Next, and then click Finish to save your changes.
PingOne
Important informationWe recommend importing metadata to configure the IdP.
Importing metadata is preferred over manual setup.
Create application in PingOne
To begin adding PingOne as an identity provider, you must create a new application for BeyondTrust Pathfinder within PingOne.
- Open your PingOne console and ensure you are logged in as an administrator.
- Select the environment you would like to configure BeyondTrust Pathfinder for, and then navigate to Connections > Applications.
- Click the plus sign beside Applications to create a new application.
- In the Add Application panel, provide a human-readable name (e.g., BeyondTrust App), a useful description, and click Configure.
- In the following SAML Configuration page, under Provide Application Metadata, select Manually Enter and provide the following information:
- ACS URLs: A temporary placeholder URL to complete the app creation. This value will be edited with a URL generated by BeyondTrust Pathfinder in a later step.
- Entity ID: A unique identifier for your IDP (e.g., ping).
- Click Save.
Add identity provider in BeyondTrust Pathfinder
To register an identity provider for use with BeyondTrust Pathfinder, it must be created in BeyondTrust Pathfinder.
- Sign into login.beyondtrust.io.
The BeyondTrust Home page displays. - At the top right of the page, click your site name to display a drop-down menu.
- Select Administration.
The BeyondTrust Pathfinder Administration page opens and displays each available site as a tile. - Provide the following information in the Add Identity Provider panel:
- Provider Name: The name of your SSO service, or a human-readable name for reference (e.g., PingOne).
- Binding Type: Select Post from the dropdown.
- Domain Name: Your organization’s email domain (e.g., example.com). The Domain Name field is an important part in the SAML authentication process. When a user logs on, the domain specified by the user is validated against the value in this field. If the domains align, the SAML authentication process is initiated. However, if the domains do not match, local authentication takes place, bypassing SAML.
To test settings, leave the Domain Name field blank. See Test IdP Configuration. - Service Provider Entity ID: The unique Entity ID assigned in the previous step.
Ensure that the Service Provider Entity ID matches the Entity ID configured in your Ping application.
Provide PingOne credentials
Once your PingOne application is created, PingOne generates several values required to complete setup.
- Within the PingOne dashboard, open your app configuration from Step 2 if it is not already open (navigate to Connections > Application and click your new BeyondTrust app), and then click the Overview tab.
- Copy the Single Signon Service URL. Within the BeyondTrust Pathfinder Add Identity Provider panel, paste the Single Signon Service URL value into the field labeled Identity Provider Sign-On URL.
- Copy the Issuer ID. Within the BeyondTrust Pathfinder Add Identity Provider panel, paste the Issuer ID value into the field labeled Identity Provider Entity ID.
- Click Download Signing Certificate and open the certificate file in a program such as Notepad++.
- Copy the text between -----BEGIN CERTIFICATE----- and -----END CERTIFICATE----- and paste the value into the field labeled Certificate 1.
- Within the BeyondTrust Pathfinder Add Identity Provider panel, click Save Settings.
Update PingOne configuration
Update the ACS URL
BeyondTrust Pathfinder now generates a unique single sign-on URL to use with PingOne. To provide this URL to PingOne, follow the below steps:
- Within the Identity & Authentication Providers dashboard in BeyondTrust Pathfinder, click Actions to the right of your newly configured identity provider and select Edit.
- Copy the SAML Single Sign-On URL.
The field, SAML Single Sign-On URL, only displays after the initial save of the identity provider. The value in the field is an auto-generated URL and is used as the Redirect URL or Reply URL for your SAML application.
- In your PingOne application (in PingOne, navigate to Connections > Application and click your new BeyondTrust app), select Configuration.
- Click the pencil in the top right of the configuration menu and edit the following values:
- ACS URL: Remove the placeholder value, and paste the SAML Single Sign-On URL generated by BeyondTrust Pathfinder.
- Click Save.
Update mapped attributes
- Click on Attribute Mappings.
- Click the pencil in the top right of the configuration menu and edit the following values:
- saml_subject: Ensure this is set to Username.
- userName: Ensure this is set to Username.
- Click Save.
Test IdP configuration
To test IdP configuration before enforcing SAML authentication with your organization's email domain, set up IdP without adding the domain.
This test assumes the organization admin is using a local account and is configuring a SAML IDP to enable authentication with an external IDP for authentication to Pathfinder and/or SSO into Pathfinder.
Important informationIf there is more than one domainless IdP configuration, local login is not available and you cannot safely test the new IdP configuration.
High-level steps
- In Pathfinder, create the IdP without adding a domain.
When a domain is not added, the Pathfinder logon page prompts you to login by IdP instance or local account.
- Log off Pathfinder.
- Login with an account that IdP controls and select the newly configured IdP from the dropdown to authenticate. For example, use the admin account you want to use for the IdP authentication.
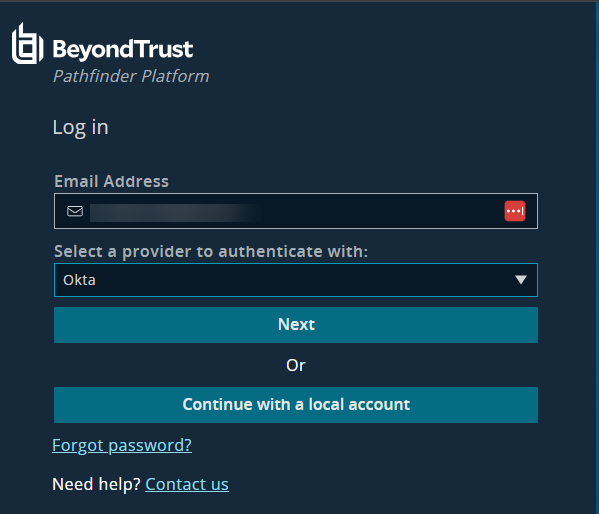
- You are redirected to authenticate with the IdP.
- Did authentication with the IdP succeed?
- Yes
Update the IdP configuration and specify the domain of the admin user’s email to enforce authentication of that domain with the configured IdP. - No
- Log on to Pathfinder again (app.beyondtrust.io) and select Continue with a local account.
- Adjust IdP configuration (in Pathfinder and/or the IdP application), and test again.
- Yes
Invite organization users
Once your identity provider is configured in BeyondTrust Pathfinder, invite users on the User Management page.
For more information, see the Manage users guide.
Edit an Identity Provider
To edit an Identity Provider:
- Sign into login.beyondtrust.io.
The BeyondTrust Home page displays. - At the top right of the page, click your site name to display a drop-down menu.
- Select Administration.
The BeyondTrust Platform Administration page displays. - From the top left of the page, click
 > Administration > Identity & Authentication Providers.
The SAML Providers page displays. - For the Identity Provider you want to edit, click
 > Edit Provider.
 - Make your changes, and then click Save Changes.
Delete an Identity Provider
-
Sign into login.beyondtrust.io.
The BeyondTrust Home page displays. -
At the top right of the page, click your site name to display a drop-down menu.
-
Select Administration.
The BeyondTrust Platform Administration page displays. -
From the top left of the page, click
> Administration > Identity & Authentication Providers.
The SAML Providers page displays. -
For the Identity Provider you want to remove, click
> Delete Provider. -
The following confirmation dialog displays:
![A confirmation box reads, "Confirm Provider Deletion. Are you sure you want to delete [server name]? This action cannot be undone." A text box has the word "delete" typed in. Two buttons are available: Delete and Discard.](https://files.readme.io/d755d4278a11f4ac4d21786374283b1e5bd1bf3bc5f43188d39b0113127cc523-ConfirmationDelete_ServiceProvider.png)
- In the textbox, type "delete".
- Click Delete.
Updated 4 months ago
