Schedule groups | EPM-L
What is the Schedule groups feature?
Use the Schedule groups feature to schedule when to apply your roles to your endpoints.
Schedule types
When adding a schedule, you can create two types:
- Fixed Schedule: Choose a specific date range.
- If you do not specify the end date, the range defaults to continuous.
- If you do not specify the start date, the schedule begins immediately.
- Recurring Schedule: Choose a range of 15 minute blocks per day within a full calendar week.
Add a new recurring schedule
- Sign into app.beyondtrust.io.
The BeyondTrust Home page displays. - Click
 > Endpoint Privilege Management for Linux > Policy.
The Role Based Policy page displays. - Click the When tile.
The Schedule Groups page displays.
- Click Add Schedule Group.
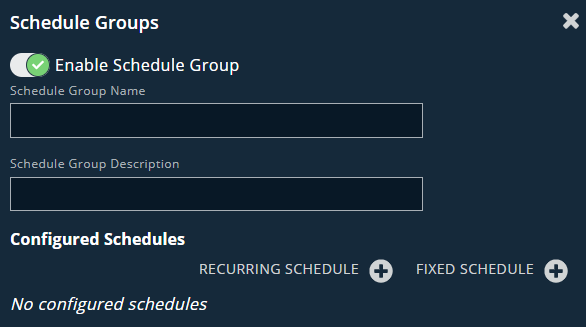
The Schedule Groups panel displays.

- Optionally, if you do not want the schedule active upon save, select Enable Schedule Group to switch the schedule off.
Important informationBy default, schedules are enabled. To save a schedule in draft form for editing later, ensure you turn off the schedule prior to saving.
- Enter a Schedule Group name.
- Enter a Schedule Group description.
- Click Recurring Schedule.
A calendar displays, with a column for each day of the week (Sunday - Saturday), and each column with 15-minute blocks of time. - Double-click any block.
The Event dialog displays. - Either select All Day to continuously run the schedule throughout the day, or set the Start and End times.
- If you do not set the end date, the range defaults to continuous.
- If you do not set the start date, the schedule begins immediately.
- Click Save.
The Event dialog closes and the block saves. - If you are adding individual blocks of time, continue adding them until your schedule is complete.
- Click Save.
The recurring schedule saves and displays in the list on the Schedule Groups page.
Add a new fixed schedule
- Sign into app.beyondtrust.io.
The BeyondTrust Home page displays. - Click
 > Endpoint Privilege Management for Linux > Policy.
The Role Based Policy page displays. - Click the When tile.
The Schedule Groups page displays.
- Click Add Schedule Group.
The Schedule Groups panel displays. - Optionally, if you do not want the schedule active upon save, select Disable Schedule Group to disable it.
- Enter a Schedule Group name.
- Enter a Schedule Group description.
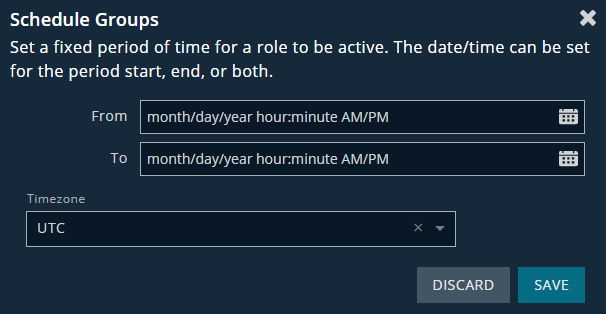
- Click Fixed Schedule.

- To the right of the From line, click
 to open the calendar.
 - Select a start date and a start time.
- Click Set.
The calendar closes. - To the right of the To line, click
 to open the calendar.
 - Select a start date and start time.
- Click Set.
The calendar closes. - Select a time zone from the Timezone drop-down list.
- Click Save.
The fixed schedule saves and displays in the list on the Schedule Groups page.
View a schedule
- Sign into app.beyondtrust.io.
The BeyondTrust Home page displays. - Click
 > Endpoint Privilege Management for Linux > Policy.
The Role Based Policy page displays. - Click the When tile.
The Schedule Groups page displays.
- Locate the schedule you wish to view in the list.
- Click the schedule name.
The Schedule Groups panel displays. - Click the schedule to view the scheduled times.
The schedule displays as the names of the scheduled days of the week.
Edit a draft schedule
Important information
- You can only edit disabled schedules.
- Once you enable a schedule, you can no longer edit it.
- You can only delete an enabled schedule, then create a new one.
- Sign into app.beyondtrust.io.
The BeyondTrust Home page displays. - Click
 > Endpoint Privilege Management for Linux > Policy.
The Role Based Policy page displays. - Click the When tile.
The Schedule Groups page displays.
- Locate the schedule in the list.
- Click the schedule name.
The Schedule Groups panel displays. - Click the schedule to open the calendar.
The schedule displays as the names of the currently-scheduled days of the week.
- Modify the schedule as detailed in the Add a new recurring schedule or Add a new fixed schedule procedures.
- Click Save.
This saves the time blocks. - Optionally, if you're ready to enable the schedule, select Enable Schedule. If you want to keep the schedule in draft mode, ensure this toggle is off.
- Click Save.
The schedule saves and, if enabled, begins to run as configured.
Delete a schedule
WARNINGDeleting a schedule is an unrecoverable operation.
- Sign into app.beyondtrust.io.
The BeyondTrust Home page displays. - Click
 > Endpoint Privilege Management for Linux > Policy.
The Role Based Policy page displays. - Click the When tile.
The Schedule Groups page displays.
- Locate the schedule in the list.
- Click the schedule name.
The Schedule Groups panel displays. - Click Delete.
A confirmation message displays. - Click OK.
The schedule immediately stops running and is deleted from EPM for Linux.
Updated about 1 month ago
