SIEM connections | EPM-L
What are SIEM connections?
A SIEM connection refers to the relationship or integration between a Security Information and Event Management (SIEM) system and the endpoints in your network.
How are they useful to my organization?
SIEM connections provide a centralized and automated way to monitor, detect, analyze, and respond to security threats across your network.
Add a Splunk Cloud SIEM connection
Use Splunk Cloud and Splunk Enterprise with EPM Cloud for Linux to read data from EPM-L, including event log and I/O logs.
Two Splunk indexes are provided in this implementation:
- beyondtrust-epml-ecs-eventlog for event logs
- beyondtrust-epml-ecs-iolog for IO logs
The index names cannot be changed.
Prerequisites
- Splunk Cloud instance
- Allowlist the Splunk Cloud search-api to use the unified search feature. The Splunk Cloud search-api allowlist requires an entry of 0.0.0.0/0. In your Splunk Cloud instance, go to Configure IP allow lists using Splunk Web.
Connect to Splunk without a SIEM connection
Adding Splunk connectivity via a SIEM connection requires Splunk permissions to create the indexes and HTTP Event Collector (HEC) token within Splunk from EPM-L.
The workaround, which is the best practice, is for the Splunk administrator to create the indexes and HEC token prior to their use in EPM-L. This method has two minor drawbacks:
- The user must obtain the HEC token.
- The EPM-L Unified Search feature requires a SIEM connection. As an alternative to the Unified Search, you can use raw Splunk queries to search event log and IO log data.
To connect with Splunk without the SIEM connection:
- In the Splunk Cloud UI, retrieve the HEC token from the Settings > Data Inputs > HTTP Event Collector page.
- On the HTTP Event Collector page, locate your HEC (for example, beyondtrust-epml-ecs-collector) and click Copy to copy the HEC token to the clipboard. Enter the token, along with other necessary information, into standard EPM-L settings.
- Go to EPM-L, select Editor View and navigate to the Splunk-related settings, as shown:
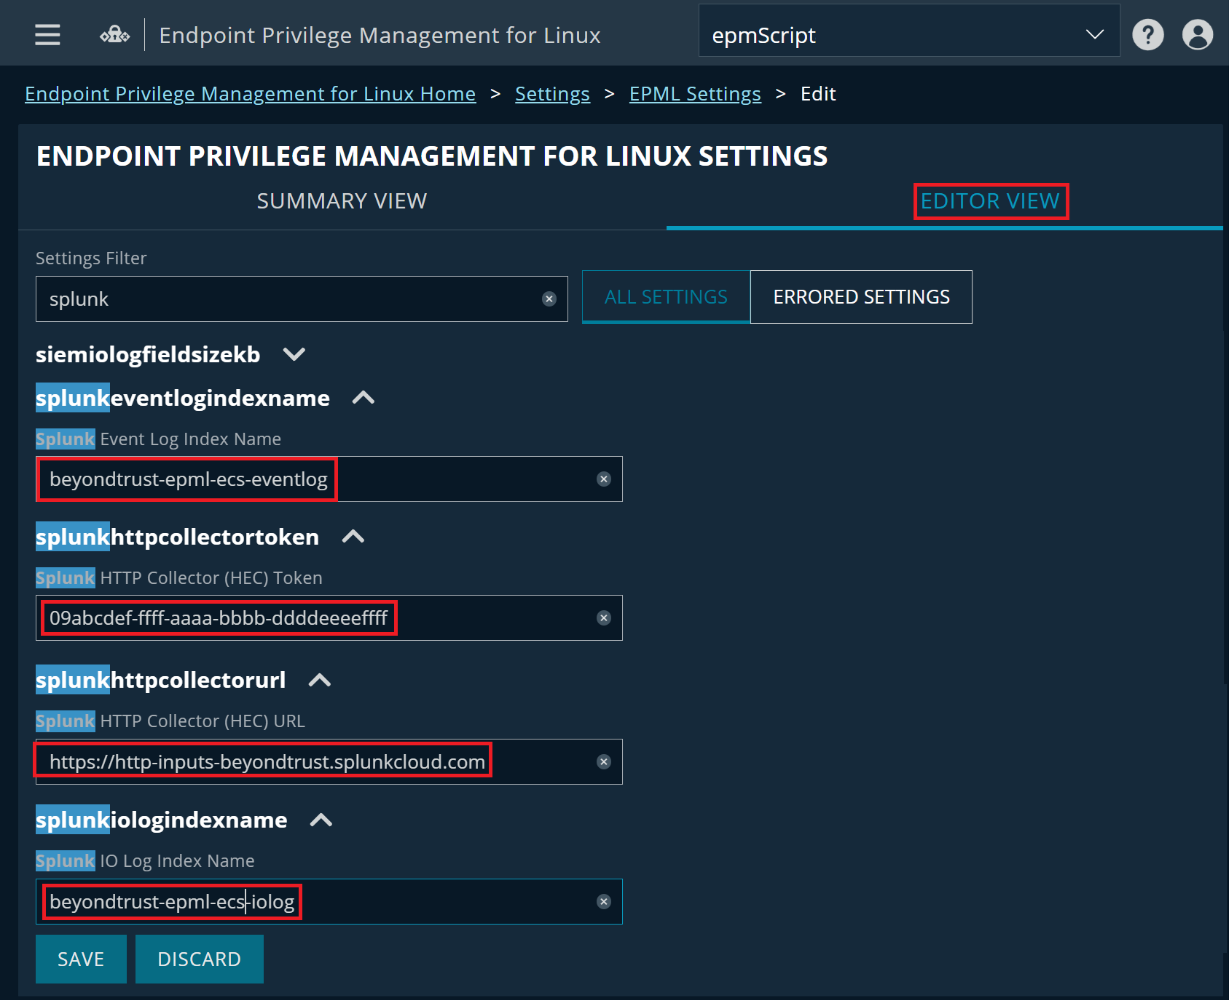
- Copy the HEC token into splunkhttpcollectortoken, and enter appropriate values for splunkeventlogindexname, splunkiologindexname and splunkhttpcollectorurl.
The splunkhttpcollectorurl uses the form https://http-inputs-{_stack_}.splunkcloud.com, where {_stack_} should be replaced with the name of your stack, e.g., beyondtrust as above, or your company name. - Click Save to validate the settings and send them to EPM-L.
A message displays if any Splunk values provided are invalid. Confirm and reenter settings and save again.
While the above assumes events and IO logs will be sent to Splunk, it is also possible to deliver events without IO logs.
To do this, leave the splunkiologindexname field blank, and ensure the siemdatatypes setting does not include iologs as an option.
If you prefer using the SIEM connection, then proceed to the next section. Otherwise, your EPM-L system should be configured to deliver events and (if desired) IO logs to Splunk.
Add Splunk connection details
- Sign into app.beyondtrust.io.
The BeyondTrust Home page displays. - Click
 > Endpoint Privilege Management for Linux > SIEM Connections.
The SIEM Connections page displays. - In the SIEM Connections panel, click Add Connection.
The Create New SIEM Connection page displays. - On the Create New SIEM Connection page, select Splunk or Splunk Cloud from the SIEM Connection Type drop-down list.
- Add the name and URL for the Splunk instance.
- Optionally, select the option to Verify certificate.
Select this option if using an unknown signer (for example, if a self-signed certificate is in use). - Expand Splunk Connection Details and add the credentials to authenticate to the Splunk instance.
- Click Test Settings.
- If the test is successful, click Save SIEM Connection.
If the test is unsuccessful, check your settings and try again.
Edit a SIEM connection
- Sign into app.beyondtrust.io.
The BeyondTrust Home page displays. - Click > Endpoint Privilege Management for Linux > SIEM Connections.
The SIEM Connections page displays. - Locate your configured SIEM connection from the list.
- Click the SIEM connection name.
The Edit SIEM Connection page displays. - Modify the connection Name, URL, certificate verification check, and any of the connection details.
- Click Test Settings.
- If the test is successful, click Save SIEM Connection.
If the test is unsuccessful, check your settings and try again.
Delete a SIEM connection
WARNINGDeleting a SIEM connection is an unrecoverable operation.
- Sign into app.beyondtrust.io.
The BeyondTrust Home page displays. - Click > Endpoint Privilege Management for Linux > SIEM Connections.
The SIEM Connections page displays. - Locate your configured SIEM connection from the list.
- Click the SIEM connection name.
The Edit SIEM Connection page displays. - Click Delete.
A confirmation message displays. - Click OK.
The connection is deleted.
