Support Teams | RS Pathfinder
What are support teams?
Support teams are groups of representatives organized to improve efficiency by assigning leadership roles and directing customers to the most suitable representatives.
How are they useful to my organization?
Support teams enhance productivity by streamlining support session management, organizing representatives into focused groups, and displaying each team as a distinct queue in the representative console for better customer routing.
How do I access the Support Teams page?
- Sign into app.beyondtrust.io.
The BeyondTrust Home page displays. - From the left menu, click Remote Support > Configuration.
The Configuration page opens and the Options page displays by default. - At the top of the page, click Support Teams.
The Support Teams page displays.
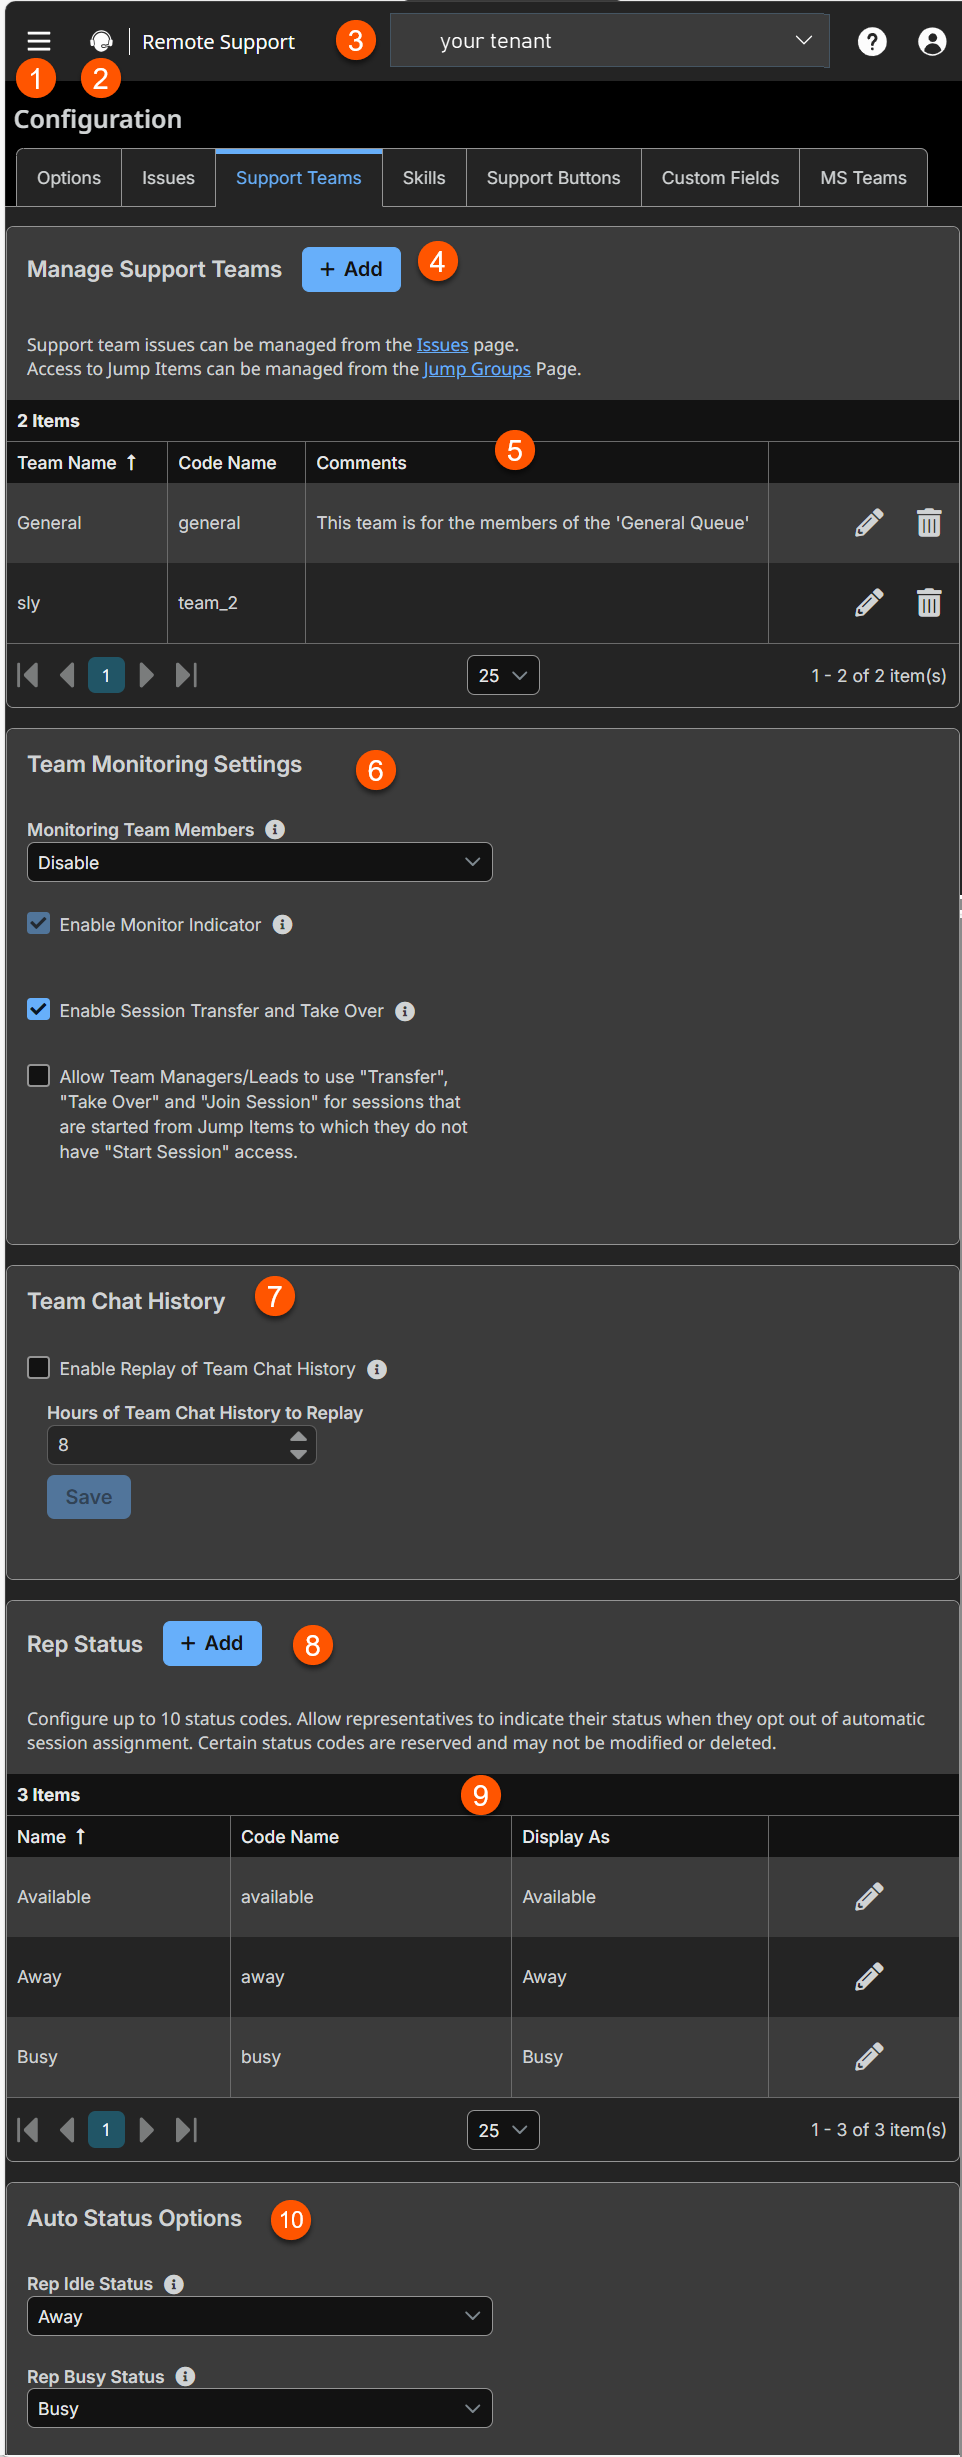
The Support Teams page
-
Add: Adds a new support team
-
Support Team columns: List of Support Team columns.
Issues columns
- Team Name: Unique name of the team.
- Code Name: Set a code name. If not provide, one is automatically assigned.
- Comments: Enter notes about the team.
-
Team Monitoring Settings:
-
Team Chat History:
-
Rep Status: Adds a new status code.
-
Rep Status columns: List of Rep Status columns.
Rep Status columns
- Name: Unique name of the status code.
- Code Name: Set a code name. If not provide, one is automatically assigned.
- Display As: Set the issue priority.
-
Auto Status Options: Set Rep status options.
Manage your support teams
Add a support team
- Navigate to the Support Teams page, and click Add.
- Enter a unique Team Name.
- Optionally, enter a Code Name.
Code names are used for integrations. If you do not set a code name, one is created automatically. - Optionally, enter comments to describe the team.
- Optionally, enable Persistent Queue.
- When checked, support sessions remain in this queue even if no representatives are available.
- A session in this queue remains indefinite until a representative or API operation handles the session.
- This option provides additional flexibility for custom session routing management.
- Optionally, click Group Policies to create or edit group policies you want associated with this team.
- Select your team's portal access:
- Allow members of the selected team access to all portals: Grant all members of your team access to your Remote Support portals.
- Allow members of this team to access the following portals:: Grant all members of your team access to specific portals.
- We recommend that you grant your team members access to the default portal.
- Unchecked portals do not appear on the list of portal options when the representative generates a session key.
- Optionally, add team members.
- Optionally, create your equilibrium settings:
- Routing algorithm: If this is set to Least Busy, a session in this queue is assigned to the least busy representative who is available to take sessions from this queue. If it is set to Skills Match, Least Busy, then if a session has needed skills marked and is in this queue, that session is assigned to the representative with the best skills match who is available to take sessions from this queue.
- Alert timeout: A representative has as long as is set here to either accept or reject an assigned session. Suppose the representative rejects the session or fails to respond before the timeout. In that case, the session will be reassigned to the next best-matched representative available to take sessions from this queue.
- Waiting session rule: If enabled, set how long a session is allowed to remain in this queue. Then choose the action to take if the session waits for longer than the set time. You can either transfer the session to an overflow queue, or you can mark the session as overdue. A session that becomes overdue plays an audio alert, flashes in the queue, causes the queue itself to flash, and displays a pop-up notification. These notifications can be modified in the representative console settings.
For more information, please see Equilibrium guide.
- Click Save.
The team saves and displays in your Manage Support Teams list on the Support Teams page.
Add one or more team members to a support team
In the Team Members table, view existing team members. You can filter the view by entering a string in the Filter by name text box. You can also edit a member's settings or delete a member from the team.
- From the left menu, click Configuration.
The Options page opens and displays by default. - At the top of the page, click Support Teams.
The Support Teams page displays. - Click the Edit icon next to the support team you wish to edit.
The Edit Team page displays. - In the New Member Name search for the user to add.
- Select the member’s role from the New Member Role dropdown. These roles play a significant part in the Dashboard feature of the representative console:
- Team Member
- Team Lead
- Team Manager
To add a group of users to a team, go to Users & Security > Group Policies and assign that group to one or more teams in a given role.
You may see some users whose Edit and Delete options are disabled. This occurs when a user is added via group policy.
You can click the group policy link to modify the policy as a whole. Any changes made to the group policy apply to all members of that policy.
You also can add the individual to the team, overriding their settings as defined elsewhere.
Edit a support team
- Go to Configuration > Support Teams.
- Click the Edit icon next to the support team you wish to edit.
The Edit Team page displays. - The Edit Team page's content is identical to the Add Team page.
- Click Save.
The support team save.
Delete a support team
- Go to Configuration > Support Teams.
- Click the Delete icon next to the support team you wish to delete.
- Click Yes.
Team Monitoring
What is team monitoring?
Team monitoring is the ability of team leads or managers to monitor team members from the dashboard.
How is team monitoring useful?
Team monitoring allows users to effectively administer teams on this site and their members. Within a team, a user can administrate only others with roles lower than their own.
Roles apply strictly on a team-by-team basis, so a user may be able to administrate another user in one team, but not be able to administer that same user in another team.
Configure team monitoring
- Select an option from the Monitoring Team Members dropdown:
- Disable: Disables the ability to monitor,
- Only Representative Console: Restricts monitoring to only the representative console.
- Entire Screen:. Allows a team lead or manager to monitor a team member's entire screen.
Monitoring affects team leads and managers for all teams on the site.
- Select or deselect the Enable Session Transfer and Take Over checkbox.
If this option is checked, a team lead can take over or transfer a team member’s sessions. Similarly, a team manager can administrate both team members and team leads. The team lead must have start session access to the Jump Item that was used to create the session unless the option below is also checked.
- Select or deselect the Enable Monitor Indicator checkbox.
If this option is checked, a team member whose screen is being monitored sees a monitoring icon on their screen.
- Select or deselect the Allow or disallow team managers/leads to use "Transfer", "Take Over" and "Join Session" for sessions started from Jump Items checkbox.
If this option is checked, a team lead can join or take over a team member's sessions, even if the team lead does not have start session access to the Jump Item that was used to create the session.
For more information, please see Dashboard.
Team chat history
What is team chat history?
Team chat history is the ability to preserve chat messages to everyone in the team chat area between representative console logins.
How is team chat history useful?
Team chat history allows the representative console logins to refer back to any previous messages or historical knowledge that can improve their support's efficiency and quality.
Enable or disable the replay of team chat history
If this option is checked, chat messages to everyone in the Team Chat area of the representative console persist between representative console logins.
This prevents the loss of chat history if the connection is lost. This does not affect chat within a session, or private chats.
Hours of team chat history to replay
By default, 8 hours of history is retained. This can be changed from a minimum of 1 to a maximum of 24, using the + and - icons or entering the desired value. The time is set in one-hour increments. Click Save after changing the time.
A maximum of 1000 chat messages is replayed. This limit applies regardless of the number of hours selected.
Rep Status
What is rep status?
Rep status allows representatives to indicate their status when they opt out of automatic session assignments.
How is rep status useful?
Rep status indication increases transparency and functionality among team members and managers.
When representatives change their status, the new status displays in the representative console dashboard for all team managers. Representative status changes are also logged in the Team Activity Report.
Add a custom rep status
- Under Rep Status, click + Add.
The Add Rep Status Code page displays. - Insert a unique Display Name.
- Optionally, insert a unique Code Name. If you do not set a code name, one is created automatically.
- Under Display As, select one of two options of predefined status codes, Away or Busy.
- Click Save.
Edit a custom rep status
- Click the Edit icon next to the Rep status you wish to edit.
The Edit Rep Status Code page displays. - The Edit Rep Status Code page's content is identical to the Add Rep Status page.
Important info
There are 3 predefined status codes: Available, Away, and Busy.
- The Available status code may not be modified or deleted.
- The Away and Busy status codes may be modified but not deleted.
- Click Save.
The Rep Status saves.
Delete a custom rep status
- Click the trash icon next to the Rep Status team you wish to delete.
- Click Yes.
Auto status options
What are Auto status options?
Auto status options are default statuses that display when a representative is either "idle" or "busy" and has not changed their status manually.
How are Auto status options useful?
Auto status options improve transparency and functionality among team members and managers by fixing the true status of the representative automatically.
- Set your rep "idle" status: Specify a status to automatically set when the representative is idle.
- Set your rep "busy" status: Specify a status to automatically set when the representative is busy.
