DESKTOP REPRESENTATIVE CONSOLE USER GUIDE | RS for Desktop
What is the Desktop Representative console?
The Desktop Representative console is the Remote Support desktop client. Use it to support your customers remotely by connecting to them through the B Series Appliance.
How do I access the Desktop Representative console?
Once installed on your machine, locate the Representative Console application and sign in with your credentials.
Quick steps to get started in the console
View quick steps
- Starting sessions: How to connect to remote endpoints
- Jump interface: How to start a session with an unattended system
- Support session toolset: How to perform actions in a support session
- Representative collaboration: How to collaborate with other representatives
Installation
In any web browser, go to the URL of your B Series Appliance followed by /login and enter the username and password set by your administrator. You may be prompted to change your password the first time you log in.
From the My Account page, download and install the BeyondTrust representative console. The option will default to the appropriate installer for your operating system.
On a Linux system, you must save the file to your computer and then open it from its downloaded location. Do not use the Open link that appears after downloading a file from some browsers.
When the installation wizard appears, follow the instructions to install the software. After installing the representative console, you can choose Run Representative Console Now and Run at Startup, and then click Finish.
If you choose Run Representative Console Now during installation, a login prompt will appear on your screen.
Login
After installing the BeyondTrust representative console, launch the console from its directory location as defined during installation.
By default, in Windows, you can access the console from Start Menu > All Programs > BeyondTrust > support.example.com, where support.example.com is the hostname of the site from which you downloaded the console.
If the Login Agreement has been enabled, you must click Accept to proceed.
For more information on how to set up, enable or disable this feature, please see Site configuration.
At the prompt, enter your username and password.
If two-factor authentication is enabled for your account, enter the code from the authenticator app.
If more than one language is enabled for your site, select the language you want to use from the dropdown menu.
Use passwordless login
FIDO2-certified authenticators can be used to securely log in to the desktop representative console, web rep console, and the /login administrative interface without entering your password. You can register up to 10 authenticators.
If passwordless login has been enabled, Authenticate Using may default to Passwordless FIDO2, or it can be selected. The exact process for passwordless login depends on the type of device and manufacturer.
You can enable passwordless login and set the default authentication after logging into the /login administrative interface, by navigating to Management > Security, and then registering passwordless authenticators at My Account > Security.
Passwordless login for the desktop representative console on macOS or Linux systems is supported only for roaming authenticators (such as the YubiKey hardware security keys). Platform or integrated authenticators (such as Face ID and fingerprint scanners) are not supported for the desktop desktop representative console login when using macOS or Linux systems.
Use Kerberos server
If your administrator has configured a Kerberos server to enable single sign-on, you can log in to the console without entering your credentials. The representative console remembers the last used login mechanism, whether it used local credentials, Kerberos, or another security provider.
Invited users can also enter a session key to join a shared session on a one-time basis.
Check Remember my login information to have the console save your username and password. This option can be enabled or disabled from /login > Management > Security.
If you have multiple languages enabled for your site, select the language you wish to use from the dropdown beside the globe icon. If you wish to change the selected language after logging in, you must log back out to choose another language.
Once you log in, the console will open, and a BeyondTrust icon will appear in your computer’s system tray. If you close the console but remain logged in, you can reopen the window by double-clicking the system tray icon or by right-clicking the icon and selecting Show Window.
Your administrator might require you to be on an unrestricted network to log in to the console. This network restriction might apply only the first time you log in or every time. This restriction does not apply to rep invites.
If you lose your connection, the representative console attempts to reconnect for 60 seconds. If your connection is restored within this time, your representative console reopens, restoring all of your open sessions. If the connection cannot be restored within this time, your sessions fall back according to the rules set on /login > Configuration > Options, and you are prompted to retry login or quit.
If you are logged into the representative console in one location and then log in from another, your open sessions are maintained.
To log in with an account already in use and forcibly close the connection on the other system, the setting Terminate Session If Account Is In Use must be checked on the /login > Management > Security page.
After an upgrade or at first launch of the desktop representative console, a What's New dialog appears automatically upon login for all non-invited representatives. This dialog may be viewed at any time through Help > What's New and shows new release information for current and past releases. This is a roaming preference per account, so the dialog appears just once regardless where a representative signs in from.
NoteFor more information about invited users, please see Rep invite.
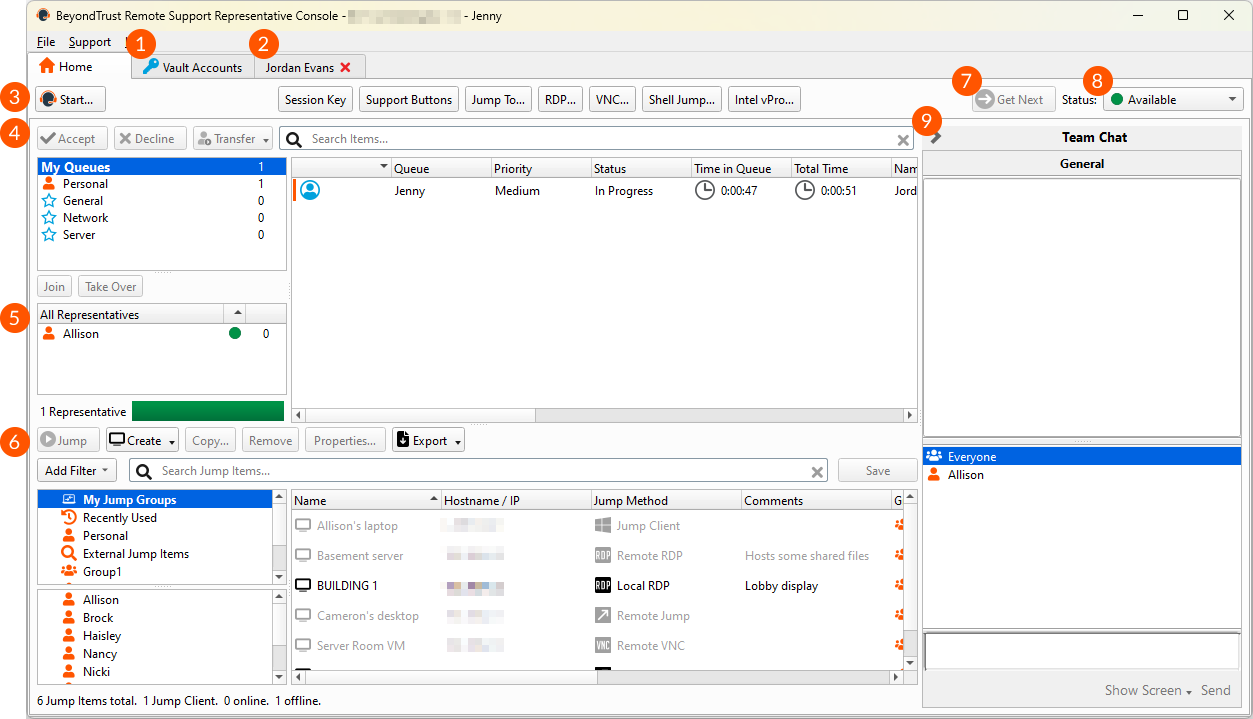
Interface
-
Vault Accounts: Displays a list of available credentials and their details. From here, you can check out and check in credentials as needed, whether during a session or on your local machine.
-
Sessions: Manage multiple remote sessions at the same time. Session tabs can be moved and reordered to help you organize and prioritize your workload. Simply click and drag a session tab to a new position. Session tabs can also be detached from the main representative console window.
-
Quick Start Buttons: Easily access frequently needed tools. Quick start buttons can be turned on or off from File > Settings.
- Start: Open a dialog for a quick-reference guide to starting a session.
- Session Key: Begin sessions with randomly generated, one-time use session keys.
- Support Buttons: View details and usage statistics of deployed Support Buttons.
- Jump To: Jump to a computer on a remote network via Jumpoint or on your local network. BeyondTrust’s Jump Technology enables privileged representatives to connect to an unattended remote computer to start a session without end-user assistance.
- RDP: Start a Remote Desktop Protocol session with a remote Windows system.
- VNC: Start a VNC session with a remote Windows system.
- Shell Jump: Quickly connect to SSH-enabled and Telnet-enabled network devices through a deployed Jumpoint.
- Intel® vPro: Using Intel Active Management Technology, support fully provisioned Intel vPro Windows systems below the OS level.
-
Queues: Queues list customers who are waiting for support or who are in a session. Details about the remote system being supported appear in this section.
-
Type: How the session was started.
-
Queue: The queue the session is assigned to.
-
Time in Queue: How long the session has been waiting in this queue.
-
Total Time: Total duration since the session was created.
-
Name: Customer’s entered name.
-
Computer: The hostname of the customer’s system.
-
OS: The operating system running on the customer’s system.
-
Issue: The problem description entered by the customer.
-
Uptime: How long the customer’s system has been running since last reboot.
-
Language: The language preference for the session.
-
Company: The company name provided by the customer.
-
Company Code: The company code tied to the session.
-
External Key: An identifier passed from an external system (like a ticket ID).
-
Session Details: Information about the support issue, entered by the customer.
-
Credential: The stored credential in BeyondTrust Vault linked to the session.
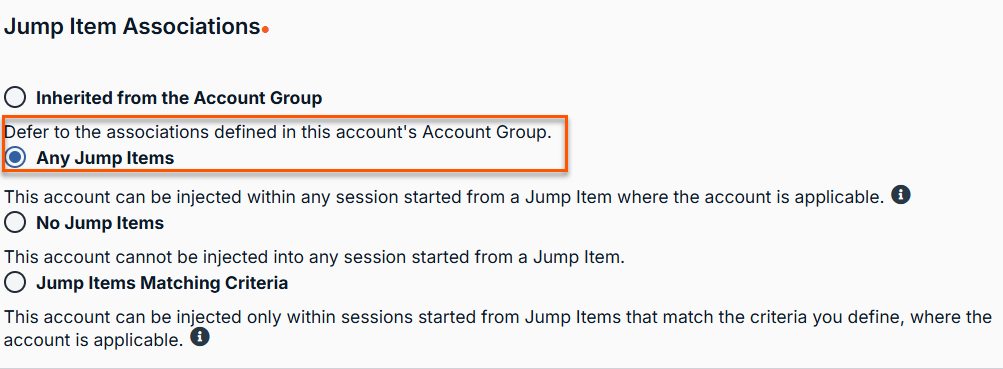
About credentials
In order for the credential column to work correctly, the following items need to be configured:
-
A Vault account (personal or shared) needs to be created.
-
A Jumpoint needs to be created.
-
A Jump item needs to be created.
-
In the Jump Item Associations section of the Vault account, the Any Jump Items option needs to be selected.
-
In Access Permission section of the Users & Security > Users page, the appropriate Jump items and roles need to be selected for the Allowed Jump Item Methods and Jump Item Roles permissions.

- The credential name for this field comes from the Credential Store and is not the actual credential.
- The credential name is comprised of the Name and Username fields of the Vault account.
-
-
-
Dashboard: Privileged users can view and monitor ongoing sessions and teammates of a lower role, providing administrative oversight to help manage staff. Status indicators show whether representatives are available, are idle, are busy, or have auto-assign turned off. A bar at the bottom of the dashboard shows the percentage of representatives in each state.
-
Jump Item Interface: Installed Jump Clients and Jump shortcuts appear here, grouped according to who can access them.
You can filter the list of Jump Items and search within specific fields. You can also save filters. Once a filter has been created and applied, click Save to enter a name for the filter and keep it for future use. Saved filters appear in a list under the Add Filter button. To apply a saved filter, double-click the filter name in the list, or right-click the filter name and click Apply. To delete a saved filter, right-click the filter name and click Remove. -
Get Next: Assigns the next available session to the representative, bypassing Equilibrium settings.
-
Status: If you have opted out of automatic session assignment, you can set your status from this dropdown. Your team managers see your status on their dashboard. If your administrator has configured custom statuses, you may select any of these here if you want your status to display as something other than a default status of Available, Busy, or Away.
-
Chat: Chat with other logged in users. You also can share your screen with a team member without requiring a session.
Settings and preferences
Click on File > Settings in the upper left corner of the console to configure your preferences.
In general, you may configure the console settings according to your preferences. However, your BeyondTrust administrator may choose to manage your settings, possibly enforcing those managed settings.
If your BeyondTrust administrator has changed and applied the default settings, then a Settings Changed alert appears the next time you log in to your console. Click View Settings to open your settings window to view the changes, or simply click OK to acknowledge the changes.
Changing settings
These instructions assume you are allowed to choose the settings used in your console. Settings enforced by your administrator appear marked with an asterisk and grayed out, and they are not locally configurable. Please see your administrator or Representative console settings for more information.
Each console settings window includes a Restore Defaults button in the lower left corner of the window. Clicking the button returns all of your settings to the BeyondTrust default settings or to the default settings applied by your administrator, if any have been set. An alert dialog asks you to confirm that you wish to change to the defaults. Click Cancel if you wish to return to your locally saved preferences.
If any of the defaults are forced by your administrator, you are unable to configure them.
Global Settings
- Enable spell checking: Enable or disable spell check for chat and session notes. Currently, spell check is available for US English only.
- Disable automatic session assignment on login: Check this option to automatically set your status to Busy when you first log in. You will not receive automatically assigned sessions until you set your status to Available.
- Quick start buttons: If you select Start Session, a Start button appears at the top of your representative console. Clicking this button walks you through the ways your customer can start a support session. You also can select Session Key to display a session key generation button, and select Support Buttons to display a button to launch the Support Button management interface. Select Jump To, RDP, VNC, Shell Jump, and Intel® vPro to display buttons to launch those respective Jump connections.
- Configurable session side bar: Choose whether you want the session menu icon to display, whether the sidebar can be detached, and whether the widgets on the session sidebar can be rearranged and re-sized.
- **Preferred chat language:**If real-time chat translation is enabled for your site, select your preferred chat language from the dropdown menu. This lets the rep console know what language you type in so that chat messages can be translated to the customer's selected language and vice-versa.
- Dark mode: You can choose to change your display mode. Options include Use OS Setting (default), Use Light Mode, and Use Dark Mode.
The dark mode option applies to Windows and macOS only.
In addition to switching the display mode within the access console, users can change it in OS Settings by selecting Themes and related settings > Color > Choose your color.
Chat messages
- Audible alerts: When you receive a chat message, you can choose to hear a sound. If you would like to upload a custom sound for chat messages, click the … button and select a WAV file on your computer. The file can be no larger than 1MB.
- Visual alerts: When you receive a chat message, you can choose to see the application icon flash.
- Show status messages in support teams chat windows: Choose whether the team chat should include status messages, such as users logging in and out, or only chats sent between team members.
- Show a popup notification when a chat message is received: Choose if you want to receive pop-up notifications for messages received in a team chat and/or in a session chat.
Queue alerts
- Audible alerts: Choose if you want to hear an audible alert when a customer enters one of your queues and/or when a waiting session has been marked as overdue. If you would like to upload a custom sound for either of these alerts, click the … button and select a WAV file on your computer. The file can be no larger than 1MB.
- Visual alerts: Choose whether you want to see the application icon flash when a customer enters one of your queues and/or when a waiting session has been marked as overdue. Additionally, when a customer enters your personal queue, such as by clicking on your name or entering a session key on the public site, the session can start immediately or prompt for your acceptance.
- Popup notifications: Choose to receive pop-up notifications for certain events. These notifications appear independent of your console and on top of other windows. Set where you wish to see pop-ups and how long they should display.
- Support session assignment alerts: Choose if you want to hear an audible alert when a session has been assigned to you and/or when an assigned session is expiring. If you would like to upload a custom sound for either of these alerts, click the … button and select a WAV file on your computer. The file can be no larger than 1MB.
Automatic behavior
- Automatically request screen sharing: Choose whether you want to start sessions with chat only or to immediately request screen sharing.
- Automatically detach: You can choose to open sessions as tabs in the console or to automatically detach sessions into new windows.
- Prompt to elevate if customer's secure desktop is enabled: For situations where you might experience issues because a customer’s secure desktop is enabled, you can be prompted to elevate to run with administrative rights when the session begins.
Screen sharing
- Default quality: Set the default quality for a screen sharing session — black and white, few colors, more colors, full color, best performance, or lossless. Select Hide color quality optimized options to see only the high-resolution options.
The customer must be running the full customer client, not the web client, for the lossless option to be visible when in screen sharing.
- **Default scaling:**Set the default size for a screen sharing session.
- Full screen: When screen sharing starts, you can automatically enter full screen mode, and/or automatically collapse the sidebar.
- Default RDP display size: Select the default RDP display size for all RDP sessions.
- Remote screenshot save directory: For easier access to screenshots you capture from the console, set the default directory where you will save your console-captured remote screenshots.
File transfer
- Default local directory: For an easier file transfer experience, set the default directory from which you wish to start browsing your local file system.
Command shell
- Number of lines of available command history: Set the number of lines to save in the command shell history.
- Shell display settings: You can change the command shell display by selecting the font type and size. Customize the colors by selecting a built-in theme, or click a colored square to customize your display.
- Shell preference: Several options for the default shell are available, including Windows Command Prompt, PowerShell, Zsh, BASH, sh, FISH, and tcsh. To set the shell preference order, select each shell and use the arrow buttons beside the list to move the selected shell up or down. Sessions start using the first available shell for the session.
