Host inventory | EPM-UL
The Host Inventory page displays all Unix and Linux servers that BeyondInsight has discovered and can connect to, serving as the starting point for managing those systems.
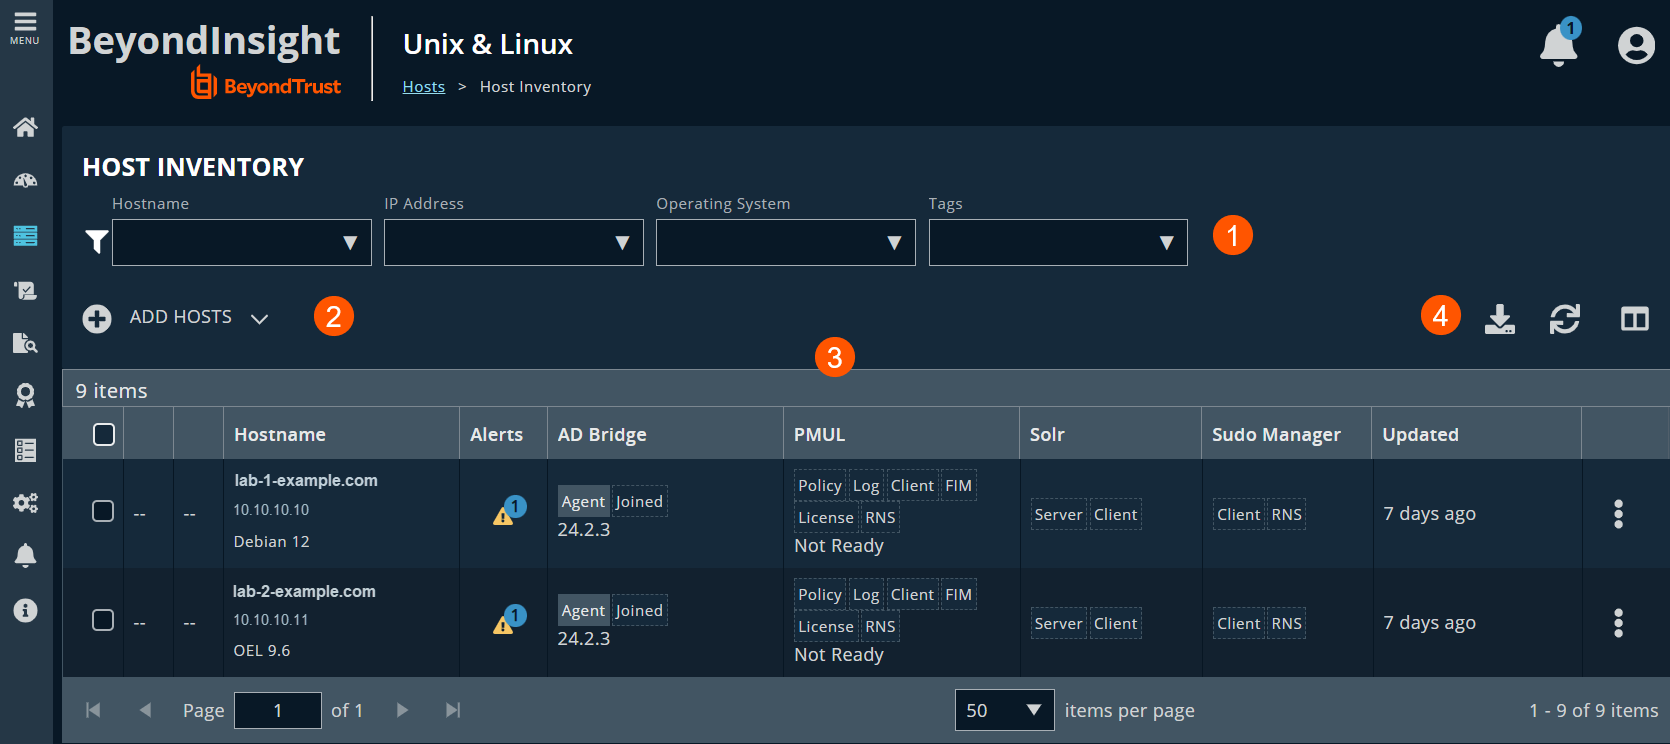
Host Inventory page
On the Host Inventory page:
- Discover hosts (servers) on the network that are reachable via SSH. Discovered assets are stored as hosts. Discovery does not require a credential. It runs a port scan to test for an SSH connection.
- Store those discovered machines as managed “hosts” in BeyondInsight
- View and manage those hosts after discovery
Keep these points in mind when working with hosts.
- Most actions require credentials so BeyondInsight can authenticate with the selected host. Credentials are managed on the Credentials page.
- When running an action, check the box in the header to select all of the hosts.
-
Filters: Filter hosts by Hostname, IP Address, Operating System, and Tags.
-
Add Hosts menu: Select a way to discover hosts not already added to BIUL.
-
Column headers:
-
Primary server: The first two columns display an icon indicating the server type.
-
 Primary License server
 -
 Primary Registry Name Service server
-
-
Hostname: The DNS name of the host, host IP address, operating system, and version. Click the Hostname header to sort and refresh the data.
-
Alerts: Possible alerts:
 Indicates a critical issue with the host.
 Indicates a problem with the host.
-
AD Bridge, PMUL, Solr, Sudo Manager: Display visuals on the components installed. See Install Status.
-
Updated: The last time data related to the host changed. Click the Updated header to sort and refresh the data.
-
-
Download, Refresh, and Column selector
- Select columns to display. The columns display from left to right in the order you select them.
- Download the results data as a JSON or CSV file. The file downloads to your Download folder.
Install status
AD Bridge
If AD Bridge is installed, the AD Bridge column displays the software version number, agent, and joined status.
- Agent: Indicates if the agent is installed.
- Joined: Indicates the domain joined status, which will either display it is not joined or the domain the host is joined to.
EPM-UL
If EPM-UL is installed, the EPM-UL column displays the version number and an icon for each feature and role the host has enabled.
- Policy: Policy server
- Log: Log server
- Client: Submit or run host
- FIM: FIM policy applied to the server
- License: License server
- RNS: Registry Name Service server
Solr
- Server: Solr Server
- Client: Client (indexed machine)
As of version 23.1, Solr is deprecated. EPM-UL no longer supports installing Solr, but features that use an existing Solr installation will continue to work.
Sudo Manager
- Client: Client (index machine)
Discover hosts
Hosts are discovered through the following methods:
- Scan for hosts
- Import hosts
- Scan the Registry Name Service (RNS)
Hosts are discovered in parallel batches to avoid saturating the network connection. The default size is 20. This can be configured by changing the pool settings option.
To start finding hosts, go to the Host Inventory page and click the Add Hosts dropdown menu.
The page refreshes every 5 seconds during a scan.
IP addresses can be added using one of the following formats:
- Single IP: To discover a single host, type the IP address. For example, 10.1.100.15.
- IP Range: Discover any hosts in a range. For example, 10.1.100.15–10.1.100.20.
- CIDR Notation: Discover hosts in a CIDR block. For example, 10.100.1.10/24.
To manually discover hosts:
- Enter the IP addresses using one of the accepted formats.
- Enter an SSH port. The value should map to the SSH port for the host provided. If no SSH port is provided, the default port is 22. Each discovery scan uses a single port regardless of the number of machines.
ℹ️ To update the SSH port for the host, navigate to Host Details. The value can then be configured under General > Connection Details.
- When discovering a single host, you can enter an SSH fingerprint using SHA-256 format. If the value matches the received fingerprint, the host is automatically accepted. This is optional and only applies when running single IP discovery.
- Check the Automatically accept SSH fingerprints box to accept all SSH fingerprints for discovered hosts. If the host already exists in the system, the SSH fingerprint is ignored.
- Click Scan for Host.
ℹ️ Search for non-sequential IP addresses at the same time by entering each IP address before clicking Scan for Host.
Manage a host
On the Hosts > Host Inventory page, access host actions for a server from the ![]() menu. Select Perform Host Actions from the menu to start the Host Actions wizard. Host actions include:
menu. Select Perform Host Actions from the menu to start the Host Actions wizard. Host actions include:
- Profile
- Install software for AD Bridge, and EPM-UL
- Join domain
- Deploy keyfile
Additionally, from the menu for each server, you can:
- View host details
- Delete hosts
When using the Host Actions wizard, only 25 hosts are displayed at a time. Select Check All to apply settings to all discovered hosts.
Apply updates to servers using bulk actions
Alternatively, you can apply actions to more than one server at a time. On the Hosts > Hosts Inventory page, you can select more than one host and select the Actions menu.
Use privilege escalation for BIUL credentials
Most actions require a credential be supplied in BeyondInsight for Unix & Linux (BIUL). This is the account BIUL authenticates as on selected servers. However, this account might not have sufficient privileges to execute the required commands. The console allows users to choose a Delegation Tool to escalate user privileges. Selecting sudo su requires the user to choose a second credential to delegate to.
Profile servers
Run a profile to gather preinstall information to ensure a host is prepared for software installs.
- A valid SSH credential is required for a selected host. The credential requires, at minimum, write permission on the host’s remote working directory.
- By default, the remote working directory is /tmp.
- The Defaults requiretty setting in the sudoers file is not supported.
You can run a profile immediately, or run it as a scheduled task.
Run now
Run a profile now, and the Tasks page appears, with the Task Summary panel open, displaying the results.
- Go to the Hosts > Host Inventory page.
- Select a host, and then at the far right, click
 and select Perform Host Actions.
 - Select Profile, and then click Next Step.
- On the Credential Selection page, select a logon credential to access the remote system. If you cannot log on as root, then select one of the following to run the action with escalated privileges: pbrun, sudo, or sudo su. This might require choosing a second credential.
- Select Run Now, and then click Next Step.
- Review the Summary page, and then click Finish.
- Review the Task page and verify the completed status of attempted actions under Task Summary.
- To view more information about Task Status, click Task Details.
Schedule a task
Set up a profile to run as a scheduled task. After the task has run per your schedule, you can open the Tasks page and locate and click the task to see the results in the Task Summary panel.
- Go to the Hosts > Host Inventory page.
- Select a host, and then at the far right, click and select Perform Host Actions.
- Select Profile, and then click Next Step.
- On the Credential Selection page, select a logon credential to access the remote system. If you cannot log on as root, then select one of the following to run the action with escalated privileges: pbrun, sudo, or sudo su. This might require choosing a second credential.
- Select Schedule, and the Calendar tool appears.
- Select the month, week, and day for the task. The full day hours are displayed. To display just the business hours, at the bottom left of the hours, click the Show business hours button. Click it again for full day hours.
- Double-click the top or bottom of the hour you want to select, and the Event scheduling dialog box appears.
- Verify/set the Start date and time, and then select the Timezone.
- (Optional). Set the number of Retries.
- If you want the task to be repeated, select the frequency to repeat.
- Click Save.
- Click Next Step.
- Review the Summary page, and then click Finish.
- The Tasks page appears. Verify that the information in the Scheduled Summary panel is accurate.
- (Optional). You can update, pause, or delete the schedule by using the buttons at the bottom of the panel.
Use a credential rule
To avoid requiring password authentication when you run a host profile, configure a credential rule. Use default credentials to run a profile on one or many hosts.
- Go to the Hosts > Hosts Inventory page.
- Select the hosts you want to profile:
- Single host: Select the host, and then at the far right, click and select Profile Host with Default Credentials.
- Multiple hosts: To select the hosts to profile, check the boxes on the left of the hostnames. From the Actions menu, select Profile Host with Default Credentials.
- Single host: Select the host, and then at the far right, click
Manage AD Bridge hosts
To access the hosts, a valid SSH credential with administrative rights on the host is required.
Install and upgrade AD Bridge
To install or upgrade AD Bridge hosts:
-
Go to the Hosts > Host Inventory page.
-
Select a host, and then at the far right, click
and select Perform Host Actions. -
On the Primary Action page, select Active Directory Bridge.
-
On the Secondary Action page, select one from the following:
- Install: Install AD Bridge software.
- Upgrade: Upgrade AD Bridge software to the version loaded in the console. If you select Upgrade, you can skip to step 6.
-
If you select Install, you can configure the Active Directory information on the Action Requirements page. By default, the Use Domain Browser toggle is turned on. To manually enter the information, click the toggle to turn it off.
- Perform optional Domain join: Select to join the Active Directory host to the domain. The join action occurs after the AD Bridge software installation completes. The toggle is turned on by default. Click the toggle if you do not want to join the host to the domain at this time.
- Forest: Select the forest from the list. The forest listed here is the directory service connection already configured from the Settings > Directory Services menu.
- Domain: Select a domain from the list.
- OU: Click Browse to search for the OU.
- AD Credential: Select the credential you want to use to access Active Directory. This credential is added when you create the directory services connection.
- Additional Arguments: Add domain-join cli arguments.
-
On the Credential Selection page, select a logon credential to access the remote system. If you cannot log on as root, then select one of the following to run the action with escalated privileges: pbrun, sudo, or sudo su. This might require choosing a second credential.
-
Review the Summary page, and then click Finish.
-
Review the Task page and verify the completed status of attempted actions under Task Summary.
-
To view more information about Task Status, click Task Details.
Join the host to an Active Directory domain
To join selected AD Bridge hosts to a domain:
-
Go to the Hosts > Host Inventory page.
-
Select a host, and then at the far right, click
and select Perform Host Actions. -
On the Primary Action page, select Active Directory Bridge.
-
On the Secondary Action page, select Domain join.
-
On the Action Requirements page, select the Active Directory information. By default, the Use Domain Browser toggle is turned on. To manually enter the information, click the toggle to turn it off.
- Forest: Select the forest from the list. The forest listed here is the directory service connection already configured from the Settings > Directory Services menu.
- Domain: Select a domain from the list.
- OU: Click Browse to search for the OU.
- AD Credential: Select the credential you want to use to access Active Directory. This credential is added when you create the directory services connection.
- Additional Arguments: Add domain-join cli arguments.
-
On the Credential Selection page, select a logon credential to access the remote system. If you cannot log on as root, then select one of the following to run the action with escalated privileges: pbrun, sudo, or sudo su. This might require choosing a second credential.
-
Review the Summary page, and then click Finish.
-
Review the Task page and verify the completed status of attempted actions under Task Summary.
-
To view more information about Task Status, click Task Details.
Remove the host from an Active Directory domain
You can remove an Active Directory host from a domain.
To remove a joined domain:
-
Go to the Hosts > Host Inventory page.
-
Select a host, and then at the far right, click
and select Perform Host Actions. -
On the Primary Action page, select Active Directory Bridge.
-
On the Secondary Action page, select Domain Leave.
-
On the Action Requirements page, check the box Delete Computer account in Active Directory, and then select an Active Directory credential from the list.
-
On the Credential Selection page, select a logon credential to access the remote system. If you cannot log on as root, then select one of the following to run the action with escalated privileges: pbrun, sudo, or sudo su. This might require choosing a second credential.
-
Review the Summary page, and then click Finish.
Join the host to an Azure tenant application
To join selected AD Bridge hosts to a Azure application, an application must have already been appropriately configured in Azure.
To join selected AD Bridge hosts to an Azure application:
-
Go to the Hosts > Host Inventory page.
-
Select a host, and then at the far right, click
and select Perform Host Actions. -
On the Primary Action page, select Active Directory Bridge.
-
On the Secondary Action page, select Tenant Join.
-
On the Action Requirements page, enter the Azure application information. As noted above, an Azure application must already have been configured.
- Tenant ID: The tenant ID from the Azure application configuration.
- Application ID: The application ID from the Azure application configuration.
- Secret: An application secret value from Azure. This value must have been created in the Azure application (see link below).
- License Key: An AD Bridge license key to license the endpoint at the same time as joining the Azure tenant.
-
On the Credential Selection page, select a logon credential to access the remote system. If you cannot log on as root, then select one of the following to run the action with escalated privileges: pbrun, sudo, or sudo su. This might require choosing a second credential.
-
Select Run Now.
-
Review the Summary page, and then click Finish.
-
Review the Task page and verify the completed status of attempted actions under Task Summary.
-
To view more information about Task Status, click Task Details.
To reduce the data entry required at Step 5 above, it is possible to create a Join template under Settings > Software > AD Bridge >
Remove the host from an Azure tenant application
To remove a host from an Azure application:
-
Go to the Hosts > Host Inventory page.
-
Select a host, and then at the far right, click
and select Perform Host Actions. -
On the Primary Action page, select Active Directory Bridge.
-
On the Secondary Action page, select Tenant Leave.
-
On the Credential Selection page, select a logon credential to access the remote system. If you cannot log on as root, then select one of the following to run the action with escalated privileges: pbrun, sudo, or sudo su. This might require choosing a second credential.
-
Select Run Now.
-
Review the Summary page, and then click Finish.
Update the Azure application secret for a host
The Azure application secret has a configurable expiration date. When BeyondInsight for Unix & Linux identifies that a host is using an Azure application secret that will expire soon, a notification is generated. The notification details provides you with some guidance to update the application secret.
To update the application secret used by a host to connect to an Azure application, a secret must have already been configured in Azure.
If you view an Azure Secret Key Expiring Soon notification, you can update the secret from the Notification Details panel by clicking the Update Secret button. Alternately, use the next procedure to update.
To update the application secret:
-
Go to the Hosts > Host Inventory page.
-
Select a host, and then at the far right, click
and select Perform Host Actions. -
On the Primary Action page, select Active Directory Bridge.
-
On the Secondary Action page, select Tenant Secret.
-
On the Action Requirements page, enter the new Azure application secret value. As noted above, an Azure application must already have been configured.
-
On the Credential Selection page, select a logon credential to access the remote system. If you cannot log on as root, then select one of the following to run the action with escalated privileges: pbrun, sudo, or sudo su. This might require choosing a second credential.
-
Select Run Now.
-
Review the Summary page, and then click Finish.
-
Review the Task page and verify the completed status of attempted actions under Task Summary.
-
To view more information about Task Status, click Task Details.
Uninstall AD Bridge
When you uninstall AD Bridge, you can also choose to leave the domain and delete the Active Directory account.
-
Go to the Hosts > Host Inventory page.
-
Select a host, and then at the far right, click
and select Perform Host Actions. -
On the Primary Action page, select Active Directory Bridge.
-
Select Uninstall.
-
On the Action Requirements page, select one of the following:
- Uninstall: Uninstall AD Bridge software from the host.
- Leave and Uninstall: Remove the host from the domain and uninstall AD Bridge software.
- Leave Domain, Delete Account, and Uninstall: Remove the host from the domain, delete the Active Directory account in Active Directory, and remove the AD Bridge software.
- AD Credential: The credential to use to access Active Directory. The setting is required when you select Leave Domain, Delete Account, and Uninstall. This credential is added when you create the directory services connection.
-
On the Credential Selection page, select a logon credential to access the remote system. If you cannot log on as root, then select one of the following to run the action with escalated privileges: pbrun, sudo, or sudo su. This might require choosing a second credential.
-
Review the Summary page, and then click Finish.
Manage EPM-UL hosts
To access the hosts, a valid SSH credential with administrative rights on the host is required.
To manage Endpoint Privilege Management for Unix and Linux (EPM-UL) hosts:
-
Go to the Hosts > Host Inventory page.
-
Select a host, and then at the far right, click
and select Perform Host Actions. -
Choose an action, and then follow the procedures in this section.
Software is installed with default configuration values, unless RNS Primary and All Components is selected. If not detected during installation, the installer generates network and REST encryption keys. All future EPM-UL installations will use these keys. The keys can be managed on the Settings page.
Install the EPM-UL policy server
To install the EPM-UL policy server:
-
Go to the Hosts > Host Inventory page.
-
Select a host, and then at the far right, click
and select Perform Host Actions. -
Select Endpoint Privilege Management for Unix and Linux, and then select Next Step.
-
Select Install, and then click Next Step.
-
On the Action Requirements page, select an installation template. The features enabled in the template affect the options available. The following list displays default templates.
- All Components: All EPM-UL components will be installed except for RNS server.
- License Server Only: Only the EPM-UL license server will be installed.
- Policy and Log Server Only: All server components of EPM-UL will be installed except for RNS server.
- Submit and Run Host Only: The client components of EPM-UL will be installed.
- Primary Registry Server and All Components: All EPM-UL components will be installed including RNS server.
-
After selecting a template, you can choose to use client registration. Note that some features selected in installation templates may require or disallow using client registration. To use client registration select a Client Registration Server, and then select a Client Registration Profile.
-
Starting in BIUL 26.1, client registration is no longer configurable. For a new EPM-UL 26.1 installation:
- Primary License Server installs: Client registration is set to Off.
- Other installation types: Client registration is set to On.
If installing EPM-UL 25.1 and earlier, client registration is still enforced.
For EPM-UL 25.1 or earlier, client registration is still enforced.
-
Review the Summary page, and then click Finish.
-
Review the Task page and verify the completed status of attempted actions under Task Summary.
-
To view more information about Task Status, click Task Details.
Upgrade the EPM-UL policy server
To upgrade the policy server to the version loaded in the console:
-
Go to the Hosts > Host Inventory page.
-
Select a host, and then at the far right, click
and select Perform Host Actions. -
Select Endpoint Privilege Management for Unix and Linux, and then click Next Step.
-
Select Upgrade, and then click Next Step.
-
On the Credential Selection page, select a logon credential to access the remote system. If you cannot log on as root, then select one of the following to run the action with escalated privileges: pbrun, sudo, or sudo su. This might require choosing a second credential.
-
Review the Summary page, and then click Finish.
-
Review the Task page and verify the completed status of attempted actions under Task Summary.
-
To view more information about Task Status, click Task Details.
Uninstall the EPM-UL policy server
To remove the policy server:
-
Go to the Hosts > Host Inventory page.
-
Select a host, and then at the far right, click
and select Perform Host Actions. -
Select Endpoint Privilege Management for Unix and Linux, and then click Next Step.
-
Select Uninstall, and then click Next Step.
-
On the Credential Selection page, select a logon credential to access the remote system. If you cannot log on as root, then select one of the following to run the action with escalated privileges: pbrun, sudo, or sudo su. This might require choosing a second credential.
-
Review the Summary page, and then click Finish.
-
Review the Task page and verify the completed status of attempted actions under Task Summary.
-
To view more information about Task Status, click Task Details.
Configure SIEM for EPM-UL server
To configure a SIEM connection, it must first be set up under Settings > SIEM Connection.
To configure SIEM for use with an EPM-UL server:
-
Go to the Hosts > Host Inventory page.
-
Select a host, and then at the far right, click
and select Perform Host Actions. -
Select Endpoint Privilege Management for Unix and Linux, and then click Next Step.
-
Select Configure a SIEM for use with one or more Endpoint Privilege Management for Unix and Linux servers, and then click Next Step.
-
On the Action Requirements page, select a SIEM connection from the dropdown.
-
On the Credential Selection page, select a logon credential to access the remote system. If you cannot log on as root, then select one of the following to run the action with escalated privileges: pbrun, sudo, or sudo su. This might require choosing a second credential.
-
Review the Summary page, and then click Finish.
-
Review the Task page and verify the completed status of attempted actions under Task Summary.
-
To view more information about Task Status, click Task Details.
Manage Solr
As of version 23.1, Solr is deprecated. EPM-UL no longer supports installing Solr, but features that use an existing Solr installation will continue to work.
Deploy keyfiles
The Deploy PMUL Network and REST encryption key files action uses the network and encryption keys configured on the Settings > Integration page.
To deploy keyfiles:
-
Go to the Hosts > Host Inventory page.
-
Select a host, and then at the far right, click
and select Perform Host Actions. -
Select Endpoint Privilege Management for Unix and Linux, and then select Next Step.
-
Select Deploy PMUL Network and REST encryption key files, and then click Next Step.
-
On the Credential Selection page, select a logon credential to access the remote system. If you cannot log on as root, then select one of the following to run the action with escalated privileges: pbrun, sudo, or sudo su. This might require choosing a second credential.
-
Review the Summary page, and then click Finish.
-
Review the Task page and verify the completed status of attempted actions under Task Summary.
-
To view more information about Task Status, click Task Details.
Delete hosts
The Delete Host action removes the selected host from the console database. No action is taken on the host nor on any credentials the console may have stored for it.
To delete a host:
- Go to the Hosts > Hosts Inventory page.
- Select the host you want to delete:
- Single host: Select the host, and then at the far right, click and select Delete Hosts.
- Multiple hosts: For all hosts you want to delete, check the boxes on the left of the hostnames. From the Actions menu, select Delete Hosts.
- Single host: Select the host, and then at the far right, click
- To confirm, click Delete.
View host details
You can view more information about host servers including errors and warnings for particular products deployed.
On the Host Details panel, you can manage the following settings:
- Configure the Endpoint Privilege Management for Unix and Linux (EPM-UL) Rest API Time Correction, which is the acceptable time offset between BeyondInsight for Unix & Linux (BIUL) and the EPM-UL host in seconds.
To view more information about a host:
- On the Hosts > Host Inventory page, select a server, and then at the far right, click and then select View Host Details. At the top, general host details are displayed, including:
- Discovered
- Last Profiled
- IP
- Operating System
- Architecture
- Default Gateway
- Tags
- Select an entry in the Host Details panel to view details about the host collected by BIUL. Details on errors and warnings are included here, if any.
REST API connectivity
BIUL automatically configures a REST connection to EPM-UL Policy Servers.
Note the following when using the REST API:
- REST API connections can only be made to a Policy Server with EPM-UL v 9.4 or later.
- REST connectivity does not open any firewall ports. This must be done by the user.
- By default, EPM-UL uses self-signed certificates. BIUL does not verify a certificate authority.
To assist in sourcing errors and troubleshooting connections, a task displays on the Tasks page. Additional troubleshooting information may be available on the Host Details page.
Tag a discovered host
Tags are user-defined values that can be assigned to hosts to aid in filtering the discovered hosts in the Hosts Inventory grid. Tags are freely entered and as such allow the user to navigate to and manage hosts quickly.
ExampleYou can create a tag for all hosts in a group such as Log Servers. Assign that tag to the log servers in your environment. Tags can then be used for filtering throughout the application. To find the log servers in the Hosts Inventory grid, simply filter by the Log Servers tag.
Create a new tag
To create a new tag for a discovered host:
-
Go to Hosts > Host Inventory page.
-
Select a host, and then at the far right, click
and select View Host Details. -
Under General Details, type the desired tag name in the Add tags field, and press Enter.
Assign tags to hosts
To assign an existing tag to a discovered host:
-
Go to Hosts > Host Inventory page.
-
Select a host, and then at the far right, click
and select View Host Details. -
Under General Details, click the Add tags field and enter the tag name or scroll until you find the desired tag.
-
Select the tag to apply it to the host.
Filter hosts by tags
To filter discovered hosts by a specific tag:
- Go to Hosts > Host Inventory page.
- Click the Tags dropdown menu at the top of the Host Inventory grid.
- Enter the tag name in the Search Term field and click Update to filter the results.
Delete an existing tag
To delete an existing tag on a discovered host:
-
Go to Hosts > Hosts Inventory page.
-
Select a host, and then at the far right, click
and select View Host Details. -
Under General Details, click the Add tags field, and scroll till you find the desired tag.
-
Click the X that appears beside the tag name to delete it from the list.
Set up policy caching
A cached policy can be used when the client is offline and cannot connect to the policy server. Setting up policy caching is optional.
The following must be in place to activate policy caching:
- The policy server must allow caching of policy by clients. Set this option during the policy server installation or set allowcaching in the pb.settings file after installation.
- The client must enable caching of policy from the server. Set this option during the installation of the client.
Policy caching can be configured during policy server or client installations, if the installation template used:
- Includes installation of a policy server. Set the Allow Caching option.
- Includes installation of a submit host and run host, and the installation uses client registration. Set the Enable caching option.
Policy caching is not supported on license server installs.
Since one applies to policy servers and one applies to policy clients, an EPM-UL host would not typically have both Allow Caching and Enable caching set.
To view the status of policy caching:
-
Go to Hosts > Hosts Inventory page.
-
Select a host, and then at the far right, click
and select View Host Details. -
Under Endpoint Privilege Management for Unix and Linux, scroll to the Configuration section, and verify the values for Policy Caching Allowed? and Policy Caching enabled?
