
Settings | EPM-UL
From the Settings page, you can configure:
- Console Access: Add new users and groups to BeyondInsight for Unix & Linux (BIUL).
- Roles: Manage the assignment of roles to users.
- Software: Manage BeyondTrust software versions.
- System: Manage BIUL settings.
- Directory Services: Manage directory services connections.
- SIEM Connections: Manage SIEM Elasticsearch and Logstash connections.
- Integration: Manage integration settings for external BeyondTrust integrations.
- Certificates: Manage certificates.
- Authentication Services: Add multifactor authentication
BIUL system settings
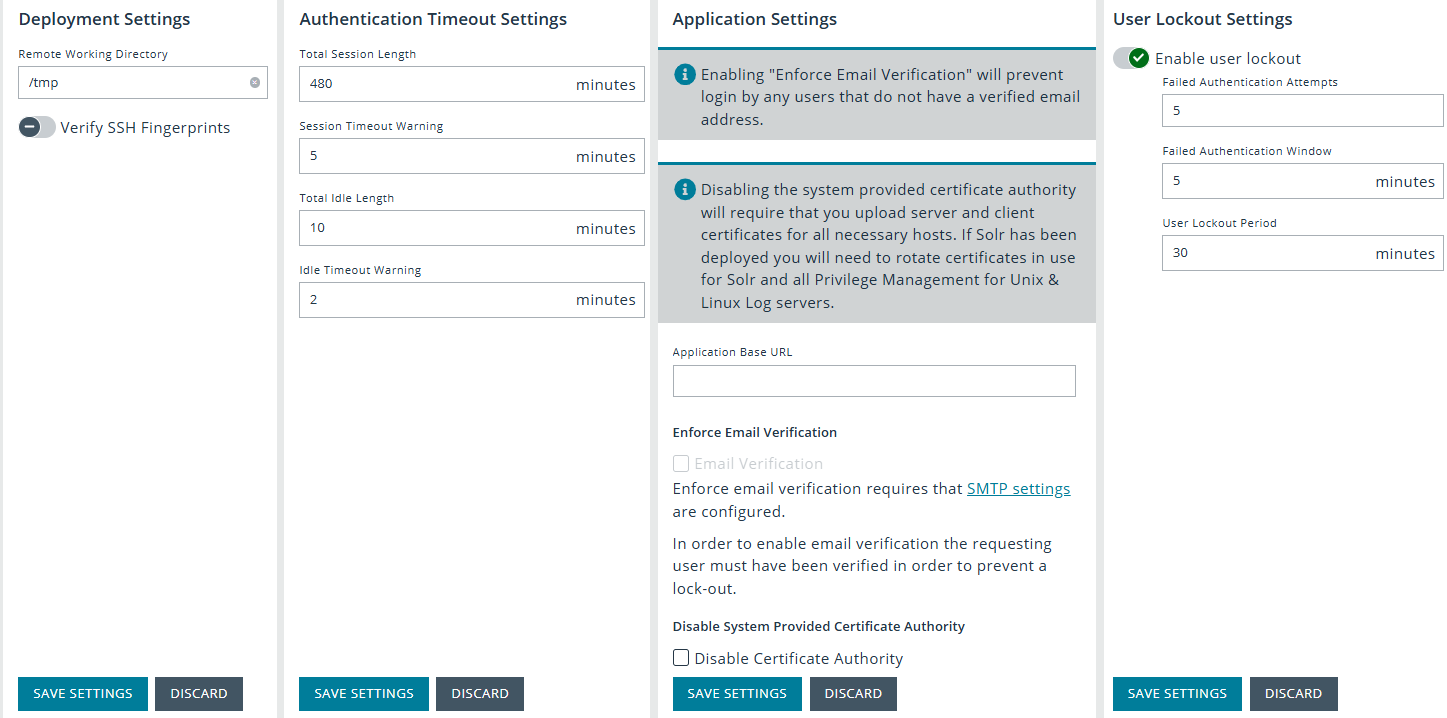
To configure deployment settings:
- Select the Settings menu.
- Click System.
- Set the Remote Working Directory for deployments. For example, /tmp.
- Enable or disable Verify SSH Fingerprints to verify if a host is trusted by BIUL by default upon discovery.
- Click Save Settings.
Set up password reset
A Reset Password link is available on the BIUL logon page. A local user must verify their email address to use the password reset feature. Verifying the email address must be completed (regardless of whether the account verification is enabled).
The password reset feature is not available to directory service users.
To use the Reset Password link for local accounts:
- SMTP settings must be configured for your mail server. If the SMTP server is not configured the Send Verification Email option is not available.
- Application settings must be configured.
- The email address for your BIUL account must be verified and authenticated. Only after the address is verified can it be used to reset a password.
A BIUL administrator can send a verification email.
To send an email verification:
- Click the Settings menu, and then click Console Access.
- Click the Users tab.
- Click the edit icon for a local user account to display the User Details page.
- Click Send Verification Email.
The user receiving the verification email must click the link and provide credentials to authenticate the account. After this authentication the email account is verified and can be used in a password reset.
Add a directory service
BeyondInsight for Unix & Linux (BIUL) supports connections to directory service providers:
- Active Directory
- Red Hat Identity Management (IdM)/FreeIPA
- OpenLDAP
More than one directory service provider can be configured in the same deployment.
In some cases, the connection type might be set to Unknown. This can occur if the data existed previous to BIUL 9.4. The connection will work. However, we recommend selecting the appropriate connection type from the list.
To add a connection:
- Select the Settings menu, and then click Directory Services.
- Click Add Connection.
- Select the connection type from the list.
- Select the settings for the connection, including domain, user credentials, and port. Ensure the correct format is used for the user names.
- Active Directory: Enter the user name in the user principal name (UPN) format (admin@domain) or in the sAMAccountName format (domain@admin).
- IdM and OpenLDAP: Enter the user name in bind DN format (cn=admin,dc=domain,dc=tes).
- (Optional). Click Test Settings to ensure the connection between BIUL and the directory service works.
- Click Save Directory Service Settings.
Delete a directory connection
- Select the Settings menu, and then click Directory Services.
- Select a connection.
- Click Delete Connection.
- Click Delete to confirm.
BIUL console access
You can add and manage user accounts and groups in the console.
Local user accounts
Add a local user account
- Select the Settings menu.
- Click the Console Access tile.
- Click the Users tab, and then click Add Users.
- Click Add > Local User.
- Enter the information:
- Enabled: Enable or disable the user account.
- Username: This will be used to authenticate the account in the console and must be unique in the system. Once the Username has been saved, it cannot be changed.
- First Name: The user's first name.
- Last Name: The user's last name.
- Email: The user's email address.
- Password: The user's password. Used to authenticate the account in the console. Must be at least 8 characters.
- Confirm Password: Must match the Password value.
- Click Create User.
Assign a role to a user account
- Select the Settings menu.
- Click the Console Access tile.
- In the Console Access list, click the Users tab.
- Click the edit icon for a local user account to display the Edit User Details page.
- On the User Details panel, click Roles.
- Select from roles:
- System Administrator
- API User
- Auditor
- Account Administrator
- Policy Administrator
- Software Administrator
Update a local user account
- Select the Settings menu.
- Click the Console Access tile.
- In the Console Access list, click the Users tab.
- Click the edit icon for a local user account to display the Edit User Details page.
- On the User Details panel, click Details (by default, this option is displayed). Configuration options available:
- Enable User: Enable or disable the user account.
- First Name: The user's first name.
- Last Name: The user's last name.
- Email: The user's email address.
- Click Save User.
Update password for a local user account
- Select the Settings menu.
- Click the Console Access tile.
- In the Console Access list, click the Users tab.
- Click the edit icon for a local user account to display the Edit User Details page.
- On the User Details panel, click Authentication.
- Change the password, and then click Update Password.
Delete a local user account
- Select the Settings menu.
- Click the Console Access tile.
- In the Console Access list, click the Users tab.
- Click the edit icon for a local user account to display the Edit User Details page.
- Click the trashcan icon, and then click OK to confirm the deletion.
Directory services users and groups
Add a directory services user
- Select the Settings menu.
- Click the Console Access tile.
- In the Console Access list, click the Users tab.
- Click Add Users.
- From the Add list, select Directory services.
- Select the directory services Forest and Domain.
- To search in an organizational unit (OU), click Browse and select an OU.
- In the Search for box, enter the search criteria for the directory services object. To help narrow the search, from the list at the right, you can select a Query Type.
- Click Search Directory Service. Search results are displayed.
- Select the user or group from the search results and it is added to the Console Access list.
The user is enabled or disabled depending on the Directory services configuration. The object configuration must be updated using directory services.
Add a directory services group
You can only add a group already created in directory services. The group is enabled or disabled depending on the directory services configuration. The object configuration must be updated using directory services.
- Select the Settings menu.
- Click the Console Access tile.
- In the Console Access list, click the Groups tab.
- Click Add Groups.
- Select the directory services Forest and Domain.
- To search in an organizational unit (OU), click Browse and select an OU.
- In Search for, enter the search criteria for the Directory Services object. To help narrow the search, from the list at the right, you can select a Query Type.
- Click Search Directory service. Search results are displayed.
- Select the group from the search results and it is added to the Console Access list.
Delete a directory services user or group
- Select the Settings menu.
- Click the Console Access tile.
- In the Console Access list, click the Users or Groups tab.
- Click the edit icon for a local user account or group to display the Edit User/Group Details page.
- Click the trashcan icon, and then click OK to confirm the deletion.
Assign a role to a group
- Select the Settings menu.
- Click the Console Access tile.
- In the Console Access list, click the Groups tab.
- Click the edit icon for a group to display the Group Details page.
- Select the Roles tab.
- Select from roles:
- System Administrator
- API User
- Auditor
- Account Administrator
- Policy Administrator
- Software Administrator
Unlock a user account
- Select the Settings menu.
- Click the Console Access tile.
- In the Console Access list, click the Users tab.
- Find the user account in the list, and then click the edit icon.
- Click Unlock User.
Configure role-based access
Access control provides a role-based system to authenticate users in BeyondInsight for Unix & Linux (BIUL). Users are assigned roles based on the level of access they need to do their BIUL job functions.
Areas in the console require certain permissions. If a user is not assigned those permissions, then they cannot access those features in the console. For example, the policyadmin role is required for an authenticated user to interact with policy.
Roles can be assigned to either a user account or a group.
The account created during the first run wizard is assigned the sysadmin role. This role has full privileges in the system.
Roles
- sysadmin: All roles; can do everything
- policyadmin: Full access to policy management
- softwareadmin: Full access to software management (deploy software, remove, etc.)
- auditor: Full access to log features
- accountadmin: Full access to controlling console access
- apiuser: Full access to using the public REST API
Full access to the entitlement gives the user or group the permission attributes: create, view, update, and delete.
You can assign roles in two ways:
- On the Settings > Console Access > Users page. Provision roles on the details page for users and groups.
- On the Settings > Roles > Users page.
- Click Settings > Roles.
- Select a role from the list.
- Click the Users tab.
- Click the Users without this role button to see users that do not currently have this role.
- Check the boxes for users you want to add.
- Click Add Selected Users.
Integrate Password Safe with BIUL
Use Password Safe to manage credentials
You can use Password Safe to manage credentials. Then, when you run actions on your hosts, passwords are retrieved at runtime from Password Safe rather than storing the passwords locally.
This section provides Password Safe configuration information within the console.
For more information on configuring Password Safe, see the Password Safe documentation.
Configure Password Safe
Configure the settings for the Password Safe server. To configure the Password Safe integration:
- In the console, select the Settings menu.
- Click Integration.
- Enter information:
- Password Safe Server: The location of the Password Safe server. Do not add a trailing slash. For example, https://pbps_server.
- API Key: The API key generated in BeyondInsight.
- RunAs User: The BeyondInsight account under which the requests will be made. This Password Safe user must be in a User Group with API access and with an access policy that has auto-approve enabled for access.
- Description: A text entry to provide any additional details (optional).
- Verify certificate: Disabling this option bypasses certificate validation.
- (Optional). To ensure the connection works, click Test Settings.
- Click Save Settings.
Import Password Safe managed accounts
A Password Safe managed account must be imported as a BeyondInsight for Unix & Linux (BIUL) credential.
Password Safe account details such as username and password cannot be changed in BIUL. These details are read-only values. The password is managed by Password Safe and retrieved dynamically.
To import a managed account:
- In the console, go to Hosts > Host Credentials.
- Click Manage Credentials and select Import from Password Safe.
- Select the managed accounts from the list of results the console can access and click Import Selected. You can filter the managed accounts by Username and Description. Imported accounts are displayed on the Credentials page.
A status 200 might be displayed if the selected managed account already exists as a console credential.
Example
The example is intended to provide a high-level configuration and is provided only as an overview.
In this example, the goal is to use an account called biul_user on a host at 10.100.10.10 to perform a Profile Servers action. BeyondInsight/Password Safe is running at https://my_pbps.
- Enable biul_user in the Password Safe API:
- In BeyondInsight, add the 10.100.10.10 asset if required.
- Choose the Add/Edit Password Safe option for 10.100.10.10 in the Assets grid.
- On the Local Accounts tab, select Add, and then provide the details for biul_user.
- Ensure the Enable for API Access option is selected.
- Get an API Key and add BeyondInsight for Unix & Linux to the allowlist:
- In BeyondInsight, go to Configure > Password Safe > Application API Registration.
- Create a new registration.
- Add the BIUL IP address to the source addresses list.
- Disable the certificate required option.
- An API key is generated when the registration is saved. This key is used in console.
- Configure an Access Policy in BeyondInsight:
- Go to Configure > Password Safe > Access Policies.
- Create a policy.
- In the Access section, ensure Approvers is set to auto-approve.
- Configure an API User Group in BeyondInsight:
- Go to Configure > Accounts.
- Create a group. Ensure Enable API Application is selected and the registered application is selected.
- In Smart Rules, select the Roles option for the All Managed Accounts rule.
- Choose Requestor under Password Safe.
- Select the access policy created earlier as the access policy.
- Create an API User in BeyondInsight:
- Go to Configure > Accounts, and add an account.
- Ensure it belongs to the group created earlier.
- Configure Password Safe in BIUL:
- Go to Settings > Integration.
- Enter the details for the Password Safe server. The API Key was obtained in step 2 and the RunAs User is the account created in step 5. The URL would be https://my_pbps.
- Add biul_user to BIUL:
- Go to Hosts > Credentials.
- Click Add Credential and select Import from Password Safe.
- In the list, select biul_user.
- Click Import Selected. The imported account is displayed on the Credentials page.
- Use the biul_user in the console:
- From the Hosts > Host Inventory page, choose Perform an Action > Profile Servers,
- Select a host, and select Perform Host Actions from the menu.
- Select Endpoint Privilege Management for Unix and Linux, and then select Profile.
- On the Credential Management page, select the biul_user.
- Go through the remaining pages on the Perform Host Actions wizard.
Configure the EPM-UL integration
Upload key files to confirm the files on the host are synchronized with the keys used by the console.
If no key files are present, the console creates them during the next installation of Endpoint Privilege Management for Unix and Linux (EPM-UL) for versions 9.4.5 and later.
To configure EPM-UL:
- In the console, select the Settings menu, then click Integration.
- If you do not want to verify certificates, turn on Bypass SSL certificate validation.
- Choose whether to enable or disable Role entitlement reporting by default.
- Choose whether to enable or disable Prevent role entitlement reporting override. When the toggle is enabled, all new role based policies will default to entitlement reporting enabled, or vice versa if set to false. The setting can be locked so the default value is both set and unchangeable per policy. This is for new policies only; disabling entitlement reporting will not change the values for existing policies.
- Upload network or REST key files to the console.
Manage software
View software managed by BeyondInsight for Unix & Linux
The Settings > Software page lists the software managed by BeyondInsight for Unix & Linux (BIUL). Basic information includes:
- Product name
- Visual indication the software is present (green dot) or not (gray dot)
- Version currently installed
- Location of the software
To update the list, click the Refresh icon.
View software details
On the Settings > Software page, you can get more detailed information for each software product listed. To view details on specific software, at the far right of the software listing, click  , and then select View Details. The Installers side panel displays at the right of the software product table. The panel list is scrollable.
To view details for a different product, click on that product's row. The Installers side panel displays the new product information.
To close the panel, at the top-right of the panel, click the X button.
Upload software packages
You can upload Endpoint Privilege Management for Unix and Linux (EPM-UL) and AD Bridge software packages on the Software page.
EPM-UL installation templates
Use installation templates to apply different components to an EPM-UL server.
Some templates are preset and read-only:
- All components
- License Server only
- Policy and Log Server
- Submit and Run Host Only
- Primary Registry Server and All Components
Apply an installation template when running the Host Actions wizard for an EPM-UL install.
Create an EPM-UL installation template
You can create a custom EPM-UL installation template. For example, you might want a template to only install the log server feature. Create a template called Log Server and select only Install Log Server.
You can select an existing template and click Clone to start with a base configuration for a new template.
To create an installation template:
- Go to the Settings > Software page.
- At the far right of the Endpoint Privilege Management for Unix and Linux row, click , and then select Manage Installation Templates.
- Click Add New Template.
- Enter a Name for the template, and then click Create.
- Select the template options. The template settings are automatically saved.
Clone an EPM-UL installation template
Clone an EPM-UL installation template to make a backup of an existing one, or use it as a template to create a new one.
To clone an installation template:
- On the Installation Templates panel, select a template, and then click Clone.
- Enter a Name for the template, and then click Create.
- Select the template options. The template settings are automatically saved.
Delete an EPM-UL installation template
To delete an installation template:
- On the Installation Templates panel, select a template.
- Click Delete, and then click OK to confirm.
AD Bridge join templates
To reduce data entry when joining the host to an Azure tenant application, use AD Bridge (ADB) join templates. When joining a specific host to the tenant, select the template to populate the tenant ID, application, and license key fields automatically.
To create an ADB join template:
- Select Settings > Software.
- At the far right of theAD Bridge row, click , and then select Manage Join Templates.
- Click Add New Template.
- Enter a Name and Description for the template.
- Enter the Tenant ID, Application ID, and AD Bridge License Key.
- Click Create. The template is added to the list on the left.
When using the template, you must still provide an application secret.
Update an AD Bridge join template
To update an existing ADB join template:
- On the AD Bridge Join Templates panel, select the template to update.
- Update the information for the template.
- Click Update.
Delete an AD Bridge join template
To delete an existing ADB join template:
- On the AD Bridge Join Templates panel, select the template to delete.
- Click Delete, and then click OK to confirm.
SIEM connections
You can set up SIEM connections to integrate with Endpoint Privilege Management for Unix and Linux (EPM-UL) and AD Bridge events. The available connection types are Elasticsearch and Logstash.
ImportantYou can have only one Elasticsearch type connection.
Add a SIEM connection
-
On the sidebar menu, click Settings > SIEM Connections.
-
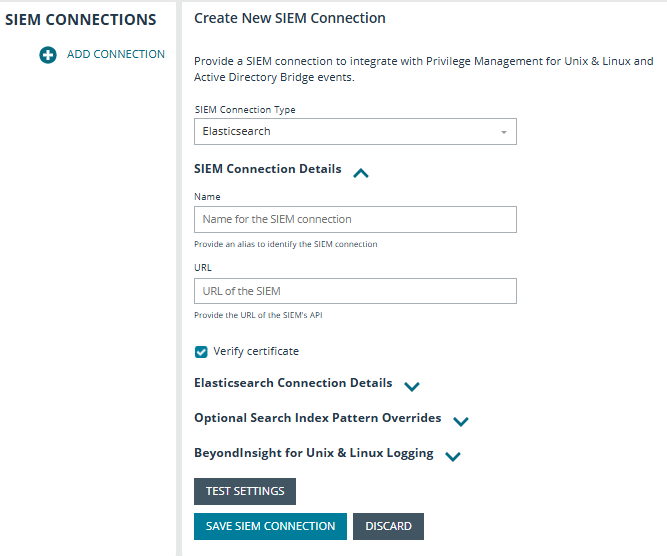
In the SIEM Connections left panel, click Add Connection.
-
On the Create New SIEM Connection page, select the SIEM connection type.
-
In the SIEM Connection Details section, enter a name and URL for the connection.
-
Optionally, check the box to verify the certificate for the connection. You can use this option in the case of unknown signer, for example, if a self-signed certificate is in use.
- In the Elasticsearch Connection Details section, select a credential type from the list: Username and Password or API Key.
- Depending on the credential type you select, enter:
- Username and Password
- API ID and API Key
- Cloud ID
- You can leave the Optional Search Index Patterns Overrides section fields as is, because there are default pattern values. Optionally, enter:
- EPM-UL Index Patterns
- EPM-UL Session Replay Index Patterns
- AD Bridge Index Patterns
- Proceed to the "To complete the process for either connection type" section.
You can define the location of an Elasticsearch instance using two methods:
- Directly providing the URL of the Elasticsearch instance. This method indicates the location of Elasticsearch but contains no information about the location of Kibana.
- Providing a CloudID identifying the Elasticsearch instance. This method encodes the locations of both Elasticsearch and Kibana. Only connections using CloudID can identify the location to deploy the Kibana dashboard.
To complete the process for either connection type:
- In the BeyondInsight for Unix & Linux Logging section, select the logging option(s), to send BIUL Console Audit Data, System Logs, or Task Data to the SIEM.
When enabled, data stored in the local log file or BIUL database is forwarded to the elastic connection. This data is in the elastic common schema format and displays in the Audit > Unified Search > BeyondInsight for Unix & Linux section. - Select Use Elastic Alias to use Elastic-native Index Lifecycle Management (ILM) for event data forwarding. BIUL routes events through a fixed index alias (-current). Elasticsearch then assumes native control of index rollover, retention, and tiering across storage phases according to cluster ILM policies.
The index alias and bootstrapped index must be created in Elasticsearch before setting this option. BIUL validates the alias upon saving; if validation fails, the SIEM connection configuration cannot be saved. For more information, see Set up Elasticsearch ILM for EPM-UL data. - Optionally, to test your updated settings and connection, click Test Settings, and check for the success message.
- Click Save SIEM Connection.
Edit a SIEM connection
You can change the settings for an existing SIEM connection.
- On the sidebar menu, click Settings > SIEM Connections.
- In the SIEM Connections list, select a connection.
- On the Edit SIEM Connection page, make your modifications, and then click Save SIEM Connection.
- Optionally, to test your updated settings and connection, click Test Settings.
Deploy a Kibana dashboard
Connections using CloudID can identify the location to deploy the Kibana dashboard.
To deploy a Kibana dashboard, you must:
- Configure Elasticsearch in BIUL.
- Associate a Kibana instance with the Elasticsearch instance.
- Connect to your Elasticsearch instance using a CloudID.
To deploy a Kibana dashboard using BIUL:
-
On the sidebar menu, click Settings > SIEM Connections.
-
In the SIEM Connections list, select your Elasticsearch connection.
-
On the Edit SIEM Connection page, click to open the Elasticsearch Connection Details.
-
Click Deploy Dashboard.
-
The Kibana Dashboard URL appears.
-
Click the link to access the Kibana dashboard.
This is a prebuilt Kibana dashboard layout defined by BeyondTrust. The dashboard provides a few visualizations relevant to BeyondTrust products, including AD Bridge authentication events and EPM-UL policy events.
Set up Elasticsearch ILM for EPM-UL data
Endpoint Privilege Management for Unix and Linux (EPM-UL) sends event log and I/O log data to Elasticsearch as daily indices matching the patterns pmul-eventlog-ecs-* and pmul-iolog-ecs-*. Without a lifecycle policy, these indices accumulate indefinitely and continue consuming your cluster's most expensive storage tier. The Elasticsearch Index Lifecycle Management (ILM) feature lets you automatically move data through Hot, Warm, and Cold storage tiers over time, and delete it once it is outside your retention window.
This article shows you how to add an ILM policy to your EPM-UL data using the index template EPM-UL already installs, without creating any new templates.
If you followed a general Elastic ILM walkthrough before and built a new index template from scratch, that approach is correct for index patterns that do not already have one, such as a custom debug index you created. The EPM-UL pmul-eventlog-ecs-* and pmul-iolog-ecs-* indices are different: EPM-UL creates its own index template for these automatically during installation, so the from-scratch steps do not apply here. Follow this article instead.
ImportantEPM-UL already creates an index template for you. Do not create a new or separate index template to apply your ILM policy. Add the policy to the existing EPM-UL template instead. If you create a second template that also matches
pmul-eventlog-ecs-*orpmul-iolog-ecs-*, the save fails with an index template collision error.
How this differs from other BeyondTrust products
BeyondInsight for Unix & Linux (BIUL) and AD Bridge (ADB) use different default index patterns. Unlike EPM-UL, neither ships a pre-existing index template for its pattern. That difference changes which approach applies.
| Product | Default index pattern | Pre-existing template? | What to do |
|---|---|---|---|
| EPM-UL | pmul-eventlog-ecs-*, pmul-iolog-ecs-* | Yes, created automatically on install | Attach ILM to the existing template. Follow this article. |
| BIUL | biul-ecs-* | No | No collision risk. Create a new index template covering biul-ecs-* and attach your ILM policy as part of that setup, which is the standard from-scratch approach. |
| ADB | adb-* | No | Same as BIUL. Build a new index template from scratch and attach ILM to it directly. |
If you are setting up ILM for BIUL or ADB, you are not at risk of the index template collision this article warns about for EPM-UL, because there is no pre-existing template to collide with. You can create an index template for biul-ecs-* or adb-* and attach ILM to it directly, the same way you would for any other Elastic index that does not already have a template.
Prerequisites
- An Elastic Cloud or self-managed Elasticsearch instance with admin or index-management-level permissions.
- EPM-UL already installed and actively sending data. The index template covering
pmul-eventlog-ecs-*andpmul-iolog-ecs-*already exists in your cluster, so you do not need to create it. - Your retention requirements, meaning how long data stays in each tier and when it is deleted. Establish these before you create the policy.
Step 1: Create an ILM policy
- In Kibana, go to Stack Management > Index Lifecycle Policies > Create Policy.
- Give the policy a descriptive name, for example
epm-ul-retention. - Configure the Hot, Warm, Cold, and Delete phases according to your retention needs. Only the Hot phase is required. The others are optional.
- Turn off Rollover in the Hot phase.
- If your cluster is a single node with no dedicated hot, warm, or cold node roles, turn off the data tier migration options in the Cold phase.
- Click Save.
Elasticsearch ships with several built-in Managed policies, such as a default 180-day retention policy. Do not edit these directly, because Kibana and Elasticsearch may rely on them internally. If a built-in policy does not fit your retention needs, create your own custom policy instead.
ImportantEPM-UL writes directly to date-suffixed index names, for example
pmul-eventlog-ecs-20260101, rather than using the native alias-based rollover in Elasticsearch. Rollover settings do not apply to this setup. Turn Rollover off in step 4.
ImportantElasticsearch requires nodes tagged with the
data_coldrole for the Cold phase data-tier setting. Without them, indices get stuck in Cold and never reach Delete. The Warm phase falls back gracefully without dedicated nodes, but Cold does not. Enable these options only if your infrastructure team has explicitly provisioned dedicated node roles.
Step 2: Find your existing EPM-UL index template
- Go to Stack Management > Index Management > Index Templates.
- Locate the template that already covers
pmul-eventlog-ecs-*andpmul-iolog-ecs-*. EPM-UL created this template automatically during installation. It already defines the field mappings EPM-UL needs for searching, such as making text fields searchable as keywords. - Do not click Create Template. You are going to edit the template that is already listed here.
Step 3: Attach the ILM policy to the existing template
- Open the existing template and click Manage > Edit.
- Step through the wizard to the Index Settings page.
- Add the following setting, using the policy name you created in Step 1:
{
  "index": {
    "lifecycle": {
      "name": "<your-policy-name>"
    }
  }
}- Continue through the remaining pages without changing anything else, then click Save.
- The save completes without errors. Return to the Index Lifecycle Policies page and open your new policy. The EPM-UL template is now listed under Linked index templates, which confirms that every future index matching the pattern is managed by this policy.
Use the API instead of Kibana
If you prefer to script this or use the Elasticsearch API directly, retrieve the existing template first so you do not accidentally overwrite settings or mappings that are not changing:
GET /_index_template/<your-epm-ul-template-name>Then resubmit the same body with index.lifecycle.name added under settings:
PUT /_index_template/<your-epm-ul-template-name>
{
  ...the existing index_patterns, priority, and _meta for the template, unchanged...,
  "template": {
    ...existing mappings, unchanged...,
    "settings": {
      ...existing settings, unchanged...,
      "index.lifecycle.name": "<your-policy-name>"
    }
  }
}
Step 4: Apply the policy to older indices
ILM attached to the template applies only to indices created after this point. Indices that already existed before you made this change do not automatically pick up the policy. To bring older indices under management, apply the setting directly to the matching pattern:
PUT /pmul-eventlog-ecs-*,pmul-iolog-ecs-*/_settings
{
  "index": {
    "lifecycle.name": "<your-policy-name>"
  }
}
ILM runs a check roughly every 5–10 minutes. Allow time for the check to run, then refresh the Index Management page to confirm that older indices are progressing through phases, or have been deleted if your policy specifies deletion.
Step 5: Verify the policy is applied
Run the following against your index pattern to confirm that each index is managed and to see its current phase:
GET /pmul-eventlog-ecs-*,pmul-iolog-ecs-*/_ilm/explainIndices under management show "managed": true along with their current phase and step.
Troubleshooting
The error Index template has index patterns matching existing templates appears. You created a new template instead of editing the existing one. Delete the new template and follow Step 3 to add ILM to the template EPM-UL already created.
An index is stuck and does not move to Delete. This is almost always the Cold phase data-tier requirement described in Step 1. Confirm whether your cluster has dedicated cold-tier nodes. If it does not, turn off data-tier migration in the Cold phase.
You need to start over on a stuck policy. Remove ILM from a pattern and reapply it once the policy is fixed:
POST /pmul-eventlog-ecs-*,pmul-iolog-ecs-*/_ilm/remove
PUT /pmul-eventlog-ecs-*,pmul-iolog-ecs-*/_settings
{ "index": { "lifecycle.name": "<your-policy-name>" } }
A single index is stuck on a bad step, rather than the whole pattern. If only one index is misbehaving and you do not want to reset ILM for the entire pattern, force that specific index to skip to a different phase. Run _ilm/explain first to find its exact current phase, action, and step name.
In the following request, set phase to the phase the index is stuck in, set action to the action it is stuck on, set name to the step name returned by _ilm/explain, and set the next_step phase to the phase you want to force it to:
POST /<index-name>/_ilm/move
{
  "current_step": {
    "phase": "hot",
    "action": "rollover",
    "name": "ERROR"
  },
  "next_step": {
    "phase": "delete"
  }
}
General diagnostics. These commands are useful starting points for any ILM issue. GET _cluster/health reports overall cluster health, _ilm/explain reports why a pattern is stuck, and GET _ilm/status reports whether ILM itself is running.
GET _cluster/health
GET /pmul-eventlog-ecs-*,pmul-iolog-ecs-*/_ilm/explain
GET _ilm/status
Frequently asked questions
Do I need to create my own index template for ILM? No. EPM-UL already creates one for you during installation. Add your ILM policy to that existing template rather than creating a new one.
Does my ILM setting survive an EPM-UL upgrade? This has not been confirmed for every release. As a precaution, check that your ILM policy is still attached to the template after any EPM-UL upgrade, and reapply Step 3 if it is not.
Can I use the same policy for multiple EPM-UL index patterns? Yes. You can attach the same policy to the template covering both pmul-eventlog-ecs-* and pmul-iolog-ecs-*, because the same EPM-UL-installed template typically covers both patterns.
Delete a SIEM connection
To delete an existing SIEM connection:
- On the sidebar menu, click Settings > SIEM Connections.
- In the SIEM Connections list, select a connection.
- On the Edit SIEM Connection page, at the far right, click Delete Connection.
- To confirm the deletion, click Delete.
Add SMTP server connection
To provide local BeyondInsight for Unix & Linux (BIUL) users access to the Reset Password link on the BIUL logon page, add SMTP server details. Using the password reset feature requires a verified email address.
The configured SMTP server must support encrypted sessions. The protocols to be supported by the SMTP Server are STARTTLS and TLS.
- Select the Settings menu.
- Click the Integration tile.
- Enter the information for the mail server, including: server address, port, and user credentials.
- (Optional). Click Test Settings to ensure there is a connection to the mail server.
- Click Save Settings.
Certificates
On the Manage Certificates page, you can:
- Add certificate authorities (CA) to the BeyondInsight for Unix & Linux (BIUL) trusted certificate pool
- Upload server and client certificates for remote connections
- Generate certificate signing requests
- Add a signed certificate from a trusted Certificate Authority (CA)
A BIUL installation generates unique CA and TLS certificates. BIUL relies on the operating system built-in cryptographically secure random number generator (PRNG) for secure key generation.
The CA is unique per installation.
The SSL certificate for the BIUL cannot be updated or deleted from the Manage Certificates page.
Add a certificate authority
An uploaded CA is added to the BIUL trusted certificate pool.
When BIUL connects to a remote service, a trusted CA in the BIUL database is added to the trusted certificate pool for that connection.
To add a CA:
- Go to Settings > Certificates.
- Click Add Certificate > Upload a Certificate Authority.
- Click the upload arrow and navigate to the .PEM file location.
- Click Upload File.
A CA can be removed when no longer required.
An uploaded CA is added to Solr during deployment or adoption actions for the Solr instance.
As of version 23.1, Solr is deprecated. EPM-UL no longer supports installing Solr, but features that use an existing Solr installation will continue to work.
Upload certificates
When deploying a Solr instance or assigning a log server, BIUL searches the host for a certificate with the same name (wildcards supported). If found, that certificate is used for the host. Otherwise, BIUL generates a certificate using the BIUL CA.
- Go to Settings > Certificates.
- Click Add Certificate > Upload Existing Certificate.
- Select the host to copy the certificate to.
- Select a certificate type.
- Click the upload arrow and navigate to the certificate file location.
- Click Upload Files.
Create a certificate signing request
You can create a request to sign a certificate by a CA. After the certificate is signed, you can upload to the host.
To request a signed certificate:
- Go to Settings > Certificates.
- Click Add Certificate > Create Certificate Signing Requests.
- Fill out the form with details, including host, common name, organization, and organization email.
- Select a certificate type: client or server.
- Select a SAN type: DNS Name, IP address, or email address.
- Click Create.
- After the request is created, you can view the Pending status for the request.
- Click and select Certificate Details.
- Click Download as PEM. After the certificate is signed, upload the certificate to complete the request.
Certificate expiry
A warning icon indicates a certificate is expiring soon or is already expired.
Add a certificate
Upload signed certificates from a trusted Certificate Authority (CA) to eliminate browser security warnings such as “Your connection is not private” and ensure trusted HTTPS connections.
BIUL certificates are managed through the BIUL UI. EPM-UL certificates are typically managed through configuration files or command‑line tools.
To upload the certificate:
- From the Home page, select Settings.
- In Settings, select Certificates.
This page displays a list of certificates created during the initial BIUL installation. - Select Add.
- Select Upload Existing Certificate.
- Upload the required certificate files using one of the methods:
- Drag and drop the files into the upload area
- Use Browse to select files from your local system
- After upload, select the certificate entry to:
- Review certificate details
- Confirm validity and expiration
- Download the certificate if needed
Add multifactor authentication
This MFA implementation is intended for on-prem BIUL console access
Prerequisites
RADIUS/Ping setup
- Ensure Ping Access Manager is available through a RADIUS endpoint (directly or via your organization’s RADIUS proxy design).
- Collect the RADIUS connection values:
- Hostname/IP
- UDP port (commonly 1812)
- Shared secret
- Any required authentication protocol
Network
- BIUL must be able to reach the RADIUS server over UDP on the configured port.
Create the RADIUS authentication service in BIUL
In the BIUL console, go to:
-
Select the Settings menu.
-
Select the Authentication Services tile.
-
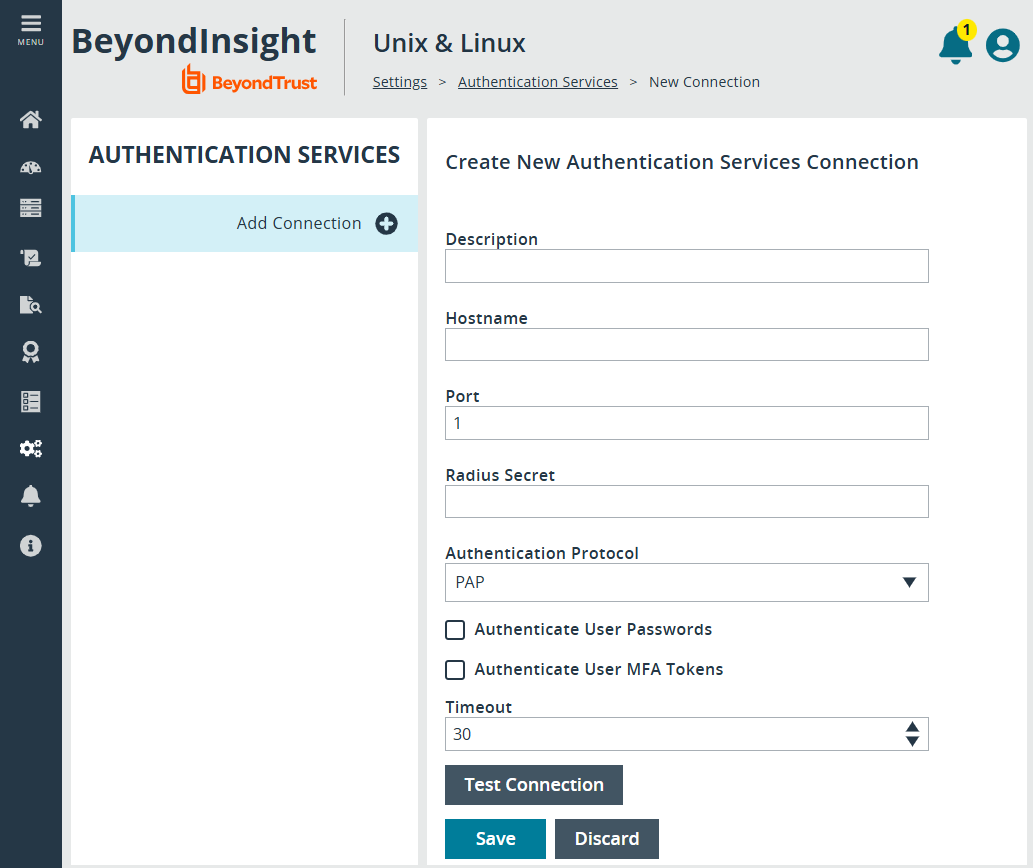
Select Add Connection.
-
Create a new RADIUS connection and provide:
- Name (friendly display name)
- Hostname/IP address
- Port
- RADIUS secret (shared secret)
- Authentication Protocol
- Authentication option: Select either user passwords or MFA token
- Timeout: RADIUS server timeout (wait for server response)
-
Select Test Connection button to validate the settings.
Apply MFA to users via groups
MFA is applied by associating groups to one or more authentication services (RADIUS servers).
-
Select the Settings menu.
-
Select the Console Access tile and select the Groups tab.
-
Create or edit a group:
- Local groups
- Remote groups
-
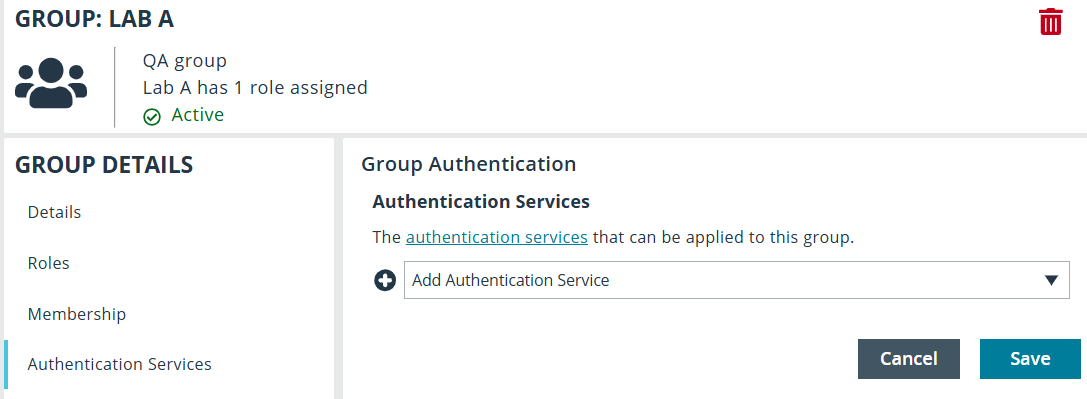
Select the Authentication Services tab and select one or more RADIUS authentication services.
-
Click Save.
What users experience at login
When a user who belongs to an MFA-enabled group logs in:
- User enters username and password.
- If MFA is required, BIUL prompts for a token.
- User enters the MFA token and BIUL completes authentication.
Updated 21 days ago
