Working with AD Bridge Cells | AD Bridge
Create a default cell
You can create a Default Cell that maps computers that are not in an OU with an associated cell. The Default Cell can contain the mapping information for all your Linux and Unix computers. AD Bridge does not require a Default Cell.
A Linux or Unix computer can be a member of an OU that does not have a cell associated with it. In such cases, the group policies associated with the OU apply to the Linux and Unix computer, but user UID-GID mappings follow the policy of the nearest parent cell, or the Default Cell.
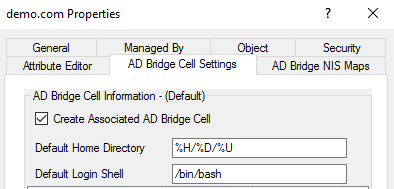
To create a Default Cell:
- Start Active Directory Users and Computers.
- Right-click the name of your domain, and then select Properties.
- Select the AD Bridge Cell Settings tab, and then check the Create Associated AD Bridge Cell box.
Use pre-existing RFC 2307 data
To recognize and use pre-existing Unix data that is stored in Active Directory with RFC 2307 attributes, make sure AD Bridge is in Directory Integrated mode and then create a Default Cell.
Associate a user with AD Bridge cells
You can associate a user with one or more AD Bridge Cells to give the user access to the Linux and Unix computers that are members of each cell.
- Start Active Directory Users and Computers.
- In the console tree, click Users.
- In the details pane, right-click a user, and then click Properties.
- Select the AD Bridge Cell Settings tab.
- Under AD Bridge Cells, select the check box for the cell that you want to associate the user with. You can select more than one cell.
- Under User info, a default GID value, typically 100000, is automatically populated in the GID box.
The user's settings can vary by cell.
- To set the UID, click Suggest, or type a value in the UID box.
The Suggest button generates an ID based on the same hash used in Unprovisioned mode. This allows systems to retain user IDs when migrating to ADB Enterprise.
Setting UIDs below 1,000 is not advised, as they can result in a security vulnerability.
For more information about Unprovisioned mode, see Storage modes in Active Directory.
Access and link cells
When you link cells, computers in one cell can be accessed by the users in the cell that you linked.
To provide a mechanism for inheritance and to ease system management, AD Bridge can link cells. Users and groups in a linked cell can access resources in the target cell.
For example, if your Default Cell contains 100 system administrators and you want those administrators to have access to another cell, called Engineering, you do not need to provision those users in the Engineering cell. Link the Engineering cell to the Default Cell. The Engineering cell will inherit the settings of the Default Cell.
To ease management, in the Engineering cell you can set any mapping information that should differ from the Default Cell.
Although you can use linking to create a hierarchy of cells, linking is not transitive. For example, consider the following linked cells:
- Civil cell linked to Engineering cell
- Engineering cell linked to Default cell
In this scenario, the Civil cell will not inherit the settings of the Default Cell.
Link to multiple cells
The order of the UIDs controls the search order. Consider the following scenario:
Kathy, a system administrator, has UIDs set in the Default Cell (100,000) and in the Engineering cell (150,000). In the Civil cell, however, the UID from the Engineering cell must be used to log into Civil computers.
If the Civil cell is linked to the Default Cell and the Engineering cell, the order is important. If Engineering does not precede the Default Cell in the search order, Kathy will be assigned the wrong UID and will be unable to log on computers in the Civil cell.
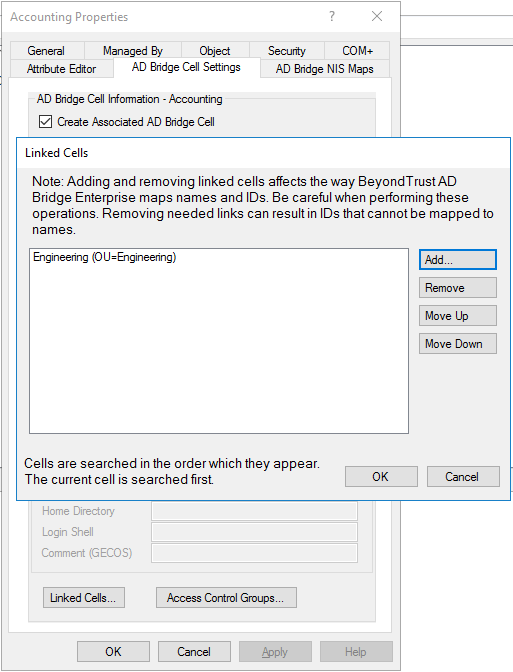
In the following scenario, a link is created to the Engineering cell. With this link, users in the Engineering cell can access the computers in the Accounting cell:
- Start Active Directory Users and Computers.
- In the console tree, right-click the organizational unit that is associated with the cell you want to link to another cell, and then click Properties.
- Click the AD Bridge Cell Settings tab.
- Click Linked Cells, click Add, click the cell that you want, and then click OK.
- When you link to multiple cells, the order that you set is important because it controls the search order. The cells are searched in the order listed. Use Move Up or Move Down to set the order of the cells.
- Click OK.
Assign access control groups
You can apply access control to UNIX and Linux agents (hosts) using the access control group setting that is available through AD Bridge Cell Settings. Using an access control group you can apply restrictive access control to the AD Bridge hosts and users that can access those hosts.
An access control group can be used to supplement existing Group Policy Allow Logon Rights settings and cumulative policy settings. The resultant set of groups will be a combination of the group membership for the AD Bridge host together with the Group Policy Allow Logon Rights settings and cumulative policy.
Configuring and using access control groups is a two-step process:
- Create an Active Directory group: this is a host access group. Create host access groups using a common attribute in the naming convention. For example, prefix all group names with ADB_.
Add the user accounts and the AD Bridge hosts to the group.
Members can be added directly to the group or through nested group membership. For a user to access an AD Bridge agent, the user and the agent must be a member of the same host access group (directly or through nested groups).
- Add the groups to the Access Control Groups associated with the AD Bridge Cell.
A template is a way to associate the groups with the cell. Host access templates identify the groups to use for the Access Control Group. The host access template can match on group names using wildcards. The name matching is applied to the “Group name (pre-Windows 2000) attribute”. This is the sAMAccountName attribute.
When an AD Bridge agent has no membership in any host access group, restrictions will not apply to that host. This can be confusing when removing a host from a host access group. If you want the default behavior to disable access to all AD Bridge hosts unless they are a member of a host access group then create a host access template for Domain Computers where only hosts are defined.
Apply changes to the access control group
The agent checks for changes to the access control group during the lsass refresh. Each group the computer object belongs to that also matches the template name is added to the host access groups. The lsass refresh interval is every 30 minutes. To apply the settings immediately, run the following command:
/opt/pbis/bin/lwsm refresh lsass
Confirm configuration on the agent
To confirm the templates are applying on an agent system use the pbis acl command. This returns the template that is configured and all the matching groups that have been applied.
Example scenario
In a database environment, control access is required on a set of hosts running database applications that include the following:
- Group of database server hosts DatabaseServers: dbsrv1, dbsrv2, dbsrv3
- Group of database client hosts DatabaseClients: dbcli1, dbcli2, dbcli3
- Group of database administrator accounts: DatabaseAdmins: dbadm1, dbadm2, dbadm3
- Group of database application user accounts: DatabaseUsers: dbusr1, dbusr2, dbusr3
Database administrators can access all database hosts by creating a DatabaseAdmins-ACL group that includes the following groups as members: DatabaseServers, DatabaseClients and DatabaseAdmins.
Database users can access only database client hosts by creating a DatabaseUsers-ACL group that includes the following groups as members: DatabaseClients and DatabaseUsers.
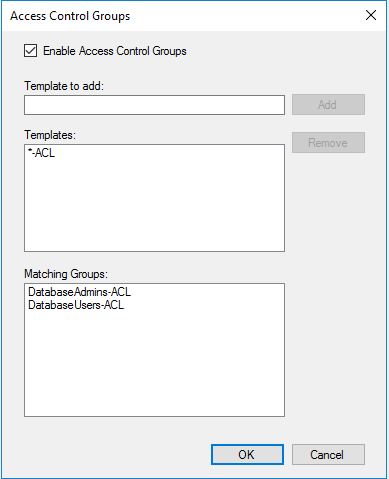
On the Access Control Groups dialog box, enter the template name similar to the following: *-ACL. The wildcard matching adds all groups that contain -ACL to the list, as shown.
Move a computer to another cell
When you move a computer from one cell to another, you must do the following if you want the cell information to be updated immediately on the client:
- Clear the authentication cache for user and group membership:
/opt/pbis/bin/ad-cache --delete-all
- Restart the AD Bridge authentication service by running this command as root:
/opt/pbis/bin/lwsm restart lsass
- Force the computer to refresh its Group Policy settings by running this command as root:
/opt/pbis/bin/gporefresh
Updated 7 days ago
