Install the Management Console | AD Bridge
This section provides information on management console requirements and installing the console.
Requirements to use AD Bridge with Active Directory
You must have at least the following components to use AD Bridge with Active Directory:
- An Active Directory domain controller
- A Windows administrative workstation that is running ADUC and is connected to your Active Directory domain controller
- One or more Unix or Linux computers running an operating system that AD Bridge supports, such as versions of Red Hat, SUSE Linux, CentOS, Debian, Sun Solaris, IBM AIX, and Ubuntu
For agent requirements (the software that runs on the Linux or Unix computers that you want to connect to AD), see What is the AD Bridge agent?.
Microsoft management tools
AD Bridge works with ADUC, and GPMC. Ensure that the Microsoft management tools are installed before you install AD Bridge.
The Microsoft management tools vary by Windows version but include the Remote Server Administration Tools (RSAT) for Windows.
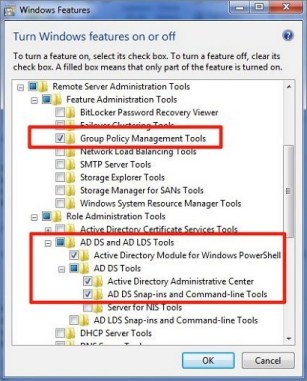
Turn on the following RSAT features. Go to Control Panel, select Programs, and then select Turn Windows features on or off:
- Group Policy Management Tools
- Active Directory Module for Windows PowerShell
- Active Directory Administrative Center
- AD DS Snap-ins and Command-Line Tools
For more information, see Remote Server Administration Tools for Windows.
Administrator privileges
To add Linux or Unix computers to an AD domain, the following admin privileges are required:
- Root access or sudo permission on the Linux or Unix computers that you want to join to the domain.
- Active Directory credentials that allow you to add computers to an Active Directory domain. For example, membership in the Domain Administrators security group or the Enterprise Administrators security group.
Active Directory requirements
For the list of supported platforms, see Supported platforms.
Windows requirements for the console
These are the minimum requirements for the console:
- Microsoft .NET Framework 4.8
- Microsoft .NET 7
- 50MB of free space
For the list of supported platforms, see Supported platforms.
Requirements to rRun AD Bridge in Directory Integrated mode
To run AD Bridge in Directory Integrated Mode, you must meet the following requirements:
- Active Directory installations that comply with RFC 2307
- Domain and forest functional levels have been raised to Windows Server 2012 or later
For more information, see Storage modes).
Networking
The subnets with your Linux or Unix computers must be added to Active Directory sites before joining the computers to Active Directory so that the AD Bridge agent can detect the optimal domain controller and global catalog.
Replication
Make sure your AD replication system is up to date and functioning properly by using the following diagnostic tools from www.microsoft.com/download to test replication.
- DCDiag: Part of Microsoft's support tools for Windows Server 2012, dcdiag.exe should be run with the /v /c /e switches to test the domain controllers in all your sites.
- FRSDiag: Use frsdiag.exe tool, available from the Microsoft Resource Kit tools, to check the File Replication Service (FRS).
In addition, the following tools can help you review and troubleshoot FRS problems.
- Sonar: Use it to perform a quick review of FRS status.
- Ultrasound: Use it to monitor and troubleshoot FRS.
- ReplMon: Included in the Microsoft Resource Kit Tools. Use it to investigate replication problems across links where DCDiag showed failures.
For instructions, see the Microsoft documentation for each tool.
Supported platforms and applications
Platforms
AD Bridge supports many Linux or Unix and virtualization platforms.
For the list of supported platforms, see Supported platforms.
Applications
You can use the Advanced Group Policy Management (AGPM) tool to manage your GPOs. Any AD Bridge settings applied to your GPOs are maintained.
Install the console
Install the BeyondTrust Management Console on a Windows administrative workstation that can connect to your Active Directory domain controller.
We recommend that you do not install the console on a domain controller.
- Review the requirements before proceeding with the installation.
- Ensure the account you are using to run the install is a member of the Domain Admins group or Enterprise Admins group. The account needs privileges to change objects and child objects in Active Directory.
- Ensure the Microsoft management tools for Active Directory are installed before you install the console.
During the installation, checks are in place to ensure that your environment meets successful installation requirements. If you need more information, a log file is created here during the install: %UserProfile%AppData\Local\PBIS.Logs.
- Locate and copy the ADBridge64-##.#.#.###.msi install file to your Windows workstation. The installer file includes the version and build number.
- Run ADBridge64-##.#.#.###.msi.
- On the Installation Wizard page, check the box to accept the license agreement and click Next.
- Unless you need to place the files elsewhere, accept the default Install Location Destination Folder and click Next.
- Select the features to install and click Next.
- To begin the installation, on the Install Steps window, click Next.
- Once the installation is complete, click Finish.
At the end of the installation, you can start the configuration wizard to configure Directory Integrated mode, and follow best practices for configurations. You can also choose to run this wizard later from the default install location.
For more information, see the following:
- Requirements to use AD Bridge with Active Directory.
- On Microsoft management tools, Requirements to use AD Bridge with Active Directory .
- For the Configuration wizard, see Install the console.
- For best practices, see Best practices.
Use msiexec.exe
Silent install or uninstall
Run a silent install or uninstall of the console using msiexec.exe. To see a complete list of options, run msiexec.exe.
Example
msiexec.exe /i ADBridge64-##.#.#.###.msi /quiet /qn``msiexec.exe /x ADBridge64-##.#.#.###.msi /quiet /qn
Install individual modules
Install individual AD Bridge modules using msiexec.exe. The following module options are available:
- BaseInstall
- ConsoleInstall
- ReportingToolsInstall
- OperationsDashboard
- DBUpdateTool
- MigrationToolsInstall
- MMCExtensions
- MigrationToolsInstall
- GPMC
- ADUC
Example
msiexec /i ADBridge64-##.#.#.###.msi ADDLOCAL=BaseInstall /qn
Upgrade the console
AD Bridge supports in-place upgrades. Run the latest installer on the computer where AD Bridge is already installed.
Use the configuration wizard
At the end of the installation, you can start the Configuration wizard to configure Directory Integrated mode and follow best practices for configurations. The Configuration wizard is designed to simplify deployments. The essential components for a successful deployment can all be set up using the wizard.
You can also choose to run this wizard later from the default install location.
Use the Configuration wizard to:
- Set up Directory Integrated Mode and Promote Attributes to Global Catalog
- Schema Admin rights are required to promote attributes to the global catalog. This does not extend the schema and is reversible.
- Create Default Cell
- Create a Default Cell at the root of the domain. Named cells are still supported but cannot be created in the Configuration wizard.
- Provision Group to Default Cell
- Provision an Active Directory group to the Default cell. If you do not select an AD group, the Domain Users group is provisioned by default.
- Create a License Container and Import a License
- Create a license container at the root of the domain.
Import a license file to the license container.
- Create a license container at the root of the domain.
- Create Default Group Policy object with Specific Group Polices
- The following Group Policies can be created using the Default Group Policy:
- Enable audit and forward events to
- Prepend default domain name to AD users and groups
- Disable user logon GPO processing
- The following Group Policies can be created using the Default Group Policy:
At the end of the wizard, you can launch Cell Manager, BMC, ADUC, and Group Policy Management.
Access the configuration wizard
If you haven't used the wizard from the last window of the Windows installer, you can run it from the command line:
C:\\Program Files\\BeyondTrust\\PBIS\\Enterprise\\ConfigurationWizard.exe
Change to Directory Integrated mode
Running the configuration wizard indexes frequently searched attributes in the Active Directory global catalog.
- Go to the install directory C:\Program Files\BeyondTrust\PBIS\Enterprise.
- Run ConfigurationWizard.exe.
- On the Promote Attributes page, click Promote Attributes.
- After the attributes are promoted, click Finish.
The necessary attributes are updated.
Changes applied by the Directory Integrated mode configuration
Note
This is not a schema extension. All attributes are part of the RFC 2307 and have existed as part of the Active Directory schema since 2003.
After you raise the domain and forest to 2012 functional levels, the AD Bridge domain configuration wizard changes the following attributes. These are required for AD Bridge to run in Directory Integrated mode. These attributes already exist as part of the RFC 2307.
Schema admin rights are required to make the following changes.
Promotes and indexes the following attributes to the global catalog:
- displayName
- gidNumber
- uid
- uidNumber
Promotes (but does not index) the following attributes to the global catalog:
- gecos
- loginShell
- unixHomeDirectory
Note
For more information on the Directory Integrated mode, see Storage modes in Active Directory.
Change to Directory Integrated mode during installation
Running the configuration wizard promotes and indexes frequently searched for attributes in the Active Directory global catalog.
- Go to the install directory C:\Program Files\BeyondTrust\PBIS\Enterprise.
- Run ConfigurationWizard.exe.
- On the Promote Attributes page, click Promote Attributes if needed.
- After the attributes are promoted, click Finish.
The necessary attributes are updated.
Change to Directory Integrated mode via LDF files
The Active Directory schema changes are applied from a set of LDAP Data Interchange Format (LDIF) files. The standard installation places these files in the following directory: Program Files\BeyondTrust\PBIS\Enterprise\Resources\LDF.
Note
Here are Microsoft Learn references to understand more about the benefits of these changes:
- For index attributes in AD DS, see Index Attributes in AD DS.
- For including attributes in the global catalog, see Attributes in the Global Catalog.
Updated 3 months ago
