Manage users and groups | AD Bridge
Configure cell settings for users
In Active Directory Users and Computers, configure AD Bridge Cell settings for your users.
Administrative privileges are required to manage AD Bridge Cell settings. Ensure you are logged on as a Domain Administrator, Enterprise Administrator, or that you are assigned the appropriate permissions. For more information, see Working with AD Bridge Cells.
To establish a connection between Active Directory and your clients, configure the following cell settings.
| Setting | Description |
|---|---|
| UID | The Unix user ID. The user's settings can vary by cell. |
| GID | The Unix primary group ID. By default, you can select any group or enter an arbitrary primary group ID for the user account. If you need to restrict this to only allow groups enabled in the cell and assigned to the user, you can use the btopt.exe tool to enforce this validation. |
| Login Name | Provide an alias for an Active Directory user so that the user can log into a bridged client using the alias. An alias only applies to the selected cell. |
| Home Directory | When you set the default home directory, you must use the default user name variable (%U). Using the default domain name using the domain name variable (%D) but it is optional.
|
| Login Shell | When assigning a login shell, you can select a user or more than one user. You can assign the login shell at the OU level or user level. |
| Comment (GECOS) |
Configure cell settings at the OU level, user level, or select a range of users in a selected OU.
To configure cell settings:
-
Start Active Directory Users and Computers.
-
Navigate to the OU where your users reside.
-
Right-click the user and then select Properties.
-
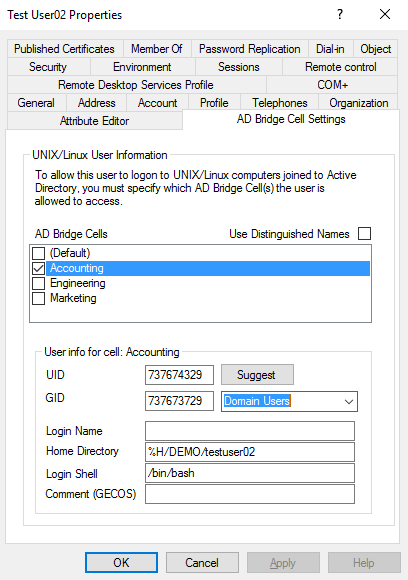
Select the cells where you want the settings to apply. When editing the properties for a particular cell, if the box is already checked, then select the cell to activate the settings in the user info section.
-
Enter information for the following:
- UID: Click Suggest, or type a value in the box.
- GID: The GID value is automatically populated. Select a group from the list to change the primary group for the user account.
If you select another group from the list, the GID can be validated. If the group is unavailable, be sure to add the group to the cell. For more information, see Configure cell settings for a group.
- Home Directory: To override the default home directory, type the directory that you want to set for the user. For example, /home/%D/%U
- Login Shell: Enter a login shell if you want to override the default. For example, /bin/sh or /bin/bash.
- Comment (GECOS): Enter a comment (Optional).
-
Click OK.
Assign settings to more than one user
You can assign settings to more than one user at the same time. For example, you can assign users to a cell and then set the home directory. The users must be members of a group already associated to a cell and each user must have a UID-GID mapping.
Configure cell settings for a group
In Active Directory Users and Computers, configure AD Bridge Cell settings for a group, including a GID and group alias.
Administrative privileges are required to manage AD Bridge Cell settings. Ensure you are logged on as a Domain Administrator, Enterprise Administrator, or that you are assigned the appropriate permissions. For more information, see Working with AD Bridge Cells.
A cell must already be created.
-
Start Active Directory Users and Computers.
-
In the console tree, right-click a group, and then click Properties.
-
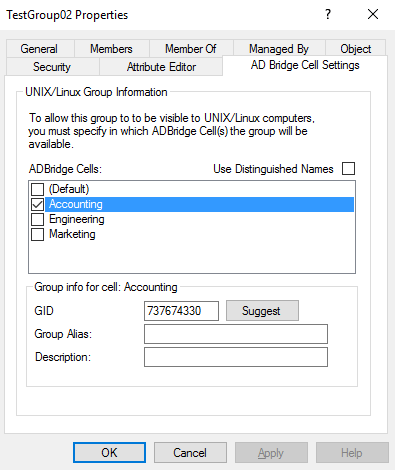
Click the AD Bridge Cell Settings tab.
-
In the AD Bridge Cells section, select the check box for the cell to provide the group access to.
-
In the Group info for cell section, set the following:
- GID: Click Suggest, or type a value in the GID box.
You can assign a group identifier (GID) to an Active Directory group by associating the group object with a cell and setting a GID value. The GID information applies to all objects in the group. However, the settings are not applied to nested groups; you must apply the GID information to each group. - Group Alias: Set an alias for the group (Optional). The alias applies only within the cell.
- GID: Click Suggest, or type a value in the GID box.
-
Click OK.
Find users and groups in Active Directory users and computers
Because of a limitation with the Active Directory Users and Computers snap-in, when you try to find an AD Bridge user or group by right-clicking an OU and then clicking Find, the user or group will not appear in the results even when the user or group is in the OU. The Find command does, however, work at the domain level.
As an alternative, find AD Bridge users and groups in an OU using the procedure:
-
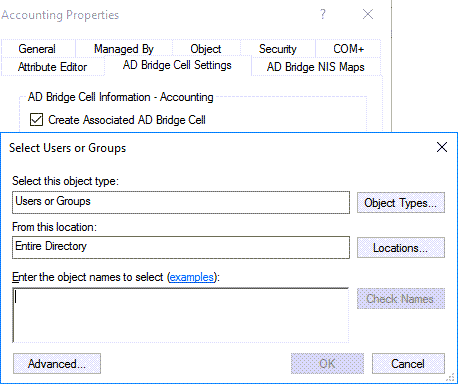
Right-click the OU with an associated cell, select Properties, and then click the AD Bridge Cell Settings tab.
-
Click Add, and then search the user or group.
Use the BeyondTrust Management Console to find orphaned objects
Use the BeyondTrust Management Console to find and remove orphaned objects. An orphaned object is a linked object, such as a Unix or Linux user ID or group ID, that remains in a cell after you delete a group or user's security identifier, or SID, from an Active Directory domain.
Removing orphaned objects from Active Directory cleans up manually assigned user IDs and improves search speed. We recommend that you remove orphaned objects before you use the migration tool with a domain that operates in Schemaless mode (see note below).
Schemaless mode is deprecated.
To find and remove orphaned objects:
- In the BeyondTrust Management Console tree, expand Enterprise Console, and then click Diagnostics & Migration.
- From the Tasks list, click Find Orphaned Objects.
- Click Select Domains, select the domains that you want to scan, and then click OK.
- Click Begin Scan.
- To remove the objects that appear in the Orphaned objects to delete box, click Delete Objects.
Find duplicate objects
Use the BeyondTrust Management Console to find and remove duplicate objects. Duplicate objects are any objects with the same Unix or Linux user ID or group ID, User login name, or Group Alias in the Active Directory domain.
Removing duplicate objects from Active Directory cleans up manually assigned user IDs and prevents conflicts. We recommend that you remove duplicate objects whenever they exist.
To find duplicate objects:
-
In the BeyondTrust Management Console tree, expand Enterprise Console, and then click Diagnostics & Migration.
-
From the Tasks list, click Find Duplicate Objects.

-
Navigate the folders indicated in red to find the duplicates.
Migrate users to Active Directory
The Network Information System (NIS) migration tool imports Linux and Unix passwd files and group files and maps them to users and groups in Active Directory. The migration tool includes options to ease your NIS migration to Active Directory, including:
- Migrating account information to the organizational units that you want.
- Creating groups in Active Directory to match your Linux and Unix groups.
- Generating scripts to repair file ownership and group settings.
- Changes to the GID of imported users to that of the AD Domain Users group.
- Automatically setting an alias for each migrated user.
- Generating Visual Basic scripts to migrate users and groups in an automated and custom way.
- Modifying GIDs during migration.
- Selecting only the groups and users to migrate from your full list of groups and users.
- Setting the home directory and shell for migrated users.
- Filtering out standard Unix and Linux accounts, such as mail and news.
- Modifying UID information during migration.
- Using NIS map files to migrate netgroups, automounts, and other services to Active Directory.
Overview
The AD Bridge migration tool can import Linux and Unix password and group files (typically /etc/passwd and /etc/group) and automatically map their UIDs and GIDs to users and groups defined in Active Directory.
You can also generate a Windows automation script to associate the Unix and Linux UIDs and GIDs with Active Directory users and groups. Before you commit the changes, you can resolve ambiguous user names and other conflicts.
ImportantBefore you migrate users to a domain that operates in Schemaless mode (note that Schemaless mode is deprecated), we recommend finding and removing orphaned objects. The IDs associated with orphaned objects are reserved until you remove the orphaned objects. For more information, see Use the BeyondTrust Management Console.
Before running the migration tool
Before running the migration tool, obtain information:
- The domain name where you want to migrate the account information.
- The credentials to modify the domain.
- The Unix or Linux passwd file and corresponding group file that to add to Active Directory. The password and group files can be from a computer or an NIS server.
Run the migration tool
Use the migration tool to import Linux and Unix password and group files and automatically map UIDs and GIDs to users and groups in Active Directory:
- In the BeyondTrust Management Console tree, expand Enterprise Console, and then click Diagnostics & Migration.
- From the Tasks list, click Run Migration Tool.
- Click Next.
- In the Domain box, type the domain name that you want to migrate the account information to.
- Select credentials:
- Use logon credentials: Select if your logon credentials allow you to modify the domain.
- Use alternate credentials: Select if your logon credentials are not allowed to modify the domain, and then enter credentials with appropriate privileges.
- Click Next.
- Select your mapping files:
- Click Import to import a Linux/Unix password and group file, and then provide the following information.
- Map name: The migration tool imports the passwd file and group file into the map file, which is then matched to existing Active Directory user and group names.
- Passwd file: Type the path and name of the file that you want to import, or click Browse to find the file.
- Group file: Type the path and name of the passwd file's corresponding group file, or click Browse and then find the file.
- To import default Unix or Linux user accounts such as root and public, clear the Omit standard Linux/UNIX user accounts check box.
- In the list under Users, clear the Import check box for any user that you do not want to import, and then click Next.
- Click Import NIS Map to import an NIS Map File. You can run the ypcat command on the NIS server to create the map file.
- NIS Map file: Click Browse to find the map file.
- Map type: Select the map file type: Netgroups, Automounts, or Services.
- Click Import to import a Linux/Unix password and group file, and then provide the following information.
- Select the OU where you want to migrate the Linux or Unix account information.
- If you select the top of your domain, the information is migrated to the default AD Bridge cell of your Active Directory forest and UID numbers are automatically assigned within the domain's range.
- If you select an OU, AD Bridge creates a cell for the OU and migrates the account information to it. UIDs and GIDs are maintained if the passwd and group files agree, and if the UIDs and GIDs do not conflict with existing users or groups.
The migrated account information applies only to computers that are members of the OU.
- Click Next.
- Select from the following list of migration options:
- Create groups in Active Directory to match Linux/Unix groups: Create groups in Active Directory that match your Linux or Unix groups.
- Create all groups in AD: Create all groups in Active Directory, not just the referenced ones. To select this option, you must first select the Create groups in Active Directory to match Linux/UNIX groups check box.
- Generate scripts to repair file ownership and group settings: Run scripts that can repair ownership issues and group settings issues.
- Change GID of imported users to Domain Users
- Always set Login Name (alias), even when same as sAMAcountName
- Generate VBScript to perform migration: Enter the name of the script in the Script name box. Enter the directory where the script is located.
- Name map file (optional): File to automatically map Linux and UNIX users and groups to Active Directory accounts and groups in the form of the key/value pairs (delimited by = sign). The value can use the LDAP path to the Active Directory user or group or it can use the format DOMAIN\username.
For example, john=LDAP://CN=jdoe,OU=accounts,DC=thedomain,DC=com or john=thedomain\jdoe, where Unix user with login john is matched to AD user with CN=jdoe.
If [name map file] is not provided or a successful match is not found, then the Migration tool will try to find the best match in the target domain.
- Click Next.
- Click the Users tab and verify that the information is correct.
- Click the Groups tab and verify that the information is correct.
- To import the passwd and group files after you verify that the information is correct, click Next.
Migrate NIS domains
If you use AD Bridge to migrate all your Unix and Linux users to Active Directory, in most cases you will assign these users a UID and GID that is consistent across all the Unix and Linux computers joined to Active Directory. This is a simple approach that reduces administrative overhead.
If you have multiple NIS domains and want to move everything to Active Directory, keeping a single UID and GID for each user can get complicated especially since users often have different UID-GID mappings across different NIS domains. AD Bridge solves this by letting you retire those NIS domains while preserving the original mapping information in Active Directory. It does this through a feature called a cell, which allows the same user to have different UIDs and GIDs depending on which Unix or Linux computer they're logging into.
To move to Active Directory when you have multiple NIS servers, create an OU or choose an existing OU, and join to the OU all the Unix computers that are connected to the NIS server. You can then use cells to represent users' UID-GID mapping from the previous identity management system.
Disable a user's access with AD Bridge
When a computer cannot communicate with a domain controller, a user whose account was disabled on the domain controller, but who logged on to the computer prior to their account being disabled, can continue to log on until you clear the cache or until the computer regains communication with the domain controller.
By default, the cache expires after 4 hours. You can configure the interval using an AD Bridge Group Policy setting or, if the policy setting has not been configured, by using the AD Bridge config tool.
- Start Active Directory Users and Computers.
- Find the user.
- Right-click the user that you want to disable, and then click Properties.
- Click the AD Bridge Cell Settings tab.
- In the AD Bridge Cells section, clear the boxes for the cells where you want to disable the user. To disable the user's access to all Linux and Unix computers, clear all the boxes.
Updated 16 days ago
