Birthright policies | Entitle Pathfinder
Overview
Entitle birthright policies are sets of rules that automatically manage employees’ birthright permissions, allowing a group of employees to be entitled to a set of birthright permissions.
When an employee joins the group, e.g., upon joining the organization, they will be automatically granted the permissions defined for the group, and upon being removed from the group, e.g., leaving the organization, the permissions will also be automatically removed.
This page will provide you with step-by-step instructions on how to use Policies in Entitle.
View and manage Policies
View role access to the Birthright Policies page
See which roles can perform each action.
ImportantThis page is accessible only to Super Admins, Tenant Admins, Admins, and Read-Only Admins.
| Actions | Super Admin | Tenant Admin | Admin | Read-Only Admin |
|---|---|---|---|---|
| View policies | Allowed: Action is available and clickable | Allowed: Action is available and clickable | Allowed: Action is available and clickable | Allowed: Action is available and clickable |
| Add policies | Allowed: Action is available and clickable | Allowed: Action is available and clickable | Allowed: Action is available and clickable | Not visible: Action does not appear |
| Edit policies | Allowed: Action is available and clickable | Allowed: Action is available and clickable | Allowed: Action is available and clickable | Not visible: Action does not appear |
| Delete policies | Allowed: Action is available and clickable | Allowed: Action is available and clickable | Allowed: Action is available and clickable | Not visible: Action does not appear |
| Reorder policies | Allowed: Action is available and clickable | Allowed: Action is available and clickable | Allowed: Action is available and clickable | Not visible: Action does not appear |
- Sign in to app.beyondtrust.io with your credentials. The BeyondTrust Pathfinder Home displays.
- At the top right of the page, select your site from the drop-down.
- Select the Entitle tile from your list of available applications.
- From the top left menu, select Policies.
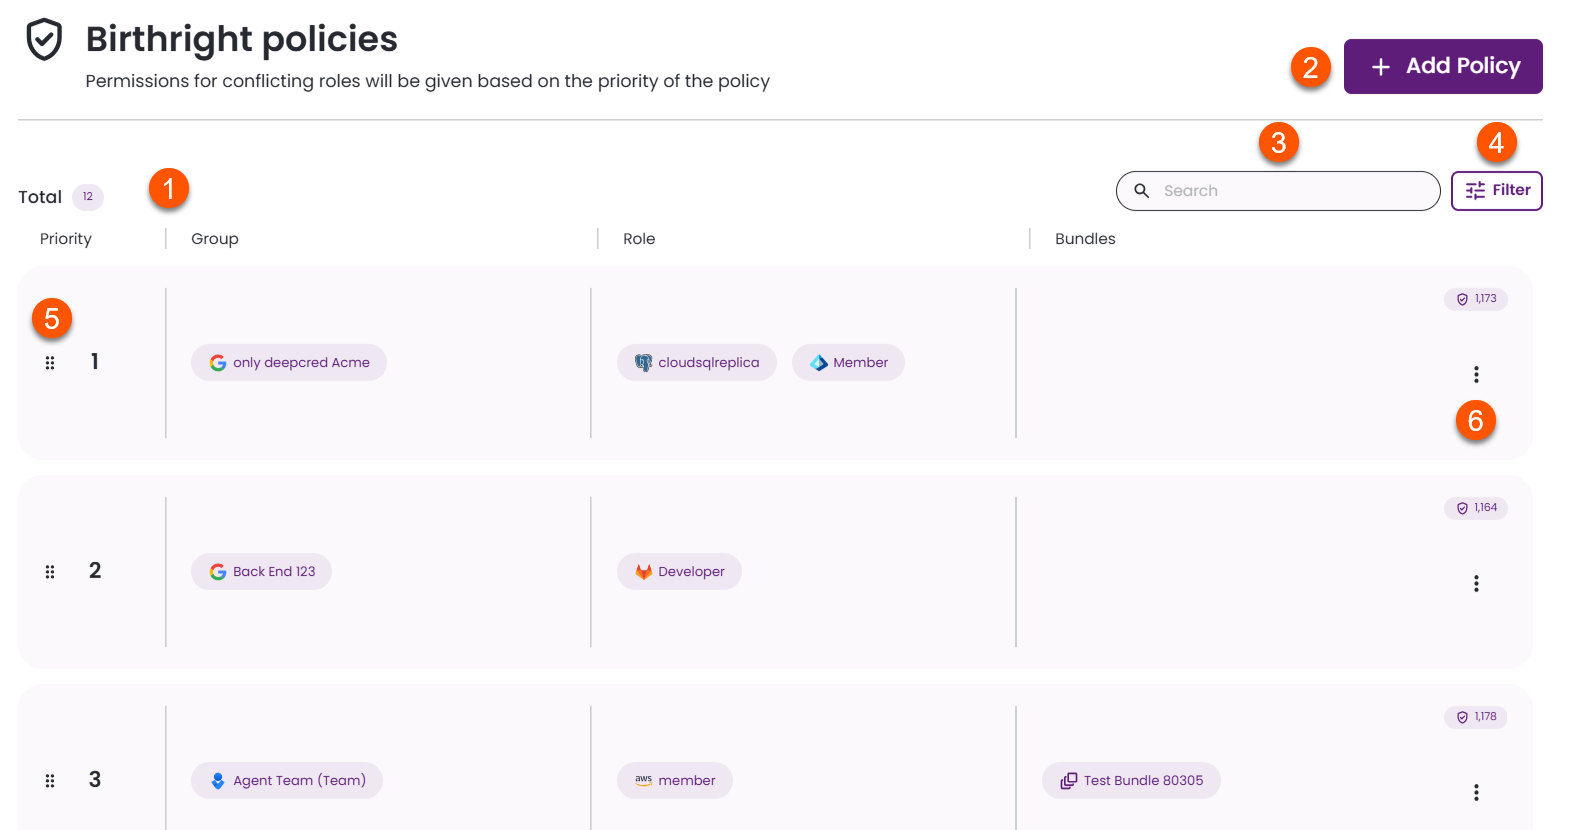
- Policies table: This table presents all existing policies within the tenant. The columns from left to right are:
- Group: Displays the groups to which the policies grant access.
- Role: Displays the roles to which the policies grant access.
- Bundle: Displays the bundles to which the policies grant access.
- Add policy: Create a new policy. For details, see Set up Entitle policies in this guide.
- Search: Find policies based on:
- Group
- Integration
- Resource
- Role
- Bundle
- Filter: Filter your table view by:
- IdP group
- On call
- Integration
- Resource
- Role
- Policy ID
- Bundle
- Prioritize policies: Permissions for conflicting roles are given based on the priority of the policy. To modify the priority, drag the chosen policy using the grip icon. The higher the policy, the higher the priority.
- Edit/Delete policies: Click the vertical ellipses at the right to access the Edit and Delete options.
- Edit: Click the pencil icon. Make your changes, and when you are done, click Save.
- Delete: Click the trash icon, and in the pop-up screen click Delete policy. This action will remove the permissions that the specific users within the selected groups had through this policy.
It is recommended that when deleting a policy, remove the roles/bundles from the policy first, and then proceed to delete it.
Hovering over the different components within the policies table will provide you with further information on the groups, bundles, and roles.
Set up Entitle Policies
-
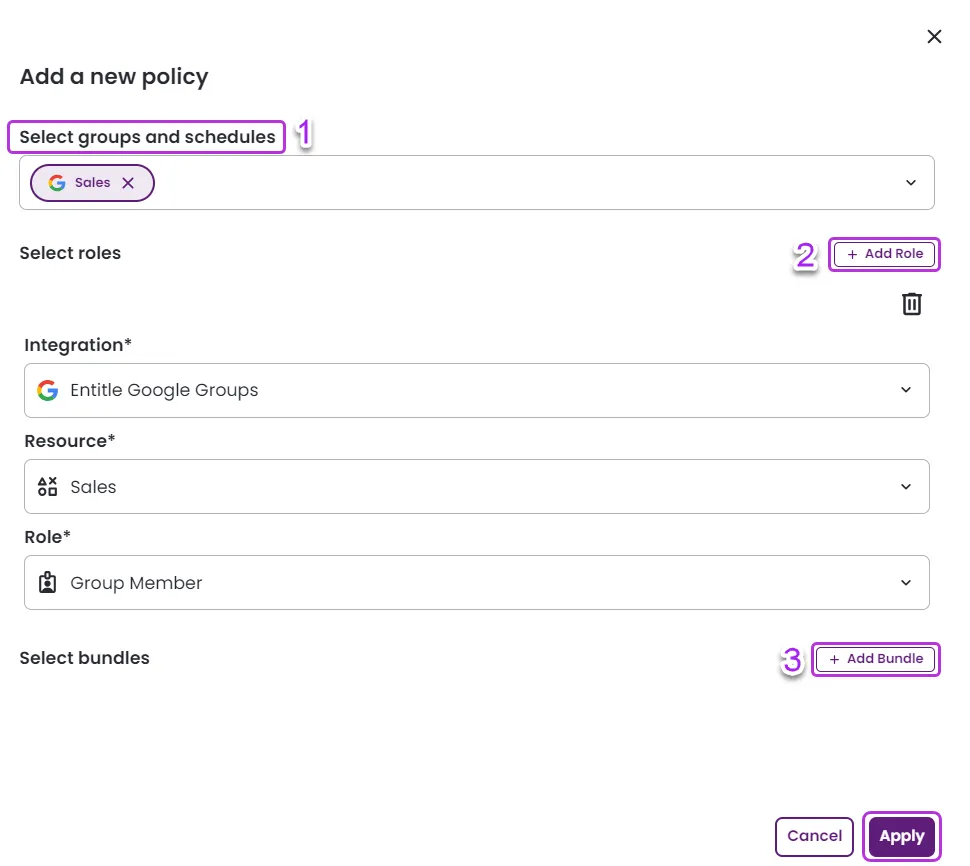
Navigate to the Policies screen and click the Add Policy button in the top-right corner.
-
In the pop-up screen, you will need to choose the following details for your new policy:
-
Groups and Schedule (Number 1): Select your chosen groups and/or schedules from the list - you can choose as many as you wish**. Note:** The groups that can be chosen are identity providers and on-call groups. You can see the detailed lists of each group under the Org settings page.
-
Next, choose whether you want the policy to give access to roles, bundles, or both.
-
Give access to roles (Number 2): Click the Add Role button on the right side, then choose the Integration, resource, and role you wish to add.
- If you encounter the "No roles available" message, consider the following:
This message appears for roles created by an Admin in a Virtual Application that are connected to roles that cannot be requested or received under these circumstances:
- The integration has been deleted.
Can_update_permissionsis set tofalseandcan_create_actorsis set totrue.
As a result, when an Admin attempts to set up a Policy using that Virtual Application, these roles will not be visible. If only one role exists when an Admin accesses the Add role field, it will display "No roles available."
-
Give access to bundles (Number 3): Click the Add Bundle button on the right side, then choose the Bundle Name from the list.
-
To add multiple roles or bundles, click the Add Role or Add Bundle button each time.
-
-
-
Finally, click Apply. You should now be able to see the new policy you just created in the original Birthright policies screen.
Changes in Policies
Any change made in the system is documented in the Audit logs screen, including changes in policies; e.g., changes in the policy’s content through creating, editing, or deleting policies, as well as changes in the policy’s permissions.
Triggers for Policies
The policies are applied once a day; however, any of the following changes will be applied immediately: creating, editing, or deleting policies, reordering the policies, changes in the on-call groups, and changes in the IdP groups.
Troubleshooting
Birthright policy sync issue
A Birthright policy automatically assigns roles to users who belong to a specified group. In some cases, a user is in the correct group but does not get the specified role. To resolve this issue, follow the steps below:
Identify the issue
-
Navigate to the Audit logs screen in Entitle.
-
Download the logs as a CSV file.
-
Search for the user’s ID, which is available on the user’s profile page. For example:

-
Look for the following action in the CSV file:
OrganizationPolicyPermissionsUpdatesMissingAccounts.
Add the user’s integration account
-
Navigate to the user’s page in Entitle.
-
Select Add integration.
-
Choose the integration used in the Birthright policy.
-
Select the user’s account.

If the user's associated account is not listed, it may not have synced to Entitle yet:
- Confirm the user has an account in the integration application.
- In Entitle, open the integration and select Sync. After 10 minutes, recheck the user's page to confirm the account has been added.
Resync the Birthright policy
If the user still does not receive the role, proceed with one of two options:
- Option 1: Recreate the Birthright policy.
- Option 2: Re-order the Birthright policies by dragging them in the Birthright policies
screen and changing their hierarchy.
Updated 4 days ago
