Manage a Privileged Remote Access session
 A workflow for Privileged Remote Access
A workflow for Privileged Remote AccessAudience: IT administrator, security engineer
Scope of this guide
This workflow shows you how to control, grant, and review privileged access sessions in PRA using the Pathfinder admin interface at app.beyondtrust.io. You can configure session and asset policies, manage vendor and external user access, and generate session reports.
Prerequisites
Before beginning this workflow, confirm the requirements are in place:
- You have a PRA user account with administrative permissions.
- You are signed in to Pathfinder at app.beyondtrust.io.
- At least one Asset (Jump Client or Gateway-connected system) is configured and available in Asset Management.
- If you plan to grant vendor access, a vendor group is created or you have permissions to create one.
- If you plan to use approval workflows, at least one user or team is designated to approve session requests.
Why is this important
Without controls on who can access which systems, when, and how, privileged remote sessions create significant security risk. Enforcing session policies, approval workflows, and ticket requirements reduces that risk by ensuring every session is authorized, limited to what is needed, and auditable. This workflow shows you how to configure those controls and review session activity in Pathfinder.
Steps summary
| Step | Action |
|---|---|
| 1 | Configure a session policy |
| 2 | Configure a group policy for users |
| 3 | Apply an asset policy to control session access |
| 4 | Manage vendor group access (optional) |
| 5 | Send an access invite to an external user (optional) |
| 6 | Configure session tools available to representatives |
| 7 | Configure session recording |
| 8 | Generate a session report (optional) |
Steps
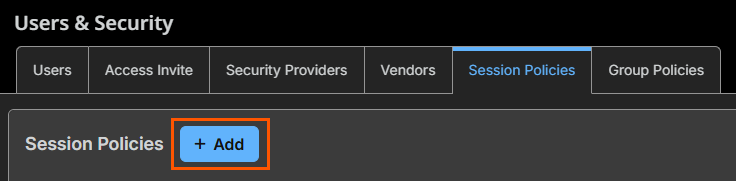
Step 1: Configure a session policy
Session policies define which tools, such as screen sharing, file transfer, and command shell, are permitted during a session. You create or edit policies in Users & Security > Session Policies and assign permissions per access method.
Why this matters
Without a session policy, representatives may have access to tools they don't need for a given task. Limiting permissions to only what's required reduces the risk of accidental or intentional misuse during a session.
How to
-
Sign in to app.beyondtrust.io. The BeyondTrust Home page displays.
-
From the main menu, select Privileged Remote Access > Users & Security. The Users & Security page opens.
-
Select the Session Policies tab.
-
To create a new policy, select Add. To update an existing policy, select the policy name.
-
Enter a Name for the policy.
-
In the Availability section, select the access methods this policy applies to (for example, Jump Client or Remote RDP).
-
In the Permissions section, enable or disable tools for this policy. Options include screen sharing, file transfer, command shell, and system information access.
-
Select Save when you are done selection your options.
Use the Session Policy Simulator on the Session Policies tab to verify which policy applies to a specific user and asset before a session starts. This helps you confirm that the correct permissions are in effect.
Step 2: Configure a group policy for users
Group policies set user-level session behavior, including whether users can share sessions, invite external participants, how long idle sessions stay open, which asset types they can access, and what they can do with those assets.
Why this matters
Group policies are how you enforce least privilege at the user level. They prevent representatives from accessing asset types outside their role and ensure sessions close automatically when left idle.
How to
-
From the main menu, select Privileged Remote Access > Users & Security.
-
Select the Group Policies tab.
-
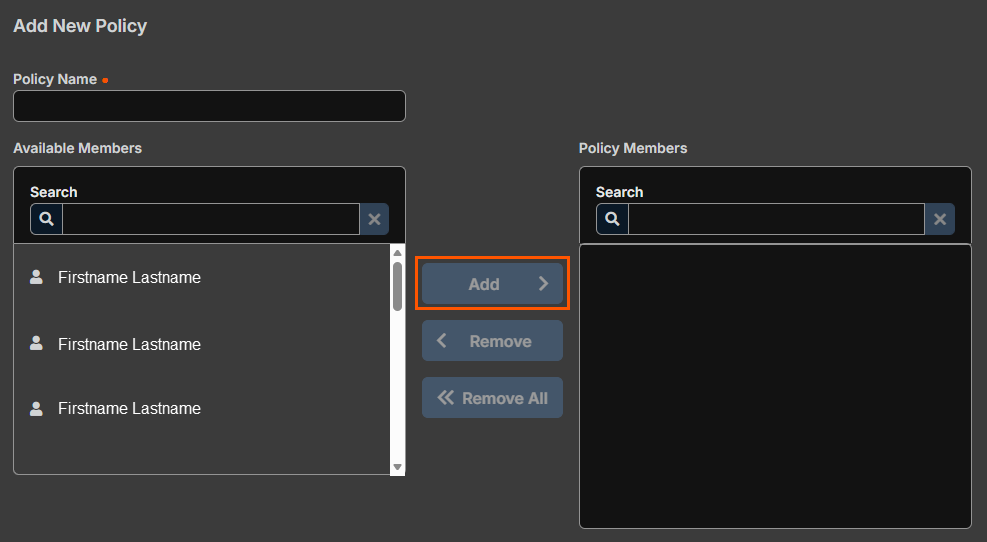
Select Add to create a new group policy, or select an existing policy to edit it.
-
Add the policy name and assign users a policy members.
-
Select your account settings options and select policy permissions.
-
Select Save.
Step 3: Apply an asset policy to control session access
Asset policies add access controls directly at the asset level, such as access schedules, ticket ID requirements, 2FA challenges, approval workflows, session start/end notifications, simultaneous connection behavior, and whether recording is suppressed.
Why this matters
Even if a user has broad group policy permissions, an asset policy can restrict when they can connect, require them to justify the session with a ticket number, or force a manager to approve access before a session starts. This is your last line of defense before a connection is made.
How to
-
From the main menu, select Privileged Remote Access > Asset Management.
-
Select the Asset Policies tab.
-
Select Add to create a new asset policy, or select an existing policy to edit it.
-
Set the required options:
Access schedule
- Enable Restrict access to the following schedule to limit when users can start sessions with assets assigned to this policy.
- Define the days and times when access is permitted.
Ticket ID requirement
- Select Require a ticket ID to require users to enter a valid ticket number before starting a session.
- Enter the ticket system URL if you want PRA to validate ticket IDs against an external ticketing system.
Two-factor authentication challenge
- Select Prompt for two-factor authentication to require users to complete an additional authentication step before a session starts.
Session start and end notifications
- Enable Send session start notification or Send session end notification to alert designated users when a session begins or ends on assets using this policy.
- Enter the email addresses to notify.
Approval workflow
- Select Require approval before starting a session to enforce an approval step before access is granted.
- Select the users or teams who can approve or deny session requests.
- Set the Approval expiration time (how long an approval remains valid after it is granted).
Simultaneous connections
- For Jump Clients: choose Join Existing Session, Disable, or Use Global Setting to control whether multiple users can connect to the same asset at the same time.
- For RDP: choose Start New Session, Disable, or Use Global Setting.
Session recording
-
To prevent sessions on this asset from being recorded, select Disable recordings for sessions started from assets using this policy.
-
Select Save.
Step 4: Manage vendor group access (optional)
Vendor groups control how third-party vendors and contractors sign in and what they can do. Each group links to a group policy, supports account expiration, and optionally provides a self-registration portal with branding and network restrictions.
Why this matters
Vendors are often the highest-risk users in a privileged access environment. They're external, temporary, and may have broad access needs. Vendor groups let you scope and time-limit their access rather than managing them as regular users.
How to
-
From the main menu, select Privileged Remote Access > Users & Security.
-
Select the Vendors tab.
-
To add a new vendor group, select Add. To edit an existing group, select the pencil icon next to the group name.

-
Enter a unique Name for the vendor group.
-
In the Authorization Settings section:
-
Select a Group Policy to apply to all users who authenticate through this vendor group. This policy controls their session permissions and cannot be overridden on a per-user basis.
Group policies with administrative permissions are not available for vendor groups.
- Set Vendor users expires after to define how many days a vendor account remains active after it is created. After expiration, the vendor cannot sign in until their account is extended.
- Optionally, select Automatically delete expired users and specify how many days after expiration to remove the account.
-
-
Under Users and Teams for management and notifications, add up to 10 users or teams to receive alerts for this vendor group. Configure which events trigger a notification, such as when a new user is added or when a user account expires.
-
In the Network Restrictions section, enter network address prefixes to restrict which IP addresses vendor users can connect from.
-
To enable a self-registration portal for vendors, select Enable Vendor Portal and customize the portal logo, branding colors, instructions, and email templates.
-
Select Save.
-
After saving, assign at least one vendor administrator. Select Proceed, fill in the administrator details, and select Save.
Step 5: Send an access invite to an external user
Access Invite lets a representative send a one-time session link to an external user who doesn't have a PRA account. You configure the email template (subject, body, and macros) in Users & Security > Access Invite.
Why this matters
Sometimes you need to bring an outside party into a session quickly without provisioning a full account. Access Invite makes that possible without creating a permanent credential or bypassing your session policy controls.
How to
-
From the main menu, select Privileged Remote Access > Users & Security.
-
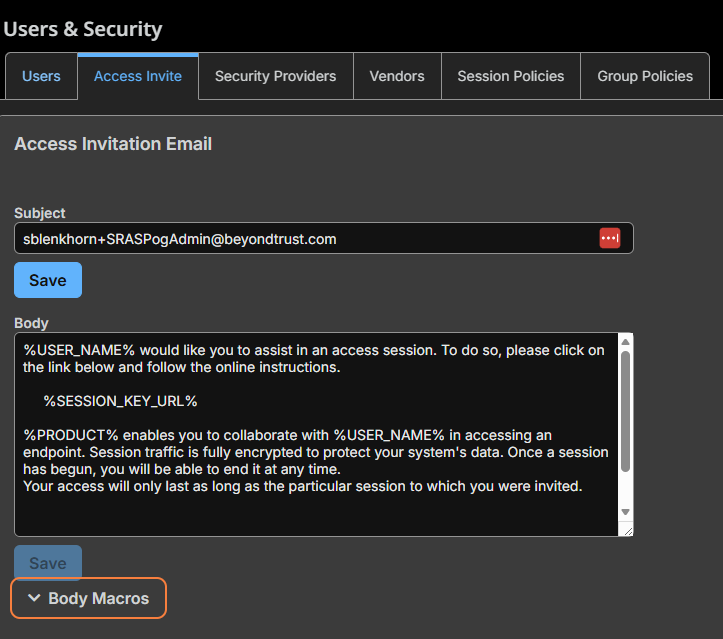
Select the Access Invite tab.
-
In the Subject field, enter the subject line for the invitation email. Select Save for this field.
-
In the Body field, enter the invitation email body. Use the available macros to insert dynamic content:
-
%USER_NAME%: inserts the invitee's name.
-
%SESSION_KEY_URL%: inserts the one-time session link the external user selects to join.
-
-
Select Save for the body field.
The Access Invite feature requires that the session policy applied to the invitee is enabled for access invite use. Verify this on the Session Policies tab before sending invitations.
When a representative sends an access invite during a session, PRA uses the template you configured here to generate and send the invitation email automatically.
Step 6: Configure session tools available to representatives
Administrators define which in-session tools are available to representatives: canned scripts (pre-written commands), custom links (external URLs with session context), and special actions (commands triggered from a dropdown). These are configured in Console Settings.
Why this matters
Sometimes you need to bring an outside party into a session quickly without provisioning a full account. Access Invite makes that possible without creating a permanent credential or bypassing your session policy controls.
How to
Canned scripts
Canned scripts are pre-written scripts that representatives can run during screen sharing and command shell sessions. They run in the context of the signed-in user or the local system, depending on session elevation.
- From the main menu, select Privileged Remote Access > Console Settings.
- Select the Canned Scripts tab.
- Select Add to create a new script.
- Enter a Script Name and a brief Description.
- Set Team Availability to control which teams can use the script, or leave it set to Available to All Users.
- Assign the script to one or more Categories to help representatives find it during a session.
- If the script depends on a resource file, upload the file in the Resources section first, then reference it in the script.
- Enter the script content and select Save.
Categories help organize canned scripts into groups in the access console. Add categories on the Canned Scripts tab before creating scripts that use them.
Custom links
Custom links are URLs that appear in the representative console during sessions. Representatives select these links to open external resources such as a knowledge base, CRM system, or ticketing tool without leaving the console.
- From the main menu, select Privileged Remote Access > Console Settings.
- Select the Custom Links tab.
- Select Add.
- Enter a unique Name for the link.
- Enter the URL. Use the available macros to pass session, endpoint, or user context into the URL automatically:
- Session macros insert information about the active session.
- Endpoint macros insert information about the remote system.
- User macros insert information about the representative who opened the link.
- Select Save.
Special actions
Special actions are custom commands that representatives can trigger from a dropdown during a session. They automate specific tasks on Windows, Mac, and Linux systems.
- From the main menu, select Privileged Remote Access > Console Settings.
- Select the Special Actions tab.
- Select Add.
- Enter an Action Name. This name appears in the special actions dropdown during a session.
- Enter the Command (the full path of the application to run). Do not use quotation marks; PRA adds them as needed.
- Enter any Arguments the command accepts. Windows arguments may use macros.
- To require a confirmation prompt before the action runs, select the Confirm checkbox. If this is not selected, the action runs immediately when the representative selects it.
- Select Save.
To include BeyondTrust's built-in special actions (such as Windows Security / Ctrl+Alt+Del) alongside your custom actions, select the Show Built-In Special Actions checkbox in the Special Actions Settings section. The Windows Security (Ctrl+Alt+Del) action cannot be disabled.
Tools available to a representative during a session also depends on the permissions set in their session policy (Step 1). Canned scripts require command shell access; special actions require screen sharing or shell access. Verify the relevant session policy permissions are enabled before testing these tools.
Step 7: Configure session recording
Session recording is enabled globally in Configuration > Access Session Logging Options. You can turn on recording for screen sharing, command shell, TCP/IP tunnel DB connections, system information, and session forensics. Recording can be suppressed per asset using an asset policy.
Why this matters
Recording is your primary audit mechanism. If something goes wrong during a session, whether accidental or malicious, recordings and forensics logs let you reconstruct exactly what happened. Session forensics also makes those records searchable, which is essential for compliance investigations.
How to
-
From the main menu, select Privileged Remote Access > Configuration. The Configuration page opens and the Options tab displays by default.
-
In the Access Session Logging Options section, enable the recording types your organization requires:
-
Enable Screen Sharing Recording: PRA automatically records screen sharing activity during access sessions. Recordings are stored on the appliance and are available in session reports as compressed video.
-
Enable User Recording for TCP & IP Tunnel Database Connection: Records the user's full desktop during sessions started from a TCP/IP Tunnel Database Connection. This recording is available in session reports with appropriate permissions.
-
Enable Command Shell Recording: Records all command shell activity automatically. Video recordings and text transcripts of each shell session are available in session reports.
-
Enable Automatic Logging of System Information: At the start of each session, PRA automatically retrieves and logs the endpoint's system information. This data is available in session reports. System information that a user views manually during a session is not logged.
-
Enable Session Forensics: Builds a searchable index of session events, including chat messages, command shell commands, file transfers, file system modifications, registry modifications, and foreground window titles. This enables the Session Forensics report type in Reports.
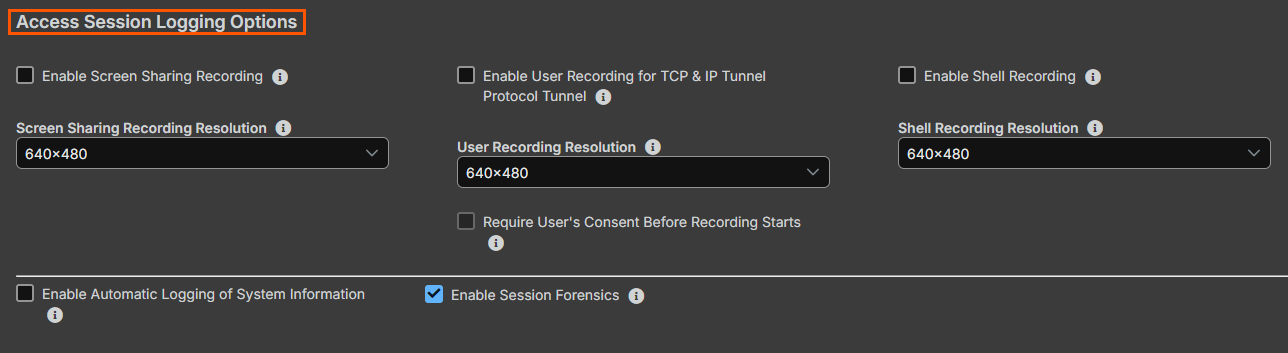
Session forensics is enabled by default. The forensics index requires additional system resources. After enabling it, the search index must rebuild before all matches appear in searches. This feature does not apply to Remote RDP Assets.
-
-
Select Save to apply your changes.
Disable recording for specific assets
If you need to prevent recording for sessions connected to a particular set of assets, use an asset policy:
- Navigate to Privileged Remote Access > Asset Management > Asset Policies.
- Select the relevant asset policy or create a new one.
- Select the Disable recordings for sessions started from assets using this policy checkbox.
- Select Save.
Disabling recording at the asset policy level overrides the global recording settings in Configuration for any asset assigned to that policy.
Step 8: Generate a session report
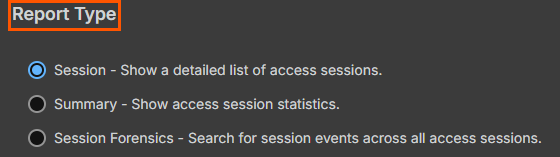
Reports let you audit completed sessions by type (Session, Summary, or Session Forensics) and filter by date range, endpoint, asset group, user, vendor group, or external key. Results can be exported to Excel or CSV.
Why this matters
Access controls and recordings are only useful if someone reviews them. Regular reporting lets you confirm that sessions are authorized, spot anomalies like unexpected after-hours access, and produce evidence for compliance audits.
How to
-
From the main menu, select Privileged Remote Access > Reports. The Reports page opens and the Access tab displays by default.
-
Select a Report Type:
-
Session: Lists all sessions that match your filters, with links to session details, chat transcripts, and video recordings.
-
Summary: Shows an overview of session activity over time, grouped by user, including total sessions and average duration.
-
Session Forensics: Searches session events across all sessions for specific text, commands, or file transfers. This option only displays if session forensics is enabled in your configuration.
-
-
Apply one or more filters to narrow the results:
- Session ID or sequence number: Retrieves a single session by its unique ID. Cannot be combined with other filters.
- Date range: Sets the start date and time period for the report.
- Endpoint: Filters by computer name, public IP, or private IP.
- Asset Group: Filters by all sessions from assets in a specific Asset Group, or by personal assets.
- User: Filters by a specific user who participated in the session. Optionally, select Match only if the selected user is the primary user for the session to exclude sessions where the user joined as a secondary participant.
- Vendor group: Filters by sessions where any user in a vendor group participated.
- External key: Filters by a specific external key value used to link sessions to an external ticketing system.
- Include only completed sessions: Excludes sessions that are still in progress.
-
To download the report, select Download Report and choose Microsoft Excel or CSV.
-
To view the report in your browser, select Show Report.
Verify the results
Confirm that your session policies are listed on the Session Policies tab and that the Session Policy Simulator returns the expected policy for your target user and asset. Verify that the asset policy appears on the Asset Policies tab and that the access schedule and approval settings are correct. After any session is complete, confirm that a session entry appears in Reports > Access with the correct endpoint name, user, and timestamp.
Next steps
- To review Vault credentials used during sessions, navigate to Privileged Remote Access > Reports > Vault reports.
- To review vendor session activity, navigate to Privileged Remote Access > Reports > Vendors reports.
- To review compliance data, navigate to Privileged Remote Access > Reports > Compliance reports.
- To configure which assets are available for sessions, navigate to Privileged Remote Access > Asset Management > Assets to add or manage individual assets.
- To group assets for access control purposes, navigate to Privileged Remote Access > Asset Management > Asset Groups.
- To manage Vault credentials used in sessions, navigate to Privileged Remote Access > Vault.
Related resources
- Welcome to Privileged Remote Access on Pathfinder | PRA Pathfinder
- Session policies | PRA Pathfinder
- Group policies | PRA Pathfinder
- Asset Policies | PRA Pathfinder
- Asset Management | PRA Pathfinder
- Vendors | PRA Pathfinder
- Access invite | PRA Pathfinder
- Reports | PRA Pathfinder
- Understanding Session and Group policy behavior | PRA
