JIT (Just-In-Time) access and approvals through workflows
 A workflow for Privileged Remote Access
A workflow for Privileged Remote AccessJIT (Just-In-Time) access and approvals workflow
This document is a step-by-step administrator workflow for implementing just-in-time privileged access in BeyondTrust Privileged Remote Access. It guides security teams through eliminating standing privileged access by requiring users to submit an access request that must be approved before a session can start.
It covers how to define access tiers by criticality, lock down group policies so direct connections are blocked, create and assign approval-based access policies to the right systems, enforce automatic session time limits, route approval notifications to the right people, and confirm that every session produces a complete audit record.
The intended audience is security administrators who need to move their environment away from always-on privileged accounts toward a model where access is granted only when needed, for the minimum time required, and with full logging.
Introduction
What Is Just-in-Time Access?
Just-in-Time (JIT) access is a privileged access model in which elevated permissions are provided only when needed, for the minimum duration required, and are revoked automatically when the session ends or the approved time window expires. This contrasts with traditional models in which users are permanently members of the local Administrators group on their workstations.
Why JIT Access Matters
Permanently elevated accounts and standing privileges are a primary target for attackers. If a user account with local administrator rights, privileged IdP group membership, cloud admin roles, or other elevated entitlements is compromised via phishing, malware, or credential theft, the attacker immediately has admin-level access to that endpoint and potentially to connected systems. JIT access removes this standing risk by ensuring that elevated privileges are granted only for a specific, approved task.
Prerequisites
Before beginning this workflow, confirm the following are in place:
- The Privileged Remote Access appliance or cloud tenant is live and reachable by administrators and end users.
- Admin accounts with sufficient permissions are in place.
- Target systems are registered as Assets within PRA and organized into Asset Groups.
- The individuals or groups responsible for approving JIT session requests have been defined for each access tier, along with escalation contacts if the primary approver is unavailable.
Workflow: Configuring Just-in-Time Access
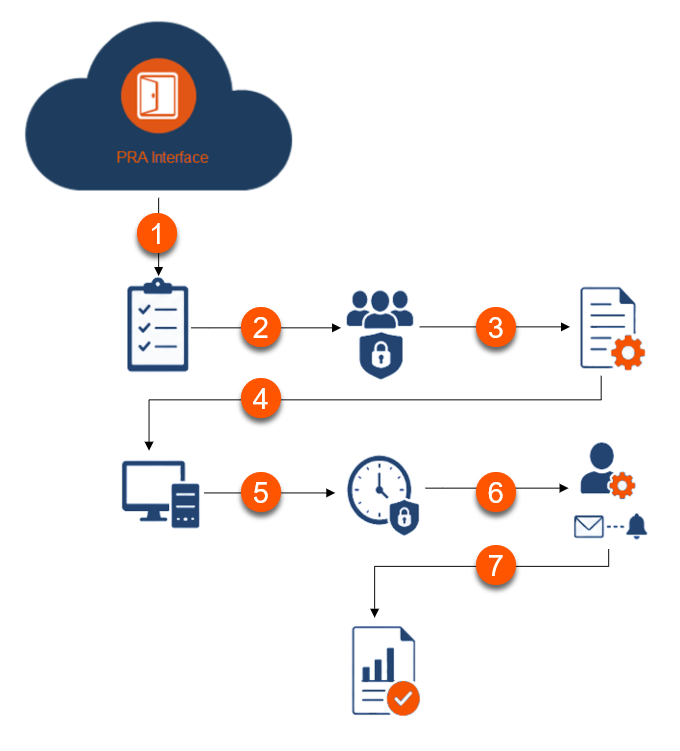
The seven steps below cover the full configuration lifecycle for JIT access in PRA.
Workflow stages at a glance
Complete these steps in order. Otherwise, configuration might not be successful.
| Step | Stage |
|---|---|
| 1 | Define JIT access tiers |
| 2 | Configure group policies for JIT-only access |
| 3 | Create JIT asset policies for each tier |
| 4 | Assign JIT asset policies to assets based on criticality |
| 5 | Configure session duration enforcement |
| 6 | Configure approvers and notification routes |
| 7 | Validate audit logging for JIT sessions |
Steps
Step 1 - Define JIT access tiers
Before configuring anything in PRA, map out your access tiers based on system criticality (for example, Tier 1 = critical, Tier 2 = elevated, Tier 3 = standard). Identify which assets require single-approver JIT, which require multi-approver JIT, and which (if any) require manager notification only. Document the maximum session duration for each tier and the approver chain. This planning document becomes the blueprint for the steps that follow.
Why this step matters
Every other configuration step depends on the tier decisions you make there. Skipping it leads to mismatched policies and gaps in coverage that are difficult to fix after the fact. It also forces the right stakeholder conversations about system criticality and approver ownership before those decisions are locked into live policy.
Step 2 - Configure group policies for JIT-only access
This step locks down user groups so that direct connections are blocked and every user must submit a request to start a session.
Why this step matters
Without this step, users can bypass the approval workflow entirely by connecting directly. This is the control that makes JIT enforcement real rather than optional.
How to
- In the PRA administrative interface, navigate to Users & Security, and then select Group Policies.
- Click Add.
- Create a group policy for each JIT tier defined in Step 1.
- Disable persistent/standing access so that no user can connect to an asset without an active approval.
- Assign users to their appropriate JIT group policy based on role.
For more information, see Group policies.
Step 3 - Create JIT asset policies for each tier
Step three builds the access policies that define approval requirements and session controls for each criticality tier.
Why this step matters
Each tier needs its own policy so that approval requirements and session controls match the criticality of the systems being accessed. Without distinct policies, you cannot apply different rules to different risk levels.
How to
- Navigate to Asset Management, and then select Asset Policies.
- Click Add.
- Create a separate asset policy for each JIT tier. For each policy:
- Configure the approval workflow settings: set the number of required approvers, define whether approval is required every session or only on first access, and set the session time limit.
- Enable session recording for all JIT asset policies.
- Save each policy before proceeding.
For more information, see Asset policies.
Step 4 - Assign JIT asset policies to assets based on criticality
Attach each tier policy to the correct Asset Groups and Assets so the controls are active on the right systems.
Why this step matters
A policy has no effect until it is attached to the assets it governs. This step is where your tier definitions become active controls on specific systems.
How to
- In the access console, select Assets, then select the asset you want to configure.
- Right click and then click Edit.
- Under Asset Policy, assign the appropriate JIT asset policy based on the criticality tier determined in Step 1.
Repeat for all assets in scope. Verify that no assets in the JIT program are left with a permissive or standing-access policy.
For more information, see Asset Management Interface.
Step 5 - Configure session duration enforcement
Set time limits on approved sessions and enable automatic termination so access cannot extend beyond the approved window.
Why this step matters
Approval grants access for a defined window — without a time limit, an approved session could stay open indefinitely, defeating the purpose of JIT. This step ensures access automatically expires when the approved window closes.
How to
- Within each JIT asset policy, set the maximum session duration to match your tier definitions. When the session duration is reached, PRA will automatically terminate the session.
- Confirm that session extension requests (if permitted) also require re-approval.
- Validate the duration settings by reviewing each asset policy before moving to Step 6.
For more information, see Asset policies > Schedule.
Step 6 - Configure approvers and notification routes
Assign the right approvers to each tier policy and set up notifications so requests are acted on promptly.
Why this step matters
An approval workflow is only as effective as the people receiving and acting on requests. This step ensures the right approvers are notified immediately and that requests do not expire unanswered.
How to
- Navigate to Asset Management, and then select Asset Policies.
- Select policy to edit.
- For each JIT tier, assign the designated approvers. These should be named individuals, not shared accounts.
- Configure email or SIEM notification routes so approvers are alerted immediately when a session request is submitted.
- Set an approval timeout window so that unanswered requests are automatically denied after a defined period, preventing sessions from remaining in a pending state indefinitely.
- Test the notification route by submitting a test request and confirming approvers receive the alert.
For more information, see Asset policies > Notification and Asset policies > Asset approval.
Step 7 - Validate audit logging for JIT sessions
Run a test session and confirm that all request, approval, and session events are captured completely in PRA's reports.
Why this step matters
Configuration alone does not guarantee logging is working correctly. This step confirms that every request, approval, and session action is being captured before the workflow goes into production use.
How to
- Navigate to Reports and then select Access.
- Under Report Type, select Session.
- Submit a test JIT access request, complete the approval workflow, and conduct a brief session.
- Confirm that the session appears in the report with the correct user, asset, approval timestamp, session start/end time, and session duration.
- Verify that the approver action is logged and that session recording is attached to the report entry.
- Share the validated report format with your compliance or security team to confirm it meets audit requirements.
For more information, see How to generate an Access report.
Outcome
All privileged sessions are request-driven, time-limited, and fully audited. No user holds standing access to any system. Every access event produces an approval record, a session log, and a session recording, satisfying compliance requirements and supporting incident investigations.
