Import metadata to configure IdP | Pathfinder
Use the import metadata feature to import metadata directly from your IdP (via an exported file), streamlining the setup process and reducing the potential for errors.
Important information
- Creating the initial setup without adding a domain (domainless IdP) allows you to test the configuration using a local account. After successful testing, add the domain to the Pathfinder IdP configuration page to enforce SAML authentication with your organization's email domain.
- Local login provides a way to test configuration when there is a domainless IdP.
Microsoft Entra ID
Log on to Pathfinder and Microsoft Entra ID. Work through the configuration with the applications open side-by-side.
-
Create an application in Entra ID.
- Enter a name for the app and use the default settings.
- Entra ID displays Getting Started steps.
- Assign users and groups. This configuration is different for every customer.
- Go to Single Sign on and select SAML.
- For now, enter ACS URL as https://placeholder.com and Entity ID as https://placeholder.com (these are temporary; you’ll update these settings later).
- Click the Federation Metadata XML link to download the file.
-
Create an IdP for Entra ID in Pathfinder.
- Select Administration.
The BeyondTrust Pathfinder Administration page opens and displays each available site as a tile. - Go to Administration > Identity & Authentication Providers.
- Click Add Identity Provider.
- Add a name for the provider.
- Click the box to upload the metadata file downloaded from Entra ID. This imports the configuration needed to set up Entra ID as your IdP. By default, the import tool sets the ACS URL and Service Provider Entity ID to the same value when you import.

- Click Add Identity Provider.
The SAML Configuration dialog box displays. - Click Copy to Clipboard.
- Select Administration.

-
Go back to Entra ID.
- Replace the placeholder values for ACS URL and Entity ID. Completing this step establishes the link between the Service Provider and the IdP for SAML.
-
Test and finalize configuration.
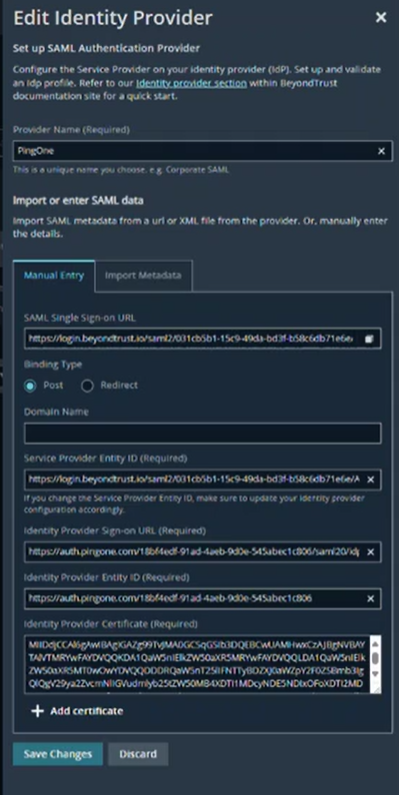
- In Pathfinder, edit the Identity provider settings, leave the Domain Name box blank to test without email service domain binding.
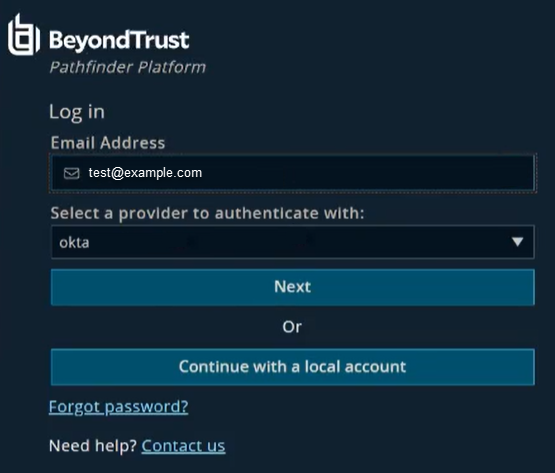
- Log on to Pathfinder via Entra ID. Pathfinder detects a domainless IdP.
- Select Entra ID and click Next.
- After successful login, update the domain setting in Pathfinder to the actual email domain.
- Click Save Changes.
- Log on again after adding the domain name to ensure you can successfully log on to Pathfinder via Entra ID.
Okta
Log on to Pathfinder and Okta. Work through the configuration with the applications open side-by-side.
-
Create a SAML application in Okta.
- In the Admin Console, select Applications > Create App Integration.
- Select SAML 2.0.
- Configure general settings.
- For now, enter ACS URL as https://placeholder.com and Entity ID as https://placeholder.com (these are temporary; you’ll update these settings later).
- Select EmailAddress as the Name ID format.
- Expand Advanced Settings.
- Set Honor Force Authentication to Yes.
- Click Next.
- Enter groups in the Name field under Group Attribute Statements section and define a filter if desired. The groups submitted in the assertion will determine the RBAC access of a user within each BeyondTrust app.
- Click Next.
- For App type, select This is an internal app that we have created.
- Click Finish.
- Click View SAML setup instructions.
- Scroll to the IDP metadata and save the text as an XML file.
-
Create an IdP for Okta in Pathfinder.
- Select Administration.
The BeyondTrust Pathfinder Administration page opens and displays each available site as a tile. - Go to Administration > Identity & Authentication Providers.
- Click Add Identity Provider.
- Add a name for the provider.
- Click the box to upload the metadata file downloaded from Okta. This imports the configuration needed to set up Okta as your IdP.
- Click Add Identity Provider.
The SAML Configuration dialog box displays. - Click Copy to Clipboard.

- Select Administration.
-
Go back to Okta SAML config.
- Go to SAML Settings and click Edit.
- Click Configure SAML.
- Replace the placeholder values for single sign on URL and Entity ID with the URL with the URL copied above. Completing this step establishes the link between the Service Provider and the IdP for SAML. Copy the metadata from Pathfinder to the Single sign-on URL and the Recipient URL (Entity ID) fields.
-
Test and finalize configuration.
- In the Identity provider settings, leave the Domain Name box blank to test without email service domain binding.
- Log on to Pathfinder via Okta. Pathfinder detects a domainless IdP.
- Select Okta and click Next.
- After successful login, update the domain setting in Pathfinder to the actual email domain.
- Click Save Changes.
- Log on again after adding the domain name to ensure you can successfully log on to Pathfinder via Okta.
PingOne
Log on to Pathfinder and PingOne. Work through the configuration with the applications open side-by-side.
-
Create a SAML application in PingOne.
- Log in to your PingOne Admin Console as administrator.
- Navigate to Applications > Applications, then click + Add Application and select SAML application.
- Select Manually enter SAML configuration.
- For now, enter ACS URL as https://placeholder.com and Entity ID as https://placeholder.com (these are temporary; you’ll update these settings later).
- Click Save, then toggle the application to enabled.
- Download the metadata file. This file contains the temporary ACS URL and Entity ID values.
-
Create an IdP for PingOne in Pathfinder.
- Select Administration.
The BeyondTrust Pathfinder Administration page opens and displays each available site as a tile. - Go to Administration > Identity & Authentication Providers.
- Click Add Identity Provider.
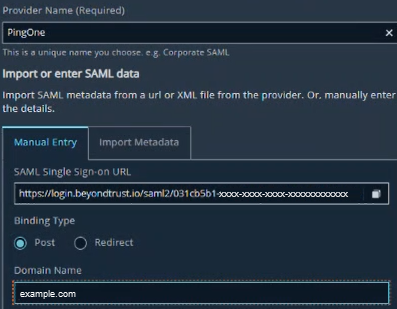
- Add a name for the provider.
- Click the box to upload the metadata file downloaded from PingOne. This imports the configuration needed to set up Ping as your IdP. By default, the import tool sets the ACS URL and Service Provider Entity ID to the same value when you import.
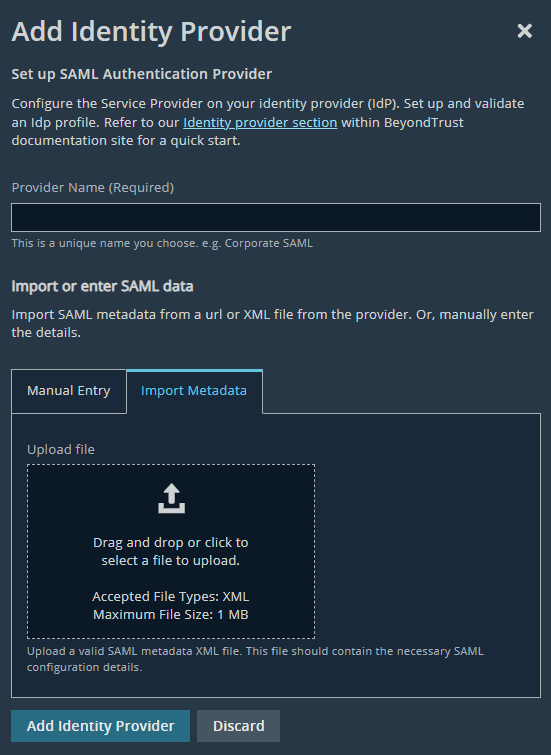
- Click Add Identity Provider.
The SAML Configuration dialog box displays.
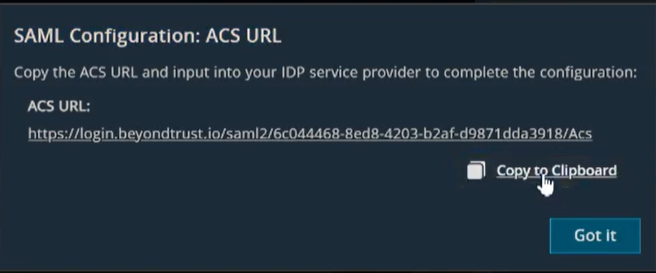
- Click Copy to Clipboard.
- Select Administration.
-
Go back to PingOne.
- Replace the placeholder values for ACS URL and Entity ID. Completing this step establishes the link between the Service Provider and the IdP for SAML.
- Set attribute mapping:
- saml_subject maps to Username
- username maps to Username
- Save mappings and finish setup.
-
Test and finalize configuration.
- In the Identity provider settings, leave the Domain Name box blank to test without email service domain binding.
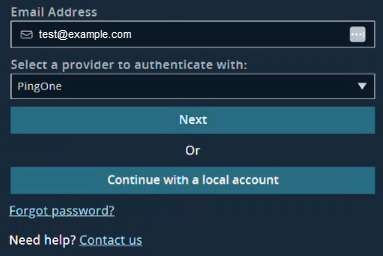
- Log on to Pathfinder via PingOne. Pathfinder detects a domainless IdP.
- Select PingOne and click Next.
-
After successful login, go to the Edit Identity Provider Settings (step i. in this procedure) and update the domain to your actual email domain and click Save Changes.
-
Log on again after adding the domain name to ensure you can successfully log on to Pathfinder via PingOne.
