Jump Item Roles (25.2-COPY)
What are Jump Item Roles?
Jump Item Roles define the specific permissions and access levels granted to users for different Jump Items, determining what actions they can perform.
How are Jump Item Roles useful to my organization?
Jump Item Roles help administrators manage access control and ensure users can only perform the necessary tasks for their role, enhancing security and efficiency during remote access sessions.
How do I access the Jump Item Roles page?
- Use a Chromium-based browser to sign in to your Privileged Remote Access on-prem URL.
This URL is provided in the BeyondTrust welcome email and includes your site URL followed by /login. - From the left menu, click Jump.
The Jump Clients page opens and displays by default. - At the top of the page, click Jump Item Roles.
The Jump Item Roles page displays.
How to configure Jump Item Roles
If more than one role is assigned to a user, then the most specific role for a user is always used. The order of specificity for Jump Item Roles, from most specific to least specific, is:
- The role assigned to the relationship between a user and a Jump Group on the Jump > Jump Item Roles page.
- The role assigned to the relationship between a user and a Jump Group on the Users & Security > Group Policies page.
- The Jump Item Roles configured for a user on the Users & Security > Users page or the Users & Security > Group Policies page.
NoteStarting with PRA 25.2, a Jump Item Role called Auditor is automatically created on new site installations. On previous installations, it has to be created. This role only has a single View Reports permission enabled, giving admins the option to grant a user just the permission to run Jump Item reports, without the need to grant any other permission.
Add a Jump Item Role
- From the left menu, click Jump.
The Jump Clients page opens and displays by default. - At the top of the page, click Jump Item Roles.
The Jump Item Roles page displays. - Click Add.
The Add a Jump Item Role page displays. - In the Name field, type a unique name to help identify this role. This name helps when linking a Jump Item Role with a user or group of users in a Jump Group.
- In the Description field, type a description to summarize the purpose of this role.
- In the Permissions section, on the Jump Group or Personal Jump Items setting, you can set the following options:
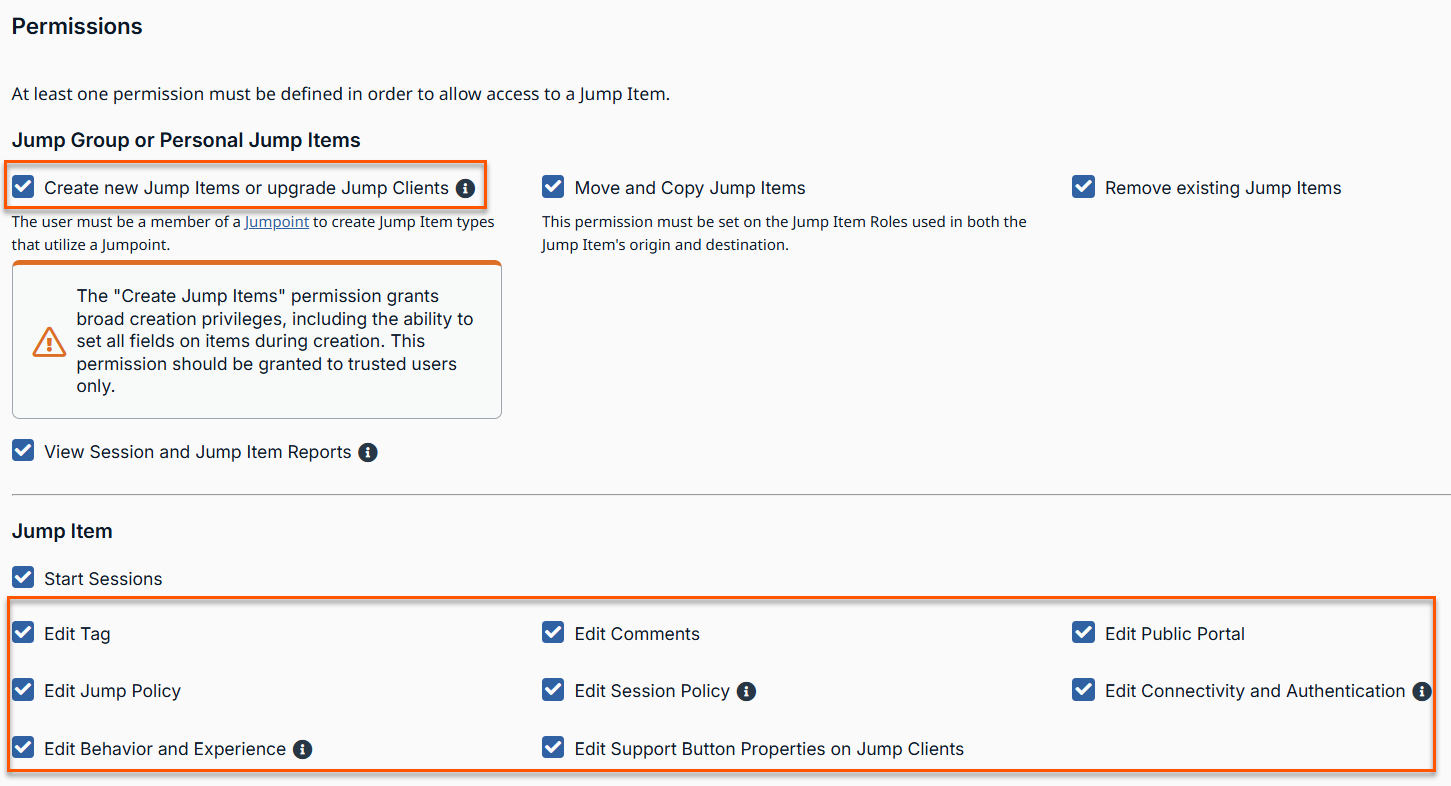
- In the Jump Item section, you can set the following options:
| Field name | Description |
|---|---|
| Start Sessions | You can Jump to a remote system. |
| Edit Jump Policy | You can set any Jump Policy that is applied to a Jump Item |
| Edit Behavior and Experience | You are able to modify the behavior of Jump Items. This includes the following field types: Remote RDP
Shell Jump
Protocol Tunnel Jump
|
| Edit Tag | You are able to edit a Jump Item's tag field. |
| Edit Session Policy | You set which session policy a Jump Item should use. Changing the session policy may affect the permissions allowed in the session. Applies to all Jump Item types. |
| Edit Comments | You are able to edit a Jump Item's comments field. |
| Edit Connectivity and Authentication | You can modify a Jump Item's connection and authentication information. This includes such fields as hostname, Jumpoint, port, and username, among others. |
Edit a Jump Item Role
- From the left menu, click Jump.
The Jump Clients page opens and displays by default. - At the top of the page, click Jump Item Roles.
The Jump Item Roles page displays. - Select a role from the list, click the pencil
 .
.
The Edit Jump Item Role page displays. - Make your changes, and then click Save.
Delete a Jump Item Role
-
From the left menu, click Jump.
The Jump Clients page opens and displays by default. -
At the top of the page, click Jump Item Roles.
The Jump Item Roles page displays. -
Click the trash can
 .
.
The following message displays: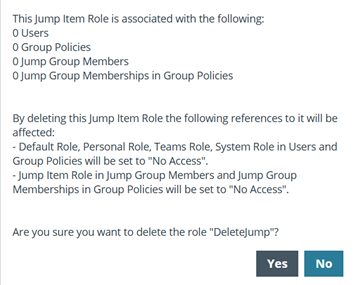
-
Click Yes.
Updated 4 months ago
