Users & security | PRA Cloud
What is the Users page?
The Users page allows administrators to manage individual user accounts, including creating, editing, and deleting accounts. It provides detailed control over user-specific settings, permissions, and roles within the Privileged Remote Access environment.
How is the Users page useful to my organization?
The Users page enables administrators to customize access and permissions for each user, ensuring security and proper role alignment. It also allows for efficient user management, helping to maintain compliance and support operational needs.
How do I access the Users page?
- Use a Chromium-based browser to sign in to your Privileged Remote Access URL.
This URL is provided in the BeyondTrust welcome email and includes your site URL followed by /login. - From the left menu, click Users & Security.
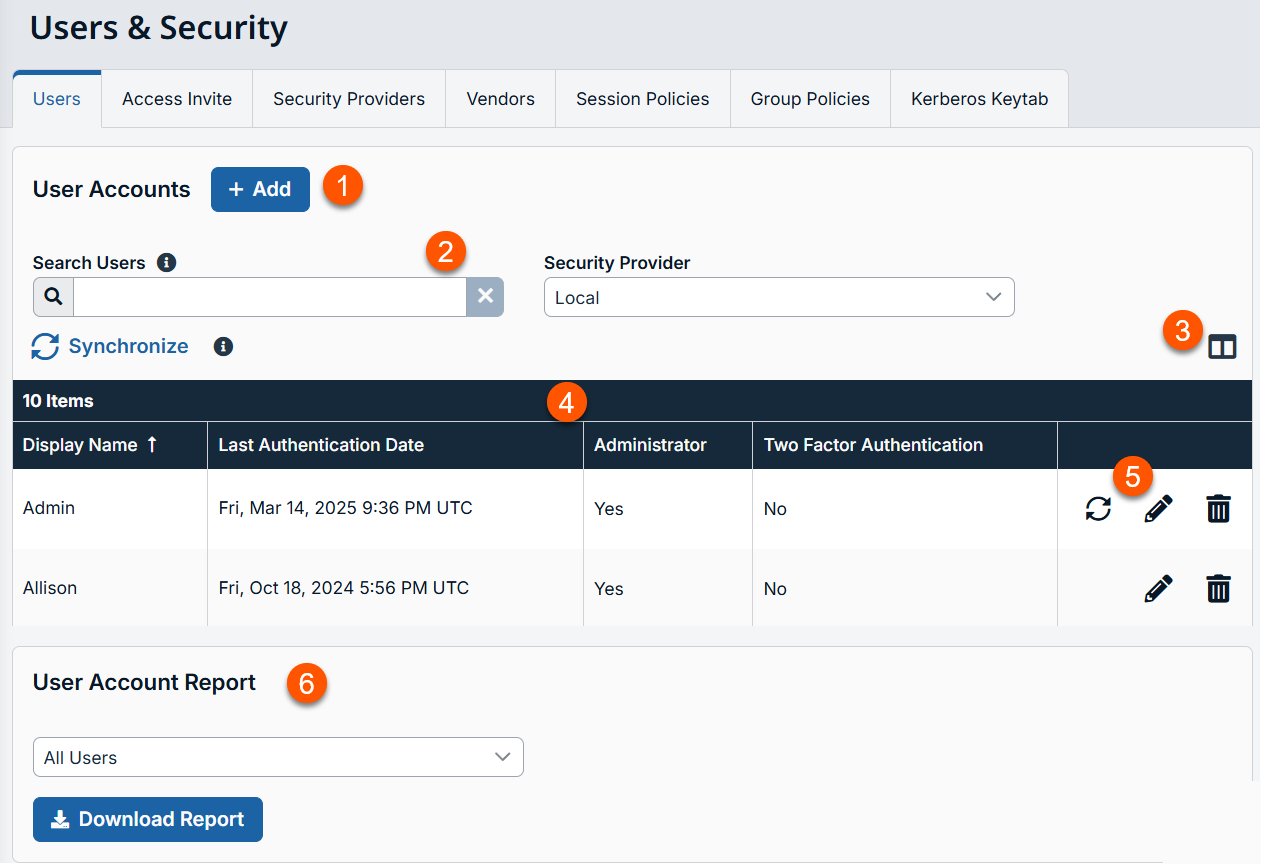
The Users page opens and displays by default.
-
Add: Adds a new user.
-
Filter: Search users based on Last Authenticated As, Display Name or Email Address.
-
Hide columns: Option to hide/display columns.
-
Users columns: The list of Users columns. Not all of the columns are displayed.
Users columns
- Last Authenticated As: The name of the user in the form of [email protected].
- Private Display Name: The full name of the account. For example, "John Smith".
- Last Authentication Date: The last date the user logged on.
- Administrator: Defines whether the user is an administrator which is defined in General Permission section of the Users & Security > Group Policies page. The value of the column is Yes or No.
-
Download Report: Generate a report for user accounts.
Add a user account
- From the left menu, click Users & Security.
The Users page opens and displays by default. - Click + Add.
The Add User page displays. - Enter a unique Username as an identifier used to log in.
- Enter the Display name to display on the public site, in chats, etc. Users can use a public display name, for use with customers, and a private display name, for use in all internal communications.
- Enter a unique Display number or leave this field blank to automatically select the next available number. This number affects the order in which users are listed on the public site.
- Upload a photo to be used as a representative avatar, which is displayed in the customer client chat window and in the /login administrative interface. The image used must be in .png or .jpeg format, no more than 1 MiB in size, and with a minimum 80x80 pixel size.
- Click Set Photo.
- Set the image dimensions using the slider and the buttons Fit in Box and Fill Entire Box.
- When satisfied, click Crop to use it, or Cancel, if you do not wish to keep the image you just selected.
- Click Change Photo to select a new photo or Delete Photo to remove the avatar from this user. The photo can also be changed or deleted from the /login > My Account page.
For more information, see Customer client in a session.
-
Enter the Email address to where email notifications are sent, such as password resets or extended availability mode alerts.
-
Enter the Preferred email language. If more than one language is enabled on this site, set the language in which to send emails.
-
Enter the Password used with the username to log in. The password may be set to whatever you choose, as long as the string complies with the defined policy set on the /login > Management > Security page.
-
Select Must reset password at next login to require the user to reset their password at next login.
-
Select Password never expires to allow the password to never expire.
-
Select Password expiration date to causes the password to expire on a given date.
-
Update the options in the following sections from the default settings as needed for the user:
Memberships
Memberships
- Group policy memberships: This section lists of the group policies to which the user belongs and allows you to search or Add the policy to the user. Group policies selected for a user can be edited by clicking the name of the policy in the list. All policy maintenance is handled on the Users & Security > Group Policies page.
The user can be removed from one or more group policies by selecting the policy or policies and clicking Remove. The default policy cannot be selected.Other memberships do not display while a new user is being created. Once the new user has been saved, the other memberships appear, listing any to which the user may have been added, with links for updating these memberships and for reviewing or editing details about the memberships.
- Team memberships: This membership lists the teams to which the user belongs.
- Gateway memberships: This membership lists the Gateways which the user can access.
- Asset Group memberships: This membership lists the Asset Groups to which the user belongs.
- Vault account group memberships: This membership lists the Vault Account Groups to which the user belongs.
Account settings
- Log in with an authenticator app: When Required, the user must use an authenticator app to sign in securely. When Optional, it is not mandatory.
- Remove current authenticator app: Remove the current app for this user.
- Account never expires: When checked, the account never expires. When not checked, an account expiration date must be set.
- Account expiration date: Causes the account to expire after a set date.
- Account disabled: Allows you to disable the account so the user cannot log in. Disabling does NOT delete the account.
- Comments: Add comments to help identify the purpose of this object.
General permissions
- Administration
- Administrator: Grants the user full administrative rights.
- Allowed to Administer Vault: Enables the user access to the Vault.
- Allowed to Set Passwords: Enables the user to set passwords and unlock accounts for non-administrative local users.
- Allowed to Edit Gateways: Enables the user to create or edit Gateways. This option does not affect the user's ability to access remote computers via Gateway, which is configured per Gateway or group policy.
- Allowed to Edit Teams: Enables the user to create or edit teams.
- Allowed to Edit Asset Groups: Enables the user to create or edit Asset Groups.
- Allowed to Edit Canned Scripts: Enables the user to create or edit canned scripts for use in screen sharing or command shell sessions.
- Allowed to Edit Custom Links: Enables the user to create or edit custom links.
- Allowed to Edit Group Policy Memberships: Enables users to add or remove group policies for non-administrative users for the selected group policy.
Policies with administrative or add/remove group policy memberships permissions are not available. Administrators have access to all group policies.
- Reporting
- Allowed to view access session reports: Enables the user to run reports on access session activity, viewing only sessions for which they were the primary session owner, only sessions for endpoints belonging to an Asset Group of which the user is a member, or all sessions.
- Allowed to view access session recordings: Enables the user to view video recordings of screen sharing sessions and command shell sessions.
- Allowed to view Vault reports: Enables the user to view his or her own vault events or all Vault events.
- Allowed to view syslog reports: Enables the user to download a ZIP file containing all syslog files available on the appliance. Admins are automatically permissioned to access this report. Non-admin users must request access to view this report.
Access permissions
- Allowed to access endpoints: Enables the user to use the access console in order to run sessions. If endpoint access is enabled, options pertaining to endpoint access will also be available.
- Session management
- Allowed to share sessions with teams which they do not belong to: Enables the user to invite a less limited set of user to share sessions, not only their team members. Combined with the extended availability permission, this permission expands session sharing capabilities.
- Allowed to invite external users: Enables the user to invite third-party users to participate in a session, one time only.
- Remove User from session after inactivity: Sets the time interval to remove a user from a session after inactivity. Values range from No Timeout to 24 hours.
- Allowed to enable extended availability mode: Enables the user to receive email invitations from other users requesting to share a session even when they are not logged into the access console.
- Allowed to edit the external key: Enables the user to modify the external key from the session info pane of a session within the access console.
- User to user screen sharing
- Allowed to show screen to other users: Enables the user to share their screen with another user without the receiving user having to join a session. This option is available even if the user is not in a session.
- Allowed to give control when showing screen to other users: Enables the user sharing their screen to give keyboard and mouse control to the user viewing their screen.
- Jump Technology
- Allowed Connection Types: Enables the user to connect to computers using the following:
- Jump Clients
- Local Jump (Windows only)
- Remote Jump
- Remove VNC
- Website
- Remote RDP
- SSH
- Protocol Tunnel
- Asset Roles: An Asset Role is a predefined set of permissions regarding Asset management and usage. For each option, click Show to open the Asset Role in a new tab.
- The Default role is used only when Use User's Default is set for that user in an Asset Group.
- The Personal role applies only to Assets pinned to the user's personal list of Assets.
- The Teams role applies to Assets pinned to the personal list of Assets of a team member of a lower role. For example, a team manager can view team leads' and team members' personal Assets, and a team lead can view team members' personal Assets.
- The System role applies to all other Assets in the system. For most users, this should be set to No Access. If set to any other option, the user is added to Asset Groups to which they would not normally be assigned, and in the access console, they can see non-team members' personal lists of Assets.
- The Endpoint automation role sets how a user can use endpoint automation.
- Not allowed prevents them from seeing the Asset Management > Endpoint Automation tab altogether.
- A User can create new automation jobs with these restrictions:
- They are able to choose any existing Script Template but cannot edit the Script Template, Script Command, nor select or change the template accompanying Resources.
- The Script Template, Script Command, Operating System, and Resources fields are unavailable.
- They can run scripts only on Assets where their Asset Role includes the Start Sessions permission (set on the Asset Management > Assets Role page).
- An Administrator has full access and ability to create Jobs, Scripts Templates, and Resources.
For more information, see Asset Roles and Endpoint Automation.
- External tools
- Enable static port and username for external tool sessions: This option accepts two values:
- Enable: Ensures that the port and username generated for a user starting a session with an Asset using external tools are preserved from session to session.
- Disable: A new port number and username are randomly generated for that user every time they start a new session with each Asset.
- Enable static port and username for external tool sessions: This option accepts two values:
- Allowed Connection Types: Enables the user to connect to computers using the following:
Session permissions
- Session policy: Set the prompting and permission rules that should apply to this user's sessions. Choose an existing session policy or define custom permissions for this user. If Not Defined, the global default policy will be used. These permissions may be overridden by a higher policy.
- Description: View the description of a pre-defined session permission policy.
- Allow Elevated Access to Shells, Tools and Special Actions on the Endpoint: If enabled, access to elevated functionality will be provided in the access console for this session without needing the explicit rights of a logged in user on the remote endpoint. This setting applies where allowed by the endpoint's platform.
- Allow Original Session Owner to Leave Sessions Running for Others: If enabled, this will leave the session running for others who have joined when the original owner leaves. Other users that have joined the session must already have been able to start a session with that Jump Client.
- Screen sharing
- Screen sharing rules: Select the user's and remote user's access to the remote system:
- If Not Defined, this option is set by the next lower priority policy. This setting may be overridden by a higher priority policy.
- Deny disables screen sharing.
- View Only allows the representative to view the screen.
- View and Control allows the user to view and take action on the system.
For more information, see control-the-remote-endpoint-with-screen-sharing.
- Clipboard synchronization direction: Available only if View and Control is selected above. Select how clipboard content flows between users and endpoints. The options are:
- Not allowed: The user is not allowed to use the clipboard, no clipboard icons display in the access console, and cut and paste commands do not work.
- Allowed from Rep to Customer: The user can push clipboard content to the endpoint but cannot paste from the endpoint's clipboard. Only the Send clipboard icon displays in the access console.
- Allowed in Both Directions: Clipboard content can flow both ways. Both Push and Get clipboard icons display in the access console.
For more information, see Screen sharing tools.
- Allowed endpoint restrictions: Available only if View and Control is selected above. Sets the option for the user to suspend the remote system's mouse and keyboard input. The user may also prevent the remote desktop from being displayed.
- None does not set any restrictions on the remote system.
- Display, Mouse, and Keyboard disables these inputs.
If this is selected, a check box is available to Automatically request a privacy screen on session start. Privacy screen is applicable only for sessions started from a Jump Client, a Remote Asset, or a Local Asset. We recommend using privacy screen for unattended sessions. The remote system must support privacy screen.For more information about the privacy screen, see Screen sharing options.
- Application sharing restrictions: This option limits access to specified applications on the remote system with either. There are three values:
- None
- Allow only the listed executables: Allows you to specify executables to allow as appropriate to your objectives.
- Deny only the listed executables: Allows you to specify executables to deny as appropriate to your objectives.
- If Allow or Deny is selected, you see the option to Add new executables to the allow or deny list. When you add executables, you have two choices:
- Enter file names or SHA-256 hashes, one per line: Manually enter the executable file names or hashes you wish to allow or deny. Click Add Executable(s) when you are finished to add the chosen files to your configuration.
You may enter up to 25 files per dialog. If you need to add more, click Add Executable(s) and then reopen the dialog. - Browse for one or more files: Choose executable files to automatically derive their names or hashes. If you select files from your local platform and system in this manner, use caution to ensure that the files are indeed executable files. No browser level verification is performed.
Choose either Use file name or Use file hash (advanced) to have the browser derive the executable file names or hashes automatically.
Click Add Executable(s) when you are finished to add the chosen files to your configuration. You may enter up to 25 files per dialog. If you need to add more, click Add Executable(s) and then reopen the dialog.
If Allow or Deny is selected, you may also choose to allow or deny desktop access.
- Enter file names or SHA-256 hashes, one per line: Manually enter the executable file names or hashes you wish to allow or deny. Click Add Executable(s) when you are finished to add the chosen files to your configuration.
- Screen sharing rules: Select the user's and remote user's access to the remote system:
- Application sharing restrictions applies only to Windows operating systems.
- The option to add executables to the list is available only in modern browsers, not legacy browsers.
-
System Sound Sharing
-
System Sound Sharing Rules: Allows the user to hear the endpoint's system sound during screen sharing when supported by the client. It does not allow access to the endpoint's microphone. If Not Defined is enabled, this option is set by the next lower priority policy. This setting may be overridden by a higher priority policy.
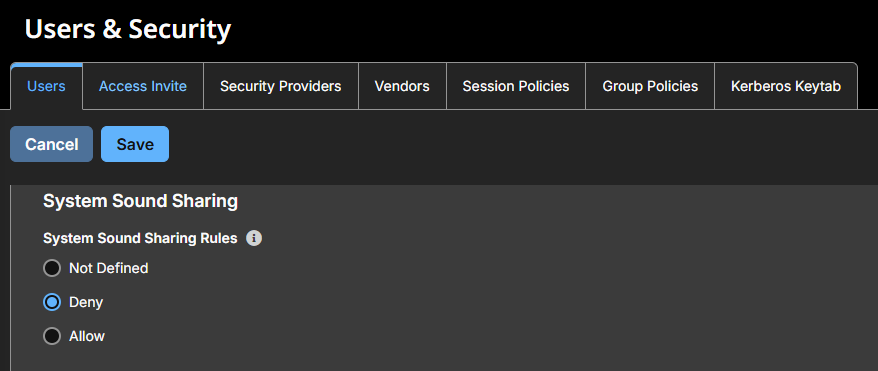
This feature only works if the representative has permissions for sound and if the site has the Peer To Peer option (located under Configuration > Options ) enabled. Enabling this option allows sound to be heard from the endpoint.
-
-
Annotations
- Annotation rules: Enables the user to use annotation tools to draw on the remote system's screen. If Not Defined is enabled, this option is set by the next lower priority policy. This setting may be overridden by a higher priority policy.
-
File transfer
- File Transfer Rules: Enables the user to upload files to the remote system, download files from the remote system, or both. If Not Defined is enabled, this option is set by the next lower priority policy. This setting may be overridden by a higher priority policy.
- Accessible paths on the endpoint's filesystem: Allow the user to transfer files to or from any directories on the remote system or only specified directories.
- Accessible paths on user's filesystem: Allow the user to transfer files to or from any directories on their local system or only specified directories.
For more information, see File transfer.
-
Shell
-
Shell Rules: Enables the user to issue commands on the remote computer through a virtual command line interface. If Not Defined is enabled, this option is set by the next lower priority policy. This setting may be overridden by a higher priority policy. Configure command filtering to prevent accidental use of commands that can be harmful to endpoint systems.
-
Allowed Executable Command Patterns: Available only if Shell rules is set to Allow. Enables the user to search for a regex pattern that matches a shell prompt. For filtering to work, the Recognized Shell Prompts section on the Asset Management > Asset page must be set and only filter commands in a Shell session.
- Shell access cannot be restricted for Shell sessions.
- For more information, see Command shell.
-
-
System information
- System Information Rules: Enables the user to see system information about the remote computer. If Not Defined is enabled, this option is set by the next lower priority policy. This setting may be overridden by a higher priority policy. You also have the option to set system information actions.
- Allowed to use system information actions: Enables the user to interact with processes and programs on the remote system without requiring screen sharing. Kill processes; start, stop, pause, resume, and restart services; and uninstall programs.
For more information, see System information.
-
Registry access
- Registry Access Rules: Enables the user to interact with the registry on a remote Windows system without requiring screen sharing. You have the ability to do the following actions:
- View, add, delete and edit keys
- Search and import/export keys
For more information, see Registry editor.
- Registry Access Rules: Enables the user to interact with the registry on a remote Windows system without requiring screen sharing. You have the ability to do the following actions:
-
Canned scripts
- Canned Script Rules: Enables the user to run canned scripts that have been created for their teams. If Not Defined is enabled, this option is set by the next lower priority policy. This setting may be overridden by a higher priority policy.
For more information about special actions and canned scripts, see Screen sharing tools and Command shell tools.
- Canned Script Rules: Enables the user to run canned scripts that have been created for their teams. If Not Defined is enabled, this option is set by the next lower priority policy. This setting may be overridden by a higher priority policy.
-
Session Termination Behavior
- When the access session ends, automatically: Controls what action to happen when session ends. The following options are:
- Not Defined
- Do Nothing
- Lock the computer
- Logout the user (Only works on Windows hosts).
- Allow users to override this setting per session: You can allow a user to override the session termination setting from the Summary tab in the console during a session.
For more information about closing a session and locking or logging out the end user, see Session tools.
- When the access session ends, automatically: Controls what action to happen when session ends. The following options are:
Availability settings
- Login schedule
- Restrict user login to the following schedule: Set a schedule to define when users can log into the access console. Set the time zone you want to use for this schedule, and then add one or more schedule entries. For each entry, click Add Schedule Entry to set the start day and time and the end day and time.
If, for instance, the time is set to start at 8 am and end at 5 pm, a user can log in at any time during this window but may continue to work past the set end time. They are not, however, allowed to log back in after 5 pm. - Force logout when the schedule does not permit login: If stricter access control is required, check this option. This forces the user to log out at the scheduled end time. In this case, the user receives recurring notifications beginning 15 minutes prior to being disconnected. When the user is logged out, any owned sessions follow the session fallback rules.
- Restrict user login to the following schedule: Set a schedule to define when users can log into the access console. Set the time zone you want to use for this schedule, and then add one or more schedule entries. For each entry, click Add Schedule Entry to set the start day and time and the end day and time.
- Click Save at the top of the page.
Edit a user account
- From the left menu, click Users & Security.
The Users page opens and displays by default. - Locate the user you want to edit from the list.
- Click
 .
.
The Edit User page displays. - Edit the User details. The details available are the same as the Add User page details except for the following Membership details, which can be viewed only when you edit a user account:
- Team memberships Listing of the teams to which the user belongs.
- Gateway memberships Listing of the Jumpoints which the user can access.
- Asset Group memberships Listing of the Asset Groups to which the user belongs.
- Vault Account Group memberships Listing of the Vault Account Groups to which the user belongs
A
icon displays next to fields that are not editable because they are defined by a group policy.
- Click Save at the top of the page.
Delete a user account
You cannot delete your own account.
- From the left menu, click Users & Security.
The Users page opens and displays by default. - Locate the user you want to delete from the list.
- Click
 to delete the user.
Updated about 1 month ago
